前言
最近刚刚做了一个基于vue+springboot的学生成绩管理系统,于是基于这点,对遇到的一些问题进行一些配置的汇总。以及vue+springboot项目是怎么实现的,以下将贴出vue和springboot的重要代码和配置。
开发使用的软件
- idea: 编写后端springboot代码
- hbuilderx或VSCode编写vue代码
- navicat或者dbeaver 编写创建数据库表
vue项目搭建
环境配置
在搭建之前,首先你需要安装nodeJs,具体如何安装就不多赘述,百度即可。
cmd命令
win+R键唤出弹框输入cmd,进入控制台界面。
然后,
命令行
cd/d 路径地址
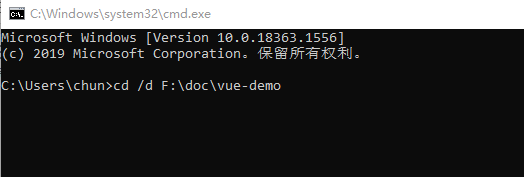
切换到想创建项目的路径
再使用
vue init webpack 项目名称
命令创建项目
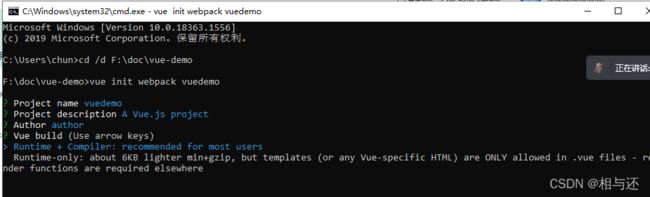
Project name:项目名称
Project description:项目描述
author:作者
Runtime + Complier: 运行时和编译器:默认第一个
install router :是否安装路由,选择安装就后面我安装步骤就不用执行
Use ESLint to lint your code? (Y/n):问你是否使用eslint限制语法,新手建议否
Set up unit tests (Y/n):单元测试,新手选否
Setup e2e tests with Nightwatch? (Y/n):使用Nightwatch设置端到端测试?,选否
Should we run `npm install` for you after the project has been created?:用什么方式运行项目:选npm
然后就创建好了,找到创建项目的路径,cmd命令行,看package.json是dev还是serve
------------------本内容于2022-04-11更新start-------------------------
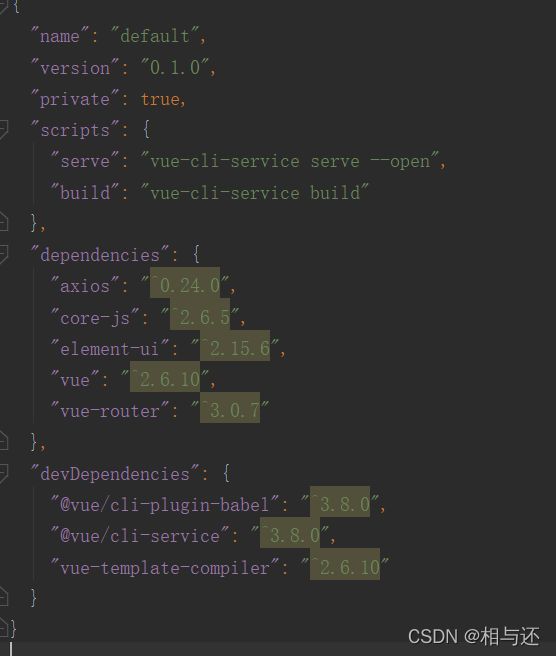
此时的package.json文件内容
{
  "name": "项目名称",
  "version": "0.1.0", // b=版本
  "private": true,
  // 运行脚本:serve为启动项目脚本,build为打包项目脚本
  "scripts": {
    "serve": "vue-cli-service serve --open",
    "build": "vue-cli-service build"
  },
  // 安装的vue依赖文件
  "dependencies": {
    "vue": "^2.6.11",
    // vue-router一般作传参和页面跳转使用
    "vue-router": "^3.5.1"
  },
  "devDependencies": {
    "@vue/cli-service": "~4.5.12",
    "vue-template-compiler": "^2.6.11"
  },
  "browserslist": [
    "> 1%",
    "last 2 versions",
    "not dead"
  ]
}
------------------本内容于2022-04-11更新end-------------------------
运行
npm run dev
或
npm run serve
vue ui 创建项目
这里给大家推荐第二种方式创建
使用cmd命令行
vue ui
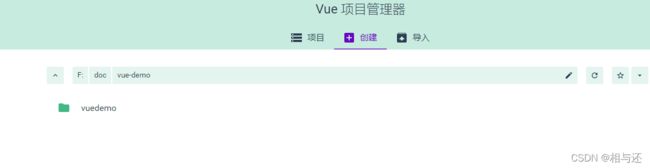
会打开一个ui界面,跟着ui提示操作就行
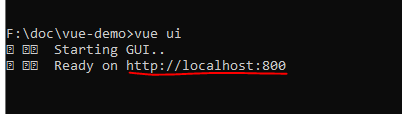
打开cmd提示的网页地址:我的是http://localhost:800
然后一步步操作:
ps:如果提示不是内部命令信息提示,就需要安装vue组件
命令行输入: npm install vue更具体的百度搜索操作即可
------------------本内容于2022-04-11更新start-------------------------
vue项目制作方向梳理
在正式开始运行之前先梳理一下创建vue项目需要什么
在按照我刚刚的方式创建完vue项目后,(如有勾选安装router的情况)
便已经可以通过npm run serve直接运行项目了,(只是有前端部分);
初始它会有一个HelloWorld.vue的组件界面。一运行便能够看到该页面的内容。
但是单单有这些是不够的。
要制作一个功能齐全的vue项目,最少需要安装这几项:
vue-router :页面跳转和传参
一个UI框架组件:根据你需要制作电脑端还是手机端项目去搜索vue ui框架。
一般都能够搜索到比较常用的vue ui框架。这些ui框架都会有文档,文档内部有如何安装
的npm install 命令。
本次的ui框架为elementUi
axios: 目前常用的与后端数据交互的组件,因为我们是vue+springboot项目,为前后端
分离的项目,需要用它来连接前后端
那么,通过梳理我们便清楚了如何往下去制作。
此外,为了快速的构建好vue项目,你最起码你需要掌握以下关于vue的
知识:
vue常用指令:
内容渲染指令 ————》
{{ 属性值 }}   别名:插值表达式
属性值为自定义的属性
该指令将数据渲染到页面
例子:
name: "张三" // 自定义属性
{{ name }}

------------------------------------------------------
属性渲染指令
v-bind:元素="属性值"  简写方式==>    :元素="属性"
------------------------------------------------------
事件渲染指令
v-on:事件名  只需要知道v-on:click="方法名" 点击事件  简写:@click="方法名"
------------------------------------------------------
双向绑定指令
v-model="属性值"
例如:给input绑定一个v-model的属性值,修改input的值,该绑定的属性值内容会跟
着改变
------------------------------------------------------
条件渲染指令
v-if
v-else-if
v-else
该指令分条件渲染页面,只有满足条件的标签才会被渲染到页面
完整写法例子:
name: "张三" // 自定义属性
// 页面写法

我的名字是张三 // 当满足条件时该文本会显示在页面

我的名字不是张三 // 不满足条件显示本文本内容

------------------------------------------------------

列表渲染指令
v-for=(item ,index) in list
该指令为渲染集合数组的指令,通过该指令可以把多条数据分批次渲染到界面
item为数组集合元素的内容,index为下标
例:
list: [
		{
	name: "xxx",
	age: xx,
	},
	{
	name: "zzz",
	age: zz,
	},
]
当下标为0时,item值为list下的
{
	name: "xxx",
	age:xx,
}
需要获取name属性值,则在页面中写成{{ item.name }}
完整写法例子:

{{ item.name }}
除了掌握基础指令外,还需要最起码掌握以下函数:
data() {
	return {
		// 在return这里定义自定义的属性
	}
},
// 在methods定义方法
methods: {
 方法A() {

	}
},
// 在created内调用方法,实现一加载页面就获取数据,用于增删改查中的查,来
查询数据
created() {
}
还需要了解:
在main.js这个入口文件引用npm install 后的组件

// 导入安装的组件
import 自定义组件名 from "组件路径(一般在搜索安装的组件文档会有说明)"
Vue.use(自定义组件名) // 引用组件(一般安装的组件文档会有说明)

例:
import Router from "./vue-router"
Vue.use(Router)
掌握了以上知识的前提,是你已经有学习过html5相关的知识后,然后就可以着手制作vue项目了
------------------本内容于2022-04-11更新end-------------------------
通过软件vscode打开项目
vscode,找到项目路径(我用的是idea,无所谓用什么软件,直接用cmd也能运行)

然后新建终端,输入运行的命令:
------------------本内容于2022-04-11更新start-------------------------

------------------本内容于2022-04-11更新end-------------------------
运行
npm run dev
或
npm run serve
vue 配置
以下vue代码皆以vue2.x为准!
vue-router
vue-router是vue.js的官方路由管理器,一般用它作页面跳转和跳转时传参。
如何配置
以我的学生管理系统的结构为例:
首先需要在vue项目的界面引入vue-router,
使用编程软件的终端或者cmd 切换到自己项目的路径下,使用以下代码安装:
npm install vue-router
axios
axios的作用用于于后端异步通信,简单的说就是你想把前端数据传给后端就需要它进行数据交互
同样,使用编程软件的终端或者cmd 切换到自己项目的路径下,使用以下代码安装:
npm install axios
ui框架
ui框架,顾名思义就是用于编写界面用的,像淘宝网站,京东等等。
其实选择哪个都ok,看自己喜好,一般比较用的多的是elementui,layui,museui,和mintui等等。
有基于移动端的也有基于电脑端。
以我的学生成绩管理系统为例,用的是elementui
同样,使用编程软件的终端或者cmd 切换到自己项目的路径下,使用以下代码安装:
npm i element-ui -S
到这里基础的vue项目所需要的都安装好了,打开package.json能看到刚刚安装的
引入
安装完了,你还需要引入
在mian.js里进行引入刚刚安装的,以及使用elementui
// 导入包
import Vue from 'vue'
import App from './App.vue'
import router from './router'
import ElementUI from 'element-ui'
import axios from 'axios'

Vue.config.productionTip = false
// elementui
Vue.use(ElementUI)
Vue.prototype.$axios = axios

new Vue({
  el: '#app',
  // 路由
  router,
  render: h => h(App),
}).$mount('#app')
结构
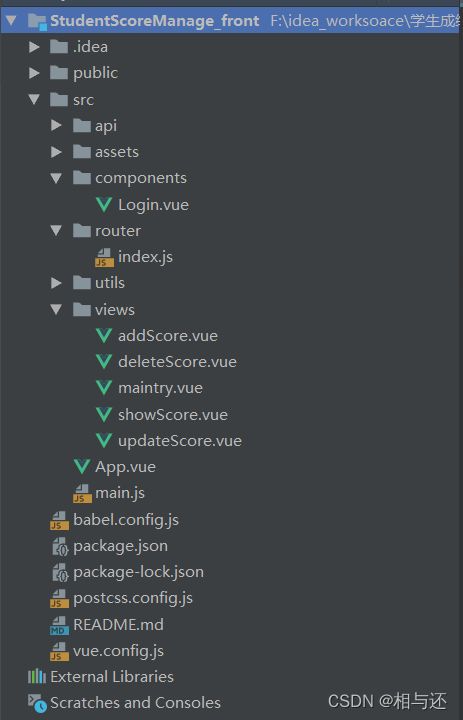
首先看看我的学生成绩管理系统的完整结构
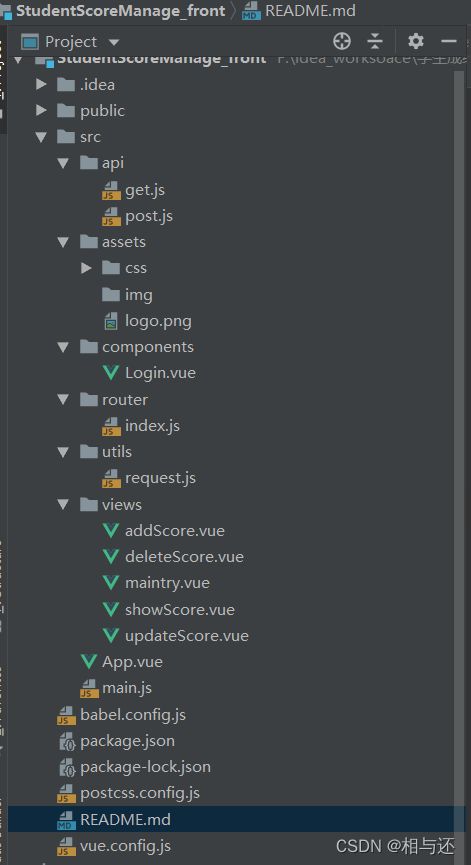
- api: 用于与后端数据交互
- assets: 用于存放静态资源,如图片,样式设置
- components: 组件,一般我用它作为项目的主入口,即项目一启动就打开它的界面
- router: 配置路由,管理页面跳转
- utils: 主要工具配置,这里主要是写axios的配置,用于引入api里的get.js和post.js,作为数据交互
- views: 你的项目里需要几个页面就使用几个页面进行增添视图组件
router配置
在以上截图中,我有:
- Login.vue
- addScore.vue
- deleteScore.vue
- updateScore.vue
- showScore.vue
- maintry.vue
这几个视图组件
则,router的index.js代码如下
import Vue from 'vue'
import Router from 'vue-router'
import Login from '@/components/Login'
import maintry from '@/views/maintry'
import addScore from '@/views/addScore'
import deleteScore from '@/views/deleteScore'
import showScore from '@/views/showScore'
import updateScore from '@/views/updateScore'

// 挂载vue-router
// 将组件添加到router
Vue.use(Router)
export default new Router({
    routes: [
        {
            path: '/',
            redirect: '/login'
        },
        {
            path: '/login',
            name: 'Login',
            component: Login
        },
        {
            path: '/maintry',
            name: 'maintry',
            component: maintry
        },
        {
            path: '/addScore',
            name: 'addScore',
            component: addScore
        },
        {
            path: '/deleteScore',
            name: 'deleteScore',
            component: deleteScore
        },
        {
            path: '/showScore',
            name: 'showScore',
            component: showScore
        },
        {
            path: '/updateScore',
            name: 'updateScore',
            component: updateScore
        }
    ]
})
ps: 需要注意的是,配置好了路由,你还需要在App.vue里进行声明,需要在App.vue
加入代码
App.vue代码:
request.js
这个文件是axios的配置文件
代码如下:
import axios from 'axios'

// 创建axios实例
// eslint-disable-next-line no-unused-vars
const service = axios.create({
    // baseURL: '/', // api的base_Url
    // 后端的请求路径
    baseURL: 'http://localhost:8081/student', // api的base_Url
    timeout: 50000 // 请求超时时间
})

// 请求拦截器
axios.interceptors.request.use(
    function (config) {
        // 在发送请求之前做些什么
        return config
    },
    function (error) {
        // 对请求错误做些什么
        return Promise.reject(error)
    }
)

// 响应拦截器
axios.interceptors.response.use(
    function (config) {
        // 对响应数据做点什么
        return config
    },
    function (error) {
        // 对响应错误做点什么
        return Promise.reject(error)
    }
)

export default service
get和post请求
写完request.js后,就需要根据自己的需求在get.js和post.js编写对应的和后端交互的代码
以其中一个进行举例:
get.js:
// 导入axios配置
import service from '../utils/request'

// 登录
export function loginTosystem(username, password) {
    return service.get('/login/loginTosystem', {
        headers: { 'Content-Type': 'application/json' },
        params: {
            username: username,
            password: password
        }
    })
}
如我想实现登录功能,则需要先引入刚刚的request.js文件,把前端输入框输入的两个参数,账号username和密码password传到后端,去获取后端路径下的/login/loginTosystem里编写的controller方法
post.js
// 导入axios配置
import service from '../utils/request'

// 注册账号
export function registerAccount (obj) {
    return service.post('/register/registerAccount', JSON.stringify(obj), {
        headers: { 'Content-Type': 'application/json' }
    })
}
post一般处理参数比较多的情况
如我实现注册功能,用一个对象参数去接收,把它传入后端的/register/registerAccount的controller方法
------------------本内容于2022-04-11更新start-------------------------
// 这里给大家举一个例子:
// 登录和注册界面以及功能
学生成绩管理系统登录入口
用户名:
登录界面
学生成绩管理系统注册入口返回
姓名:
注册界面
增删改查的思路按照该方法去制作即可
------------------本内容于2022-04-11更新end-------------------------
vue.config.js
这个是vue的配置文件,是代理的一种,可以理解解决跨域
module.exports = {
  publicPath: '/',
  lintOnSave: false,
  devServer: {
    disableHostCheck: true,
    open: true,
    port: 8080,
    proxy: {
      '/': {
        // 连接到后端的路径
        target: 'http://localhost:8081/student',
        changeOrigin: true,
        secure: false,
        pathRewrite: {
          '^/': '/'
        }
      }
    }
  }
}
这里有一个要注意的是,前面的module.exports一定要注意有没有“s”如果没有s,配置是不会生效的
vue完成
以上vue的配置基本就完成了,接下来就可以去编写你需要的页面和功能了
springboot
和前端不同,springboot一般使用的是依赖进行配置所需要的内容,以及使用注解去声明
创建springboot项目
我使用的idea去创建springboot项目。
直接创建maven项目在后面新增文件夹作为不同的功能
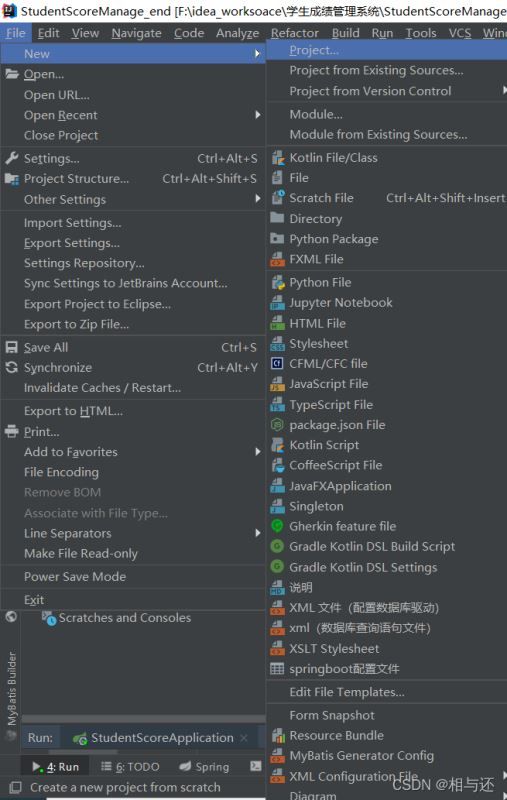
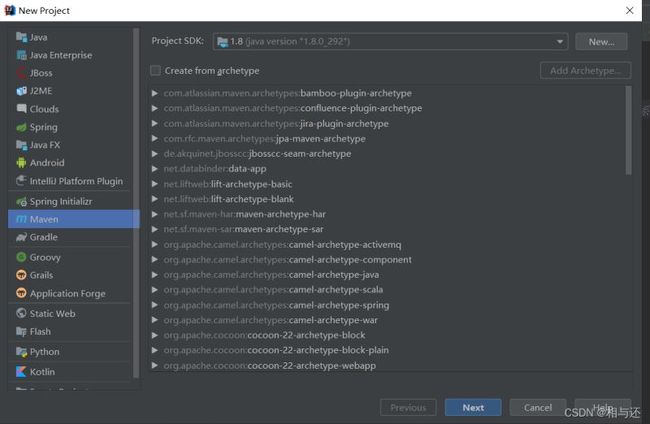
直接下一步,填写完项目名称创建即可
依赖
本依赖为pom.xml文件的内容
    4.0.0

    com.hxc
    com.StudentScoreManage
    1.0-SNAPSHOT

        org.springframework.boot
        spring-boot-starter-parent
        2.4.5


            org.springframework.boot
            spring-boot-starter-web


            org.springframework.boot
            spring-boot-starter


            org.springframework.boot
            spring-boot-starter-test
            test


            mysql
            mysql-connector-java
            8.0.26


            com.alibaba
            fastjson
            1.2.76


            com.baomidou
            mybatis-plus-boot-starter
            3.4.3


            org.projectlombok
            lombok
            1.18.12


            redis.clients
            jedis
            3.6.0


        UTF-8
        UTF-8


                org.springframework.boot
                spring-boot-maven-plugin
以上按需引入,引入了springboot依赖,mysql驱动,mybatis等等,具体功能请百度
项目结构
以我的学生成绩管理系统为例:

- config: 配置跨域和redis配置
- constant: 配置与前端交互返回的数据提示和内容
- controller: 控制层,接收前端的数据
- service: service层,处理接收到的数据,主要作功能代码
- dto: 实体类
- mapper: 从service到mapper,主要实现数据库的增删改查方法的实现
- Vo: 主要用于构建不同数据的综合的实体类,以及配置与前端交互的数据
- utils: 工具类,但是本项目并没有用到
- resource/mapper: 数据库的增删改查语句
- application.yml: 配置数据库驱动和redis配置、服务器端口等等
- pom.xml: 依赖
- StudentScoreApplication.java: 启动类
ps: constant和Vo可简化不编写,如不编写数据交互提示,把controller和service
层的返回数据修改为别的数据类型即可,如String
启动类配置
想启动项目,必须要有一个入口文件,
代码如下:
package com.StudentScore;
import org.mybatis.spring.annotation.MapperScan;
import org.springframework.boot.SpringApplication;
import org.springframework.boot.autoconfigure.SpringBootApplication;
//声明springboot
@SpringBootApplication
//定义mapper区
@MapperScan("com.StudentScore.Mapper")
public class StudentScoreApplication {
    public static void main(String[] args) {
        SpringApplication.run(StudentScoreApplication.class,args);
    }
}
配置 跨域
只有配置跨域,才能接收到前端的数据请求
原本教程需要配置redis,现在简化,修改为不需要redis,更新时间2022-04-11
package com.StudentScore.Config;

import org.springframework.context.annotation.Configuration;
import org.springframework.web.servlet.config.annotation.CorsRegistry;
import org.springframework.web.servlet.config.annotation.WebMvcConfigurer;

/**
 * @author hxc
 * @dateTime: 2021-12-2
 * @description: 跨域配置
 * */
@Configuration
public class CorsConfig implements WebMvcConfigurer {
    @Override
    public void addCorsMappings(CorsRegistry registry) {
        //设置允许跨域
        registry.addMapping("/**")
                .allowedOrigins("*")
                // 设置允许跨域请求的域名
                .allowedOriginPatterns("*")
                //设置允许的方法
                .allowedMethods("*")
                .maxAge(3600);
    }
}
数据库配置、服务端口
application.yml 文件主要是配置数据库和服务器的
server:
  port: 8081
  servlet:
# 项目的路径,配置如下之后,它的路径为http:locahost:8081/student
    context-path: /student
#    数据库
spring:
  datasource:
    username: root
    url: jdbc:mysql://localhost:3306/mydb
    password: root
    driver-class-name: com.mysql.cj.jdbc.Driver
在这里要注意的是,context-path,配置了项目的路径
于是本项目路径为:
http:locahost:8081/student
之所以提这个,因为怕你们和后面要讲的contoller的路径搞乱
数据交互
ps:如需要简化,此处可不配置
主要有两个文件,一个是ResutEnum,一个是ResutVo
用于与前端数据交互
代码如下
package com.StudentScore.constant;

import lombok.Getter;

@Getter
public enum ResutEnum {
    OK(2000,"成功"),
    Error(5000,"失败");
    ResutEnum(Integer code,String message){
        this.code = code;
        this.message = message;
    }
    Integer code;
    String message;
}
package com.StudentScore.Vo; import com.StudentScore.constant.ResutEnum; import lombok.Getter; /** * @author hxc * @dateTime: 2021-12-4 * @description: 数据交互响应-提示 * */ @Getter public class ResultVo{ private T data; private Integer code; private String message; public ResultVo(ResutEnum resutEnum) { this.code = resutEnum.getCode(); this.message = resutEnum.getMessage(); data = null; } public ResultVo(ResutEnum resutEnum,T data) { this.code = resutEnum.getCode(); this.message = resutEnum.getMessage(); this.data = data; } public ResultVo(Integer code,String message,T data){ this.code = code; this.message = message; this.data = data; } }
springboot运行顺序
以上,springboot的基础配置就已经ok了。
但是,在继续往下写代码,我们得明白,springboot是怎么执行代码的。
其实,我们哪怕只创建一个文件夹,只创建两三个java文件也能编写完一个springboot项目,但是,这样的代码是特别乱的,也不利于维护;因此我们才分层,一个文件夹一个层次,每个层次处理一种类型的功能
首先,我们知道,第一步肯定是从前端接收数据,那么接收到的数据第一步是哪里?
答案就是controller,别的层也可以,但是约定俗成,规定了它作为和前端交互
同理,controller接收到后,传到了service,service编写功能的实现,service再请求到mapper,mappe里编写数据库增删改查的实现
mapper再请求到resource下的mapper.xml,数据库的增删改查语句去查找数据库的数据。
当查到数据库数据后,返回到mapper,再到service,然后回到controller,最后再返回前端。
controller层
然后我们再看controller代码,以下所有的都以登录和注册功能作为例子,因为其他功能都和这两个差不多
登录是查询
注册是插入
登录controller:
package com.StudentScore.Controller;

import com.StudentScore.Service.LoginService;
import com.StudentScore.Vo.ResultVo;
import com.StudentScore.constant.ResutEnum;
import org.springframework.web.bind.annotation.GetMapping;
import org.springframework.web.bind.annotation.RequestMapping;
import org.springframework.web.bind.annotation.RequestParam;
import org.springframework.web.bind.annotation.RestController;

import javax.annotation.Resource;

/**
 * @author hxc
 * @dateTime: 2021-12-2
 * @description: 登录Controller
 * */
@RestController
@RequestMapping("/login/**")
public class LoginController {
    @Resource
    private LoginService loginService;

    // 登录到系统
    @GetMapping("/loginTosystem")
    public ResultVo loginTosystem(@RequestParam("username")String username, @RequestParam("password")String password) {
        return new ResultVo(ResutEnum.OK,loginService.loginTosystem(username,password));
    }
    @GetMapping("/findName")
    public ResultVo findName(@RequestParam("username")String username) {
        return new ResultVo(ResutEnum.OK,loginService.findName(username));
    }
}
ps: 如简化不编写数据交互,把ResultVo修改为别的类型,如String
这里需要特别说明,其他和它一样
我们看到,它@RequestMapping("/login/**")
代表会请求到login路径
@GetMapping("/loginTosystem")
在login路径下写这个请求,代表它的路径为
/login/loginTosystem
细心的人会发现,前端的get和post也有写相同的路径
再结合配置的路径,到请求到这里的时候,最终路径为
http:localhost:8081/student/login/loginTosystem
其他同理
注册controller:
package com.StudentScore.Controller;

import com.StudentScore.Service.RegisterService;
import com.StudentScore.Vo.ResultVo;
import com.StudentScore.constant.ResutEnum;
import com.StudentScore.dto.Account;
import org.springframework.web.bind.annotation.*;

import javax.annotation.Resource;

/**
 * @author hxc
 * @dateTime: 2021-12-2
 * @description: 注册Controller
 * */
@RestController
@RequestMapping("/register/**")
public class RegisterController {
    @Resource
    private RegisterService registerService;

    // 注册
    @PostMapping("/registerAccount")
    public ResultVo registerAccount(@RequestBody Account account) {
        return new ResultVo(ResutEnum.OK,registerService.registerAccount(account));
    }
}
ps: 如简化不编写数据交互,把ResultVo修改为别的类型,如String
dto层:实体
在请求到下面的service的时候,我们应该要有一个实体去映射,
即和数据库字段相同,账号表
package com.StudentScore.dto;

import lombok.Data;

/**
 * @author hxc
 * @dateTime: 2021-12-2
 * @description: 账号登录注册实体
 * */
@Data
public class Account {
    private String id;
    // 姓名
    private String name;
    // 账号
    private String username;
    // 密码
    private String password;
}
ps: 要注意的是,字段名称需要一样,否则会映射失败,到时候拿到的数据是空的
service层
登录service
package com.StudentScore.Service;

import com.StudentScore.Mapper.LoginMapper;
import org.springframework.stereotype.Service;

import javax.annotation.Resource;

/**
 * @author hxc
 * @dateTime: 2021-12-2
 * @description: 登录service
 * */
@Service
public class LoginService {
@Resource
    private LoginMapper loginMapper;
    // 登录
    public String loginTosystem(String username,String password){
        String message = "";
        // 判断登录的角色是否为空
        if(loginMapper.loginTosystem(username,password)== null) {
            message = "登录失败";
        }else {
            loginMapper.loginTosystem(username,password);
            message = "登录成功";
        }
       return message;
    }

    // 获取登录人员的姓名
    public String findName(String username) {
        return loginMapper.findName(username);
    }
}
注册service
package com.StudentScore.Service;

import com.StudentScore.Mapper.RegisterMapper;
import com.StudentScore.dto.Account;
import org.springframework.stereotype.Service;

import javax.annotation.Resource;

/**
 * @author hxc
 * @dateTime:2021-12-2
 * @description: 注册service
 * */
@Service
public class RegisterService {
    @Resource
    private RegisterMapper registerMapper;

    // 注册
    public String registerAccount(Account account) {
        registerMapper.registerAccount(account);
        return "注册成功";
    }
}
mapper层
登录mapper
package com.StudentScore.Mapper;

import org.apache.ibatis.annotations.Param;

/**
 * @author hxc
 * @dateTime: 2021-12-2
 * @description: 登录mapper
 * */
public interface LoginMapper {
    // 登录
    String loginTosystem(@Param("username")String username, @Param("password")String password);
    // 获取登录的人的姓名
    String findName(@Param("username")String username);
}
注册mapper
package com.StudentScore.Mapper;

import com.StudentScore.dto.Account;
import org.apache.ibatis.annotations.Param;

/**
 * @author hxc
 * @dateTime: 2021-12-2
 * @description: 注册mapper
 * */
public interface RegisterMapper {
    // 注册
    void registerAccount(@Param("account")Account account);
}
数据库查询语句
登录:
注册:
insert into scorelogin (name,username,password) values (#{account.name},#{account.username},#{account.password})
结语
到此这篇关于如何搭建vue+springboot项目的文章就介绍到这了,更多相关vue+springboot项目搭建内容请搜索脚本之家以前的文章或继续浏览下面的相关文章希望大家以后多多支持脚本之家!