canvas基础
canvas基础
一、canvas是什么
- 广义:H5新增canvas 2d绘图功能
- 在html中:
- canvas是html标签
- 需要用js在canvas里绘制图形
- canvas可以理解为一张画布
二、绘制基本图形
DOCTYPE html>
<html lang="en">
<head>
<meta charset="UTF-8">
<title>canvas绘图title>
<style>
#canvas{
background: blue;
}
style>
head>
<body>
<canvas id="canvas" width="400" height="300">
<p>不兼容p>
canvas>
<script>
// 获取到canvas元素
const canvas = document.getElementById('canvas')
// 或者通过js来设置宽高
// canvas.width = 300
// canvas.height = 300
// canvas上下文对象
const ctx = canvas.getContext('2d')
// 颜色
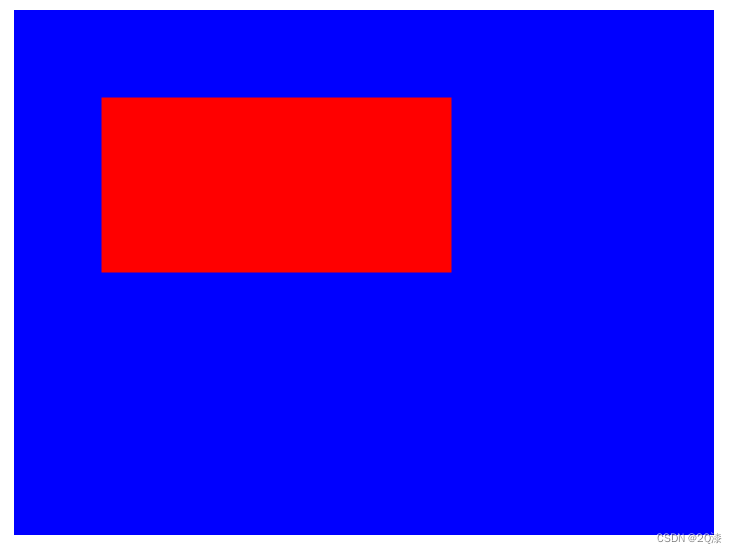
ctx.fillStyle = 'red'
// 绘制一个长方形
ctx.fillRect(50, 50, 200, 100)
script>
body>
html>
如下图,就得到了一个简单的红色的长方形了。
三、绘制路径
- 开始建立路径:
beginPath() - 向路径集合中添加子路径
- 显示路径:填充
fill(),描边stroke()
子路径的形状:
- 直线:
lineTo(x,y)
ctx.beginPath()
ctx.moveTo(50, 50)
ctx.lineTo(400, 50)
ctx.lineTo(400, 300)
ctx.stroke()

- 圆弧:
arc(x, y, 半径, 开始弧度, 结束弧度, 方向)
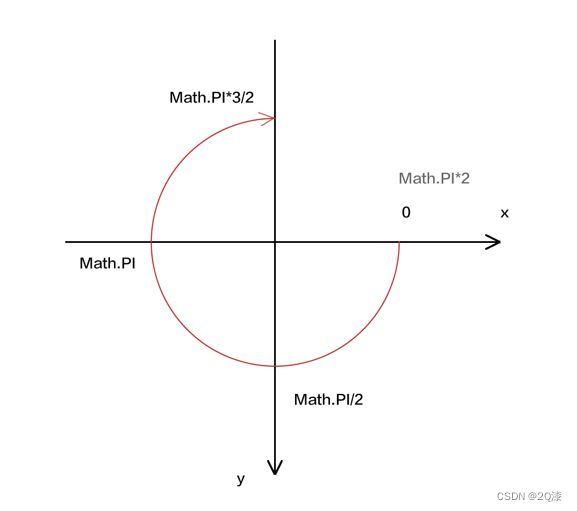
ctx.beginPath()
ctx.arc(300, 300, 100, 0, Math.PI * 3 / 2)
ctx.stroke()

- 切线圆弧:
arcTo(x1, y1, x2, y2, 半径)
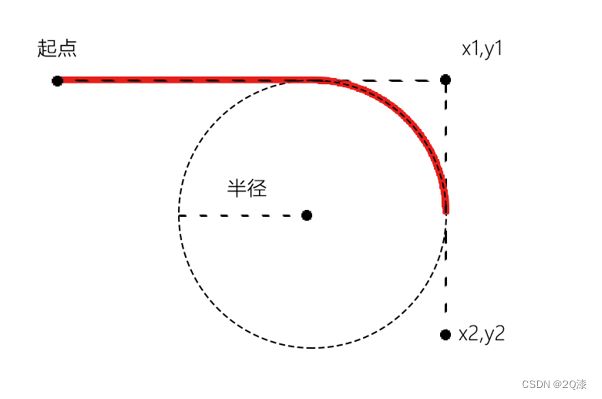
ctx.beginPath()
ctx.moveTo(50, 50)
ctx.arcTo(400, 50, 400, 300, 100)
ctx.stroke()

- 二次贝塞尔曲线:
quadraticCurverTo(cpx1, cpy1, x, y)

ctx.beginPath()
ctx.moveTo(50, 50)
ctx.quadraticCurveTo(400, 50, 400, 300)
ctx.stroke()

- 三次贝塞尔曲线:
bezierCurverTo(cpx1, cpy1, cpx2, cpy2, x, y)

ctx.beginPath()
ctx.moveTo(50, 50)
ctx.bezierCurveTo(400, 50, 400, 300, 600, 300)
ctx.stroke()

- 矩形:
rect(x, y, w, h)
ctx.beginPath()
ctx.rect(50, 50, 400, 200)
ctx.fill()

closePath
ctx.beginPath()
ctx.arc(300,300,100,0,Math.PI*3/2)
// 封闭路径,只对stroke有效
ctx.closePath()
ctx.stroke()

四、图形样式
4.1 纯色
- strokeStyle 代表了描边样式,描边区域的绘制方法是 stroke()、strokeRect() 或者strokeText()
ctx.beginPath()
ctx.arc(300, 300, 100, 0, Math.PI*2)
ctx.strokeStyle = 'rgba(255,0, 0, 0.5)'
ctx.stroke()

- fillStyle 代表了填充样式,填充区域的绘制方法是 fill()、fillRect() 或者fillText()
ctx.beginPath()
ctx.arc(300, 200, 100, 0, Math.PI * 2)
// 可以是以下各种方式设置颜色
// ctx.fillStyle ='red'
// ctx.fillStyle ='#345fff'
// ctx.fillStyl e='rgb(255,0, 0)'
ctx.fillStyle = 'rgba(255,0, 0, 0.5)'
ctx.fill()

4.2 渐变
- 建立渐变对象
线性渐变 gradient=createLinearGradient(x1, y1, x2, y2)
径向渐变 gradient=createRadialGradient(x1, y1, r1, x2, y2, r2) - 定义渐变的颜色节点
gradient.addColorStop(position, color) - 赋值
ctx.fillStyle= gradient
ctx.strokeStyle= gradient
- 线性渐变
const canvas = document.getElementById('canvas')
canvas.width = window.innerWidth
canvas.height = window.innerHeight
const ctx = canvas.getContext('2d')

// 1.建立渐变对象,定义渐变的区域
const gr = ctx.createLinearGradient(50, 50, 400, 400)

// 2.为渐变添加颜色节点
gr.addColorStop(0, 'red')
gr.addColorStop(0.5, 'yellow')
gr.addColorStop(1, 'blue')

// 3.为样式赋值
ctx.fillStyle = gr

// 4.绘图
ctx.fillRect(50, 50, 350, 350)

- 径向渐变
const canvas = document.getElementById('canvas')
canvas.width = window.innerWidth
canvas.height = window.innerHeight
const ctx = canvas.getContext('2d')

// 1.建立渐变对象,定义渐变的区域
const gr=ctx.createRadialGradient(200, 200, 50, 300, 300, 200)

// 2.为渐变添加颜色节点
gr.addColorStop(0, 'red')
gr.addColorStop(0.5, 'yellow')
gr.addColorStop(1, 'blue')

// 3.为样式赋值
ctx.fillStyle = gr


// 4.绘图
ctx.fillRect(50, 50, 350, 350)

4.3 纹理
const canvas = document.getElementById('canvas')
canvas.width = window.innerWidth
canvas.height = window.innerHeight
const ctx = canvas.getContext('2d')
// 1.建立图像源
// 图像元素:![]() // 视频元素:
// canvas:
const img = new Image()
img.src = 'https://img2.baidu.com/it/u=1369006479,3394350709&fm=253&fmt=auto&app=138&f=JPEG?w=1047&h=500'
img.onload = loadedFn
function loadedFn () {
// 2.建立纹理对象,定义重复方式
const pt = ctx.createPattern(img, 'no-repeat')
// 3.为样式赋值
ctx.fillStyle = pt
// 4.绘图
ctx.fillRect(0, 0, 400, 400)
}
// 视频元素:
// canvas:
const img = new Image()
img.src = 'https://img2.baidu.com/it/u=1369006479,3394350709&fm=253&fmt=auto&app=138&f=JPEG?w=1047&h=500'
img.onload = loadedFn
function loadedFn () {
// 2.建立纹理对象,定义重复方式
const pt = ctx.createPattern(img, 'no-repeat')
// 3.为样式赋值
ctx.fillStyle = pt
// 4.绘图
ctx.fillRect(0, 0, 400, 400)
}

五、描边样式
-
lineWidth
lineWidth定义描边的宽度,它是从路径的中心开始绘制的,内外各占宽度的一半 -
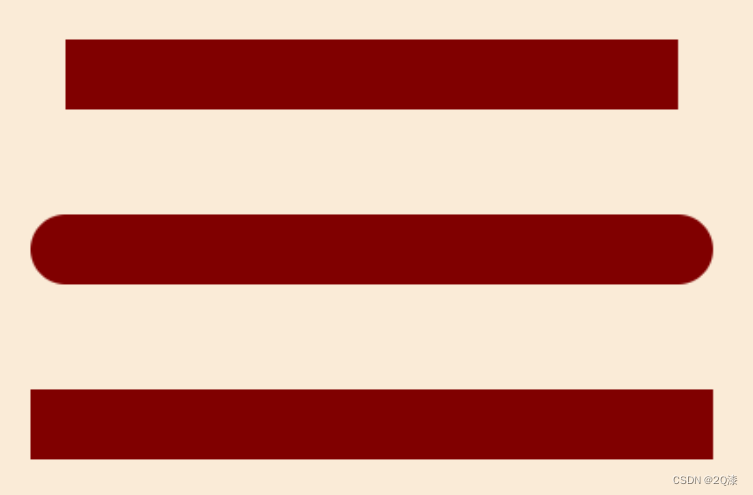
lineCap线条端点样式
const canvas = document.getElementById('canvas')
canvas.width = window.innerWidth
canvas.height = window.innerHeight
const ctx = canvas.getContext('2d')


// 描边的着色样式
ctx.strokeStyle = 'maroon'
// lineWidth:描边宽
ctx.lineWidth = 40
// lineCap 描边端点样式
ctx.save()
ctx.beginPath()
ctx.moveTo(50, 50)
ctx.lineTo(400, 50)
ctx.lineCap = 'butt'
ctx.stroke()
ctx.restore()

ctx.save()
ctx.beginPath()
ctx.moveTo(50, 150)
ctx.lineTo(400, 150)
ctx.lineCap = 'round'
ctx.stroke()
ctx.restore()

ctx.save()
ctx.beginPath()
ctx.moveTo(50, 250)
ctx.lineTo(400, 250)
ctx.lineCap = 'square'
ctx.stroke()
ctx.restore()
lineJoin拐角样式
const canvas = document.getElementById('canvas')
canvas.width = window.innerWidth
canvas.height = window.innerHeight
const ctx = canvas.getContext('2d')

// 描边的着色样式
ctx.strokeStyle = 'maroon'
// lineWidth:描边宽
ctx.lineWidth = 20

/*lineJoin 拐角类型
* miter
* round
* bevel
* */
ctx.save()
ctx.beginPath()
ctx.moveTo(50, 20)
ctx.lineTo(400, 20)
ctx.lineTo(200, 100)
ctx.lineJoin = 'miter'
ctx.stroke()
ctx.restore()

ctx.save()
ctx.beginPath()
ctx.moveTo(50, 150)
ctx.lineTo(400, 150)
ctx.lineTo(200, 240)
ctx.lineJoin = 'round'
ctx.stroke()
ctx.restore()

ctx.save()
ctx.beginPath()
ctx.moveTo(50, 300)
ctx.lineTo(400, 300)
ctx.lineTo(200, 380)
ctx.lineJoin = 'bevel'
ctx.stroke()
ctx.restore()

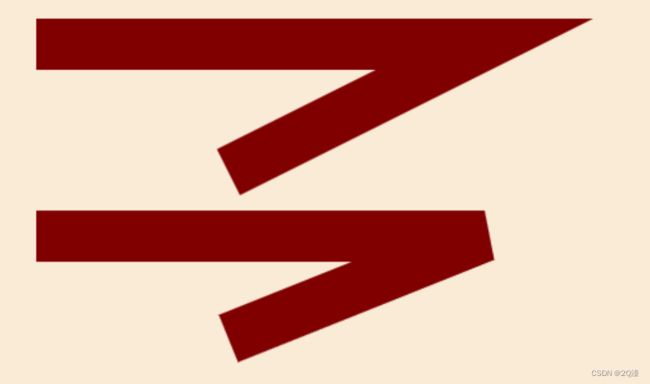
miterLimit拐角类型
const canvas = document.getElementById('canvas')
canvas.width = window.innerWidth
canvas.height = window.innerHeight
const ctx = canvas.getContext('2d')
// 描边的着色样式
ctx.strokeStyle = 'maroon'
// lineWidth:描边宽
ctx.lineWidth = 40

// miterLimit 拐角类型,number 类型,如1,2,3
ctx.save()
ctx.beginPath()
ctx.moveTo(50,50)
ctx.lineTo(400,50)
ctx.lineTo(200,150)
ctx.stroke()
ctx.restore()

ctx.save()
ctx.beginPath()
ctx.moveTo(50, 200)
ctx.lineTo(400, 200)
ctx.lineTo(200, 280)
ctx.miterLimit = 2
ctx.stroke()
ctx.restore()
etLineDash虚线
const canvas = document.getElementById('canvas')
canvas.width = window.innerWidth
canvas.height = window.innerHeight
const ctx = canvas.getContext('2d')
// 描边的着色样式
ctx.strokeStyle = 'maroon'
// lineWidth:描边宽
ctx.lineWidth = 4

// etLineDash(segments) 虚线
ctx.save()
ctx.beginPath()
ctx.moveTo(50, 100)
ctx.lineTo(700, 100)
ctx.setLineDash([30, 60, 90])
ctx.stroke()
ctx.restore()

lineDashOffset虚线偏移
const canvas = document.getElementById('canvas')
canvas.width = window.innerWidth
canvas.height = window.innerHeight
const ctx = canvas.getContext('2d')
// 描边的着色样式
ctx.strokeStyle = 'maroon'
// lineWidth:描边宽
ctx.lineWidth = 4

// lineDashOffset 虚线偏移
ctx.save()
ctx.beginPath()
ctx.moveTo(50, 100)
ctx.lineTo(700, 100)
ctx.setLineDash([60])
ctx.stroke()
ctx.restore()

ctx.save()
ctx.beginPath()
ctx.moveTo(50, 150)
ctx.lineTo(700, 150)
ctx.setLineDash([60])
ctx.lineDashOffset = 60
ctx.stroke()
ctx.restore()

ctx.save()
ctx.beginPath()
ctx.moveTo(50, 200)
ctx.lineTo(700, 200)
ctx.setLineDash([60])
// 偏移过多之后,前面空白的也会适应的补上
ctx.lineDashOffset = 150
ctx.stroke()
ctx.restore()

六、投影
注意:投影是上下文对象的一种属性,在绘制图形时,无论执行的是描边方法,还是填充方法,都会在其所绘图形的后面添加投影
const canvas = document.getElementById('canvas')
canvas.width = window.innerWidth
canvas.height = window.innerHeight
const ctx = canvas.getContext('2d')

// 位置:shadowOffsetX = float, shadowOffsetY = float
// 模糊度:shadowBlur = float
// 颜色:shadowColor = color
ctx.beginPath()
ctx.arc(300, 200, 100, 0, Math.PI * 2)
ctx.fillStyle = 'red'
ctx.shadowColor = '#000'
ctx.shadowOffsetY = 30
ctx.shadowBlur = 30
ctx.fill()
