用于网络嗅探和中间人的Ettercap教程
As pentester we use a lot of tools during penetration tests. One of the main parts of the penetration test is man in the middle and network sniffing attacks. We generally use popular tool named ettercap to accomplish these attacks. In this tutorial we will look installation and different attack scenarios about ettercap .
作为pentester,我们在渗透测试期间使用了很多工具。 渗透测试的主要部分之一是中间人攻击和网络嗅探攻击。 我们通常使用流行的工具ettercap来完成这些攻击。 在本教程中,我们将介绍有关ettercap安装和不同的攻击情形。
安装 (Install)
We will look different installation types.
我们将寻找不同的安装类型。
Debian,Ubuntu,Kali,Mint: (Debian, Ubuntu, Kali, Mint:)
$ apt install ettercap-common
If we want to install GUI too run following command.
如果我们也想安装GUI,请运行以下命令。
$ apt install ettercap-graphical
CentOS,Fedora,RHEL: (CentOS, Fedora, RHEL:)
$ yum install ettercap
视窗 (Windows)
Compiled ettercap Windows binaries can be downloaded from following link.
可以从以下链接下载已编译的ettercap Windows二进制文件。
https://sourceforge.net/projects/ettercap/files/unofficial%20binaries/windows/
https://sourceforge.net/projects/ettercap/files/unofficial%20binaries/windows/
帮帮我 (Help)
Detailed help about ettercap can be listed with the -hoption like below.
可以使用-h选项列出有关ettercap的详细帮助,如下所示。
$ ettercap -h
 Help 帮帮我
用户界面和工作模式(User Interface and Work Mode)
Ettercap provides different type of user interface. GUI is the easiest one but we will use text only interface in this tutorial.
Ettercap提供了不同类型的用户界面。 GUI是最简单的GUI,但在本教程中我们将使用纯文本界面。
纯文本 (Text Only)
Like a black linux terminal.
就像黑色Linux终端。
诅咒 (Curses)
Curses is better interface than text only where it have menus.
仅在具有菜单的情况下,诅咒比文本更好的界面。
GTK (GTK)
Gtk is fully graphical user interface
GTK是完全图形化的用户界面
守护进程(Daemon)
Daemon mode will work background without stopping.
守护程序模式将在不停止的情况下在后台工作。
列表界面 (List Interface)
Before specifying interface we should list available interfaces. We can list interfaces with -I option .
在指定接口之前,我们应该列出可用的接口。 我们可以使用-I选项列出接口。
$ ettercap -I
指定网络接口 (Specify Network Interface)
The first thing we should learn is select interface we want to operate with ettercap . We will use de facto option -i to specify interface we want to select. In this example we will select interface ens3
我们应该学习的第一件事是我们要使用ettercap select接口。 我们将使用事实上的选项-i来指定我们要选择的接口。 在此示例中,我们将选择接口ens3
$ ettercap -i ens3
选择用户界面 (Select User Interface)
We will use curses interface which can be selected with -C option.
我们将使用可通过-C选项选择的curses界面。
启动GUI (Start GUI)
We can start GUI with the following command. Because ettercap will sniff and change os settings we need to provide root privileges while starting ettercap.
我们可以使用以下命令启动GUI。 因为ettercap将嗅探并更改操作系统设置,所以我们在启动ettercap时需要提供root特权。
$ sudo ettercap -G
选择嗅探模式 (Select Sniff Mode)
We should select sniff mode where two options are ;
我们应该选择两种模式的嗅探模式:
Unified SniffingUnified SniffingBridged SniffingBridged Sniffing
We will select Unified Sniffing
我们将选择Unified Sniffing
 Select Sniff Mode 选择嗅探模式
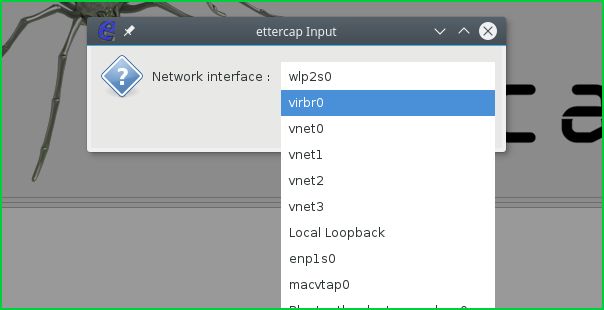
选择界面(Select Interface)
In this step we will select sniff interface
在这一步中,我们将选择嗅探界面
 Select Interface 选择界面
Current screenshot we can see that ettercap is sniffing.
当前屏幕截图中,我们可以看到ettercap在嗅探。
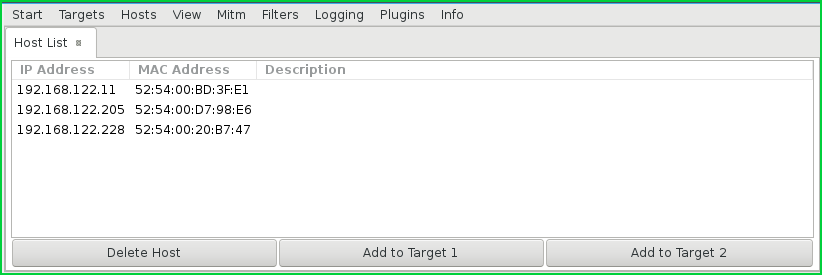
主机清单 (Host List)
We can list live hosts from the menuHost. We can see that IP address and MAC address information about the hosts are provided in the following screenshot.
我们可以从“ Host ”菜单中列出活动Host 。 我们可以在以下屏幕截图中看到有关主机的IP地址和MAC地址信息。
 Host List 主机清单
添加到目标(Add To Target)
We will add hosts to the target with Add to Target 1 and Add to Target 2 buttons. From host list menu.
我们将使用Add to Target 1和Add to Target 2按钮将主机Add to Target 2 。 从主机列表菜单。
Arp中毒 (Arp Poisoning)
We will select fromARP PoisoningMitm the menu like below.
我们将从ARP Poisoning Mitm中选择以下菜单。
 Arp Poisoning Arp中毒
We should enable ifSniff remote connections we want to sniff all connections including remote ones.
如果要Sniff remote connections我们应该启用嗅探所有连接,包括远程连接。
翻译自: https://www.poftut.com/ettercap-tutorial-network-sniffing-man-middle/


