Spring AOP初识 + swagger测试
什么是AOP
AOP(Aspect Oriented Programming),面向切面编程,是Spring的核心技术之一。在程序中,AOP可以实现权限校验、日志记录等操作,AOP编程可以使我们的程序便于维护,思路更清晰;可以抽离重复的代码,例如日志等增强其代码的复用性。
AOP概念
- 切点:即切入点,需要明确我们是要在哪里切入。切点有两种方式,一是通过 excution + 路径表达式指定哪些类织入切入面;二是通过 annotation + 注解,将添加此注解的类织入切面。
- 切面 :即 Pointcut + Advice
- 处理:包括处理的时机与处理内容。即当程序执行到切点时,我们需要做什么?
以下我们将通过案例去了解AOP,何时触发、执行处理。
准备
在案例前我们先准备一下测试环境,本次测试使用的是 springboot + swagger2
- 首先我们需要在pom文件中加入swagger2的依赖:
<dependency>
       <groupId>io.springfoxgroupId>
       <artifactId>springfox-swagger2artifactId>
       <version>2.7.0version>
dependency>
<dependency>
      <groupId>io.springfoxgroupId>
      <artifactId>springfox-swagger-uiartifactId>
      <version>2.7.0version>
dependency>
- 添加swagger2配置类
package com.gy.until;

import com.google.common.base.Predicates;
import org.springframework.context.annotation.Bean;
import org.springframework.context.annotation.Configuration;
import springfox.documentation.builders.ApiInfoBuilder;
import springfox.documentation.builders.PathSelectors;
import springfox.documentation.service.ApiInfo;
import springfox.documentation.service.Contact;
import springfox.documentation.spi.DocumentationType;
import springfox.documentation.spring.web.plugins.Docket;
import springfox.documentation.swagger2.annotations.EnableSwagger2;

import javax.swing.text.Document;
/**
 * swagger 配置类
 *
 * http://localhost:8001/swagger-ui.html  访问ui
 */
@Configuration
@EnableSwagger2
public class SwaggerConfig {
    @Bean
    public Docket webApiConfiguration(){
        return new Docket(DocumentationType.SWAGGER_2)
                .groupName("webApi")//分组
                .apiInfo(webApiInfo())
                .select()
                .paths(Predicates.not(PathSelectors.regex("/admin/.*")))
                .paths(Predicates.not(PathSelectors.regex("/error.*")))
                .build();
    }
    private ApiInfo webApiInfo(){

        return new ApiInfoBuilder()
                .title("aop测试")
                .description("测试aop的权限拦截")
                .version("1.0")
                .contact(new Contact("java","https://blog.csdn.net/qq_46033887?type=blog","[email protected]"))
                .build();
    }
}
访问路径我放在了上面代码中,配置成功即可访问。
3. 添加aop依赖
<dependency>
     <groupId>org.springframework.bootgroupId>
     <artifactId>spring-boot-starter-aopartifactId>
     <version>2.2.1.RELEASEversion>
dependency>
至此,准备工作已经完成,让我们开始吧!
案例一
首先,我们准备一个接口类
package com.gy.controller;

import io.swagger.annotations.Api;
import io.swagger.annotations.ApiOperation;
import org.springframework.web.bind.annotation.*;
@Api(description = "aop请求")
@CrossOrigin
@RestController
@RequestMapping(value = "/aop")
public class AopController {

    @ApiOperation(value = "get请求")
    @GetMapping(value = "/getTest")
    public String getTest(){

        return "code:200,success:true,msg:成功!";
    }

    @ApiOperation(value = "post请求")
    @PostMapping(value = "/postTest")
    public String postTest(){

        return "code:200,success:true,msg:成功!";
    }
}
准备好接口之后,我们需要确定我们的切点。简单理解,就是我们程序执行时,需要在哪里执行。例如,当我们在请求一个被getMapping修饰的方法之前,我们要做出一个操作。
定义切面类
package com.gy.aopHandler;

import org.aspectj.lang.annotation.Aspect;
import org.aspectj.lang.annotation.Before;
import org.aspectj.lang.annotation.Pointcut;
import org.springframework.stereotype.Component;

@Aspect
@Component
public class LogAdvice {

//定义一个切点
@Pointcut("@annotation(org.springframework.web.bind.annotation.GetMapping)")
    private void logAdvicePointcut(){}

    @Before("logAdvicePointcut()")
    public void logAdvice(){
        System.out.println(" ========== get请求... ========== ");
    }
}
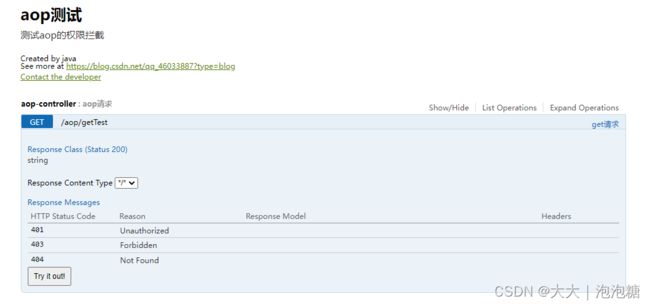
我们现在可以启动项目,访问 http://localhost:8001/swagger-ui.html
我们可以看到

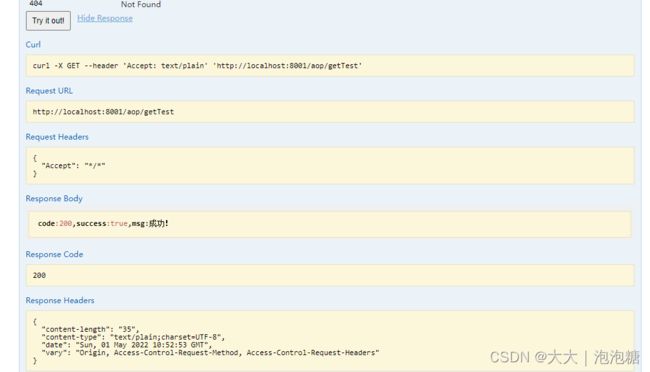
点击show,再点击try it out !
控制台输出打印

在swagger ui界面看到请求成功。

这是一个简单地例子,但可以很好地帮助我们理解AOP。在时机应用中我们的业务比这复杂得多,所以我们接下来看第二个案例。
案例二
通过第一个案例,相信大家对AOP已经有了初步的认识,接下来我们通过自定义注解的方式来演示。
- 首先我们需要自定义一个注解
package com.gy.aopHandler;

import java.lang.annotation.*;

@Target(ElementType.METHOD)//作用于方法之上
@Retention(RetentionPolicy.RUNTIME)//运行时有效
@Documented
public @interface PermissionAnnotation {
}
定义切面类,这次我们将这个类交给spring来管理。
package com.gy.aopHandler;

import com.alibaba.fastjson.JSON;
import com.alibaba.fastjson.JSONObject;
import org.aspectj.lang.ProceedingJoinPoint;
import org.aspectj.lang.annotation.Around;
import org.aspectj.lang.annotation.Aspect;
import org.aspectj.lang.annotation.Pointcut;
import org.springframework.core.annotation.Order;
import org.springframework.stereotype.Component;

@Aspect
@Component
@Order(1)//数字越小,切面类优先执行
public class PermissionFirstAdvice {

    //定义切面
    @Pointcut("@annotation(com.gy.aopHandler.PermissionAnnotation)")
    private void permissionCheck(){}

    @Around("permissionCheck()")
    public Object permissionCheckFirst(ProceedingJoinPoint joinPoint) throws Throwable {
        System.out.println("========== first pointcut ===========" + System.currentTimeMillis());

        Object[] args = joinPoint.getArgs();
        Long id = ((JSONObject) args[0]).getLong("id");
        String name = ((JSONObject) args[0]).getString("name");

        System.out.println("id:" + id + "----------" + "name:" + name);

        if (id < 0 ){
            return JSON.parseObject("{\"code\":500,\"msg\":\"失败!\"}");
        }
        return joinPoint.proceed();
    }
}
大家需要注意,这次的切点 @Pointcut 后面为我们自定义的注解。
- 准备接口测试类
package com.gy.controller;

import com.alibaba.fastjson.JSON;
import com.alibaba.fastjson.JSONObject;
import com.gy.aopHandler.PermissionAnnotation;
import io.swagger.annotations.Api;
import io.swagger.annotations.ApiOperation;
import org.springframework.web.bind.annotation.*;

@Api(description = "权限校验")
@CrossOrigin
@RestController
@RequestMapping(value = "/permissionAnnotation")
public class permissionAnnotationController {

    @ApiOperation(value = "get请求")
    @PermissionAnnotation()
    @RequestMapping(value = "/check",method = RequestMethod.POST)
    public JSONObject getGroupList(@RequestBody JSONObject request){

        return JSON.parseObject("{\"code\":200,\"success\":true,\"msg\":\"成功!\"}");
    }

}
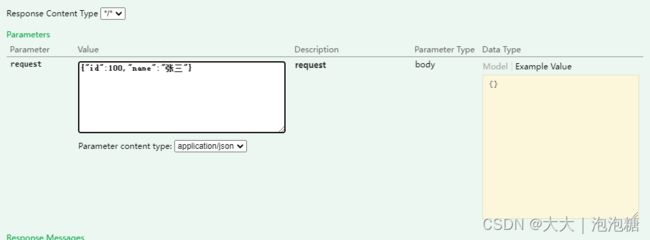
我们使用自定义的注解给这个方法,然后重启项目,刷新swagger页面。

输入: {“id”:100,“name”:“张三”}

点击 try it out ! ,控制台输出打印。

swagger页面

完结
相比于postman,swagger更加方便,测试也比较简单。推荐大家可以尝试一下。对于以上内容为个人学习时所写,有问题可以留言或者私信。感谢支持!