StringBoot初步探索
StringBoot项目的创建
方法一:前往官网创建。链接:https://start.spring.io/
方法二:通过idea创建。
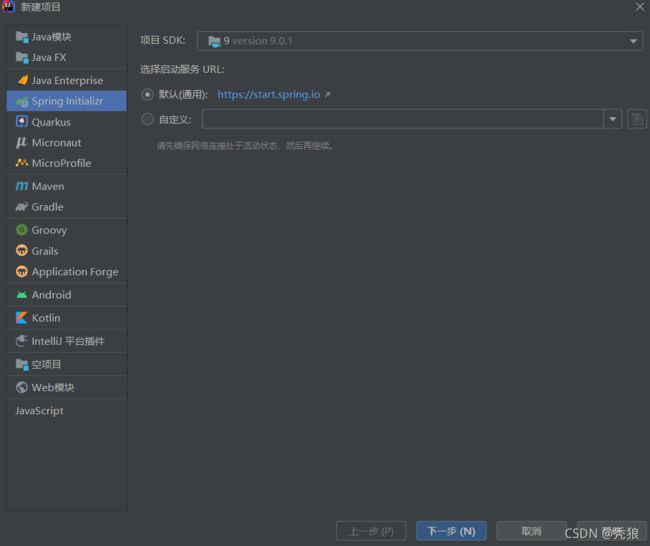
两者本质是相同的,idea集成了Spinrg Initializr。
demoApplication类必须位于在外层,否则会映射失败。
打包
将项目打包成jar包。
如果出现org.apache.maven.surefire:surefire-junit4:jar:2.18.1的错误,说明maven没有配置打包所需要的插件。
解决方法()在pom.xml配置插件:
       org.springframework.boot
       spring-boot-maven-plugin
       2.6.2
version的版本号跟springBoot的版本号一样。
热部署
对应依赖:
            org.springframework.boot
            spring-boot-devtools
            true
通过ctrl + F9 就可以构建项目,无需再次重启服务器。
jar上传云服务器
1.将对应的jar包上传到/home下。
2.在云服务器上创建对应的数据库,执行sql脚本。
3.
java -jar xxxx.jar4.
nohup java -jar xxxx.jar &5.如果要附加端口的话,就用以下格式
nohup java -jar XXXX.jar --server.port=对应端口号 &6.通过swagger来查看jar是否部署成功。
springApplication
完成以下操作:
- 推断应用类型是普通的项目还是Web项目。
- 查找并加载所有可用的初始化器,设置initializers属性中。
- 找出所有的应用程序监听器,设置到listenters属性中。
- 推断并设置main方法的定义类,找到运行的主类
- 在static中设置index.thml,controller会自动识别此页面。
Controller的参数设置
@RequestHeadler String headler : 获取请求头。
@CookieValue("对应的Cookie名") Cookie cookie : 获取对应的Cookie值。
@RequsetBody String content: 获取表单的所有信息。
矩阵变量(例子:/user/set;对应的矩阵变量1;对应的矩阵变量2;...) : 通过@Matrixvariable("对应的参数名") ,矩阵变量用于处理禁用Cookies的情况,且矩阵变量要绑定在路径变量中。(矩阵变量格式为 "变量名" = "变量值")
如果一个请求中存在多个矩阵变量,且在矩阵变量中存在相同的值,我们就要用pathvar获取指定的值 1。
例子:
/user/1;age=1/2;age=2
第一项矩阵变量为bossId, 第二项为emId。
所以对应的值就要为下:
@RequestMapping("/user/{bossId}/{emId}")
    public void people(@MatrixVariable(value = "age", pathVar = "bossId") Integer bossAge,
                       @MatrixVariable(value = "age", pathVar = "emId") Integer emAge){
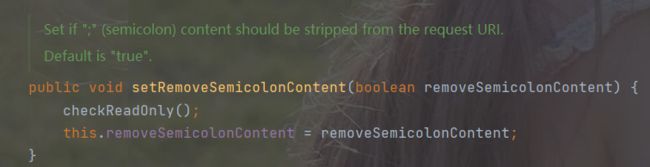
}springBoot默认不开启矩阵参数,所以我们要手动开启。之所以要手动开启是因为在WebMvcAutoConfiguration中的configurePathMatch方法创建了UrlPathHelper类,UrlPathHelper中的removeSemicolonContent属性用于控制是否去除Url中";"后的内容。
其在设置时就为true,所以是默认开启的。
开启矩阵参数方法:
方法一: 通过@Bean 注入urlPathHelper。
@Bean
    public WebMvcConfigurer webMvcConfigurer(){
        return new WebMvcConfigurer(){
            @Override
            public void configurePathMatch(PathMatchConfigurer configurer) {
                UrlPathHelper urlPathHelper = new UrlPathHelper();
                urlPathHelper.setRemoveSemicolonContent(false);
                configurer.setUrlPathHelper(urlPathHelper);
            }
        };
    }
方法二:通过实现WebMvcConfigurer接口,重写configurePathMatch方法。(方法为下)
 public void configurePathMatch(PathMatchConfigurer configurer) {
        UrlPathHelper urlPathHelper = new UrlPathHelper();
//设置为false。将去除";"后的内容去除关闭,这时矩阵变量才能生效
        urlPathHelper.setRemoveSemicolonContent(false);
        configurer.setUrlPathHelper(urlPathHelper);
    }
yaml格式
yaml:用于设置application的格式。(缩进表层级)
server:
  port: 8080
#普通元素
key: k
#对象写法一
obj:
  name: hfw
  age: 18
#对象写法二
obj2: {name: hfw, age: 18}
#数组写法一
arr:
  -cat
  -dog
  -animal
#数组写法二
arr2: [cat, dog, animal]
spring.resources.static-location: [classpath : /对应的文件夹/] 作用:配置静态资源的搜索路径,该对应的文件夹下的所有文件就会成为项目搜索静态资源时的位置,默认是/resources/**。
spring.resources.static-path-pattern=/前缀/** 作用:设置静态资源的访问路径的前缀,更改后在访问静态资源时就要加对应的前缀, 默认为/resouces/**。
在yml文件中""中的转义字符会被解析,而在''中的转义字符不会被解析。
和properties文件相比,properties的文件是使用key=value的写法,而yaml文件使用 key:空格value。
使用注解
此处会爆红,但不影响使用
![]()
如果要解决此爆红 ,那就添加以下依赖
            org.springframework.boot
            spring-boot-configuration-processor
            true
@ConfigurationProperties(prefix = "yaml文件中对应的项"),可以让类读取yaml文件中对应的数据。
如果要用properties文件读取数据的话,就使用@PropertySource(value="classpatch: 对应的properties文件名"),然后通过@value("数据")对类的属性进行赋值。
el表达式在yaml中的用法:可以将一个为存在的属性设置默认值。
dog:
    name: ${person.age}_张三
    age: 4
如果person.age不存在的话,默认值就为_张三,如果存在的话就会先读取person.age然后和_张三拼接。
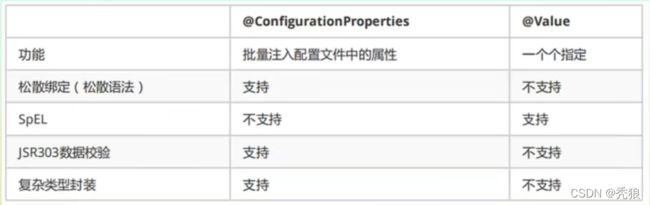
@ConfigurationProperties和@Value的区别
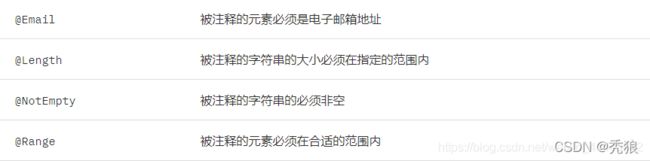
JSR303
@Validated: 数据校验启动器。
使用@Validated的依赖为下:
            javax.validation
            validation-api
            2.0.1.Final
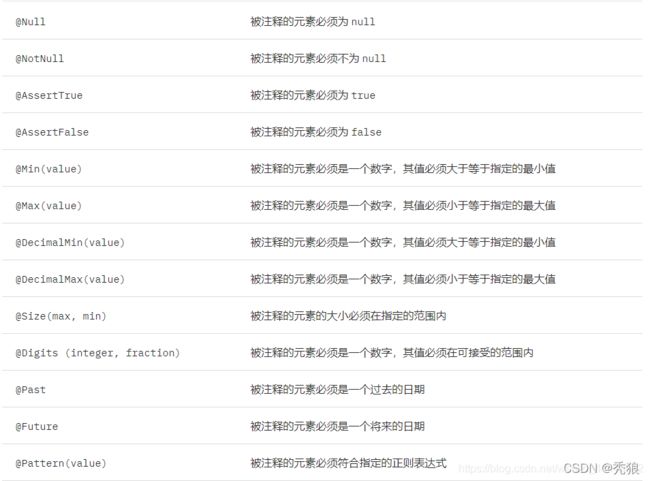
有了Validated我们就可以使用校验注解了,如: @Email(message="对应的错误提示"),括号中的属性为可选项。
JSR303校验对应的注解为下:
多环境配置
一般application的配置文件的命名方法为: application-(对应的数据).properties,为了能够激活其他的配置文件,我们可以在appliation中写:spring.profiles.active=对应的数据。
如果使用yaml的话,那就直接写在application.yaml中,通过'---'分隔。
例子为下:
server:
  port: 8084
spring:
  profiles:
    #    激活方法
    active: use

---
server:
  port: 8085
  profile: test
---
server:
  port: 8088
  profile: use
自动装配的原理
@compont & @Service & @Repository 三者的区别: 在我目前看来就是提高代码的可读性。
在自动装配类(等同于beans.xml)我们可以使用import(来将外部的组件注入ioc容器中),且import注解中的属性为注入组件类的反射。
如果要将外部的ioc容器注入此容器中就要使用@ImportResource注解将ioc容器注入到此容器中。
自动装配的步骤:
- SpringBoot启动回加载大量的自动配置类。
- 我们看我们需要的功能有没有在SpringBoot默认写好的自动装配类当中。
- 我们再来看这个自动装配类中到底配置了哪些组件;(只要我们要用的组件存在其中,我们就不需要再手动配置了)
- 给容器中配置类添加组件的时候,会从properties类中获取某些属性。我们只需要在配置文件中指定这些属性的值即可。
- xxxxAutoConfiguration:自动配置类;给容器中添加组件
- xxxxProperties:封装配置文件中相关的属性;
debug: 如果想要查看自动装配的类是否生效,那我们就可以在application中架入以下代码。
debug: true静态资源导入
在SpringBoot中,我们可以使用以下方式处理静态资源
1.webjar localhost:8080/webjars/
2.public ,static, /**, resources localhost/8080/
访问优先级: resources>static>public
在templates下的资源,只能通过controller访问。
设置页面的小图标:通过在static创建一文件叫favicon.ico,将图片放入其中。
Thymeleaf
其对应的依赖为下:
      org.thymeleaf
      thymeleaf-spring5
      3.0.11.RELEASE
      compile


      org.thymeleaf.extras
      thymeleaf-extras-java8time
      3.0.4.RELEASE
      compile
Thymeleaf名字空间:
xmlns:th="http://www.thymeleaf.org"
xmlns:sec="http://www.thymeleaf.org/extras/spring-security"
xmlns:shiro="http://www.pollix.at/thymeleaf/shiro"
Thymeleaf语法:类似Vue。(将v-替换为th:)

th: fragment="对应片段名": 模板布局
如果要调用此布局时,我们可以通过 th:(insert&replace)="~{对应的模板布局目录/对应的模板布局的页面: :对应的片段名}"
th: fragment的作用:提高代码的复用性,可以创建一个commend文件夹用来存放th: fragment。
页面国际化:
1.我们想要配置i18n文件。
2.我们如果想要在项目中进行按钮自动切换,我们想要自定义一个组件localeResolver。
3.记得将自己写的组件配置到Spring容器中。(@Bean)
例子为下:
public class MyLocalResolver implements LocaleResolver {
    @Override
    public Locale resolveLocale(HttpServletRequest request) {
        String language = request.getParameter("l");
        System.out.println(language);
        Locale Default = Locale.getDefault();
        if(!StringUtils.isEmpty(language)){
            String[] list = language.split("_");
            return new Locale(list[0], list[1]);
        }
        return Default;
    }

    @Override
    public void setLocale(HttpServletRequest request, HttpServletResponse response, Locale locale) {

    }
}
SpringBoot-Config的设置
@Configuration注解的使用:
在次注解中可以配置
proxyBeanMethods属性,其可以设置的值为boolean,单为true时就表示为单例模式(默认值),为false时就不为单例模式。
@ConfigurationProperties注解的使用:
此注解的作用:使得applicatio文件可以配置此类。
此注解的属性: prefix=""表示此applicaion文件中属性的前缀, value=""表示此属性的默认值。
在目录中创建一个Config文件夹。

创建MvcConfig类
用于编写配置信息,此类会被自动装配。
此类可以添加拦截器,视图的控制等一些方法。
例子为下:
public class MyHandlerIntercepter implements HandlerInterceptor {
    @Override
    public boolean preHandle(HttpServletRequest request, HttpServletResponse response, Object handler) throws Exception {
        Object msg = request.getSession().getAttribute("loginUser");
        if(msg == null){
            request.setAttribute("msg", "权限不够,请登录后查看!");
            request.getRequestDispatcher("/index.html").forward(request,response);
            return false;
        }
        return true;
    }
}
@Configuration
public class MyMvcConfig implements WebMvcConfigurer {
    @Override
    public void addViewControllers(ViewControllerRegistry registry) {
        registry.addViewController("/index.html").setViewName("index");
        registry.addViewController("/main.html").setViewName("dashboard");
    }

    @Override
    public void addInterceptors(InterceptorRegistry registry) {
        registry.addInterceptor(new MyHandlerIntercepter()).addPathPatterns("/**").excludePathPatterns("/index.html","main.html", "user/login");
        //MyHandlerIntercepter()为自己定义的拦截器
    }

    @Bean
    public LocaleResolver localeResolver(){
        return new MyLocalResolver();
    }

}
JDBC的整合
如果要获取Conntion的话,我们可以通过在application的配置文件中设置DataSource的数据, 在要使用的类中自动装配DataSource属性。
例子为下:
//使用Conntion的类
@SpringBootTest
class DemoApplicationTests {
    @Autowired
    DataSource dataSource;
    @Test
    void contextLoads() throws SQLException {
        Connection connection = dataSource.getConnection();
        String sql = "select * from user";
        PreparedStatement preparedStatement = connection.prepareStatement(sql);
        ResultSet resultSet = preparedStatement.executeQuery();
        while(resultSet.next()){
            System.out.println(resultSet.getObject("name"));
        }

    }

}
application的DataSource的配置(例子使用yml格式)
spring:
  datasource:
    username: root
    password:
    url:  jdbc:mysql://localhost:3306/mybatis?useUnicode=true&characterEncoding=utf-8&userSSL=true
    hikari:
driver-class-name: com.mysql.cj.jdbc.Driver在SpringBoot中已经写好了JDBC的操作模板jdbcTemplate,我们要使用时就自动装配一个jdbcTemplate的属性,当然在使用前我们要配置DataSource。
例子为下:
@RestController
public class jdbcController {
    @Autowired
    JdbcTemplate jdbcTemplate;
    @RequestMapping("/userList")
    public List> query1(){
        String sql = "select * from user";
        return jdbcTemplate.queryForList(sql);
    }
}
Druid
对应的依赖:
            com.alibaba
            druid
            1.2.8
在application中配置连接池的类型,默认使用hikari,通过以下设置Druid连接池。
type: com.alibaba.druid.pool.DruidDataSourceDruid的filters属性:
- stat: 监控统计。
- log4j: 日志记录。
- wall: 防御sql注入。
如果要使用,可以在application中配置,且要导入相应的依赖。
filters: stat/log4j/welllog4j使用例子:
@Configuration
public class DruidConfig {
    //通过此注释实现DruidConfig和application绑定在一起
    @ConfigurationProperties(prefix = "spring.datasource")
    @Bean
    public DataSource duidDataSource(){
        return new DruidDataSource();
    }
    //后台监控
    @Bean
    public ServletRegistrationBean a(){
        ServletRegistrationBean Bean = new ServletRegistrationBean<>(new StatViewServlet(), "/druid/*");
        //后台需要有人登录,账号密码配置
        HashMap map = new HashMap<>();
        //名字固定
        map.put("loginUsername","admin");
        map.put("loginPassword","123456");
        //表示不可以访问的人
        //map.put("allow", "");
        //map.put("huang","192.168.11.123");
        Bean.setInitParameters(map);
        return Bean;

    }
    //filter
    @Bean
    public FilterRegistrationBean webStatFilter(){
        FilterRegistrationBean bean = new FilterRegistrationBean();
        bean.setFilter(new WebStatFilter());
        //可以过滤那些请求呢?
        HashMap initParams = new HashMap<>();
        //这些东西不进行统计
        initParams.put("exclusions", "*.js,*.js,*.css,/druid/*");
        bean.setInitParameters(initParams);
        return bean;
    }
}
SpringBoot内置了servlet容器,所以没有web.xml,因此我们可以使用替代类:ServletRegistractionBean。
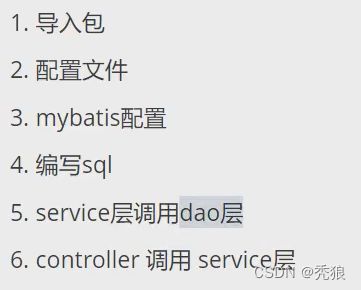
Mybatis整合
对应的依赖:
    org.mybatis.spring.boot
    mybatis-spring-boot-starter
    2.2.0
mybatis的所有配置可以在application中配置。
配置例子:
spring:
  datasource:
    username: root
    password:
    url:  jdbc:mysql://localhost:3306/mybati?useUnicode=true&characterEncoding=utf-8&userSSL=true
    driver-class-name: com.mysql.cj.jdbc.Driver
    type: com.alibaba.druid.pool.DruidDataSource
    #SpringBoot默认是不注入这些的,需要自己绑定
    #druid数据源专有配置
    initialSize: 5
    minIdle: 5
    maxActive: 20
    maxWait: 60000
    timeBetweenEvictionRunsMillis: 60000
    minEvictableIdleTimeMillis: 300000
    validationQuery: SELECT 1 FROM DUAL
    testWhileIdle: true
    testOnBorrow: false
    testOnReturn: false
    poolPreparedStatements: true

    #配置监控统计拦截的filters,stat:监控统计、log4j:日志记录、wall:防御sql注入
    #如果允许报错,java.lang.ClassNotFoundException: org.apache.Log4j.Properity
    #则导入log4j 依赖就行
    filters: stat,wall,log4j
    maxPoolPreparedStatementPerConnectionSize: 20
    useGlobalDataSourceStat: true
    connectionoProperties: druid.stat.mergeSql=true;druid.stat.slowSqlMillis=500
整合例子:
#整合mybtis

mybatis:
  mapper-locations: classpath:Mybatis/Mapper/UserMapper.xml  #引入mapper.xml文件
  type-aliases-package: com.huang.pojo  #实现自动命名
其余步骤与原本一致。
SpringSecurity
授权例子为下:
@EnableWebSecurity
public class SecurityConfig extends WebSecurityConfigurerAdapter {
    //链式编程
    @Override
    protected void configure(HttpSecurity http) throws Exception {
        //授权请求的规则
        http.authorizeRequests().antMatchers("/").permitAll()
                .antMatchers("/level1/**").hasRole("vip1")
                .antMatchers("/level2/**").hasRole("vip2")
                .antMatchers("/level3/**").hasRole("vip3");
    }
}
//没权限就会跳转到登录页面
        //loginPage()表示定制登录页面
        http.formLogin().loginPage("/toLogin");
        //注销,开启注销功能
        //logoutUrl()可以实现注销的位置
        //loginSuceessUrl()注销成功后的位置
        http.logout();
        //开启记住我
        http.rememberMe();
认证:
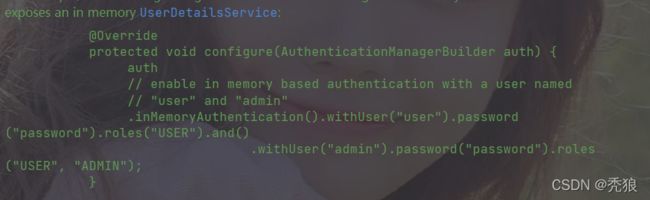
认证也采用链式编程,此方法为在内存中授权,仅适用于少量的用户,如果存在大量的用户的话就使用数据库授权。此方法使用and()间隔来编写多个用户。要配置账号名,命名,身份。
为了安全,SpringSecurity不会进行授权,因为使用明文会被反编译,所以我们要使用加密。
例子为下:
 //认证
    //密码编码: passwordEncoder
    //之所以500是因为密码没有加密,为了防止反编译,所以报500,所以要添加passwordEncoder
    @Override
    protected void configure(AuthenticationManagerBuilder auth) throws Exception {
//        super.configure(auth);
        auth.inMemoryAuthentication().passwordEncoder(new BCryptPasswordEncoder()).withUser("hfw").password(new BCryptPasswordEncoder().encode("123456")).roles("vip1","vip2", "vip3")
                .and().withUser("guest").password(new BCryptPasswordEncoder().encode("123456")).roles("vip1");
    }
这里使用BCPasswordEncoder,SpringSecurity中XXXXPasswordEncoder的类都是SpeingSecurity配好的,可以直接使用,使用encode("对应的明文")
shior
shiro的工作流程:
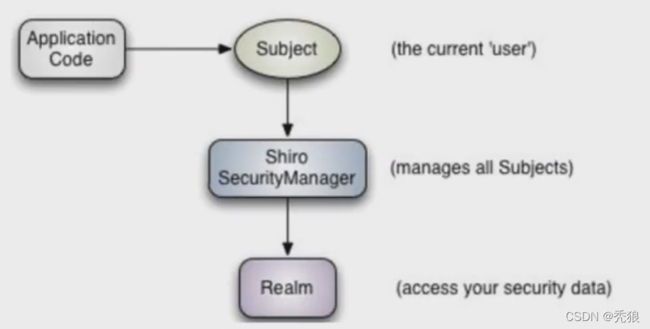
quickstart 源码分析:
public class Quickstart {

    private static final transient Logger log = LoggerFactory.getLogger(Quickstart.class);//对应的格式,可以使用sysout


    public static void main(String[] args) {
    	//这三段为固定代码
        Factory factory = new IniSecurityManagerFactory("classpath:shiro.ini");
        SecurityManager securityManager = factory.getInstance();
        SecurityUtils.setSecurityManager(securityManager);

        //获取当前用户
        Subject currentUser = SecurityUtils.getSubject();
        //获取Subject的session
        Session session = currentUser.getSession();
        //对session赋值
        session.setAttribute("someKey", "aValue");
        //从session中取值
        String value = (String) session.getAttribute("someKey");
        if (value.equals("aValue")) {
            log.info("Retrieved the correct value! [" + value + "]");
        }
        //在没有授权成功时
        if (!currentUser.isAuthenticated()) {
        	//创建一个令牌
            UsernamePasswordToken token = new UsernamePasswordToken("lonestarr", "vespa");//参数为username和password
            //设置记住我
            token.setRememberMe(true);
            try {
                currentUser.login(token);//执行登录操作
            } catch (UnknownAccountException uae) {
            	//用户名不存在
                log.info("There is no user with username of " + token.getPrincipal());
            } catch (IncorrectCredentialsException ice) {
            	//密码错误
                log.info("Password for account " + token.getPrincipal() + " was incorrect!");
            } catch (LockedAccountException lae) {
            	//用户被锁定
                log.info("The account for username " + token.getPrincipal() + " is locked.  " +
                        "Please contact your administrator to unlock it.");
            }
            catch (AuthenticationException ae) {
            	//认证异常
            }
        }
        //currentUser.getPrincipal()获取当前用户的认证
        log.info("User [" + currentUser.getPrincipal() + "] logged in successfully.");

        //当前用户是否存在此身份
        if (currentUser.hasRole("schwartz")) {
            log.info("May the Schwartz be with you!");
        } else {
            log.info("Hello, mere mortal.");
        }

        //是否有什么权限
        //一些简单的权限
        //粗粒度
        if (currentUser.isPermitted("lightsaber:wield")) {
            log.info("You may use a lightsaber ring.  Use it wisely.");
        } else {
            log.info("Sorry, lightsaber rings are for schwartz masters only.");
        }

      //是否有什么权限
      //一些复杂的权限
      //细粒度
        if (currentUser.isPermitted("winnebago:drive:eagle5")) {
            log.info("You are permitted to 'drive' the winnebago with license plate (id) 'eagle5'.  " +
                    "Here are the keys - have fun!");
        } else {
            log.info("Sorry, you aren't allowed to drive the 'eagle5' winnebago!");
        }
        currentUser.logout();

        System.exit(0);
    }
}
shiro整合Spring
对应的依赖为下:
    org.apache.shiro
    shiro-spring
    1.4.0
登录例子为下:
Controller层:
@Controller
public class MyController {
    @RequestMapping("/login")
    public String Login(String loginName,String password, Model model){
        //获取当前用户
        Subject subject = SecurityUtils.getSubject();
        //将数据整合,使用Token
        UsernamePasswordToken usernamePasswordToken = new UsernamePasswordToken(loginName, password);
        //通过Token登录,如果异常就会爆出异常
        //设置记住我
        usernamePasswordToken.setRememberMe(true);
        try {
            subject.login(usernamePasswordToken);
        } catch (AuthenticationException e) {
            e.printStackTrace();
            model.addAttribute("msg", "用户名或密码错误!");
            return "User/login";
        }
        return "index";
    }
    @RequestMapping("/unLogin")
    @ResponseBody
    public String unLogin(){
        return "没有权限登录此页面~";
    }
    @RequestMapping("/logout")
    public String logout(){
        SecurityUtils.getSubject().logout();
        //通过Subject进行注销
        return "redirect:User/login";
    }
}
ShiroConfig:
@Configuration
public class shiroConfig {
    //这里采用从下往上写的方式,表示其依赖的关系
    //这里是使用@Autowired和@Qualifier()的效果一样
    //ShiroFilterFactoryBean
    @Bean
    public ShiroFilterFactoryBean getShiroFilterFactory(@Autowired  DefaultWebSecurityManager defaultWebSecurityManager){
        ShiroFilterFactoryBean shiroFilterFactoryBean = new ShiroFilterFactoryBean();
        //设置安全管理器
        shiroFilterFactoryBean.setSecurityManager(defaultWebSecurityManager);
        //添加shiro的内置过滤器
        /**
         * anon:无需认证就可以访问
         * authc:必须认证了才能访问
         * user:必须拥有记住我才能访问
         * perms:拥有某个资源的权限才能访问
         * role:拥有某个角色的权限才能访问
         */
        //设置初始化参数
        LinkedHashMap filterChainDefinitionMap = new LinkedHashMap<>();
        //perms的格式为: "perms["对应的权限名"]"
        filterChainDefinitionMap.put("/user/add", "perms[user:add]");
        filterChainDefinitionMap.put("/user/update", "perms[user:update]");
        filterChainDefinitionMap.put("/logout", "logout");//表明注销的位置
        shiroFilterFactoryBean.setFilterChainDefinitionMap(filterChainDefinitionMap);
        //设置登录的请求,在没有权限时就会走该请求进行登录
        shiroFilterFactoryBean.setLoginUrl("/toLogin");
        //设置没有相应权限时跳转的错误页面
        shiroFilterFactoryBean.setUnauthorizedUrl("/unLogin");
        return shiroFilterFactoryBean;
    }
    @Bean
    //DefaultWebSecurityManager
    public DefaultWebSecurityManager getWebSecurity(@Qualifier("userRealm") UserRealm userRealm){
        DefaultWebSecurityManager defaultWebSecurityManager = new DefaultWebSecurityManager();
        //设置数据连接
        defaultWebSecurityManager.setRealm(userRealm);
        return defaultWebSecurityManager;
    }
    //创建realm对象,用于编写用户的数据
    @Bean
    public UserRealm userRealm(){
        return new UserRealm();
    }
}
UserRealm:
public class UserRealm extends AuthorizingRealm {
    @Autowired
    userServiceImpl userService;
    @Override
    //授权
    protected AuthorizationInfo doGetAuthorizationInfo(PrincipalCollection principalCollection) {
         //授权类
        SimpleAuthorizationInfo simpleAuthorizationInfo = new SimpleAuthorizationInfo();
        Subject subject = SecurityUtils.getSubject();
        User user = (User) subject.getPrincipal();
        simpleAuthorizationInfo.addStringPermission(user.getPerms());
        return simpleAuthorizationInfo;
    }

    @Override
    //认证
    protected AuthenticationInfo doGetAuthenticationInfo(AuthenticationToken authenticationToken) throws AuthenticationException {
        //这里从数据库中取
        //authenticationToken为登录时创建的Token
        //所以可以通过此Token来和数据库中的用户信息进行比较
        UsernamePasswordToken token = (UsernamePasswordToken) authenticationToken;
        String username = token.getUsername();
        System.out.println(username);
        System.out.println(token.getPassword());
        User user = userService.queryUserByName(username);
        if(user == null){
            return null;
        }
        //此时说明存在用户,我们就将用户数据存放到session中,
        //前端可以通过${session.loginUser}获取用户数据
        Subject Csubject = SecurityUtils.getSubject();
        Session session = Csubject.getSession();
        session.setAttribute("loginUser", user);
      //密码认证由shiro自动完成
        return new SimpleAuthenticationInfo(user,user.getPwd(),"");
        //第一个参数表示传入Subject的数据对象名,第二个表示正确的密码(可以进行加密)
        //加密

    }
}
Shiro整合Thymeleaf
index
注销
登录
Swagger
依赖:
            io.springfox
            springfox-swagger-ui
            2.9.2


            io.springfox
            springfox-swagger2
            2.9.2
如果在启动时报错的话,是因为此版本的boot与swagger的版本发生冲突,这时我们可以降低boot的版本。
swagger配置扫描接口
SwaggerConfig:
@Configuration
@EnableSwagger2
public class SwaggerConfig {
    @Bean
    //groupName("")表示分组的名字
    public Docket docket1(Environment environment){
       return new Docket(DocumentationType.SWAGGER_2).groupName("A");
    }
    @Bean
    //分组例子二
    public Docket docket2(Environment environment){
        return new Docket(DocumentationType.SWAGGER_2).groupName("B");
    }

    @Bean
    //配置Docket的bean实例
    public Docket docket(Environment environment){
        //设置要显示的swagger的环境
        Profiles profiles = Profiles.of("dev");
        //只有当环境为dev的时候才会启动swagger
        //获取项目环境
        //通过environment.accepsProfiles()来判断是否处在自己设定的环境当中
        boolean flag = environment.acceptsProfiles(profiles);
        return new Docket(DocumentationType.SWAGGER_2)
                .apiInfo(apiInfo())
                .groupName("飞武")//设置组的名字,在组中可以存放多个docket文件
                .enable(flag)//表示配置是否要启动swagger
                .select()//检查APi
                .apis(RequestHandlerSelectors.basePackage("com.huang.controller"))
                //basePackage()指定要扫描的包
                // any()扫描全部
                // none()都不扫描
                // withClassAnnotation()扫描类上的注解,且其参数为注解的反射类
                //withMethodAnnotation()扫描方法上的注解,且其参数为注解的反射类
                .paths(PathSelectors.ant(""))//只保留PathSelectors.ant("/huang/**")对应的路径的controller
                .build();//进行创建
    }
    //配置swagger的信息=apiInfo
    private ApiInfo apiInfo(){
        Contact contact = new Contact("飞武", "http://www.4399.com", "[email protected]");
        return new ApiInfo("飞武的swagger日志",
                "一个简单的swagger日志",
                "v1.0",
                "http://www.4399.com",
                contact,
                "Apache 2.0",
                "http://www.apache.org/licenses/LICENSE-2.0",
                new ArrayList());
    }
}
对应的swagger-ui.html的界面为下:
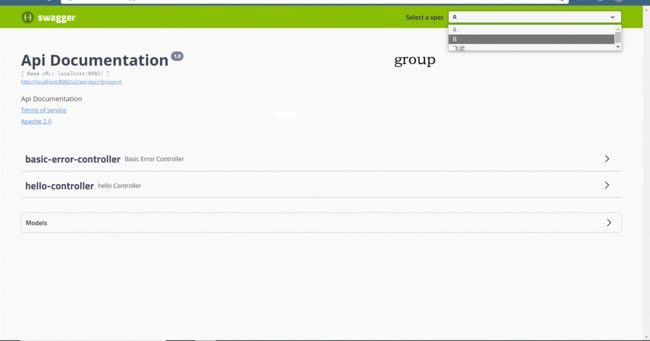
enable()的作用就是:可以控制在生产时使用swagger,在发布时不使用swagger。
在swagger中由model这个项,其实就是pojo类,那swagger是如何扫描的呢?
swagger扫描model的原则为:当Controller层的请求中存在返回值为pojo类的请求时,swagger就会扫描该pojo类。
@API(value="",tags="对应的注释"):给类加注释。
@APIModel("对应的注释"):给生成的类加注释。
@APIModelProperty("对应的注释"):给生成的类的属性加注释。
@APIOperation("对应的注解"):给方法加注解。
异步任务
@Async:为我们开启一个线程池。
要开起线程池的话就需要在入口函数处,添加@EnableAsync,从而实现多线程。
这两个注解用于处理异步任务,提高用户体验。
邮件任务
对应依赖为下:
            org.springframework.boot
            spring-boot-starter-mail
application的配置:
spring:
  mail:
    username: [email protected]
    password: ********
    host: smtp.qq.com
    #开启加密验证
    properties:
      mail.smtl.ssl.enable: true
例子为下:
@SpringBootTest
class Springboot9ApplicationTests {
@Autowired
JavaMailSenderImpl mailSender;
@Test
void contextLoads() {
//用于处理简单的邮件
SimpleMailMessage simpleMailMessage = new SimpleMailMessage();
simpleMailMessage.setSubject("请你查收");
simpleMailMessage.setTo("[email protected]");
simpleMailMessage.setFrom("[email protected]");
simpleMailMessage.setText("警”");
mailSender.send(simpleMailMessage);
}
@Test
void test1() throws MessagingException {
//有于处理复杂的文件
MimeMessage mimeMessage = mailSender.createMimeMessage();
MimeMessageHelper mimeMessageHelper = new MimeMessageHelper(mimeMessage, true);
//正文
mimeMessageHelper.setSubject("黄");
mimeMessageHelper.setText("好好
", true);
//附件
mimeMessageHelper.addAttachment("1.jpg", new File("C:\\Users\\86159\\Desktop\\1.jpg"));
mimeMessageHelper.setTo("[email protected]");
mimeMessageHelper.setFrom("[email protected]");
}
}
定时任务
@EnableScheduling:开启定时功能的注解。
@Scheduled:什么时候执行。
重点:cron表达式。
corn的格式为:秒,分,时,日,月,0-7(星期),"?"表示不确定。
例子为下:
@Service
public class scheduleService {
    //0/5表示每隔五分钟
    @Scheduled(cron = "30 0/5 9 * * ?")
    public void hello(){
        System.out.println("你哈!");
    }

}
且要在入口函数上架@EnableScheduling,引入定时任务。
Dubbo
SpringBoot的源码分析
静态资源的访问以及静态资源配置原理(静态资源的目录为:/static, /public, /resources, /META-INF/resources):
只要静态资源在默认的路径下就可以直接访问对应的文件名。
原理:静态资源的映射为:/**, 在请求进来时先去找Controller看它是否可以处理该请求, 如果不可以处理该请求的话就会交给静态资源处理器,静态资源处理器如果没有找到的话就会返回404。
在WebMvcConfiguration中的配置:
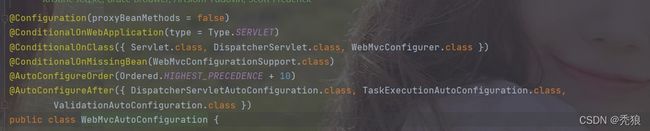
WebMvcConfiguration的方法解析:
@Bean
//在HiddenHttpMethodFilter不存在时就进行注入
	@ConditionalOnMissingBean(HiddenHttpMethodFilter.class)
//在application中的配置前缀为spring.mvc.hiddenmethod.filter默认值为true, 此方法用于接收隐藏域中的请求方式,适用于Rest风格
	@ConditionalOnProperty(prefix = "spring.mvc.hiddenmethod.filter", name = "enabled")
	public OrderedHiddenHttpMethodFilter hiddenHttpMethodFilter() {
		return new OrderedHiddenHttpMethodFilter();
}在其中存在一个内部类为WebMvcAutoConfigurationAdapter,其通过@EnableConfigurationPropertiest对应该容器中注入了 WebMvcProperties, WebProperties。
WebMvcProperties 通过 spring.mvc配置, WebProperties通过spring.web配置。
且此类就只有一个有参构造方法,所以该类在构造时的所需参数会在ioc容器中搜索。
//WebProperties会去获取spring.web绑定的所有的值
//WebMvcProperties会获取spring.mvc绑定的所有的值
//ListableBeanFactory找到对应的ioc容器
//ObjectProvider 找到所有的HttpMessageConverters
//ObjectProvider  找到所有的自定义资源处理器
//ObjectProvider 找到所有的DispatchServlet的路径
//ObjectProvider> 找到所有的给应用注册的Servlet, Filter...
public WebMvcAutoConfigurationAdapter(WebProperties webProperties, WebMvcProperties mvcProperties,
				ListableBeanFactory beanFactory, ObjectProvider messageConvertersProvider,
				ObjectProvider resourceHandlerRegistrationCustomizerProvider,
				ObjectProvider dispatcherServletPath,
				ObjectProvider> servletRegistrations) {
			this.resourceProperties = webProperties.getResources();
			this.mvcProperties = mvcProperties;
			this.beanFactory = beanFactory;
			this.messageConvertersProvider = messageConvertersProvider;
			this.resourceHandlerRegistrationCustomizer = resourceHandlerRegistrationCustomizerProvider.getIfAvailable();
			this.dispatcherServletPath = dispatcherServletPath;
			this.servletRegistrations = servletRegistrations;
			this.mvcProperties.checkConfiguration();
		}
添加资源处理器:
public void addResourceHandlers(ResourceHandlerRegistry registry) {
//在application 中获取spring.resources.add-mappings的值
			if (!this.resourceProperties.isAddMappings()) {
//作用所有的静态资源的访问配置,那么就会无法访问到静态资源
				logger.debug("Default resource handling disabled");
				return;
			}
//对应的类路径为classpath:/META-INF/resources/webjars/
			addResourceHandler(registry, "/webjars/**", "classpath:/META-INF/resources/webjars/");
//对应的类路径为"classpath:/resources/", "classpath:/static/", "classpath:/public/"(默认值)
			addResourceHandler(registry, this.mvcProperties.getStaticPathPattern(), (registration) -> {

//添加默认的类路径
registration.addResourceLocations(this.resourceProperties.getStaticLocations());
				if (this.servletContext != null) {
					ServletContextResource resource = new ServletContextResource(this.servletContext, SERVLET_LOCATION);
					registration.addResourceLocations(resource);
				}
			});
		}
private void addResourceHandler(ResourceHandlerRegistry registry, String pattern, String... locations) {
addResourceHandler(registry, pattern, (registration) -> registration.addResourceLocations(locations));
//添加location路径
}private void addResourceHandler(ResourceHandlerRegistry registry, String pattern,
Consumer customizer) {
//如果该路径的映射已经存在就结束
if (registry.hasMappingForPattern(pattern)) {
return;
}
//在注册表中添加一个新的对应路径的处理器
ResourceHandlerRegistration registration = registry.addResourceHandler(pattern);
customizer.accept(registration);
//添加缓存周期
registration.setCachePeriod(getSeconds(this.resourceProperties.getCache().getPeriod()));
//添加缓存控制
registration.setCacheControl(this.resourceProperties.getCache().getCachecontrol().toHttpCacheControl());
//设置最后的修改日期
registration.setUseLastModified(this.resourceProperties.getCache().isUseLastModified());
customizeResourceHandlerRegistration(registration);
} 此方法作用就是在ioc容器中添加一个以application中设置的静态资源的路径 的处理器。
欢迎页的处理规则:
@Bean
		public WelcomePageHandlerMapping welcomePageHandlerMapping(ApplicationContext applicationContext,
				FormattingConversionService mvcConversionService, ResourceUrlProvider mvcResourceUrlProvider) {
			WelcomePageHandlerMapping welcomePageHandlerMapping = new WelcomePageHandlerMapping(
					new TemplateAvailabilityProviders(applicationContext), applicationContext, getWelcomePage(),
					this.mvcProperties.getStaticPathPattern());
			welcomePageHandlerMapping.setInterceptors(getInterceptors(mvcConversionService, mvcResourceUrlProvider));
			welcomePageHandlerMapping.setCorsConfigurations(getCorsConfigurations());
			return welcomePageHandlerMapping;
		}
WelcomePageHandlerMapping类中:
WelcomePageHandlerMapping(TemplateAvailabilityProviders templateAvailabilityProviders,
			ApplicationContext applicationContext, Resource welcomePage, String staticPathPattern) {
		if (welcomePage != null && "/**".equals(staticPathPattern)) {
			logger.info("Adding welcome page: " + welcomePage);
			setRootViewName("forward:index.html");
		}
		else if (welcomeTemplateExists(templateAvailabilityProviders, applicationContext)) {
			logger.info("Adding welcome page template: index");
			setRootViewName("index");
		}
	}
因为存在该判断语句,因此配置了静态类的访问前缀就会影响index页面的访问,所以要适用欢迎页页面的话,访问静态资源的路径前缀就必须为/**。
在springBoot启动时会去加载三百多种自动装配类,当然不会真正的全部都加在到项目中,其会先通过自动装配类中所需的类在项目中查找,如果存在某个特定的类就会将该自动装配类加到项目中,这里使用的进行筛选使用的注解为 @ConditionOnClass(存在某个或多个类时就加载), @ConditionOnMissingBean(不存在某个或多个类时就加载 @ConditionalOnSigleCandidate(有且只有存在一个或多个类时就加载)。
当一个自动装配类只存在有参构造器时其在构造时会自动在ioc容器中搜索所有相应的参数。
Rest映射
在提交的表单中只能以Get或Post的方式进行提交,而有时我们需要使用其他的请求方式,这时我们就要使用表单中的隐藏域,这里使用_method。(基于表单使用Rest的方式)
因为在WebMvcAutoConfiguration中存在:
//表单提交的隐藏域值的类
@Bean
	@ConditionalOnMissingBean(HiddenHttpMethodFilter.class)
	@ConditionalOnProperty(prefix = "spring.mvc.hiddenmethod.filter", name = "enabled")
	public OrderedHiddenHttpMethodFilter hiddenHttpMethodFilter() {
		return new OrderedHiddenHttpMethodFilter();
	}
且在默认时spring.mvc.hiddenmethod.filter.enabled = false,所以我们需要在application中开启隐藏域方法。
在OrderedHiddenHttpMethodFilter中继承的父类HiddenHttpMethodFilter中的属性规定为下:
 private static final List ALLOWED_METHODS;
    public static final String DEFAULT_METHOD_PARAM = "_method";
    private String methodParam = "_method";
其隐藏的参数项为_method,所以我们可以为隐藏参数项中请求方式进行赋值,这样我们的前端发来的请求方式就可以为所有种类(以隐藏于中的请求方式为后端最终的请求方式)。
表单提交后就会被OrderedFormContentFilter拦截,执行doFilterInternal方法进行过滤拦截。
protected void doFilterInternal(HttpServletRequest request, HttpServletResponse response, FilterChain filterChain) throws ServletException, IOException {
        HttpServletRequest requestToUse = request;//获取请求的信息
        if ("POST".equals(request.getMethod()) && request.getAttribute("javax.servlet.error.exception") == null) {
//当请求的方式为Post或者请求没有异常时
            String paramValue = request.getParameter(this.methodParam);//获取隐藏域_method中的值
            if (StringUtils.hasLength(paramValue)) {
//存在时就将请求方式转换为大写
                String method = paramValue.toUpperCase(Locale.ENGLISH);
                if (ALLOWED_METHODS.contains(method)) {
//判断_method中的请求方式是否符合请求
//使得resquest中的method更改为_method中的值
//HttpMethodRequestWrapper重写了getMethod方法会返回新的请求方式
                    requestToUse = new HiddenHttpMethodFilter.HttpMethodRequestWrapper(request, method);
                }
            }
        }
//过滤器链放行的时候使用Wapper,且以后调用的getMethod方法本质就是调用RequestWrapper重写后的getMethod方法
 filterChain.doFilter((ServletRequest)requestToUse, response);
    }
给隐藏域中的_method更改名字,由@ConditionalOnMissingBean(HiddenHttpMethodFilter.class)可知当我们自己手动注入HiddenHttpMethodFilter时,此自动注入就不会执行,所以我们可以自己创建HiddenHttpMethodFilter,为其自定义名字。
请求查找工作原理:
在DispatchServelet中继承的FrameworkServlet重写了doGet和doPost方法,且在这两个方法中都调用了processRequest方法,在processRequest中调用了doService方法,在doSerivce中大量的代码是为request设置Attribute,其中doDispatch为核心方法。
在doDispatch中:
//用于判断处理请求对应的Handler(Controller)
mappedHandler = getHandler(processedRequest);
if (mappedHandler == null) {
noHandlerFound(processedRequest, response);
return;
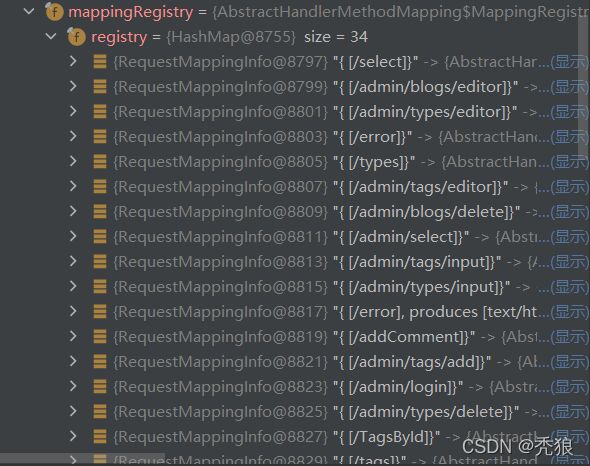
}通过deBug到getHandler方法,得到下面结果:

找到5个HandlerMapping(处理器映射),RequestMapping就是我们定义的Controller。
下图为自定义的resultMapping:
接下来通过循环查找可以处理此请求的handlerMapper。
假设找到对应路径的handlerMapping以后,我们还需要考虑请求的方式, 此就通过AbstractHandlerMethodMapping 中 的 lookupHandlerMethod 方法进行查找。
在lookupHandlerMethod方法中:
List directPathMatches = this.mappingRegistry.getMappingsByDirectPath(lookupPath);
//找到所有符合处理路径的handlerMapping,且储存于matchs中
		if (directPathMatches != null) {
			addMatchingMappings(directPathMatches, matches, request);
		}
addMatchMappings方法:
private void addMatchingMappings(Collection mappings, List matches, HttpServletRequest request) {
		for (T mapping : mappings) {
			T match = getMatchingMapping(mapping, request);//找到符合请求方式的,mapping
			if (match != null) {
				matches.add(new Match(match, this.mappingRegistry.getRegistrations().get(mapping)));
			}
		}
	}
找到适配器后就执行目标方法:

此方法需要Request, Response, 对应的处理器。
在RequestMappingHandlerAdapter类中通过:

两个判断来处理对应的参数值和返回值。
真正执行目标方法的方法在ServletInvocableHandlerMethod类中:
![]()
public Object invokeForRequest(NativeWebRequest request, @Nullable ModelAndViewContainer mavContainer,
			Object... providedArgs) throws Exception {
//获取方法参数的所有值
		Object[] args = getMethodArgumentValues(request, mavContainer, providedArgs);
		if (logger.isTraceEnabled()) {
			logger.trace("Arguments: " + Arrays.toString(args));
		}
		return doInvoke(args);
	}
通过getMethodArgumentValues方法来确定方法参数所有的值。
protected Object[] getMethodArgumentValues(NativeWebRequest request, @Nullable ModelAndViewContainer mavContainer,
			Object... providedArgs) throws Exception {
        //先获取方法上的所有参数的详细信息
		MethodParameter[] parameters = getMethodParameters();
		if (ObjectUtils.isEmpty(parameters)) {
			return EMPTY_ARGS;
		}

		Object[] args = new Object[parameters.length];
		for (int i = 0; i < parameters.length; i++) {
			MethodParameter parameter = parameters[i];
			parameter.initParameterNameDiscovery(this.parameterNameDiscoverer);
			args[i] = findProvidedArgument(parameter, providedArgs);
			if (args[i] != null) {
				continue;
			}
//判断当前解析器是否支持当前的参数类型(通过for循环挨个判断可以处理该参数的处理器)
			if (!this.resolvers.supportsParameter(parameter)) {
				throw new IllegalStateException(formatArgumentError(parameter, "No suitable resolver"));
			}
			try {
//核心
				args[i] = this.resolvers.resolveArgument(parameter, mavContainer, request, this.dataBinderFactory);
			}
			catch (Exception ex) {
				// Leave stack trace for later, exception may actually be resolved and handled...
				if (logger.isDebugEnabled()) {
					String exMsg = ex.getMessage();
					if (exMsg != null && !exMsg.contains(parameter.getExecutable().toGenericString())) {
						logger.debug(formatArgumentError(parameter, exMsg));
					}
				}
				throw ex;
			}
		}
		return args;
	}
在resolveArgument方法中:

最终执行resolveArgument方法。
Controller层中方法中的方法参数Map,Model解析
如果返回是以转发的形式那本质都是给Request传入对应的数据。
Map会找到MapMethodProcessor,ModelMethodProcessor,且两者最终都会调用ModelAndViewContainer类的getModel方法。
getModel会返回 defaultModel:
![]()
在目标方法执行完以后就会将所有的数据全部放入到ModelAndViewContainer容器中,此容器中包含要去的页面地址和Model数据。
自定义参数绑定原理
例子:将前端提交的数据封装成一个类传给后端。
处理自定义参数的解析器是ServletModelAttributeMethodProcessor。
其方法resolveArgument中:

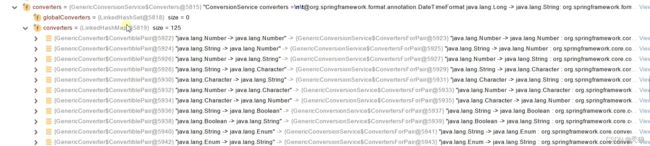
创建一个web数据绑定器,然后通过通过查找converters中可以进行对应类型转换的converter,最终完成对应的自定义参数绑定。(对应的converters为下)
 如果需要自定义参数绑定的话,就在WebMvcConfigurer的实现类中重写addFormatters方法
@Override
    public void addFormatters(FormatterRegistry registry) {
        registry.addConverter(new Converter() {
            @Override
            public User convert(String source) {
                //ostkaka, 18
                if(StringUtils.isEmpty(source)){
                    User user = new User();
                    String[] data = source.split(",");
                    user.setName(data[0]);
                    user.setAge(data[1]);
                    return user;
                }
            }
        });
    }
ReturnValueHandlery原理
如果Debug找到处理返回数据的全部解析器。
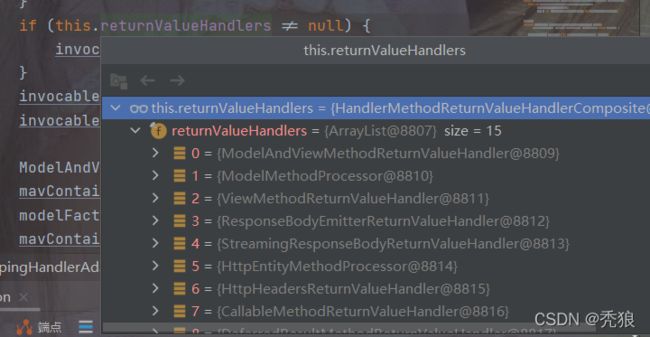
为了存在对应的可以进行处理的解析器,我们会通过循环进行判断查找对应的解析器。
解析器可以处理的数据类型为下:
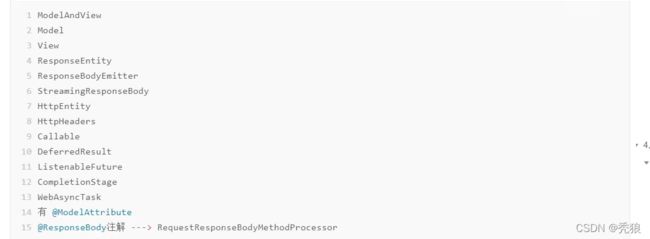
我们常用的在Controller中将数据转换为Json的原理就是通过 RequestResponseBodyMethodProcessor类中handleReturnValue方法完成的。
核心步骤为下:
![]()