先吐槽一下,现在的Bean Searcher操作手册的指引弱的可怜…
对我这样的小白及其不友好
话不多说直入主题
1、首先肯定是得引入依赖
            com.ejlchina
            bean-searcher-boot-starter
            ${searcher.version}
2、再配置一下设置
bean-searcher:
  params:
    pagination:
      start: 1
其他的依赖、数据源啥的比较常用这里就不展出
3、然后就是创建实体类
由于我为了快速就用了之前使用MyBatis做持久化的一个项目,所以会有Mapper啥的,不过看官方文档和Demo上的例子,好像也没用到所以应该没影响
!!!为了直观我直接Copy源代码上来,可以先跳过这个源码直接看重点介绍
package com.so2.core.model.entity;
import com.baomidou.mybatisplus.annotation.*;
import java.io.Serializable;
import java.util.Date;
import com.ejlchina.searcher.bean.BeanAware;
import com.ejlchina.searcher.bean.DbField;
import com.ejlchina.searcher.bean.SearchBean;
import lombok.Data;
/**
 1. 用户表
 2. @author Lynn
 3. @TableName user
 */
@TableName(value ="user")
@Data
@SearchBean( tables = "user")
public class User implements Serializable, BeanAware {
    /**
     *
     */
    @TableId(type = IdType.AUTO)
    @DbField("id")
    private Integer id;
    /**
     * 用户名
     */
    @DbField("name")
    private String name;
    /**
     * 用户 id
     */
    @DbField("userId")
    private Integer userid;
    /**
     * 用户邮箱
     */
    @DbField("email")
    private String email;
    /**
     * 用户密码
     */
    @DbField("password")
    private String password;
    /**
     * 用户是否被封禁, 0-未封禁,1-已封禁
     */
    @DbField
    private Byte delflag;
    /**
     * 用户权限, 0-游客, 1-普通用户, 2-会员用户, 3-管理员
     */
    @DbField("role")
    private Byte role;
    /**
     * 注册日期
     */
    @DbField("registerTime")
    private Date registertime;
    @Override
    public boolean equals(Object that) {
        if (this == that) {
            return true;
        }
        if (that == null) {
            return false;
        }
        if (getClass() != that.getClass()) {
            return false;
        }
        User other = (User) that;
        return (this.getId() == null ? other.getId() == null : this.getId().equals(other.getId()))
            && (this.getName() == null ? other.getName() == null : this.getName().equals(other.getName()))
            && (this.getUserid() == null ? other.getUserid() == null : this.getUserid().equals(other.getUserid()))
            && (this.getEmail() == null ? other.getEmail() == null : this.getEmail().equals(other.getEmail()))
            && (this.getPassword() == null ? other.getPassword() == null : this.getPassword().equals(other.getPassword()))
            && (this.getDelflag() == null ? other.getDelflag() == null : this.getDelflag().equals(other.getDelflag()))
            && (this.getRole() == null ? other.getRole() == null : this.getRole().equals(other.getRole()))
            && (this.getRegistertime() == null ? other.getRegistertime() == null : this.getRegistertime().equals(other.getRegistertime()));
    }
    @Override
    public int hashCode() {
        final int prime = 31;
        int result = 1;
        result = prime * result + ((getId() == null) ? 0 : getId().hashCode());
        result = prime * result + ((getName() == null) ? 0 : getName().hashCode());
        result = prime * result + ((getUserid() == null) ? 0 : getUserid().hashCode());
        result = prime * result + ((getEmail() == null) ? 0 : getEmail().hashCode());
        result = prime * result + ((getPassword() == null) ? 0 : getPassword().hashCode());
        result = prime * result + ((getDelflag() == null) ? 0 : getDelflag().hashCode());
        result = prime * result + ((getRole() == null) ? 0 : getRole().hashCode());
        result = prime * result + ((getRegistertime() == null) ? 0 : getRegistertime().hashCode());
        return result;
    }
    @Override
    public String toString() {
        StringBuilder sb = new StringBuilder();
        sb.append(getClass().getSimpleName());
        sb.append(" [");
        sb.append("Hash = ").append(hashCode());
        sb.append(", id=").append(id);
        sb.append(", name=").append(name);
        sb.append(", userid=").append(userid);
        sb.append(", email=").append(email);
        sb.append(", password=").append(password);
        sb.append(", delflag=").append(delflag);
        sb.append(", role=").append(role);
        sb.append(", registertime=").append(registertime);
        sb.append("]");
        return sb.toString();
    }
    @Override
    public void afterAssembly() {
        System.out.println("--------使用了afterAssembly方法----------");
    }
}
创建实体类需要注意几点
- 类,要在类名加上 @SearchBean( tables = “定义表名”) 注解,而且必须加上表名,我之前不加表名会报错,而且加上表名在进行多表查询时才能复用
- 实现接口,必须要实现 BeanAware或者ParamAware接口,重写的方法可以不做任何改动。
- 字段,必须要在需要得到响应的字段或查询的字段上加上**@DbField(“自定义字段名”)** 注解,而且必须指定字段名,且加上注解的字段必须 大于0 | 大于被查询数
- get set,加上LomBok的 @Data 注解,或使用idea的快速生成
4、最后就是编写Controller层
先粘上源码
同上,也可先跳过源码直接看注意事项
package com.so2.core.controller;
import com.baomidou.mybatisplus.core.conditions.Wrapper;
import com.baomidou.mybatisplus.core.conditions.query.QueryWrapper;
import com.ejlchina.searcher.MapSearcher;
import com.ejlchina.searcher.SearchResult;
import com.ejlchina.searcher.Searcher;
import com.ejlchina.searcher.util.MapUtils;
import com.github.xiaoymin.knife4j.annotations.ApiSupport;
import com.so2.core.service.impl.UserServiceImpl;
import com.so2.core.model.entity.User;
import com.so2.core.base.BaseResponse;
import com.so2.core.base.ResultUtils;
import io.swagger.annotations.Api;
import io.swagger.annotations.ApiImplicitParam;
import io.swagger.annotations.ApiOperation;
import org.apache.catalina.util.RequestUtil;
import org.apache.ibatis.util.MapUtil;
import org.springframework.beans.factory.annotation.Autowired;
import org.springframework.web.bind.annotation.GetMapping;
import org.springframework.web.bind.annotation.RequestMapping;
import org.springframework.web.bind.annotation.ResponseBody;
import org.springframework.web.bind.annotation.RestController;
import javax.annotation.Resource;
import javax.servlet.http.HttpServletRequest;
import java.util.ArrayList;
import java.util.HashMap;
import java.util.List;
import java.util.Map;
/**
* 描述:测试类
*
* @author: Lynn
* @date: 2021/12/3
*/
@Api(tags = "测试接口类")
@ApiSupport(author = "Lynn", order = 07)
@RestController
@RequestMapping("/test")
public class HealthController {
//MyBatis
@Resource
private UserServiceImpl user;
//注入MapSearcher
@Autowired
private MapSearcher mapSearcher;
// 先使用MyBatis方法做个对照组
// 提示:BaseResponse是我写的响应类,而ResultUtils是返回工具类,返回的结果包含了响应码、响应数据、控制台提示
// 千万别加这个,一旦加了就会报空指针异常
// @ApiImplicitParam(name = "userName", value = "用户账号名", required = true)
@ApiOperation(value = "通过用户账号名获取信息")
@GetMapping("/getN")
@ResponseBody
public BaseResponse> testGetUser(String userName){
QueryWrapper qw = new QueryWrapper<>();
qw.like("name", userName);
return ResultUtils.success(user.list(qw), "查找成功");
}
// 这个方法比较多变,官方文档也有说明
@ApiOperation(value = "通过新的Searcher方法来进行便捷查找")
@ResponseBody
@GetMapping("/searcherGet")
public Object getForSearcher(HttpServletRequest request){
// 可以在builder()后使用其他方法进行数据筛选
return mapSearcher.search(User.class,
MapUtils.builder()
.build());
}
// 这个方法可以传入值进行动态查找
@ApiOperation(value = "使用Searcher “动态“ 查找字段")
@ResponseBody
@GetMapping("/searcherGetName")
public BaseResponse
Controller层编写的注意事项
- 需要先注入MapSearcher或BeanSearcher(官方文档那个提示构建构造器的步骤坑死我了,还以为要写一个单例Bean来进行配置)
- 看源码注释,哈哈
- (dog这个源码比较粗糙,看的出来我并没有对一些可能出现的异常、情况进行捕获。
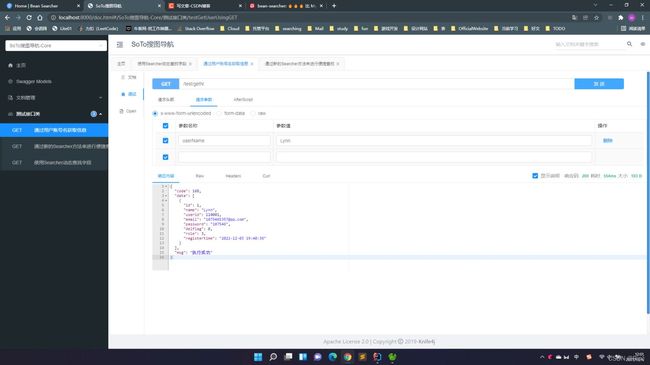
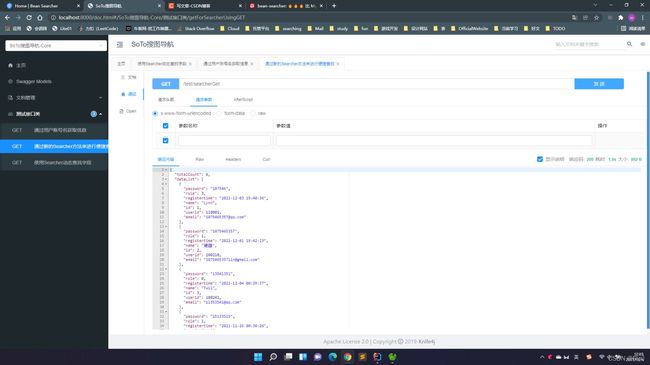
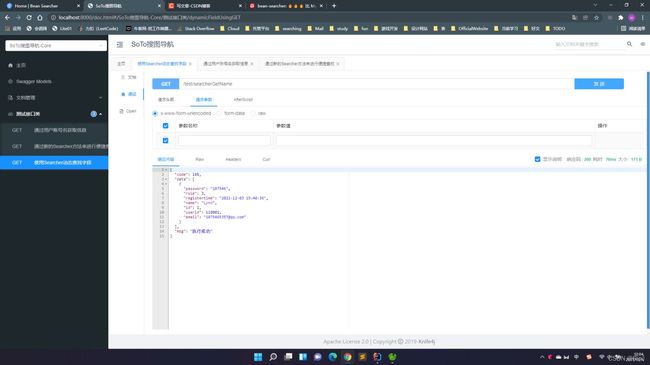
看看我查询返回的数据
MyBatis查询
Bean Searcher查询
返回加了字段名字段的所有信息
查找字段名为name且值为Lynn的加了字段名字段的信息
结语
最后要说一句,现在网上的文章很多都是抄来抄去的,有互相抄的也有直接搬官方文档的,所以大家在学一样东西之前如果有官方文档和官方示例一定要先去看,别问我为什么懂这个道理的…
最后附上Bean Searcher官方文档地址和示例的gitee仓库
官方文档地址: https://searcher.ejlchina.com/
官方Gitee仓库地址:[email protected]:ejlchina-zhxu/bean-searcher.git
到此这篇关于Bean Searcher配合SpringBoot的使用的文章就介绍到这了,更多相关Bean Searcher配合SpringBoot使用内容请搜索脚本之家以前的文章或继续浏览下面的相关文章希望大家以后多多支持脚本之家!


