springcloud微服务学习笔记
此篇内容较长。
目录
一、关于微服务
二、微服务工程的构建
1、新建maven父工程
2、新建公共模块
3、新建微服务提供者8001
4、新建微服务消费者80
三、服务和发现注册中心(Eureka)
1、新建Eureka分布式服务注册中心7001和7002
2、改进服务提供者8001
3、启用Discovery服务发现组件
四、Ribbon负载均衡
1、Ribbon负载均衡的使用
2、Ribbon规则算法:
3、Ribbon自定义规则算法:
五、Fegin负载均衡
六、服务熔断和服务降级Hystrix
1、服务熔断
2、服务降级
3、DashBoard服务监控
七、zuul网关服务
1、新建microservice-cloud-zuul-9000模块
2、pom文件
3、application.properties文件
4、启动类
5、测试
6、改进不对外暴露微服务的名称
八、config配置中心
1、配置中心服务端
a、github建立配置仓库
b、新增config配置微服务3344
2、改进Eureka注册微服务7003、服务提供者8004和服务消费者82
一、关于微服务
当单体应用越来越大的时候,一个小的改动就要重新编译打包部署(空间和时间都会增大),在这个过程中,服务是完全不能对外提供任何服务的,而微服务仅更新需要更新的服务,对其他服务的访问是不会受影响的。
这时我们要将单体应用按业务进行拆分,这就是微服务,同是微服务可以部署在不同的服务器中,同一个微服务可以复制N份,这就是分布式,因此微服务是分布式的基础。
两个微服务之间进行通信,一般有两种协议,HTTP协议和RPC协议,HTTP协议是长链接的,网络消耗上比RPC要多,不过HTTP是无状态的,不同的微服务可以采用不同的开发语言,只要对外提供的是REST风格就能进行相互通信。
springcloud基于HTTP协议,而dubbo基于RPC协议。
springcloud的基础是springboot,因此每一个微服务都可以看成是一个微小的单体应用。
将应用拆分成单体应用后,构成微服务提供者和微服务消费者,然后使用框架中的辅助性功能,服务和发现注册中心、负载均衡、断路器、网关、配置中心。
二、微服务工程的构建
1、新建maven父工程
pom文件
    4.0.0

    pom


        org.springframework.boot
        spring-boot-starter-parent
        2.3.4.RELEASE


    icu.woodlum.cn
    microservice-cloud
    0.0.1-SNAPSHOT
    microservice-cloud
    父工程


        1.8


            org.springframework.boot
            spring-boot-devtools
            runtime
            true
2、新建公共模块
公共模块,在其他微服务工程中通用的模块,如实体类、工具类、通用服务接口等可以提取出来的都可以放到公共模块,注意新建的是Module子模块
pom文件
        microservice-cloud
        icu.woodlum.cn
        0.0.1-SNAPSHOT

    4.0.0

    microservice-cloud-api


            com.fasterxml.jackson.core
            jackson-annotations
            2.11.0


            com.google.code.gson
            gson
            2.8.6


            org.projectlombok
            lombok
            true
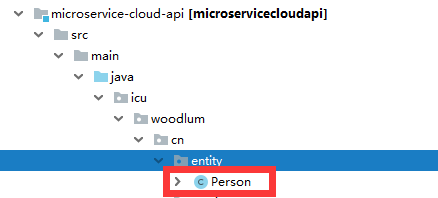
在公共模块下新建实体类Person
@Data
@Accessors(chain = true)  //实体类可以链式调用
@NoArgsConstructor   //无参构造
@AllArgsConstructor //全参构造
public class Person implements Serializable {
    private int id;
    private String name;
    private int age;
    @JsonIgnore  //密码序列化被忽略
    private String password;
    //增加一个构造
    public Person(String name, int age) {
        this.name = name;
        this.age = age;
    }
}
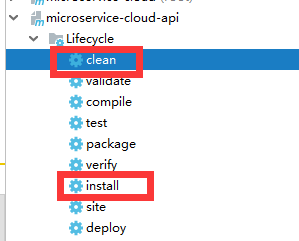
发布此公共模块,clean------install,当看到成功后
然后观察父工程的pom文件,会多出一个modules节点,同样,以后每建立一个微服务,其微服务的artifactId名称都会出现在父工程的modules节点中。
microservice-cloud-api
3、新建微服务提供者8001
pom文件
        microservice-cloud
        icu.woodlum.cn
        0.0.1-SNAPSHOT

    4.0.0
    Eurika提供者8001

    microservice-cloud-provider-8001


            icu.woodlum.cn
            microservice-cloud-api
            0.0.1-SNAPSHOT
            compile


            org.springframework.boot
            spring-boot-starter-jdbc


            org.springframework.boot
            spring-boot-starter-web


            com.baomidou
            mybatis-plus-boot-starter
            3.3.2


            mysql
            mysql-connector-java
            runtime
application.properties文件
#服务提供商品
server.port=8001

#数据库连接配置
spring.datasource.username=root
spring.datasource.password=XXXX
spring.datasource.url=jdbc:mysql://localhost:3306/test
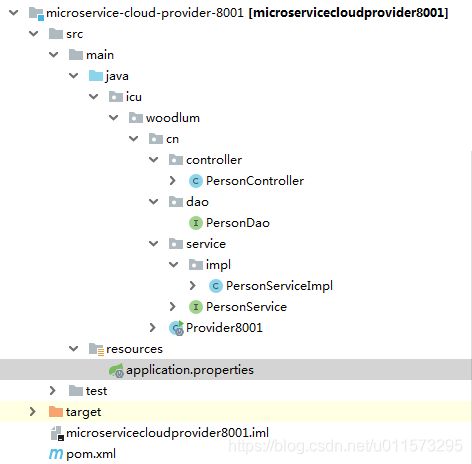
当前项目结构,数据库框架采用的是Mybatis-Plus,配置好了直接采用代码化的sql拼接
PersonController类
@RestController
@RequestMapping("/user")
public class PersonController {
    @Autowired
    private PersonService personService;
    @GetMapping("/list")
    public List list() {
        return personService.getList();
    }
    @GetMapping("/{id}")
    public Person getById(@PathVariable int id){
        return personService.getPersonById(id);
    }
    @GetMapping("/{name}/{age}")
    public int insert(@PathVariable String name,@PathVariable String age){
        return personService.insert(name,age);
    }
}
4、新建微服务消费者80
pom文件
        microservice-cloud
        icu.woodlum.cn
        0.0.1-SNAPSHOT

    4.0.0
    microservice-cloud-consummer


            org.springframework.boot
            spring-boot-starter-web


            icu.woodlum.cn
            microservice-cloud-api
            0.0.1-SNAPSHOT
application.properties
#设置端口
server.port=80
当前项目结构
配置RestTemplate----------MyConfig.class
@Configuration
public class MyConfig {
    @Bean
    public RestTemplate getRestTemplate(){
        return new RestTemplate();
    }
}
ConsummerController控制类,通过restTemplate.getForObject方法,远程调用8001端口服务中的控制器方法。
@RestController
public class ConsummerController {
    //设置RestTemplate调用地址前缀
    private static final String REST_URL_PRE = "http://127.0.0.1:8001";
    private RestTemplate restTemplate;
    public ConsummerController(RestTemplate restTemplate) {
        this.restTemplate = restTemplate;
    }
    @GetMapping("/list")
    public List list() {
        return restTemplate.getForObject(REST_URL_PRE + "/user/list", List.class);
    }
    @GetMapping("/{id}")
    public Person getById(@PathVariable int id){
        return restTemplate.getForObject(REST_URL_PRE + "/user/{id}",
                Person.class,id);
    }
    @GetMapping("/add/{name}/{age}")
    public int insert(@PathVariable("name") String name,@PathVariable("age") String age){
        Person person = new Person(name, Integer.parseInt(age));
        return restTemplate.getForObject(REST_URL_PRE + "/user/{name}/{age}",
                Integer.class,person.getName(),person.getAge());
    }
}
依次启动提供者和消费者服务
测试成功
三、服务和发现注册中心(Eureka)
通过上面的两个微服务(提供者和消费者)可以发现,消费者通过IP:端口来调用消费者的控制器,耦合性太强,如果提供者的IP或端口发生变化,又或分布式提供多个提供者,这时直接调用IP前缀的方法就不可用,因此我们需要一个中间服务器,通过中间服务器来配置,消费者就不需要关心提供者的具体位置信息,通过提供者的名称自动获取所在的服务器位置,然后来进行调用。
这个就像互联网中的域名解析服务器,比如百度网站,其服务器可能是多个,而且在不同的位置就会有多个IP,但是我们访问的时候并不需要关心,我们只需要在浏览器地址栏中输入www.baidu.com即可,浏览器会访问IP解析服务器,从中选择一个最优的服务器进行访问,服务和发现注册中心就相当于这个IP域名解析服务器,根据微服务名称和规则来合理选择在服务中心注册的微服务。
Eureka现在划归于netflix项目下了,从其maven坐标可以看出,之前的在mvn网站上已经标记为过时。
1、新建Eureka分布式服务注册中心7001和7002
![]()
pom文件
        microservice-cloud
        icu.woodlum.cn
        0.0.1-SNAPSHOT

    4.0.0
    Eurika服务器

    microservice-cloud-eurika-7001


            org.springframework.cloud
            spring-cloud-starter-netflix-eureka-server
            2.2.6.RELEASE
application.properties文件,7002服务中心同理
为了本地测试多服务注册中心,我们需要在Hosts文件中添加:
127.0.0.1 www.woodlum7001.icu
127.0.0.1 www.woodlum7002.icu
server.port=7001
#server.port=7002

#注册中心主机名
eureka.instance.hostname=www.woodlum7001.icu
#eureka.instance.hostname=www.woodlum7002.icu

#不注册自身
eureka.client.register-with-eureka=false
#不检索自身
eureka.client.fetch-registry=false

#单注册中心
#eureka.client.service-url.defaultZone=http://${eureka.instance.hostname}:${server.port}/eureka/
#分布式注册中心需要互相注册
eureka.client.service-url.defaultZone=http://www.woodlum7002.icu:7002/eureka/
#eureka.client.service-url.defaultZone=http://www.woodlum7001.icu:7001/eureka/

#关闭自我保护,默认为true,超过85%服务掉线的时候,注册中心不会移除掉线的实例
#以保证服务的可用性,AP原则,服务可用性和容错性,关闭在开发阶段中使用,生产中建议使用默认
#Renews/Renews threshold  默认0.85,小于此则会进行保护模式,注册的客户端不会删除
eureka.server.enable-self-preservation=false
在主程序中启用Eureka服务器
@SpringBootApplication
//启用Eureka服务器,同理EurekaService7002
@EnableEurekaServer
public class EurekaService7001 {
    public static void main(String[] args) {
        SpringApplication.run(EurekaService7001.class,args);
    }
}
2、改进服务提供者8001
maven中增坐标
     org.springframework.cloud
     spring-cloud-starter-netflix-eureka-client
     2.2.6.RELEASE


     org.springframework.boot
     spring-boot-starter-actuator
     2.3.5.RELEASE
父工程pom中增build节点
        microservice-cloud


                    src/main/resources
                    true


                org.apache.maven.plugins
                maven-compiler-plugin
                3.8.1

                    1.8
                    1.8
                    UTF-8


                org.apache.maven.plugins
                maven-resources-plugin


                        @
application.properties
重点:分布式多副本提供微服务,spring.application.name此名称完全一致,因为消费者是按微服务名称来查找的
#服务提供商品
server.port=8001
#Eureka注册地址,多eurika注册中心,地址用,隔开
eureka.client.service-url.defaultZone=http://www.woodlum7001.icu:7001/eureka/,http://www.woodlum.icu7002:7002/eureka/
#重点:客户端实例名称,Eureka中会显示,且显示为全大写,
# 分布式多副本提供微服务,此名称完全一致,因为消费者是按微服务名称来查找的
spring.application.name=mircroservice-cloud-provider

#Status中自定义服务名称信息
eureka.instance.instance-id=microservice-cloud-provider:8001
#访问路径可以显示IP地址,浏览器左下角显示Ip而非localhost
eureka.instance.prefer-ip-address=true


#http://192.168.0.100:8001/actuator/info页面信息设置
info.provider.name = microservice-cloud-provider-8001
info.company.name = icu.woodlum.cn
#获取pom中节点信息,注意,如果父pom中build中定界符设置为$,要使用@才能正常读取
#可能是新版本问题,当前工程actuator为2.3.4
info.build.artifactId = @project.artifactId@
info.build.version = @project.modelVersion@

#数据库连接
spring.datasource.username=root
spring.datasource.password=XXXX
spring.datasource.url=jdbc:mysql://localhost:3306/test
修改启动类
@SpringBootApplication
//启动Eureka客户端
@EnableEurekaClient
public class Provider8001 {
    public static void main(String[] args) {
        SpringApplication.run(Provider8001.class,args);
    }
}
分别启动服务中心7001、7002和服务提供8001
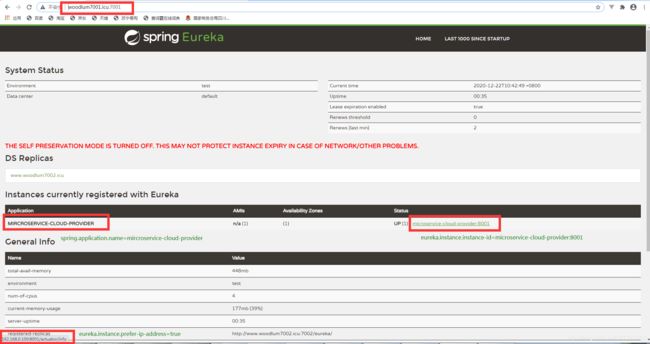
访问http://www.woodlum7001.icu:7001/和http://www.woodlum7002.icu:7002/
访问instance-id链接
3、启用Discovery服务发现组件
修改服务提供者的控制器
@RestController
@RequestMapping("/user")
public class PersonController {
    // 服务发现
    @Autowired
    private DiscoveryClient client;

    @GetMapping("/discovery")
    public Object discovery(){
       // 获取服务中心的所有微服务名称
        List list = client.getServices();
        list.forEach(e -> {
            System.out.println(e);
            //以微服务名称实例化微服务
            List instances = client.getInstances(e);
            //获取微服务实例的属性
            instances.forEach(l -> {
                System.out.println(l.getInstanceId() + "|" + l.getHost() + "|" + l.getPort() + "|" + l.getUri() + "|" + l.getScheme() + "|" + l.getMetadata());
            });
        });
        return this.client;
    }

}
启动器中启用服务发现
@SpringBootApplication
@EnableEurekaClient
//启用服务发现
@EnableDiscoveryClient
public class Provider8001 {
    public static void main(String[] args) {
        SpringApplication.run(Provider8001.class,args);
    }
}
访问服务发现服务
控制台输入:
mircroservice-cloud-provider
microservice-cloud-provider:8001|192.168.0.100|8001|http://192.168.0.100:8001|http|{management.port=8001, jmx.port=55787}
同理建立微服务提供者8002
四、Ribbon负载均衡
当服务提供者有多个时,消费者如何去选择相应的微服务?负载均衡就是处理消费者对于微服务请求的分配。
Ribbon集成在Eureka中,因此我们不需要再引入相关maven坐标。
Ribbon是客户端的负载均衡,因此我们只需要改进消费服务。
1、Ribbon负载均衡的使用
application.properties文件
server.port=80
#消费方不注册自己,但是会获取服务
eureka.client.register-with-eureka=false
#默认获取服务
eureka.client.fetch-registry=true
#eureka服务地址
eureka.client.service-url.defaultZone=http://www.woodlum7001.icu:7001/eureka/,http://www.woodlum.icu7002:7002/eureka/
配置负载均衡@LoadBalanced开启,默认为轮询方式
@Configuration
public class MyConfig {
    @Bean
    // 开启LB (负载均衡)
    @LoadBalanced
    public RestTemplate getRestTemplate(){
        return new RestTemplate();
    }
}
修改消费者控制器
@RestController
public class ConsummerController {
    // ribbon负载均衡下,访问的是微服务名称
    private static final String REST_URL_PRE = "http://MIRCROSERVICE-CLOUD-PROVIDER";
    //设置Rest访问地址
    //private static final String REST_URL_PRE = "http://127.0.0.1:8001";

    private RestTemplate restTemplate;
    public ConsummerController(RestTemplate restTemplate) {
        this.restTemplate = restTemplate;
    }
    @GetMapping("/list")
    public List list() {
        return restTemplate.getForObject(REST_URL_PRE + "/user/list", List.class);
    }
    @GetMapping("/{id}")
    public Person getById(@PathVariable int id){
        return restTemplate.getForObject(REST_URL_PRE + "/user/{id}",
                Person.class,id);
    }
    @GetMapping("/add/{name}/{age}")
    public int insert(@PathVariable("name") String name,@PathVariable("age") String age){
        Person person = new Person(name, Integer.parseInt(age));
        return restTemplate.getForObject(REST_URL_PRE + "/user/{name}/{age}",
                Integer.class,person.getName(),person.getAge());
    }
    @GetMapping("/discovery")
    public Object discovery(){
        return restTemplate.getForObject(REST_URL_PRE + "/user/discovery",Object.class);
    }
}
修改启动类
@SpringBootApplication
//启用Eureka客户端
@EnableEurekaClient
public class Consummer {
    public static void main(String[] args) {
        SpringApplication.run(Consummer.class, args);
    }
}
启动项目
测试
2、Ribbon规则算法:
默认为轮询方式,多个服务提供者按顺序会依次访问
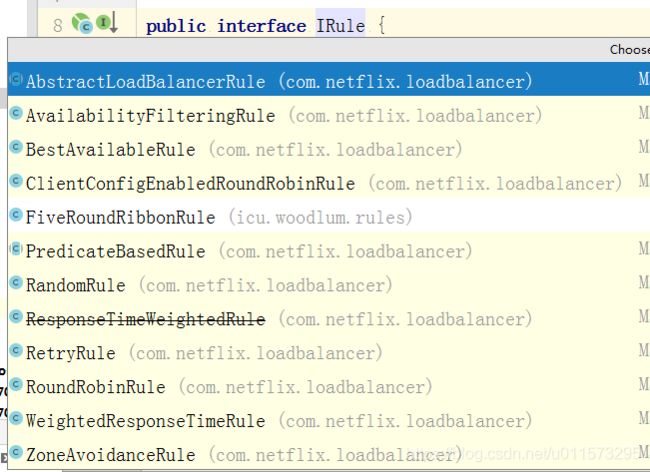
Ribbon规则有个接口IRule
| RoundRobinRule | 轮询,依次调用服务提供者,默认的方式 |
| RandomRule | 随机,多服务提供者随机调用 |
| AvailabilityFilteringRule | 先过滤掉由于故障处于断路器跳闸状态的服务,还有并发连接超过阈值的服务,然后对剩余的服务列表进行轮询 |
| WeightedResponseTimeRule | 根据平均响应时间计算所有服务器的权重响应时间越快,权重越大,刚启动统计信息不足会采用轮询,当统计信息足够,会切换到WeightedResponseTimeRule |
| RetryRule | 按照轮询算法获取服务器列表,若获取服务失败,在指定的时间重试,获取可用的服务 |
| BestAvailableRule | 先过滤由于多次访问故障而处于断路器跳闸状态的服务器,然后选择并发量最小的服务 |
| ZoneAvoidanceRule | 默认规则,复合判断server所在区域的性能和server可用性选择服务器,一般为RoundRobinRule |
框架提供了这七种算法,以下改用随机算法
@Configuration
public class MyConfig {
    @Bean
    // 开启LB (负载均衡)
    @LoadBalanced
    public RestTemplate getRestTemplate(){
        return new RestTemplate();
    }
    @Bean
    // 修改负载算法策略为随机算法
    public IRule getIRule(){
        return new RandomRule();
    }
}
现在测试会发现,服务提供者的调用是随机的,而非轮询。
3、Ribbon自定义规则算法:
规则:每个服务调用五次后轮询
新建rules包和其两个类,注意,MyRibbonRule类不能放在主启动类所在的包及其子包下,不能被@componentScan所扫描 ,否则,此规则会适配所有的Ribbon客户端,达不到特殊化要求
自定义规则FiveRoundRibbonRule.class,复制一份框架上提供的IRule实例类的源代码进行修改,重点是其中的choose方法。
public class FiveRoundRibbonRule extends AbstractLoadBalancerRule {
    private AtomicInteger nextServerCyclicCounter;
    private static final boolean AVAILABLE_ONLY_SERVERS = true;
    private static final boolean ALL_SERVERS = false;
    private static Logger log = LoggerFactory.getLogger(RoundRobinRule.class);
    private static int count = 0;  //被调用次数
    private static int index = 0;  //当前微服务索引
    public FiveRoundRibbonRule() {
        this.nextServerCyclicCounter = new AtomicInteger(0);
    }
    public FiveRoundRibbonRule(ILoadBalancer lb) {
        this();
        this.setLoadBalancer(lb);
    }
    public Server choose(ILoadBalancer lb, Object key) {
        if (lb == null) {
            log.warn("no load balancer");
            return null;
        }
        Server server = null;
        while (server == null){
            if(Thread.interrupted()) {
                return null;
            }
            //获取可用服务列表
            List upList = lb.getReachableServers();
            //获取所有服务列表
            List allList = lb.getAllServers();
            //所有微服务数量
            int serverCount = allList.size();
            if ( serverCount == 0) {
                return null;
            }
            if (count < 5) {
               //调用次数小于5的时候,继续调用当前服务
                server = upList.get(index);
                count++;
            } else {
              //调用次数大于5的时候,次数归零,服务索引加1
                count = 0;
                index ++ ;
                //当前服务索引达到最大时归零
                if (index >= upList.size() ) {
                    index = 0;
                }
            }

            if(server == null) {
                Thread.yield();
                continue;
            }
        }
        return server;
    }
    public Server choose(Object key) {
        return this.choose(this.getLoadBalancer(), key);
    }
    public void initWithNiwsConfig(IClientConfig clientConfig) {
    }
}
自定义规则的配置,MyRibbonRule.class
// 自定义Ribbon规则配置
// 注意,此类不能放在主启动类所在的包及其子包下,不能被@componentScan所扫描
// 否则,此规则会适配所有的Ribbon客户端,达不到特殊化要求
@Configuration
public class MyRibbonRule {
    @Bean
    // 修改负载算法策略为随机
    public IRule getIRule(){
        return new FiveRoundRibbonRule();
        //return new RandomRule(); //此处也可以使用框架中的规则
    }
}
在启动类中开启自定义规则
@SpringBootApplication
@EnableEurekaClient
// 自定义Ribbon规则,针对某一个微服务使用自定义规则
@RibbonClient(name = "MIRCROSERVICE-CLOUD-PROVIDER",configuration = MyRibbonRule.class)
public class Consummer {
    public static void main(String[] args) {
        SpringApplication.run(Consummer.class, args);
    }
}
现在测试会发现,8001和8002服务会在调用五次后轮询。
五、Fegin负载均衡
通过上面的Ribbon客户端负载均衡,我们是是通过RestTemplate来调用微服务的,如果restTemplate.getForObject(REST_URL_PRE + "/user/{id}", Person.class,id);这句会调用多次,我们每次都需要重复写出,这样做达不到设计模式所需要的开闭原则。
我们可以将对微服务提供者的调用逻辑提取出来,形成接口的方式,消费端调用的时候注入这个接口实例,再进行方法的调用。面向接口编程才是正道。
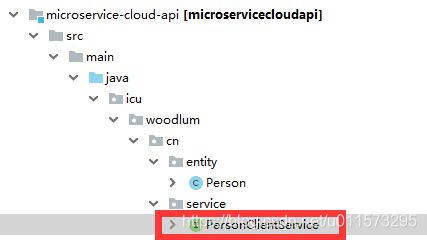
由于此接口可能会被多个消费服务调用,因此我们将它放到公共服务模块中。
使用Fegin负载均衡。
1、microservice-cloud-api公共模块中增fegin的maven坐标
    org.springframework.cloud
    spring-cloud-starter-openfeign
    2.2.6.RELEASE
2、api公共模块中增PersonClientService接口
//fegin客户端,value为被调用微服务的名称
@FeignClient(value = "MIRCROSERVICE-CLOUD-PROVIDER")
public interface PersonClientService {
    @GetMapping("user/list")
    public List list();

    @GetMapping("user/{id}")
    public Person getById(@PathVariable int id);

    @GetMapping("user/{name}/{age}")
    public int insert(@PathVariable String name,@PathVariable int age);

    @GetMapping("user/discovery")
    public Object discovery();
}
3、maven---clean---install
4、新建microservice-cloud-consummer-feign消费模块
5、pom中不需要再引入fegin坐标,因为此pom中已经引入了api模块,而api中又引入了fegin坐标
6、application.properties
server.port=81

#消费方不注册自己,但是会获取服务
eureka.client.register-with-eureka=false

#默认获取服务
eureka.client.fetch-registry=true

#eureka服务地址
eureka.client.service-url.defaultZone=http://www.woodlum7001.icu:7001/eureka/,http://www.woodlum.icu7002:7002/eureka/
7、控制类改写
@RestController
public class ConsummerController {
    //像平常那样注入PersonClientService接口的实例,通过接口来调用微服务
    @Autowired
    private PersonClientService personClientService;

    @GetMapping("/list")
    public List list() {
        return personClientService.list();
    }
    @GetMapping("/{id}")
    public Person getById(@PathVariable int id){
        return personClientService.getById(id);
    }
    @GetMapping("/add/{name}/{age}")
    public int insert(@PathVariable("name") String name,@PathVariable("age") String age){
        Person person = new Person(name, Integer.parseInt(age));
        return personClientService.insert(person.getName(),person.getAge());
    }
    @GetMapping("/discovery")
    public Object discovery(){
        return personClientService.discovery();
    }
}
8、启动类修改
启用feign,basePackages指定api模块中@FeignClient注解所在的当前包,此处踩坑一天
@SpringBootApplication
@EnableEurekaClient
//启用feign,basePackages指定api模块中@FeignClient注解所在的当前包,此处踩坑一天
@EnableFeignClients(basePackages = {"icu.woodlum.cn.service"})
public class ConsummerFeign {
    public static void main(String[] args) {
        SpringApplication.run(ConsummerFeign.class, args);
    }
}
9、依次启动微服务并测试
另外,服务提供的调用默认为轮询方式
六、服务熔断和服务降级Hystrix
在分布式系统中,当一个微服务发生异常时,或者因此网络原因很大概率会发生一个微服务不可用时,如果一个微服务此时有大量请求进来,就会发生请求阻塞,微服务中的调用异常可能会导致整个系统崩溃或者系统资源耗尽,这时我们就需要对异常或者不可用的服务进行隔离,以阻止对其他应用的影响。
1、服务熔断
服务熔断针对的是当前服务发生异常时,如何快速失败,将异常的服务隔离开并快速返回一个失败的消息,防止异常的蔓延。
新建microservice-cloud-provider-8003-hystrix微服务
pom文件增加Hystrix坐标
     org.springframework.cloud
     spring-cloud-starter-netflix-hystrix
     2.2.6.RELEASE
修改控制器类和服务实例
@GetMapping("/{id}")
// 当发生异常时,调用fallbackMethod方法
@HystrixCommand(fallbackMethod = "getHystrixCommand")
public Person getById(@PathVariable int id){
    return personService.getPersonById(id);
}
//Hystrix熔断时调用的方法
public Person getHystrixCommand(@PathVariable int id) {
    return new Person().setId(id).setName("id:" + id + "不存在");
}


//PersonServiceImpl类中抛出一个异常,如果不存在当前查询id的数据时异常
public Person getPersonById(int id) {
    Person person = personDao.selectById(id);
    if (person == null) {
        throw new RuntimeException("id:" + id + "不存在于数据库中");
    }
    return person;
}
启用Hystrix
@SpringBootApplication
@EnableEurekaClient
//服务发现
@EnableDiscoveryClient
//@EnableCircuitBreaker //启用熔断器两种注解1 @EnableCircuitBreaker 2 @EnableHystrix
@EnableHystrix
public class ProviderHystrix8003 {
    public static void main(String[] args) {
        SpringApplication.run(ProviderHystrix8003.class,args);
    }
}
在消费服务端需要启用对Hystrix的支持,在microservice-cloud-consummer-feign消费模块的application.properties中增加:
#fegin客户端启用hystrix
feign.hystrix.enabled=true
测试,id100时数据库中不存在,代码抛出异常,服务熔断,快速熔断并调用设置好的方法。
2、服务降级
服务降级针对的是当前服务不可用时,如何快速返回消息,而不是一直等待。
服务降级一般使用除了网络故障导致的服务不可能用外,另外还有当某个微服务实时需求系统资源较多,这时我们就可以将不重要的少用的微服务停掉,让更多的资源去处理紧急服务,这时一个请求如果在停掉的服务上时我们如何快速去响应消息。
在服务熔断中,熔断方法耦合在控制器中,耦合性太强,由于控制器中调用了PersonClientService接口,因此我们可以在这个接口上来操作。
1、在api公共模块中新建服务失败工厂类
@Component  //此条关键,不要掉了
public class PersonClientServiceFallbackFactory implements FallbackFactory {
    @Override
    public PersonClientService create(Throwable throwable) {
        return new PersonClientService() {
            @Override
            public List list() {
                ArrayList list = new ArrayList<>();
                list.add(new Person().setId(0).setName("服务不可用"));
                return list;
            }
            @Override
            public Person getById(int id) {
                return new Person().setId(id).setName("id:" + id + "数据库中没有对应的信息或此服务已经被关闭");
            }
            @Override
            public int insert(String name, int age) {
                return 0;
            }
            @Override
            public Object discovery() {
                return new String("服务不可用");
            }
        };
    }
}
2、修改PersonClientService接口
//fallbackFactory启用服务降级所指定的工厂类
@FeignClient(value = "MIRCROSERVICE-CLOUD-PROVIDER",fallbackFactory = PersonClientServiceFallbackFactory.class)
public interface PersonClientService {
    @GetMapping("user/list")
    public List list();

    @GetMapping("user/{id}")
    public Person getById(@PathVariable int id);

    @GetMapping("user/{name}/{age}")
    public int insert(@PathVariable String name,@PathVariable int age);

    @GetMapping("user/discovery")
    public Object discovery();
}
3、测试--服务熔断
4、关闭Hystrix8003微服务,此时再进行测试,此时也就是我们所说的服务降级
5、当服务熔断和服务降级模式都启动的时候,会先进行服务熔断尝试,如果服务不可用才会进行服务降级,因此上面的例子在服务正常时会先进行@HystrixCommand注解处的异常方法判断。
3、DashBoard服务监控
DashBoard(9001)针对的是Hystrix服务(8003)的监控,因此Hystrix服务提供者(8003)需要在方法上添加@HystrixCommand注解来启动异常的服务熔断。
1、建立DashBoard服务监控微服务microservice-cloud-consummer-hystrixdashboard9001
pom文件
        microservice-cloud
        icu.woodlum.cn
        0.0.1-SNAPSHOT

    4.0.0
    microservice-cloud-consummer-hystrixdashboard9001


            org.springframework.boot
            spring-boot-starter-web


            org.springframework.cloud
            spring-cloud-starter-netflix-hystrix-dashboard
            2.2.6.RELEASE
application.properties文件
server.port=9001
#需要设置监控目标允许的主机名称,多主机名以,分隔
hystrix.dashboard.proxy-stream-allow-list = 127.0.0.1,localhost
2、改写Hystrix8003服务提供者
@GetMapping("/{id}")
// 当发生异常时,调用fallbackMethod方法
@HystrixCommand(fallbackMethod = "getHystrixCommand")
public Person getById(@PathVariable int id){
   return personService.getPersonById(id);
}
  //Hystrix熔断时调用的方法
  public Person getHystrixCommand(@PathVariable int id) {
    return new Person().setId(id).setName("id:" + id + "数据库中不存在");
}
pom文件中需要有actuator坐标
   org.springframework.boot
   spring-boot-starter-actuator
   2.3.5.RELEASE
需要将/hystrix.stream暴露出来
@SpringBootApplication
@EnableEurekaClient
//服务发现
@EnableDiscoveryClient
//@EnableCircuitBreaker //启用熔断器@EnableHystrix
@EnableHystrix
public class ProviderHystrix8003 {
    //将/hystrix.stream暴露出来
    @Bean
    public ServletRegistrationBean getServlet() {
        HystrixMetricsStreamServlet streamServlet = new HystrixMetricsStreamServlet();
        ServletRegistrationBean registrationBean = new ServletRegistrationBean(streamServlet);
        registrationBean.setLoadOnStartup(1);
        registrationBean.addUrlMappings("/hystrix.stream");
        registrationBean.setName("HystrixMetricsStreamServlet");
        return registrationBean;
    }

    public static void main(String[] args) {
        SpringApplication.run(ProviderHystrix8003.class,args);
    }
}
3.测试
依次启动Eurekia、Hystrix8003、HystrixBoard9001服务。
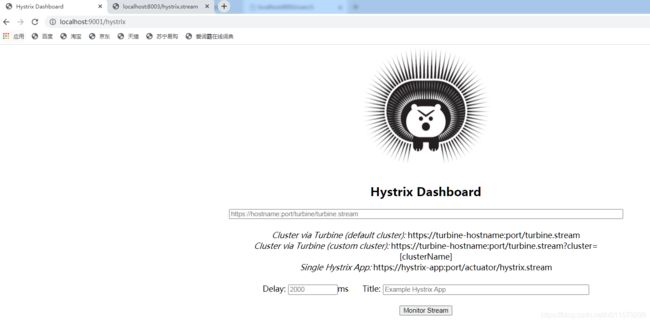
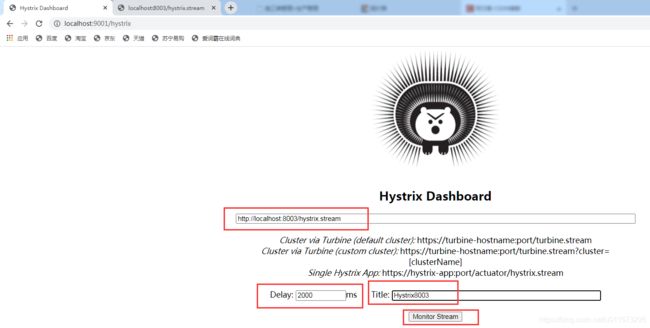
http://localhost:9001/hystrix,如果看到下面界面,表示监控服务启动成功。
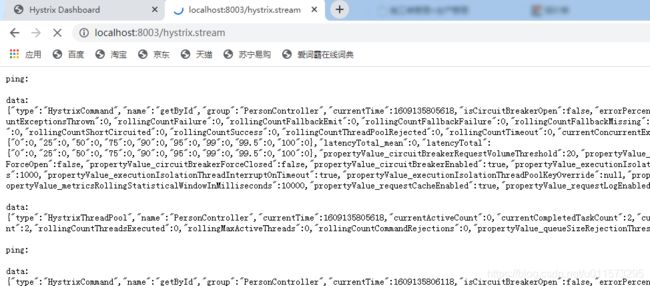
http://localhost:8003/hystrix.stream,被监控微服务的ping,先要调用一下http://localhost:8003/user/1带@HystricCommand注解的接口,不然ping会一直空白
将http://localhost:8003/hystrix.stream填入http://localhost:9001/hystrix网页中。
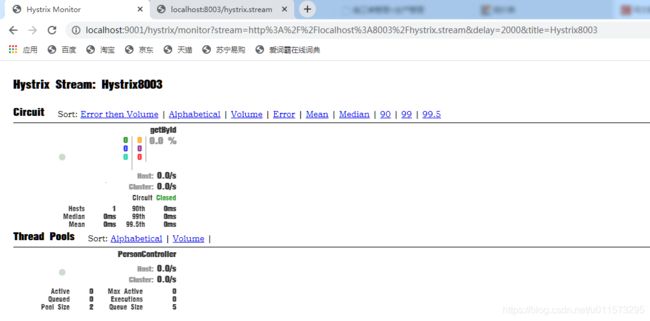
点击Monitior Stream显示监控仪表盘
一直刷新监控api的调用
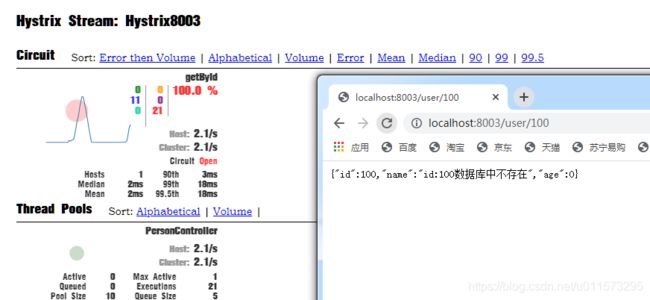
当监控api调用发生错误时
监控仪表盘指标,左边实心圆的大小代表的是流量,颜色代表的是被监控微服务的健康度,绿色>黄色>橙色>红色。
七、zuul网关服务
网关主要是路由功能和过滤,和微服务系统构成一个反向代理,对外隐藏微服务的真实名称及地址,同时方便外部访问微服务,而不需要知道微服务的名称及地址。
1、新建microservice-cloud-zuul-9000模块
2、pom文件
首先,zuul要向Eureka注册并获取微服务,因此Eureka依赖必须;然后zuul的坐标,zuul中包含了web,actuator、hystrix、ribbon等依赖
        microservice-cloud
        icu.woodlum.cn
        0.0.1-SNAPSHOT

    4.0.0
    microservice-cloud-zuul-9000


            org.springframework.cloud
            spring-cloud-starter-netflix-eureka-client
            2.2.6.RELEASE


            org.springframework.cloud
            spring-cloud-starter-netflix-zuul
            2.2.6.RELEASE
3、application.properties文件
server.port= 9000

eureka.client.service-url.defaultZone= http://www.woodlum7001.icu:7001/eureka/,http://www.woodlum.icu7002:7002/eureka/
eureka.client.instance.instance-id= zuulgataway.9000
eureka.client.instance.prefer-ip-address= true

spring.application.name= zuulgataway9000

#http://192.168.0.100:9000/actuator/info页面信息设置
info.provider.name = microservice-cloud-zuul-9000
info.company.name = icu.woodlum.cn
#获取pom中节点信息,注意,父pom中build中虽然定界符设置为$,但是要使用@才能正常读取
#可能是新版本问题,当前工程actuator为2.3.4
info.build.artifactId = @project.artifactId@
info.build.version = @project.modelVersion@
4、启动类
@SpringBootApplication
//开启zuul代理
@EnableZuulProxy
public class ZuulProxy9000 {
    public static void main(String[] args) {
        SpringApplication.run(ZuulProxy9000.class, args);
    }
}
5、测试
分别启动Eureka集群和服务提供者,再启动zuul服务
但是其中被调用微服务的名称在url中,这样做不到隐藏
6、改进不对外暴露微服务的名称
application.properties中增加
#微服务映射路径修改,之前为http://localhost:9000/mircroservice-cloud-provider/**
#映射后为http://localhost:9000/provider1/**,
#目的是在API中对外不暴露微服务名称
#provider1设置分组,可以针对多个微服务分别修改映射路径

zuul.routes.provider1.serviceId= mircroservice-cloud-provider
zuul.routes.provider1.path= /provider1/**

#zuul.routes.provider2.serviceId= mircroservice-cloud-provider2
#zuul.routes.provider2.path= /provider12/**
但是之前通过微服务名称来访问url还是可以访问的,这时我们需要通过忽略微服务的名称来控制不暴露
application.properties中增加
#忽略映射之前的原路径,单个用具体微服务名称,多个用,分隔,或者*全部
zuul.ignored-services= mircroservice-cloud-provider
这时http://localhost:9000/mircroservice-cloud-provider/user/list就不能访问了
扩充知识点:设置统一公共前缀
#设置统一公共前缀
zuul.prefix = /woodlum
八、config配置中心
当微服务项目越来越多的时候,每一个微服务都有自己的配置文件,在微服务运行期间如果要修改配置内容,需要一个一个修改,然后重新打包运行,这样会很麻烦。
因此就有了配置中心,将配置提取出来使用一个外部的集中配置来作为配置文件,程序运行中自动从配置中心获取配置文件进行加载,实现了配置文件的动态化。
springcloud配置中心分为服务端和客户端。
1、配置中心服务端
springcloud配置文件默认采用git存储方式,服务端是一个独立的微服务,主要使用是连接客户端和配置文件所在服务器的一个中转服务。
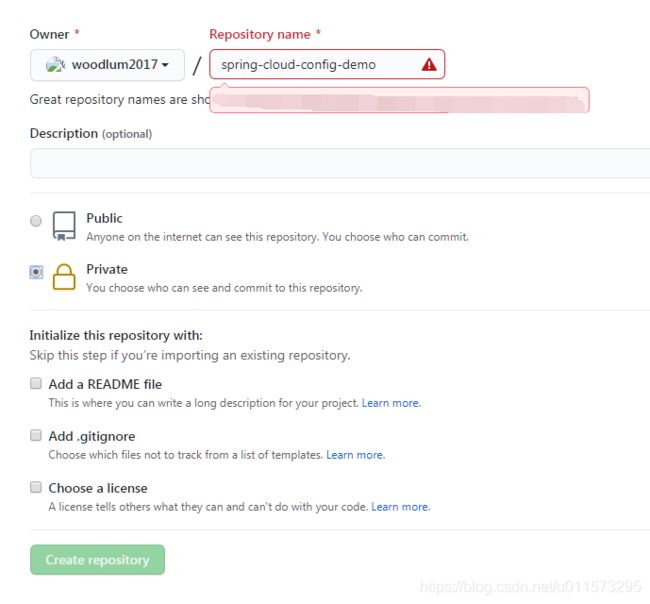
a、github建立配置仓库
b、新增config配置微服务3344
pom文件
    org.springframework.cloud
    spring-cloud-config-server
    2.2.6.RELEASE
启动类
@SpringBootApplication
//开启配置服务器
@EnableConfigServer
public class ConfigServer3344 {
    public static void main(String[] args) {
        SpringApplication.run(ConfigServer3344.class,args);
    }
}
application.properties
server.port= 3344
#当前微服务名称
spring.application.name= microservicecloud-configserver
#git仓库地址
spring.cloud.config.server.git.uri= https://github.com/woodlum2017/spring-cloud-config-demo
2、改进Eureka注册微服务7003、服务提供者8004和服务消费者82
创建三个properties属性文件,保存为utf-8格式,其中内容为原本各自的属性配置,将其push到github
将三个微服务的application.properties文件删除,各自新建bootstrap.properties文件,要spring中,bootstrap属于系统级的配置,而application属于用户级的配置,系统级配置会优先加载
#eureka的bootstrapt.properties


#需要从github上读取的资源名称,注意没有properties后缀名
spring.cloud.config.name=springcloud-config-eureka-config
#读取的分支名
spring.cloud.config.label=master
#本微服务启动后先去找3344号服务,通过SpringCloudConfig获取Gitlub的服务地址
spring.cloud.config.uri=http://www.woodlum3344.icu:3344


#provider的bootstrapt.properties

#需要从github上读取的资源名称,注意没有properties后缀名
spring.cloud.config.name=springcloud-config-provider-config
#读取的分支名
spring.cloud.config.label=master
#本微服务启动后先去找3344号服务,通过SpringCloudConfig获取Gitlub的服务地址
spring.cloud.config.uri=http://www.woodlum3344.icu:3344

#comsummer的bootstrapt.properties

#需要从github上读取的资源名称,注意没有properties后缀名
spring.cloud.config.name=springcloud-config-consummer
#读取的分支名
spring.cloud.config.label=master
#本微服务启动后先去找3344号服务,通过SpringCloudConfig获取Gitlub的服务地址
spring.cloud.config.uri=http://www.woodlum3344.icu:3344
启动微服务
测试


