vue3.0+ts+element-plus多页签应用模板:项目搭建
目录
- 系列文章
- 一、安装[email protected]
- 二、创建项目
- 三、项目配置
- 四、IDE配置
- 五、vue.config.js配置
- 六、重置浏览器默认样式
系列文章
- vue3.0+ts+element-plus多页签应用模板:前言
- vue3.0+ts+element-plus多页签应用模板:项目搭建
- vue3.0+ts+element-plus多页签应用模板:vue-router与vuex
- vue3.0+ts+element-plus多页签应用模板:element-plus按需引入与动态换肤
- vue3.0+ts+element-plus多页签应用模板:如何优雅地使用Svg图标
- vue3.0+ts+element-plus多页签应用模板:侧边导航菜单(上)
- vue3.0+ts+element-plus多页签应用模板:侧边导航菜单(下)
- vue3.0+ts+element-plus多页签应用模板:多级路由缓存
- vue3.0+ts+element-plus多页签应用模板:头部工具栏(上)
- vue3.0+ts+element-plus多页签应用模板:头部工具栏(中)
- vue3.0+ts+element-plus多页签应用模板:头部工具栏(下)
一、安装[email protected]
工欲善其事,必先利其器,我们需要安装vue-cli来创建项目(别问为什么,问就是简单、便捷、高效)。但是,在安装之前,首先要保证你的电脑里有12以上的node.js,不然你直接运行npm是会报错的。至于安装node的方案,请自行网上搜索。
接下来,我们打开电脑上的终端软件(windows用powershell或者cmd),输入以下代码并回车:
npm install -g @vue/cli
如果觉得下载的时候网速太慢,可以切换一下淘宝源(分两次执行):
npm config set registry https://registry.npm.taobao.org
npm i mirror-config-china -g
二、创建项目
好了,接下来我们可以开始创建项目了:
vue create multi-tabs
首先你会看见这样的界面:

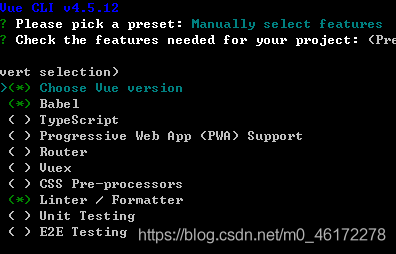
这里我们选择最下面的Manually select features,然后回车

这里选择TypeScript,上下键切换高亮行,空格选中,回车确认。这里的Router和Vuex不用选,后面我们可以自己安装

这里就是选择我们vue的版本了,选择下面的3.x
接下来会有几个连续的问题:
- Use class-style component syntax? (y/N) 回答:n
- Use Babel alongside TypeScript (required for modern mode, auto-detected polyfills, transpiling JSX)? (Y/n) 回答:n
- Pick a linter / formatter config 回答:ESLint + Prettier | Lint on save
- Where do you prefer placing config for Babel, ESLint, etc.? 回答:In dedicated config files
- Save this as a preset for future projects? 回答:y,然后自己起个名,下次就可以直接用了
然后回车,项目就会开始自动构建了,当显示这样的界面的时候,就是构建成功了:

三、项目配置
为了有更好的开发体验,以及更规范的代码,我们在项目中引用了ESLint + Preitter,所以,我们现在就要来配置一下这两个插件:
打开根目录下的.eslintrc.js,用下面的代码覆盖:
/*** .eslintrc.js ***/
module.exports = {
  root: true,
  env: {
    node: true
  },
  extends: [
    'plugin:vue/vue3-essential',
    'eslint:recommended',
    '@vue/typescript/recommended',
    '@vue/prettier',
    '@vue/prettier/@typescript-eslint'
  ],
  parserOptions: {
    ecmaVersion: 2020
  },
  rules: {
    quotes: ['error', 'single'],
    'comma-dangle': ['error', 'never'],
    'prettier/prettier': [
      'error',
      {
        vueIndentScriptAndStyle: false,
        endOfLine: 'auto'
      }
    ],
    'no-undef': 'off',
    'space-before-function-paren': 'off',
    'no-use-before-define': 'off',
    'no-console': process.env.NODE_ENV === 'production' ? 'warn' : 'off',
    'no-debugger': process.env.NODE_ENV === 'production' ? 'warn' : 'off',
    'no-unused-vars': [
      'error',
      {
        argsIgnorePattern: '^h$',
        varsIgnorePattern: '^h$'
      }
    ],
    '@typescript-eslint/ban-ts-ignore': 'off',
    '@typescript-eslint/explicit-function-return-type': 'off',
    '@typescript-eslint/no-explicit-any': 'off',
    '@typescript-eslint/no-var-requires': 'off',
    '@typescript-eslint/no-empty-function': 'off',
    '@typescript-eslint/no-use-before-define': 'off',
    '@typescript-eslint/ban-ts-comment': 'off',
    '@typescript-eslint/ban-types': 'off',
    '@typescript-eslint/no-non-null-assertion': 'off',
    '@typescript-eslint/explicit-module-boundary-types': 'off',
    '@typescript-eslint/no-unused-vars': [
      'error',
      {
        argsIgnorePattern: '^h$',
        varsIgnorePattern: '^h$'
      }
    ],
    'vue/require-default-prop': 'off',
    'vue/custom-event-name-casing': 'off',
    'vue/comment-directive': 'off',
    'vue/singleline-html-element-content-newline': 'off',
    'vue/html-self-closing': 'off',
    'vue/max-attributes-per-line': 'off'
  }
}
在项目根目录创建文件:.prettierrc,并输入以下内容
{
  "eslintIntegration": true,
  "printWidth": 100,
  "tabWidth": 2,
  "useTabs": false,
  "semi": false,
  "vueIndentScriptAndStyle": false,
  "singleQuote": true,
  "quoteProps": "as-needed",
  "bracketSpacing": true,
  "trailingComma": "none",
  "jsxBracketSameLine": false,
  "jsxSingleQuote": false,
  "arrowParens": "always",
  "insertPragma": false,
  "requirePragma": false,
  "proseWrap": "never",
  "htmlWhitespaceSensitivity": "strict",
  "endOfLine": "auto"
}
接着打开根目录下的tsconfig.json,用下面的代码覆盖:
{
  "compilerOptions": {
    "target": "es5",
    "module": "esnext",
    "strict": true,
    "jsx": "preserve",
    "importHelpers": true,
    "moduleResolution": "node",
    "skipLibCheck": true,
    "esModuleInterop": true,
    "allowSyntheticDefaultImports": true,
    "allowJs": true,
    "sourceMap": false,
    "baseUrl": ".",
    "types": ["webpack-env"],
    "paths": {
      "@/*": ["src/*"],
      "tslib": ["path/to/node_modules/tslib/tslib.d.ts"]
    },
    "lib": ["esnext", "dom", "dom.iterable", "scripthost"],
    "typeRoots": ["./src/typings", "./node_modules/@types"]
  },
  "include": ["src/**/*.ts", "src/**/*.tsx", "src/**/*.vue", "tests/**/*.ts", "tests/**/*.tsx"],
  "exclude": ["node_modules"]
}
然后安装tslib:
npm i tslib --save-dev
这样,我们的项目就配置好了
四、IDE配置
我们选用的IDE是vscode(真的很好用)。然后安装以下插件:vetur, eslint, prettier,之后就可以进行愉快的开发了
五、vue.config.js配置
在根目录下新建文件vue.config.js,并输入以下代码:
/*** vue.config.js ***/
const IS_DEV = process.env.NODE_ENV === 'development'
const CompressionPlugin = require('compression-webpack-plugin')
const HardSourceWebpackPlugin = require('hard-source-webpack-plugin')
const path = require('path')

const options = {
  // 是否开启eslint保存检测,有效值:ture | false | 'error'
  lintOnSave: IS_DEV,

  // 如果你不需要生产环境的 source map,可以将其设置为 false 以加速生产环境构建
  productionSourceMap: false,

  // 用于放置生成的静态资源 (js、css、img、fonts) 的;(项目打包之后,静态资源会放在这个文件夹下)
  assetsDir: 'static',

  // 配置Webpack
  chainWebpack: (config) => {
    /***  开发环境配置 ***/
    if (IS_DEV) {
      // 配置静态依赖
      config.plugin('hard-source-webpack-plugin').use(HardSourceWebpackPlugin)
    }

    /***  生产环境配置 ***/
    if (!IS_DEV) {
      // 配置gzip
      config.plugin('compression-webpack-plugin').use(CompressionPlugin, [
        {
          algorithm: 'gzip',
          test: /\.(js|css)$/,
          threshold: 10240,
          deleteOriginalAssets: false,
          minRatio: 0.8
        }
      ])
    }

    // 设置网站标题
    config.plugin('html').tap((args) => {
      args[0].title = '多页签系统模板'
      return args
    })

    // 映射路径
    config.resolve.alias.set('@', path.resolve('src'))
  }
}

module.exports = options
安装[email protected](安装最新版会警告没安装webpack5.1.0):
npm i compression-webpack-plugin@6.1.0 -D
安装hard-source-webpack-plugin:
npm i hard-source-webpack-plugin -D
六、重置浏览器默认样式
新建src/assets/styles/reset.scss:
* {
  box-sizing: content-box;
}

body,
div,
p,
h1,
h2,
h3,
h4,
h5,
h6,
ul,
li,
dl,
dt,
a,
input,
button,
textarea,
select {
  margin: 0;
  padding: 0;
  outline: none;
}

html,
body {
  font-family: Microsoft Yahei, Helvetica Neue, Helvetica, Arial, Hiragino Sans GB, Heiti SC,
    WenQuanYi Micro Hei, sans-serif;
  color: #333333;
  background-color: #ffffff;
  height: 100%;
}

a {
  text-decoration: none;
}

ul,
li {
  list-style: none;
}

input {
  font: normal;
}

input:focus,
a:focus {
  outline: none;
}

input::-webkit-outer-spin-button,
input::-webkit-inner-spin-button {
  -webkit-appearance: none;
}

input[type='number'] {
  -moz-appearance: textfield;
}
同目录新建index.scss:
@import './reset.scss';
然后在main.ts中导入:
import '@/assets/styles/index.scss'
下一篇预告:vue3.0+ts+element-plus多页签应用模板:vue-router与vuex