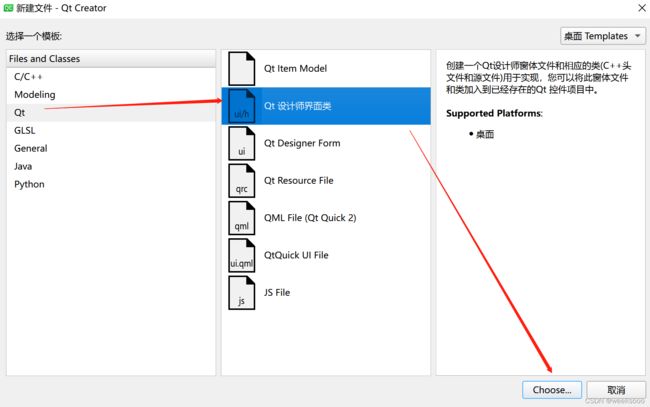
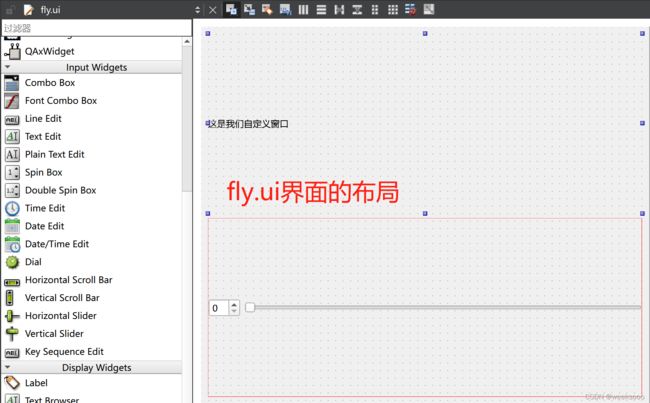
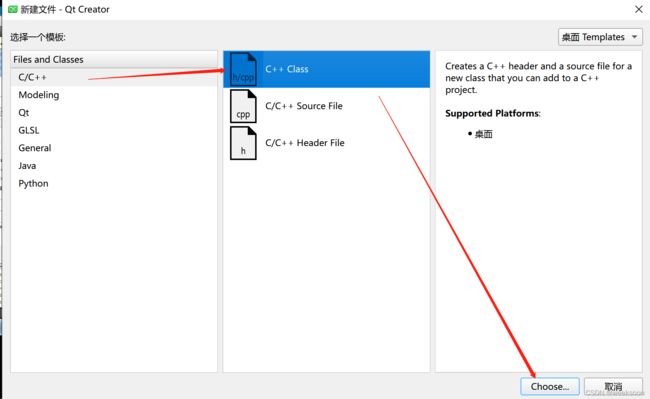
QT5/6使用
*免责声明:
1\此方法仅提供参考
2\搬了其他博主的操作方法,以贴上路径.
3*
QT安装
Windows10中安装Qt6.0.1开发环境
Qt软件打包后报错“无法定位程序输入点_ZN10QArrayData10deallocateEPs_jj于动态链接库… .exe上。”解决办法
B站课程推荐
B站课程推荐2
day01
//快捷键
//注释  ctrl + /
//运行  ctrl + r
//保存  ctrl + s
//编译  ctrl + b
//查找  ctrl + f
//字体缩放 ctrl+ 鼠标滚轮
//帮助文档  f1
//自动对齐  ctrl + i
//同名之间的.h 和.cpp文件的切换 f4
知识点一: 按钮的使用与窗体的简单设置
#include "fire_detect.h"
#include "ui_fire_detect.h"
#include

fire_detect::fire_detect(QWidget *parent)
    : QWidget(parent)

{

    //第一种方式创建一个按钮
    QPushButton  * btn = new QPushButton;
    //btn -> show();  show()方法会以顶层方式重新弹出来一个窗口
    btn->setParent(this);    //让btn按钮在我们的   fire_detect主体窗口里面,设置父窗口
    btn->setText("第一个按钮");//给btn设置一个名字

    //第二种方式创建一个按钮
    QPushButton  * btn2 = new QPushButton( "第二个按钮",this );
    btn2->move(500,600); //移动btn2的按钮位置.不移动的话,btn2会覆盖btn
    btn2->resize(100,100); //设置按钮的大小

    //第三种方式创建一个按钮
    QPushButton  * btn3 = new  QPushButton("第三个按钮" , this);
    btn3->move(200,400);

    btn3->setStyleSheet("QPushButton{background-color:#63B8FF;};");


    //窗体相关属性
    setWindowTitle("森林火灾");
    resize(600,1200);   //重置窗口大小,这种方法可以移动窗口大小,左上角是原点,右是大

    setFixedSize(600,800); //设置指定窗口的大小,不能被移动

    setWindowIcon(QIcon("E:\\1.jpg")); //给窗口加图标

}

fire_detect::~fire_detect()
{
    delete ui;
}
//当前窗口的宽度与高度
int a = this->width();
int b = this->height() ;
知识点二: 信号槽机制
普通信号普通槽,系统带的
//需求 点击上面的第二个按钮,执行窗口关闭动作
//发出的信号的是btn2 , 接收信号的是窗口this
//建立两者的连接  connect(btn2  ,   发出的信号 ,  this , 处理信号的槽函数 )

connect( btn2, &QPushButton::clicked  ,  this ,  &fire_detect::close   );
// 发出的信号的格式:     &+信号发出类的名字+::+信号的名字
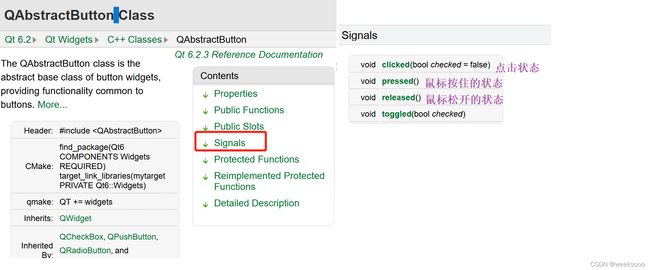
//例如QPushButton的父类QAbstractButton 有Signals里面有 clicked , pressed , released ,toggled
//信号和槽函数 都是函数,其中  信号需要声明,不需要函数定义 ,  而信号槽需要声明和定义,是回调函数
自定义槽函数
第一步: 在对应的.h文件中需要声明自定义的 槽函数,把对应的按钮都在这个.h文件中声明 ,这样可以让对应的.cpp文件可以全局使用声明的按钮
第二步: 在对应的.cpp源文件里面实现 信号槽连接和实现
#include "fire_detect.h"
#include "ui_fire_detect.h"
#include

fire_detect::fire_detect(QWidget *parent)
    : QWidget(parent)

{

    //第一种方式创建一个按钮
    btn = new QPushButton;
    btn->setParent(this);
    btn->setText("第一个按钮");

    //第二种方式创建一个按钮
    btn2 = new QPushButton( "第二个按钮",this );
    btn2->move(500,600);
    btn2->resize(100,100);

    //第三种方式创建一个按钮
    btn3 = new  QPushButton("第三个按钮" , this);
    btn3->move(200,400);
    btn3->setStyleSheet("QPushButton{background-color:#63B8FF;};");

    //窗体相关属性
    setWindowTitle("森林火灾");
    resize(600,1200);
    setFixedSize(600,800);
    setWindowIcon(QIcon("E:\\1.jpg"));


    //现在需求变为点击按钮btn ,修改 btn2的显示内容:  但是 b2 里面并没有setText槽函数
    //解决思路一:   写一个 函数继承btn2 ,然后添加 一个槽函数
    //解决思路二:  换一个接收对象 , 换 主窗口 this ,因为fire_detect能访问到btn2和btn对象,所以能修改

    //需要自定义槽函数:    在Qt5中 ,槽函数可以是任意类成员函数,全局函数 ,静态函数,lambda表达式
    //槽函数需要与信号相对应(返回值  ,参数)*****************************
    //信号没有返回值,槽函数有返回值类型
    //例如 信号 函数是   void mysing(int  , double ,   QString)
    //相对的槽函数  应该的参数 也是 上面三个值 ,  void myslot( int ,  double ,QString)
    //槽函数的参数 是不能大于 信号参数的个数的, 可以少于,槽函数 是为了接受信号传过来的参数的,
    //槽函数可以进行重载


    connect( btn, &QPushButton::clicked  ,  this, &fire_detect::slotforfire_detect );
}


fire_detect::~fire_detect()
{
    delete ui;
}

#自定义的槽函数的实现
void  fire_detect::slotforfire_detect()
{

 btn2->setText("我被btn修改了");
}
新增需求, 创建 另外 一个窗口chongqing,要求是点击fire-detect窗口中的按钮3 , 隐藏自己的窗口,显示chongqing窗口
将chongqing窗口作为fire_detect的子窗口,声明一个隐藏函数用来实现fire_detect窗口的隐藏
#include "fire_detect.h"
#include "ui_fire_detect.h"
#include

fire_detect::fire_detect(QWidget *parent)
    : QWidget(parent)

{

    btn3 = new  QPushButton("第三个按钮" , this);
    btn3->move(200,400);

    btn3->setStyleSheet("QPushButton{background-color:#63B8FF;};");

    setWindowTitle("森林火灾");
    resize(600,1200);
    setFixedSize(600,800);
    setWindowIcon(QIcon("E:\\1.jpg"));


    //新增需求,   创建 另外 一个窗口chongqing,要求是点击fire-detect窗口中的按钮3  , 隐藏自己的窗口,显示chongqing窗口

    connect( btn3, &QPushButton::clicked  , this, &fire_detect::hidden_me );


}

void fire_detect::hidden_me()
{
    //隐藏自己
    hide();

    cq.show();    //显示chongqing   cq是 在fire_detect.h中的    chongqing cq;
}
新增加需求 ,点击fire_detect里面的 按钮 4 ,修改chongqing窗口里面的按钮4的值 为 我被fire_detect修改了
fire_detect.cpp
#include "fire_detect.h"
#include "ui_fire_detect.h"
#include

fire_detect::fire_detect(QWidget *parent)
    : QWidget(parent)

{

    btn4 = new  QPushButton("第四个按钮" , this);
    btn4->move(300,400);
    btn4->setStyleSheet("QPushButton{background-color:#63B8FF;};");

    btn5 = new  QPushButton("第五个按钮" , this);
    btn5->move(400,400);
    btn5->setStyleSheet("QPushButton{background-color:#63B8FF;};");

    setWindowTitle("森林火灾");
    resize(600,1200);
    setFixedSize(600,800);
    setWindowIcon(QIcon("E:\\1.jpg"));

    //新增加需求 ,点击fire_detect里面的 按钮 4 ,修改chongqing窗口里面的按钮4的值 为 我被fire_detect修改了
    connect( btn4, &QPushButton::clicked  , this, &fire_detect::update4);

}

void fire_detect::update4()
{

    cq.btn4->setText("我被fire_detect按钮4修改了");
    cq.show();   //显示chongqing窗口   cq是 在fire_detect.h中的    chongqing cq;
}
子窗口操作主窗口
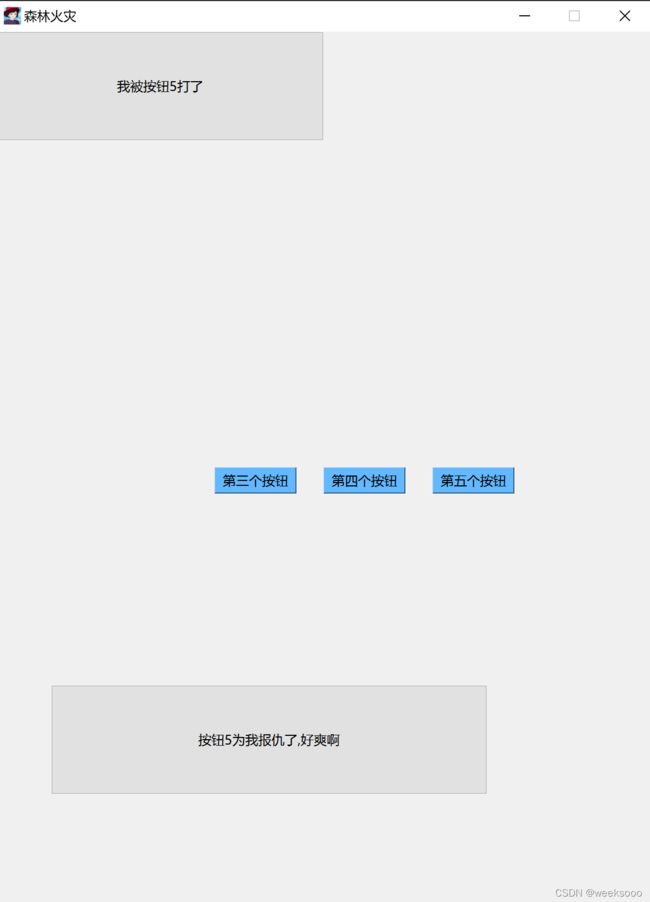
新增加需求 ,点击chongqing窗口里面的 按钮 5 ,修改fire_detect窗口里面的按钮1,2,3的值 为重庆大学 , 点击 重庆里面窗口里面的按钮6,修改fire-detect里面的按钮4,5值为虎溪校区
.值得注意的是 我们在前面 已经定义了chongqing窗口是fire_detect窗口的一个子窗口,那么这时候我们就不能 在chongqing窗口里面 在按上面的操作 了.
这时候需要 我们在 chongqing窗口里面自定义一个信号.
修改 4-5为虎溪校区一样,重新定义一个信号
fire_detect.h
#ifndef FIRE_DETECT_H
#define FIRE_DETECT_H

#include
#include
#include "chongqing.h"

QT_BEGIN_NAMESPACE
namespace Ui { class fire_detect; }
QT_END_NAMESPACE


class fire_detect : public QWidget
{
    Q_OBJECT   //允许类中使用信号槽机制

public:
    fire_detect(QWidget *parent = nullptr);   //构造函数
    ~fire_detect();

    //自定义槽函数
    void  slotforfire_detect( ) ;
    void  hidden_me( ) ;
    void  update4( ) ;
    void  update1_3( );
    void  update4_5( );

private:
    QPushButton * btn;
    QPushButton * btn2;
    QPushButton * btn3;
    QPushButton * btn4;
    QPushButton * btn5;
    QPushButton * btn6;

    //把chongqing作为 fire_detect的 一个子窗口
    chongqing cq;

    Ui::fire_detect *ui;
};
#endif // FIRE_DETECT_H
fire_detect.cpp
#include "fire_detect.h"
#include "ui_fire_detect.h"
#include

fire_detect::fire_detect(QWidget *parent)
    : QWidget(parent)

{

    //第一种方式创建一个按钮
    btn = new QPushButton;
    //btn -> show();  show()方法会以顶层方式重新弹出来一个窗口
    btn->setParent(this);    //让btn按钮在我们的   fire_detect主体窗口里面,设置父窗口
    btn->setText("第一个按钮");//给btn设置一个名字

    //第二种方式创建一个按钮
    btn2 = new QPushButton( "第二个按钮",this );
    btn2->move(500,600); //移动btn2的按钮位置.不移动的话,btn2会覆盖btn
    btn2->resize(100,100); //设置按钮的大小

    //第三种方式创建一个按钮
    btn3 = new  QPushButton("第三个按钮" , this);
    btn3->move(200,400);
    btn3->setStyleSheet("QPushButton{background-color:#63B8FF;};");


    btn4 = new  QPushButton("第四个按钮" , this);
    btn4->move(300,400);
    btn4->setStyleSheet("QPushButton{background-color:#63B8FF;};");


    btn5 = new  QPushButton("第五个按钮" , this);
    btn5->move(400,400);
    btn5->setStyleSheet("QPushButton{background-color:#63B8FF;};");


    //窗体相关属性
    setWindowTitle("森林火灾");
    resize(600,1200);   //重置窗口大小,这种方法可以移动窗口大小,左上角是原点,右是大

    setFixedSize(600,800); //设置指定窗口的大小,不能被移动

    setWindowIcon(QIcon("E:\\1.jpg")); //给窗口上图标

    //点击第二个按钮,关闭窗口
    //发出的信号的是btn2 , 接收信号的是窗口this
    //建立两者的连接  connect(btn2  ,   发出的信号 ,  this , 处理信号的槽函数 )
    connect( btn2, &QPushButton::clicked  ,  this ,  &fire_detect::close   );
    // 发出的信号的格式:     &+信号发出类的名字+::+信号的名字
    //例如QPushButton的父类QAbstractButton 有Signals里面有 clicked , pressed , released ,toggled
    //信号和槽函数 都是函数,其中  信号需要声明,不需要函数定义 ,  而信号槽需要声明和定义,是回调函数


    //现在需求变为点击按钮btn ,修改 btn2的显示内容:  但是 b2 里面并没有setText槽函数
    //解决思路一:   写一个 函数继承btn2 ,然后添加 一个槽函数
    //解决思路二:  换一个接收对象 , 换 主窗口 this ,因为fire_detect能访问到btn2和btn对象,所以能修改

    //需要自定义槽函数:    在Qt5中 ,可以是任意类成员函数,全局函数 ,静态函数,lambda表达式
    //槽函数需要与信号相对应(返回值  ,参数)
    //信号没有返回值,槽函数有返回值类型
    //例如 信号 函数是   void mysing(int  , double ,   QString)
    //相对的槽函数  应该的参数 也是 上面三个值 ,  void myslot( int ,  double ,QString)
    //槽函数的参数 是不能大于 信号参数的个数的, 可以少于,槽函数 是为了接受信号传过来的参数的,
    //槽函数可以进行重载


    connect( btn, &QPushButton::clicked  ,  this, &fire_detect::slotforfire_detect );


    //新增需求,   创建 另外 一个窗口chongqing,要求是点击fire-detect窗口中的按钮3  , 隐藏自己的窗口,显示chongqing窗口

    connect( btn3, &QPushButton::clicked  , this, &fire_detect::hidden_me );

    //新增加需求 ,点击fire_detect里面的 按钮 4 ,修改chongqing窗口里面的按钮4的值 为 我被fire_detect修改了
    connect( btn4, &QPushButton::clicked  , this, &fire_detect::update4);

    //因为cq是fire_detetct窗口的属性,所以在这里应该是,chongqiong发送了一个信号cqsig,点击chongqing里面的bt5,修改fire_detect窗口里面的1-3按钮的值为重庆大学
    connect( &cq, &chongqing::cqsig  , this, &fire_detect::update1_3);

    //因为cq是fire_detetct窗口的属性,所以在这里应该是,chongqiong发送了一个信号cqsig,点击chongqing里面的bt6,修改fire_detect窗口里面的4-5按钮的值为虎溪校区
    connect( &cq, &chongqing::cqsig4_5  , this, &fire_detect::update4_5);


}

fire_detect::~fire_detect()
{
    delete ui;
}


void  fire_detect::slotforfire_detect()
{

 btn2->setText("我被btn修改了");
}


void fire_detect::hidden_me()
{
    //隐藏自己
    hide();

    cq.show();    //显示chongqing窗口  cq是 在fire_detect.h中的    chongqing cq;
}

void fire_detect::update4()
{

    cq.btn4->setText("我被fire_detect按钮4修改了");
    cq.show();   //显示chongqing窗口   cq是 在fire_detect.h中的    chongqing cq;
}

void fire_detect::update1_3()
{
    btn->setText("重庆大学");
    btn2->setText("重庆大学");
    btn3->setText("重庆大学");
}

void fire_detect::update4_5()
{

    btn4->setText("虎溪校区");
    btn5->setText("虎溪校区");
}
chongqing.h
#ifndef CHONGQING_H
#define CHONGQING_H

#include
#include


class chongqing : public QWidget
{
    Q_OBJECT
public:
    explicit chongqing(QWidget *parent = nullptr);
    QPushButton * btn4;

    void sendsig1_3();
    void sendsig4_5();

signals:
    //自定义信号.必须在signals这里面声明
    void cqsig();
    //可以有参数
    //可以重载
    //返回值为void
    //发送信号: emit + 型号名
    //emit  cqsig;
    void cqsig4_5();

private:

    QPushButton * btn5;
    QPushButton * btn6;
    //把chongqing作为 fire_detect的 一个子窗口
    //fire_detect fd;


};

#endif // CHONGQING_H
chongqing.cpp
#include "chongqing.h"
#include

chongqing::chongqing(QWidget *parent)
    : QWidget{parent}
{

    btn4 = new QPushButton;
    btn4->setParent(this);
    btn4->setText("大学城");


    btn5 = new QPushButton( "沙坪坝",this );
    btn5->move(500,600);
    btn5->resize(100,100);

    btn6 = new  QPushButton("重庆大学" , this);
    btn6->move(200,400);
    btn6->setStyleSheet("QPushButton{background-color:#63B8FF;};");


    connect( btn5, &QPushButton::clicked  , this, &chongqing::sendsig1_3);
    connect( btn6, &QPushButton::clicked  , this, &chongqing::sendsig4_5); //其实这里改为sendsig4_5也可以

    setWindowTitle("重庆");
    resize(600,1200);
    setFixedSize(600,800);
    setWindowIcon(QIcon("E:\\2.jpg"));

}


void chongqing::sendsig1_3()
{
    //发送一个信号
    emit  cqsig();

}

void chongqing::sendsig4_5()
{
    //发送一个信号
    emit  cqsig4_5();

}
知识点三: QT的输出
#include

qDebug()<<"hello , 您好";

int num2 = 18;
QString str2 = "小魔女琪琪";
qDebug()<
知识点四: 信号的重载机制
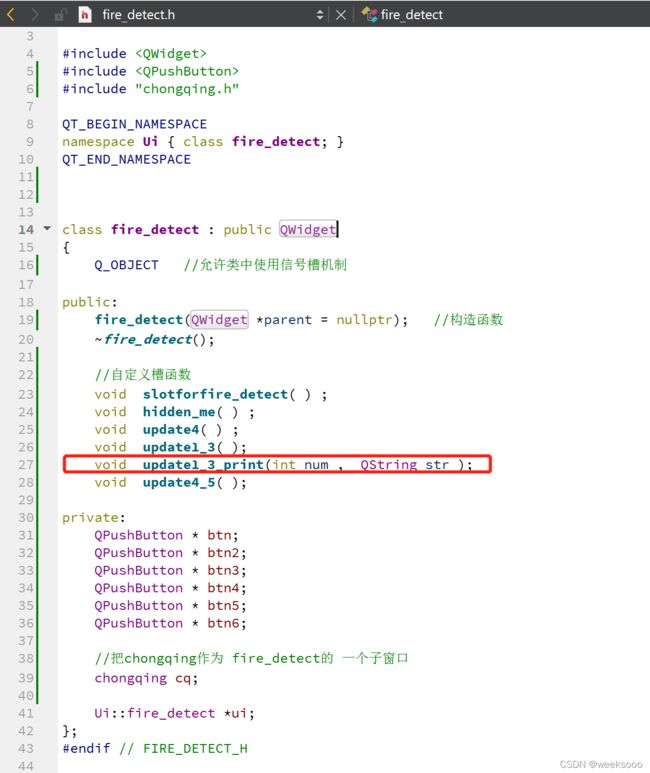
前面我们学习了,chongqing窗口作为fire_detect的一个子窗口,如果想要修改fire_detect窗口的信息,需要自定义一个信号发送出去.这一个知识点 来讲解 信号的重载。
。
如图对于自定义信号cqsig ,我们通过传入参数的不同实现重载。
这时候在按chongqing里面的按钮,不仅会修改fire_detect里面1-3按钮的值,同时通过信号的重载机制,发送了一个带参数的信号,最终fire_detect里面也会根据这个带参数的信号去寻找对应的操作
.
值得说明的是: qt5.3后的版本的信号槽机制和qt4在连接时用法不一样,因为qt4的连接机制当发生错误时不会报错,编译也是能通过的 ,例如采用qt4指定一个不存在的响应槽函数.
.
同样的槽函数的重载用法一样
知识点五: QT中的lambda表达式
lambda作为槽函数就不需要额外的定义了,当然这种方式需要在 .pro文件中 引入c+11的特性,因为lambda是c++11的一个特性,引入命令CONFIG += c++11
…
day02
知识点六: 带UI界面的项目
运行的话,一个界面就被我们 画出来了,但是 我们并没有给每一个选项赋予响应机制,现在给指定的控件加入信号槽机制.
.
为了方便编写,我们像建文章目录一样给按钮起名字
需求是 点击鲁班的太空人选项,能够自动的在账号\密码\自我介绍里面填入内容.
可以看到对应的.h文件里面有ui这个属性,所以可以通过ui来获取我们设计里面的ui控件
#include "mainwindow.h"
#include "ui_mainwindow.h"

MainWindow::MainWindow(QWidget *parent)
    : QMainWindow(parent)
    , ui(new Ui::MainWindow)
{
    ui->setupUi(this);

    //利用本文件的对应.h文件中的 ui属性 寻找action 对象

    // 例如我们要寻找鲁班太空人的控件action1_1_1   其中triggered就相当于按钮的点击触发
    connect(ui ->action1_1_1 ,&QAction::triggered , this ,  [=](){

        qDebug()<<"这是鲁班七号的太空人皮肤,快来买啊";
        ui->lineEdit->setText("鲁班")     ;
        ui->lineEdit_2->setText("太空人")     ;
        ui->textEdit->setText("鲁班是一名出色的天空人,梦想是安琪拉")     ;
    });


}

MainWindow::~MainWindow()
{
    delete ui;
}
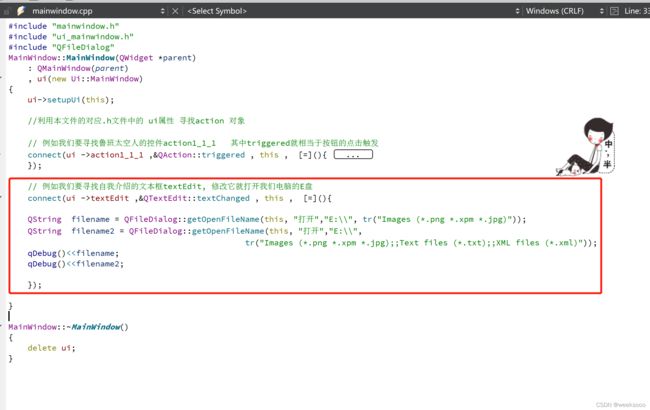
新增需求:点击指定的选项,打开我们的E盘,选定指定文件,打印目录信息
知识点七: 类中成员的变量的初始化
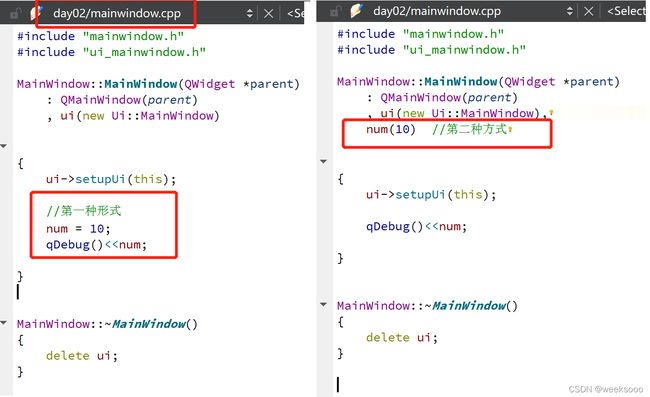
假如我们在.h中定义了一个 int num,初始化有两种方式
我们这时候再看ui这个属性,系统默认采用第二种方式
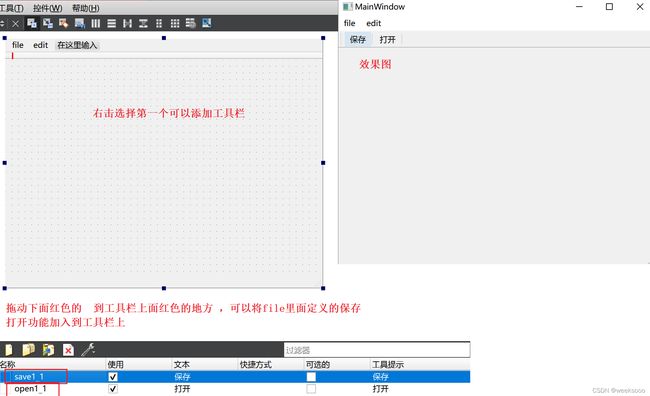
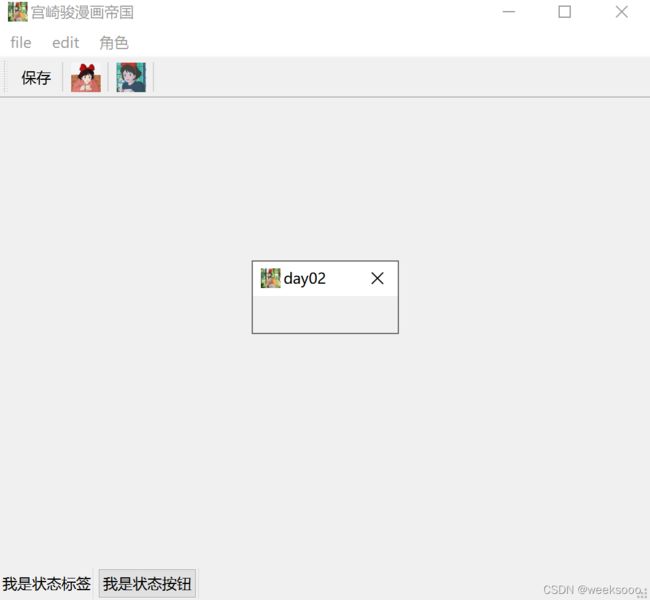
知识点八: UI界面的工具栏—>可以是多个
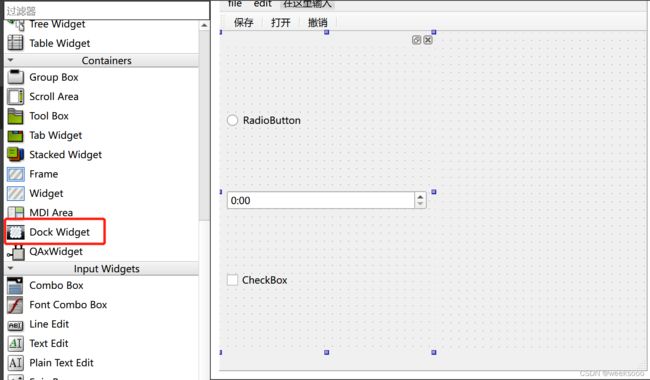
知识点九: UI界面的浮动窗口—>可以是多个
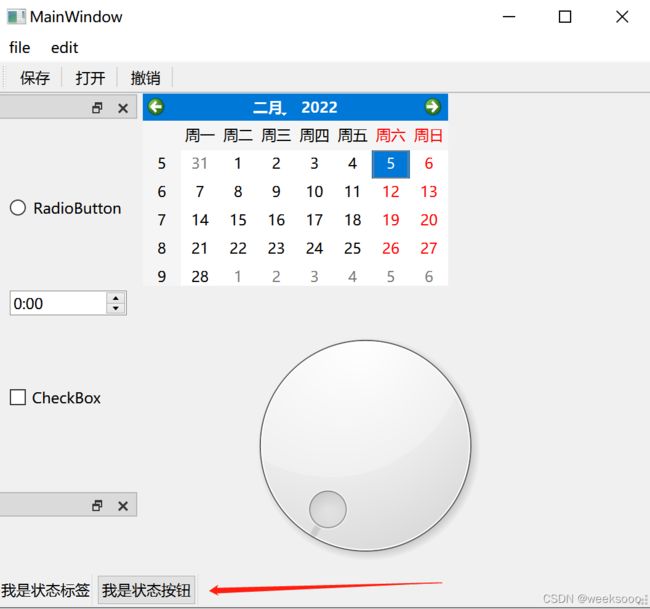
知识点十: UI界面的状态栏—>1个
状态栏只能通过代码控制进行插入,可以插入widget派生的任何东西.
通过addWidget( 控件 )状态栏的名字叫statusBar
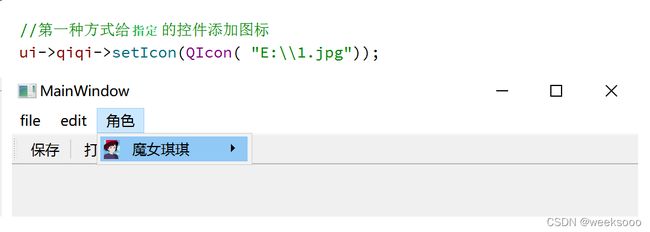
知识点十一: 给控件添图标
第一种方式: 代码的方式 传入图片路径 (不推荐)
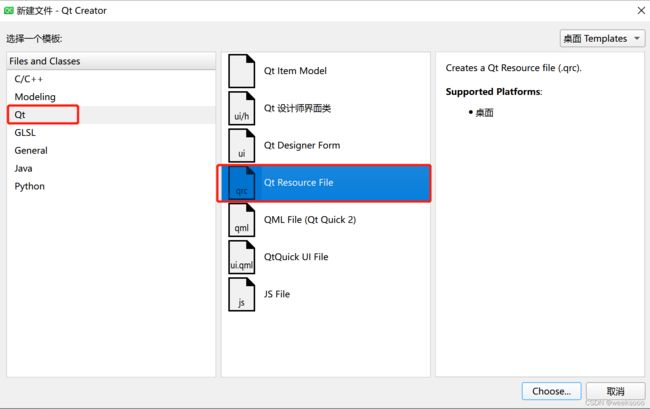
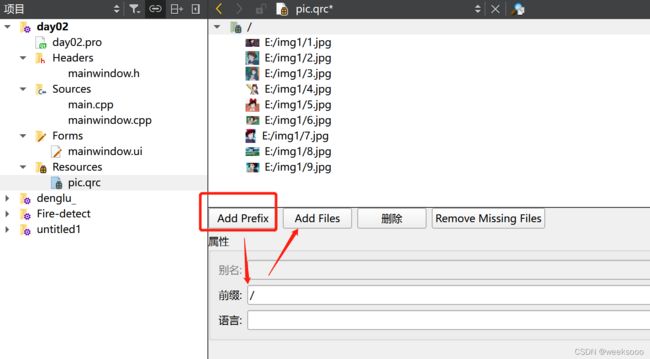
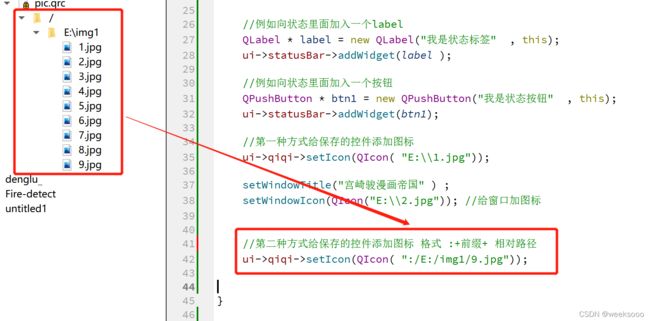
第二种方式: 采用添加新的qt资源文件的方式 (推荐)
知识点十二: QT对话框
#include
类型一: 模态对话框 ,特点弹出对话框不能操作其他窗口.
类型二: 非模态对话框 ,特点弹出对话框能操作其他窗口.
知识点十三: QT提示对话框
QT:QMessageBox的简单使用
#include
知识点十四: 字体和颜色对话框
#include
#include
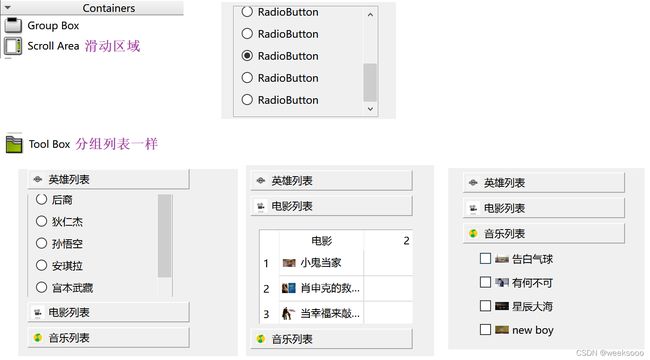
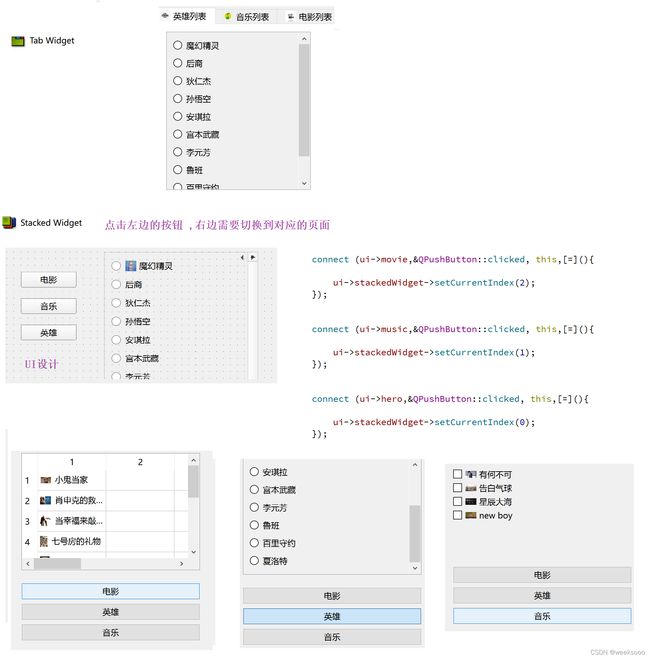
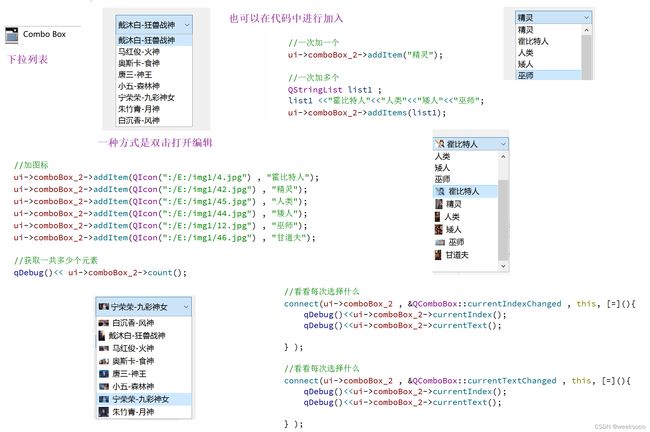
知识点十五: 基础控件
知识点十六: label加图片\动态图片
#include //加动态图片
…
day03
知识点十七: 自定义控件
给主界面进行布局,得到最终下面效果.
知识点十八: QT中的事件
重新定义一个mylabel类继承QLabel类,重写一些方法
#include
在上面的鼠标移动移动事件中, 鼠标只有按下的时候是被追踪的,那是因为Qwiget默认是不追踪的.下面开启鼠标追踪
定时器—>第一种写法
在对应的.h文件中,声明一下我们要用到的id
知识点十九: QString
知识点二十: QT绘图—>QPainter
知识点二十一: 强制刷新窗口
需求: 有一个按钮move ,每一次点击按钮,图片就移动.
update()
知识点二十二: QT绘图设备
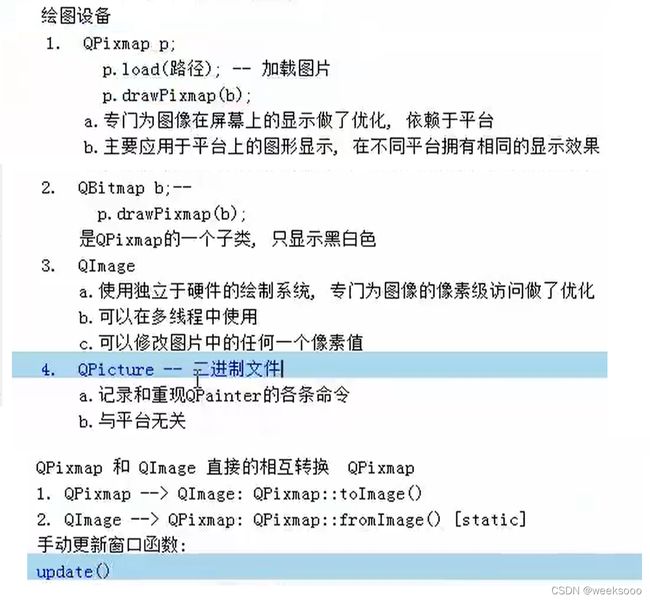
在前面中知识点二十中,我们讲解了QT的绘图设备 this 指向当前窗口,
QPainter p(this) ; //this是 指定当前绘图的窗口Qwidget类
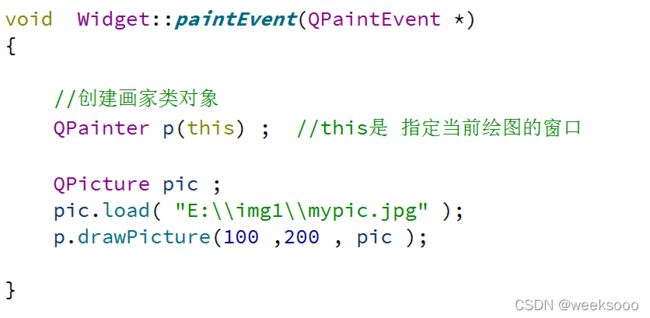
QPicture绘画完虽然以.jpg保存,但并不是 一个图片,而是绘图步骤,所以我们可以通过重写画家类把这个绘图步骤绘画出来.可以使用任何的扩展名 , 如果我们要画一个机密图 ,就可以采用这种方式,别人即使得到我们的文件,也不一定知道我们是用QT中的Qpicture绘画出来的.
知识点二十三: 不规则窗口—>透明窗口
透明窗口
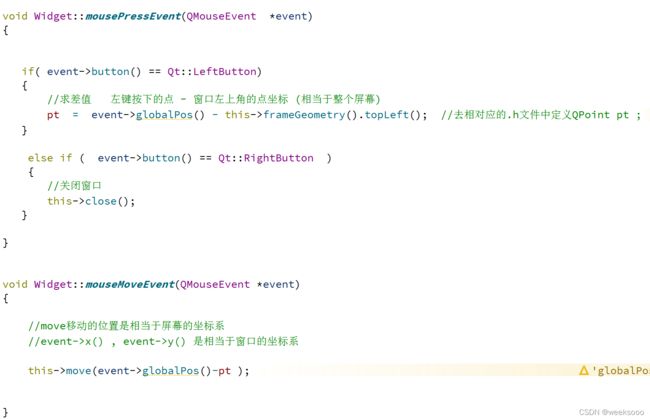
需求: 右击鼠标关闭窗口,左键鼠标拖动
透明窗口–蝴蝶移动
cpp文件
#include
#include
#include
知识点二十四: Qt中的随机数
qt6中不再使用 qsrand 与qrand.使用 QRandomGenerator比如生成0到100的随机数
#include

int rand = QRandomGenerator::global()->bounded(0,300);
…
day04
知识点二十五: 重写事件event/eventFilter–>过滤事件
实验需求: 过滤定时器事件
定时器的第一种写法:重写timerEvent
需要在对应的.h文件中申明
void timerEvent(QTimerEvent *envent);
#include "mylabel.h"
#include
#include
#include


mylabel::mylabel(QWidget *parent)
    : QLabel{parent}
{
    //定时器的第一种写法
    //定时器的第一种写法,启动定时器
    //参数一: 触发器的时间,单位ms
    //参数二: 使用默认值
    //startTimer(100);
    id = startTimer(100);
}

//定时器,触发定时器用户自定义的操作
//需求,触发label,label上面的数字会进行不断改变
void mylabel::timerEvent(QTimerEvent *event)
{
    //定时器被触发了,lable会执行自定义操作,如果定义 int num,执行完num生命就会结束
    //这时候如果让num一直变是不可以的,所以是static
    static int num = 0 ;
    if (num<100)
    {
        num = num+1;
        QString str3 =QString ("鲁班升级%1%").arg(num );
        qDebug()<
定时器的第二种写法: 类似于实例化一个QTimer的对象.
#include "mylabel.h"
#include
#include
#include
#include

mylabel::mylabel(QWidget *parent)
    : QLabel{parent}
{

    //定时器的第二种写法
    QTimer * dsq = new QTimer(this) ;
    dsq->start(100);

    connect ( dsq  , &QTimer::timeout , this,  [=](){

        static int num1 = 0 ;
        if (num1<200)
        {
            num1 = num1+1;
            QString str3 =QString ("安琪拉升级%1%").arg(num1 );
            qDebug()<stop();
            }

        }
    } );
}
实验开始: 过滤定时器事件,需要我们重写事件分发器.事件分发器的规则是 :
如果返回值true--代表事件被处理过了,不再向下分发,停止了.
false --事件没有被处理,会继续分发.
.
所以我们只需要看事件的类型是否是Timer ,如果是就返回true
//需要在对应的.h文件中声明bool event(QEvent  *event1);

bool mylabel::event(QEvent  *event1)

{
    /*返回值
     * true --代表事件被处理过了,不再向下分发,停止了.
     * false --事件没有被处理,会继续分发.
    */
        if(event1->type() == QEvent::Timer )
        {
            return  true;

        }

        return  QLabel::event( event1) ;

}
通过这样的重写,确实能够过滤定时器事件,但实验结果表明只能过滤定时器的重写的方式, 也就是
定时器的第一种写法:重写timerEvent这种方式的定时器被过滤掉了,并没有过滤第二种写法.原因不详
要想过滤第二种方式的定时器, 定时器的第二种写法: 类似于实例化一个QTimer的对象. 采用以下的重写方式.
#同样的需要在对应的.h文件中声明bool eventFilter(QObject *obj,QEvent  *event1);
bool mylabel::eventFilter(QObject *obj,QEvent  *event1)

{
        if(event1->type() == QEvent::Timer )
        {
            return  true;
        }

        return  mylabel::eventFilter(obj , event1) ;

}
猜想事件过滤重写方法:
(1)如果要过滤的事件本身被重写过 ,  例如voidtimerEvent(QTimerEvent*envent);
那么过滤事件的重写用重写event的方式 `bool mylabel::event(QEvent  *event1)`

(2)如果要过滤的事件类似于实例化一个QTimer的对象,那么过滤事件的重写用重写eventFilter(的方式 bool mylabel::eventFilter(QObject *obj,QEvent  *event1)
总代码
#include "mylabel.h"
#include
#include
#include

mylabel::mylabel(QWidget *parent)
    : QLabel{parent}
{

    //定时器的第一种写法,启动定时器
    //参数一: 触发器的时间,单位ms
    //参数二: 使用默认值
    //startTimer(100);

    id = startTimer(100);


    //定时器的第二种写法
    QTimer * dsq = new QTimer(this) ;
    dsq->start(100);

    connect ( dsq  , &QTimer::timeout , this,  [=](){

        static int num1 = 0 ;
        if (num1<200)
        {
            num1 = num1+1;
            QString str3 =QString ("安琪拉升级%1%").arg(num1 );
            qDebug()<stop();
            }

        }
    } );

    dsq->installEventFilter(this);
}

//定时器,触发定时器用户自定义的操作
//需求,触发label,label上面的数字会进行不断改变
void mylabel::timerEvent(QTimerEvent *event)
{
    //定时器被触发了,lable会执行自定义操作,如果定义 int num,执行完num生命就会结束
    //这时候如果让num一直变是不可以的,所以是static
    static int num = 0 ;
    if (num<100)
    {
        num = num+1;
        QString str3 =QString ("鲁班升级%1%").arg(num );
        qDebug()<type())
//        {
//      case QEvent::MouseMove:
//        mouseMoveEvent(event1);
//        break;
//      case QEvent::Timer:
//        timerEvent(event1);
//        break; }


        if(event1->type() == QEvent::Timer )
        {
            return  true;

        }

       return  QLabel::event( event1) ;  // //我们定义的mylabel继承Qlabel , 本质是label

}


bool mylabel::eventFilter(QObject *obj,QEvent  *event1)

{

        if(event1->type() == QEvent::Timer )
        {
            return  true;

        }

        return  mylabel::eventFilter(obj , event1) ;

}
![]()
知识点二十六: 事件过滤器eventFilter
前面讲的event过滤事件是在event中进行拦截处理,还有一种拦截方式就是事件拦截器eventFilter. 前面我们已经讲了一部分例子
前面的例子可以看出使用事件过滤器的 两个核心步骤
.
步骤一: 给窗口安装事件过滤器,例如前面是给实例化的对象dsq
dsp -> insatllEventFilter(this) ;
.
步骤二: 需要在事件过滤器中处理
![]()
知识点二十七: QT文件读取
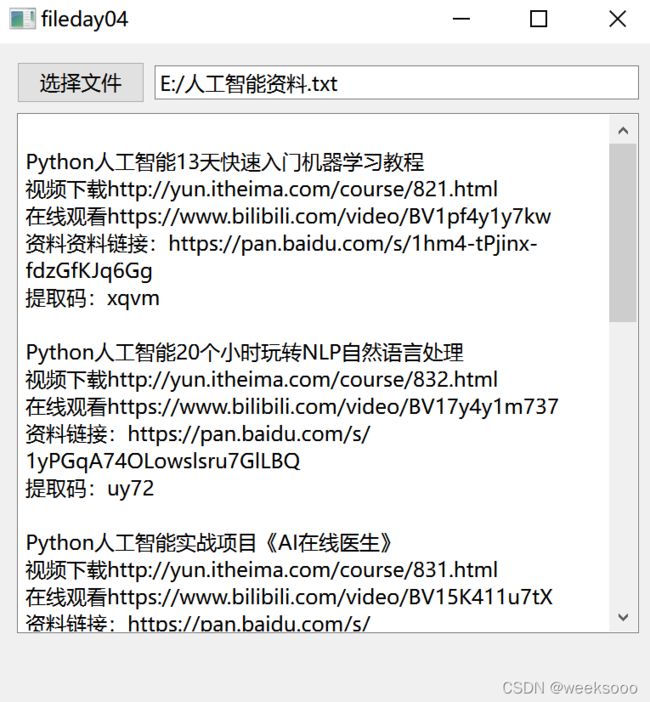
需求:点击选择文件按钮,就打开本地选择文件 ,右边的line Edit里面显示文件的路径,下面Text Edit显示文本内容
#include "fileday04.h"
#include "ui_fileday04.h"
#include
#include    //打开文件对话框
#include
#include
#include

fileday04::fileday04(QWidget *parent)
    : QWidget(parent)
    , ui(new Ui::fileday04)
{
    ui->setupUi(this);

    connect (ui->choosefile1, &QPushButton::clicked ,this , [=](){

        //打开文件,获取选择的文件的路径
        QString filename = QFileDialog::getOpenFileName ( this ,  "请选择文件" , "d\\" );
            if( filename.isEmpty() == true  ){
                QMessageBox::warning (this  ,   "警告" , "文件打开失败");
            }

            ui->filepath1->setText(filename);


         //创建文件对象,打开文件
          QFile file(filename);

          //指定打开方式
          bool a = file.open(QFile::ReadOnly);
          if (a == false){
            QMessageBox::critical (this  ,   "警告" , "文件打开失败");
            return ;
          }

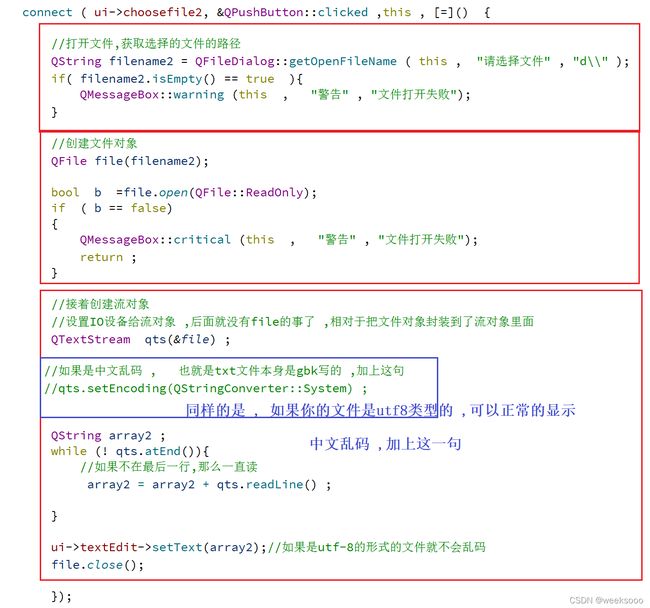
          //读文件;默认读取的文件格式是utf-8,也就是说如果你的txt文件是utf8格式的就正常显示 ,如果是gbk格式的就会乱码
         QByteArray array =  file.readAll() ;
         ui->textEdit->setText(array);
         //ui->textEdit->append() ; 下次打开在textEdit中追加显示

    });
    file.close();
}

fileday04::~fileday04()
{
    delete ui;
}
采用readLine的方式
         QByteArray array1 ;
         while (! file.atEnd()){
             //如果不在最后一行,那么一直读
             QByteArray array1 = array1 + file.readLine() ;
         }
知识点二十八: 采用file对象读取 中文乱码转换
QT中读文件;默认读取的文件格式是utf-8,如果你是其他格式如gbk的话,显示的话就可能会显示乱码,例如上面的情况,这时候我们需要转换
#include
.
不过QT6不再支持这个类了,所以我们要用的话,需要引用QT5的,
在对应的.pro文件追加QT += core5compat
QTextCodec * textcode = QTextCodec::codecForName( "gbk") ;
setText(textcode->toUnicode(array));
例如知识点二十七的代码:
#include "fileday04.h"
#include "ui_fileday04.h"
#include
#include    //打开文件对话框
#include
#include
#include
#include  ///................................

fileday04::fileday04(QWidget *parent)
    : QWidget(parent)
    , ui(new Ui::fileday04)
{
    ui->setupUi(this);

    connect (ui->choosefile1, &QPushButton::clicked ,this , [=](){

        //打开文件,获取选择的文件的路径
        QString filename = QFileDialog::getOpenFileName ( this ,  "请选择文件" , "d\\" );
            if( filename.isEmpty() == true  ){
                QMessageBox::warning (this  ,   "警告" , "文件打开失败");
            }

            ui->filepath1->setText(filename);


         //创建文件对象,打开文件
          QFile file(filename);

          //如果打开文件乱码 ,那们需要转换 #include ...........................
          QTextCodec * textcode = QTextCodec::codecForName( "gbk") ;

          //指定打开方式
          bool a = file.open(QFile::ReadOnly);
          if (a == false){
            QMessageBox::critical (this  ,   "警告" , "文件打开失败");
            return ;
          }

          //读文件;默认读取的文件格式是utf-8
         QByteArray array =  file.readAll() ;
         ui->textEdit->setText(textcode->toUnicode(array));  //............................
    });
         file.close();

}

fileday04::~fileday04()
{
    delete ui;
}
知识点二十九: QT文件写的方式
![]()
     * QIODevice::ReadWrite 可读写
     * QIODevice::Text 换行符生效
     * QIODevice::Append 追加写入
     * QFile::Truncate 表示将原文件清空
知识点三十: QT中的文本流和数据流
//QT中的文件流
//文本流 , 数据流(二进制)

#include    //操作基础数据类型:  int , float , string
#include    //可以操作二进制类型: QImage  Qpoint  QRect ,不依赖于平台
文本流的写入方式
     * QIODevice::ReadWrite 可读写
     * QIODevice::Text 换行符生效
     * QIODevice::Append 追加写入
     * QFile::Truncate 表示将原文件清空
数据流的写入方式
二进制文件,不依赖于操作平台
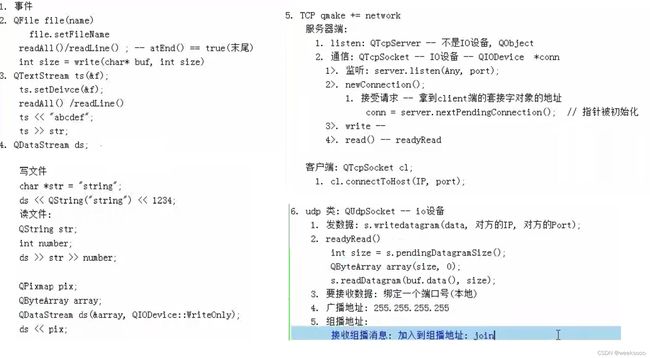
网络通信
知识点三十一: QFileInfo文件属性
#include
知识点三十二: QTateTime 获取系统时间
#include
#include
![]()
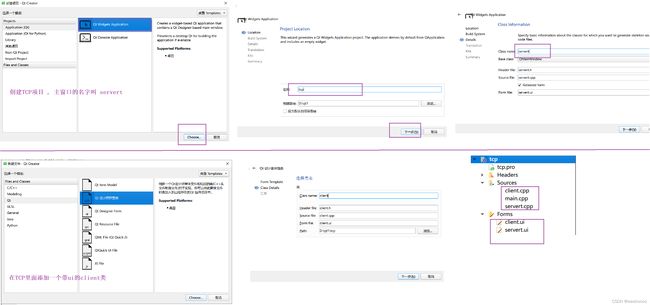
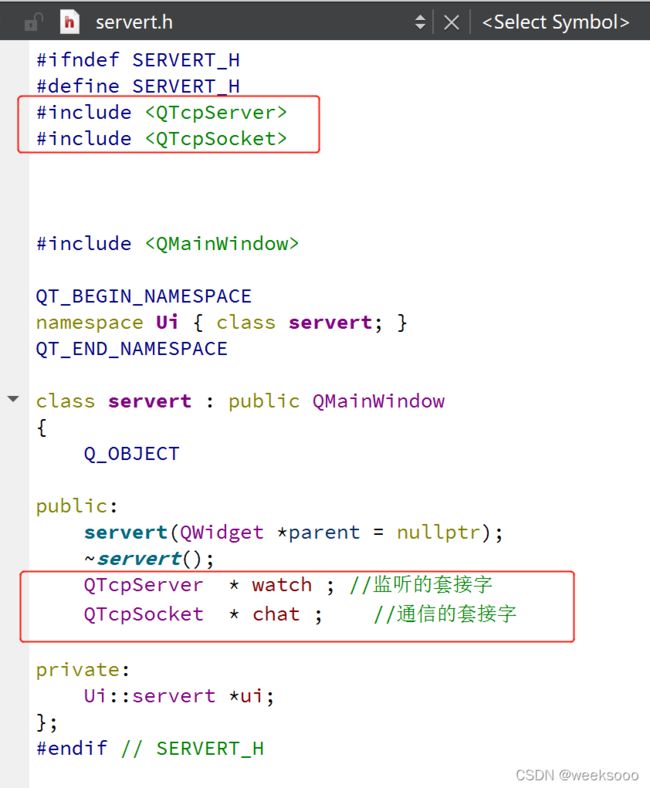
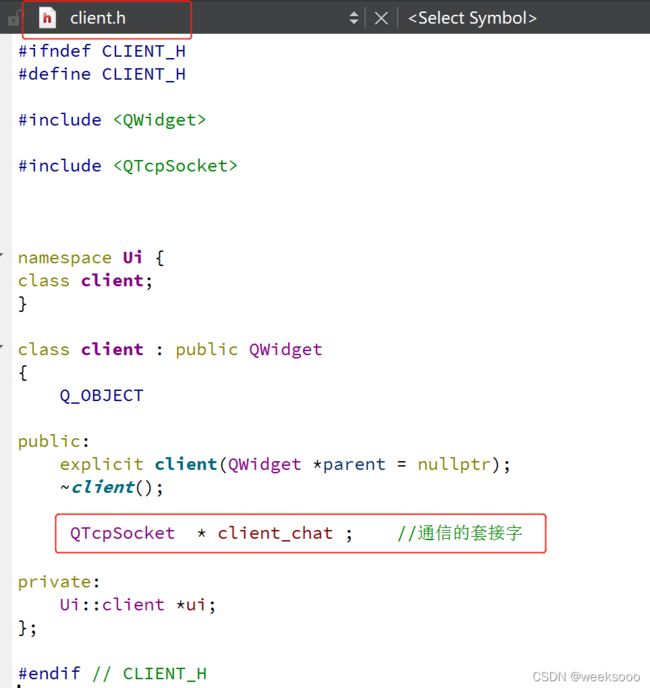
知识点三十三: QT中的TCP通信
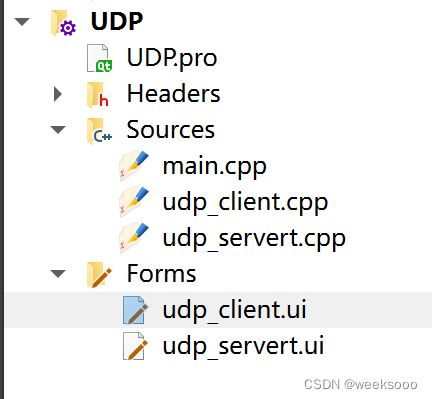
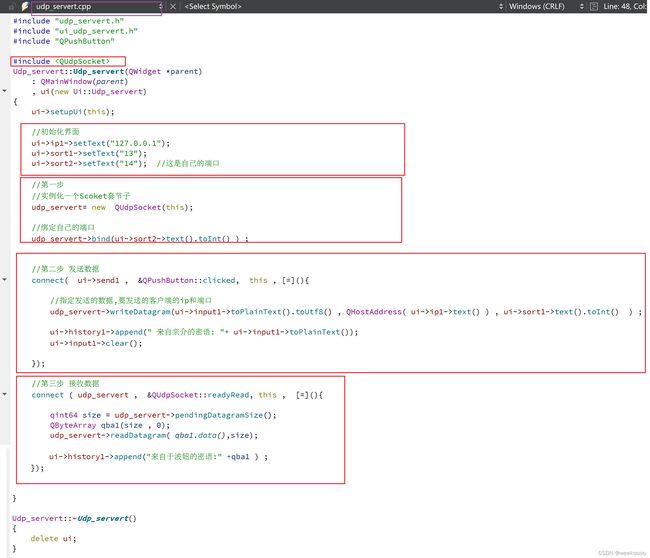
知识点三十三: QT中的UDP通信
知识点三十四: QT广播/组播
广播
例如前面在UDP中, 我们发送信息都是指定发送的内容,对方的IP地址和对方的端口号,相当于给一个人发信息。广播的意义在于给好多人发消息。
.
于是IP换一下就成为广播了。
例如服务器要进行组播,组播的话要进行设置组播段号,同时还需要要自身绑定更改
客户端不同样进行绑定端口设置,并加入服务端的组播里面.
![]()
知识点三十五: TCP文件传输
#include "servert1.h"
#include "ui_servert1.h"
#include
#include
#include
#include
#include

servert1::servert1(QWidget *parent)
    : QMainWindow(parent)
    , ui(new Ui::servert1)
{
    ui->setupUi(this);

    //监听套接字
    watch =new QTcpServer(this);

    //监听
    watch->listen( QHostAddress::Any , 77 );

    //如果有新的连接
    connect( watch ,&QTcpServer::newConnection,   this, [=](){


        //接收客户端套接字对象,从连接请求中选择一个请求连接
        chat = watch->nextPendingConnection();

        //获取对方的ip和端口
        QString ip = chat->peerAddress().toString();
        quint16 sort = chat->peerPort();

        ui->input1->append( QString("连接成功%1:%2").arg(ip).arg(sort) );

         ui->input1->append("请选则你要传输的文件" );


    }  );

    //选择文件
    connect(ui->choose1 , &QPushButton::clicked , this, [=](){

        QString filepath = QFileDialog::getOpenFileName ( this ,  "请选择文件" , "e\\" );
        if( filepath.isEmpty() == true  ){
            QMessageBox::warning (this  ,   "警告" , "文件打开失败");
        }

        ui->input1->append(filepath);

        //获取文件的名字和大小
        QFileInfo qfi(filepath) ;
        filename= qfi.fileName();
        filesize = qfi.size();


        //设置已发送大小变量
         sendsize = 0;

         //读取文件
        file.setFileName(filepath) ;

        bool a = file.open(QFile::ReadOnly);

        if (a == false){
            QMessageBox::critical (this  ,   "警告" , "文件读取失败");
            return ;
        }

    }  );


   connect (&timer ,&QTimer::timeout , this , [=](){
        //关闭定时器
       timer.stop();
       sendData();

    });

   //发送按钮
   connect(ui->send1 , &QPushButton::clicked , this, [=](){

       //先发送头报文
        QString  head = QString("%1##%2").arg(filename).arg(filesize);

         qint64 len_head = chat->write(head.toUtf8());


         if (len_head > 0)
         {
            timer.start(1000) ;
            ui->input1->append("正在发送文件");
         }
         else
         {
           qDebug()<<"头部信息发送失败" ;
           file.close();

         }

   });
}

servert1::~servert1()
{
    delete ui;
}

void servert1::sendData(){

    //发送文件信息

    //发送文件
    qint64 len = 0 ;

    do{
        //设置,每次发送的大小为4k
        char buf[4*1024]= {0};

        //读入数据
        len=file.read(  buf , sizeof(buf) );

        //读多少,发送多少
        len=chat->write(buf , len);

        //发送数据需要累积
        sendsize = sendsize + len;

    }while(len>0 );


    if (filesize == sendsize)
        {

        ui->input1->append("发送成功");
        file.close();

        //把客户端关了
        chat->disconnectFromHost();
        chat->close();
    }
}
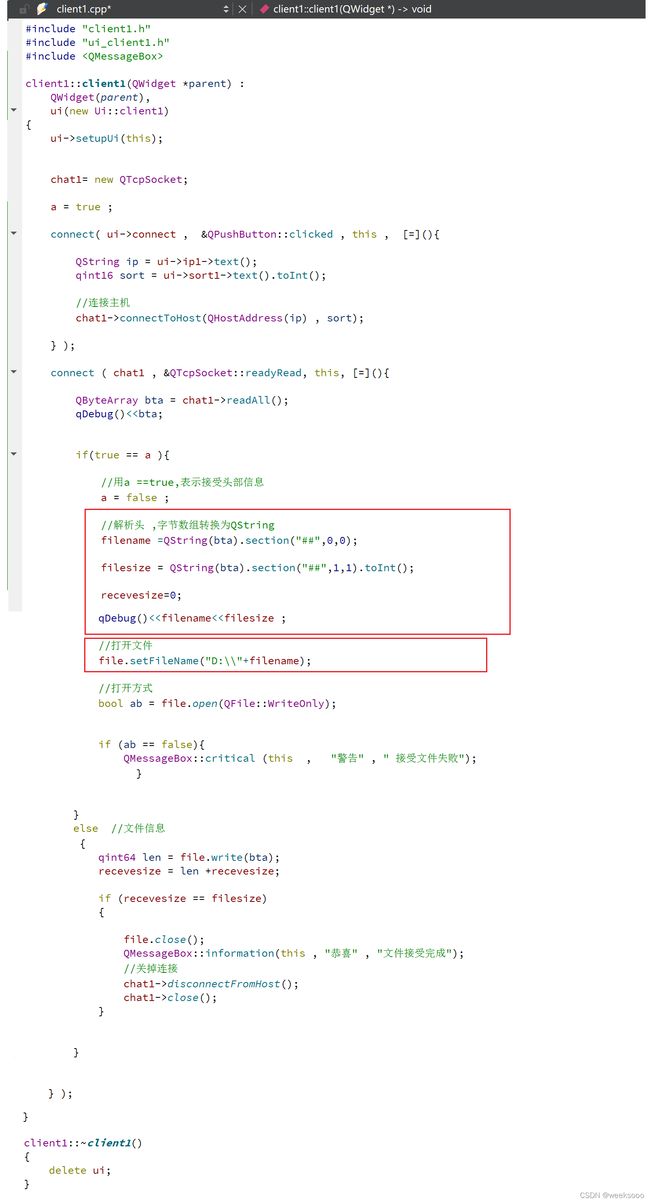
客户端
#include "client1.h"
#include "ui_client1.h"
#include

client1::client1(QWidget *parent) :
    QWidget(parent),
    ui(new Ui::client1)
{
    ui->setupUi(this);


    chat1= new QTcpSocket;

    a = true ;

    connect( ui->connect ,  &QPushButton::clicked , this ,  [=](){

        QString ip = ui->ip1->text();
        qint16 sort = ui->sort1->text().toInt();

        //连接主机
        chat1->connectToHost(QHostAddress(ip) , sort);

    } );

    connect ( chat1 , &QTcpSocket::readyRead, this, [=](){

        QByteArray bta = chat1->readAll();
        qDebug()<disconnectFromHost();
                chat1->close();
            }


        }


    } );


}

client1::~client1()
{
    delete ui;
}
…
day05
Qt 6中的Qt Multimedia模块
知识点三十六:视频播放 —>基础
//QMediaPlayer 类是高级媒体播放类。可用于回放歌曲、电影及互联网广播内容。
#include

//这个是控制声音相关的
#include

//QVideoWidget可以用于QMediaPlayer为渲染视频和QMdeidaPlaylist为访问播放列表的功能
#include
在相应的pro文件里面引入
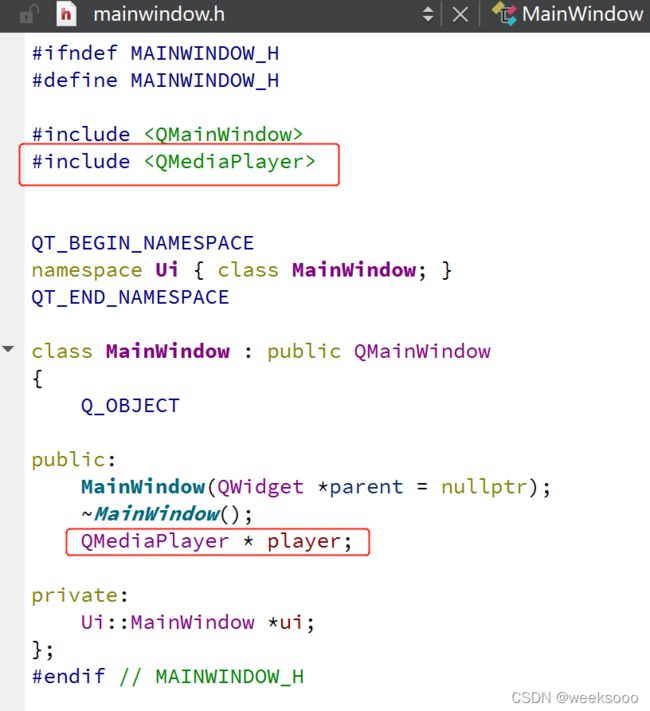
对应的.h文件中
.cpp文件
![]()
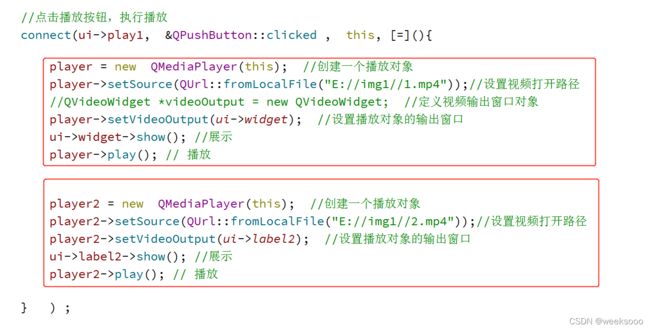
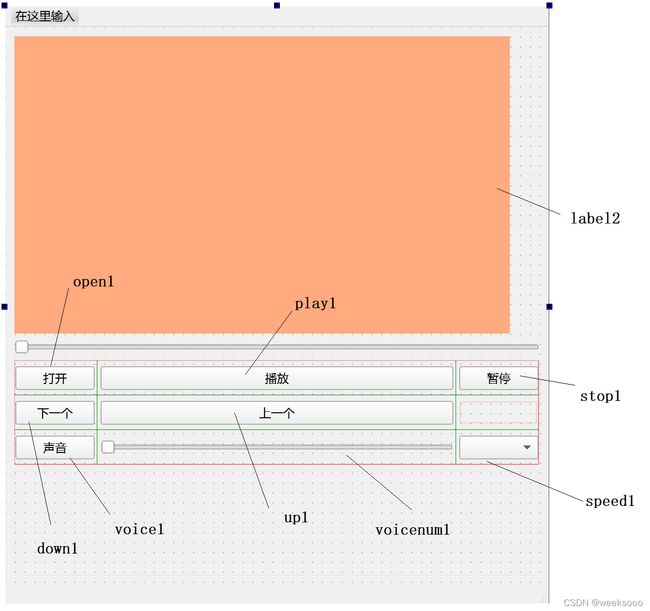
上面的代码是最基本的 播放,可以看到我们定义了一个播放窗口,实现效果如下: 并没有按我们预想的那样,展示在橙色区域,那是因为我们没有给他做一个联动。
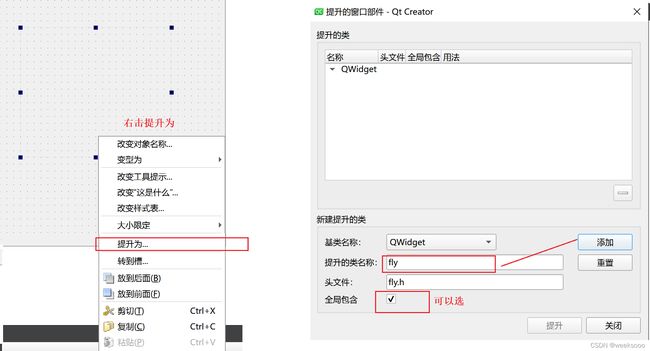
有上面的代码我们可以知道,播放的内容要放在QVideoWidget的对象里面。这时候,我们要想方设法把 label2设置为QvideoWidget对象。前面我们学过可以把控件提升为某一个类。
这时候我们就完成了基础的视频展示 ,但是 并没有接入任何的声音,声音问题将在下面的问题中解决。在看视频里面也没有满屏,周围还是有黑边,应该都可以优化,在下面的 代码中将会解决。
上述是Qlabel控件提升为QVideoWidget,但是有一个问题是setText。
不过同样的widget控件提升为QVideoWidget也能做播放窗口。还没有任何的错误。
.
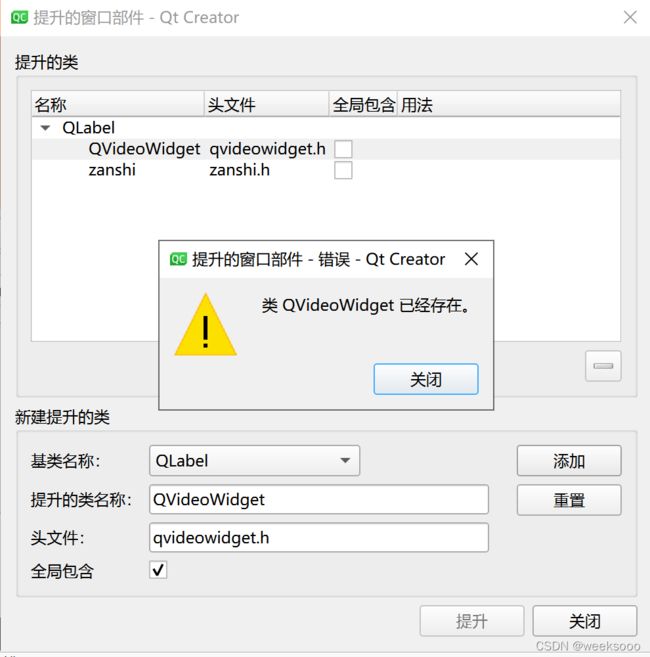
我们将widget窗口再次提升的时候,发现提升不了,不知道为啥。可能同一个界面里面对提升为同一个类的话只能提升一次。
做法一:取消对lable2的提升 , 然后把Qwidget控件提升为QVideoWidget


做法二:定义类重写QVideoWidget
如果我们在一个页面显示多个视频 ,如果是上面的情况没有办法了,这时候我们需要重写QvideoWidget类 , 例如lable2控件可以提升重写的 qvw1类,widget控件提升为重写的qvw2类。
这里是我给出的解决方案 ,不知道其他官方怎么做的,应该有更方便的方法。
.cpp里面
上述遗留问题: 视频有黑边 ,没有声音
知识点三十七:Qt视频播放相关图标以及转换
#include
知识点三十八:视频功能实现
>>播放功能
相应的.h文件
#include "mainwindow.h"
#include "ui_mainwindow.h"

//QMediaPlayer 类是高级媒体播放类。可用于回放歌曲、电影及互联网广播内容。
#include

//这个是控制声音相关的
#include

//QVideoWidget可以用于QMediaPlayer为渲染视频和QMdeidaPlaylist为访问播放列表的功能
#include

#include

MainWindow::MainWindow(QWidget *parent)
    : QMainWindow(parent)
    , ui(new Ui::MainWindow)
{
    ui->setupUi(this);


     //设置播放图标 ,这个图标是qt中提供的
     ui->play1->setIcon(style()->standardIcon(QStyle::SP_MediaPlay));

     //设置停止图标
     ui->stop1->setIcon(style()->standardIcon(QStyle::SP_MediaStop));

     //设置下一个按钮
     ui->down1->setIcon(style()->standardIcon(QStyle::SP_MediaSkipForward));

     //设置前一个按钮
     ui->up1->setIcon(style()->standardIcon(QStyle::SP_MediaSkipBackward));

     //设置声音按钮
     ui->voice1->setIcon(style()->standardIcon(QStyle::SP_MediaVolume));
     //设置声音滑动范围
     ui->voicenum1->setRange(0, 100);

     //设置变速选项
     ui->speed1->addItem("0.5x" , QVariant(0.5)); //0.5倍数
     ui->speed1->addItem("1.0x" , QVariant(1.0) ); //1.0倍数
     ui->speed1->addItem("2.0x", QVariant(2.0)); //2.0倍数
     ui->speed1->setCurrentIndex(1); //设置当前的倍数是哪一个index


     ui->stop1->setEnabled(false); //首先设置停止状态的按钮不能被按

     player = new  QMediaPlayer(this);  //创建一个播放对象
     player->setSource(QUrl::fromLocalFile("E://img1//1.mp4"));//设置视频打开路径
     //QVideoWidget *videoOutput = new QVideoWidget;  //定义视频输出窗口对象
     player->setVideoOutput(ui->widget);  //设置播放对象的输出窗口
     //设置声音1
     audioOutput1 = new QAudioOutput(this);
     player->setAudioOutput(audioOutput1);

     player2 = new  QMediaPlayer(this);  //创建一个播放对象
     player2->setSource(QUrl::fromLocalFile("E://img1//2.mp4"));//设置视频打开路径
     player2->setVideoOutput(ui->label2);  //设置播放对象的输出窗口
     //设置声音2
     //audioOutput2 = new QAudioOutput(this);
     //player2->setAudioOutput(audioOutput2);

     //点击播放按钮,执行播放
     connect(ui->play1,  &QPushButton::clicked ,  this, [=](){

         if( PlayerState1 ==QMediaPlayer::PlayingState ){

             //如果是现在处于播放状态,你一点击,就应该是暂停了
             PlayerState1 = QMediaPlayer::PausedState;
             //暂停
             player->pause();
             player2->pause();

             //状态为暂停 ,图标就是播放
             ui->play1->setIcon(style()->standardIcon(QStyle::SP_MediaPlay));
         }

         else {

             //否则的话,就是暂停状态或停止状态 , 那么一点击就应该播放了
             PlayerState1 = QMediaPlayer::PlayingState;

             ui->widget->show(); //展示
             player->play(); // 播放
             ui->label2->show(); //展示
             player2->play(); // 播放

             ui->stop1->setEnabled(true);   //播放以后设置停止状态为可点击
             ui->play1->setIcon(style()->standardIcon(QStyle::SP_MediaPause)); //设置播放的按钮为暂停暂停的图标
         }
     }) ;

}

MainWindow::~MainWindow()
{
    delete ui;

}
>>循环播放
player->setLoops(10);//设置循环播放次数为10次
>>停止功能
![]()
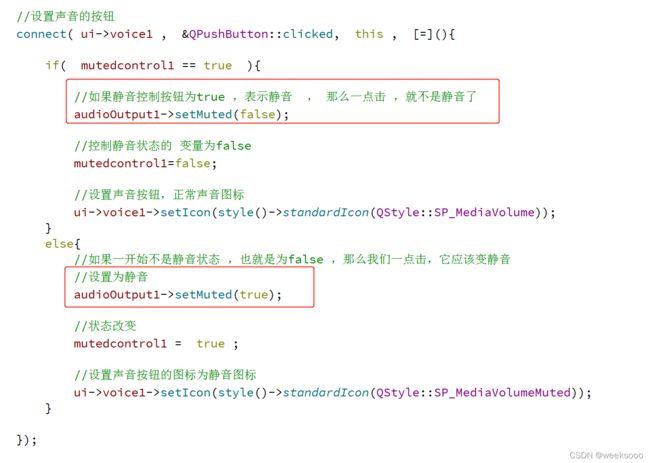
>>静音功能
对应的.h文件里面声明 mutedcontrol1变量
>>声音滑动
![]()
>>播放速度
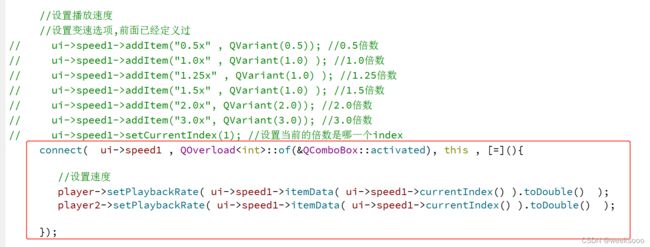
>>双击全屏
双击全屏,是鼠标事件,前面我们讲解过事件,因为我们要对视频播放的区域进行双击事件 ,上面我们采用重写 QVideoWidget类的方法,完成了视频的播放,重写的两个类是qvw1和qvw2 ,现在我们要进行双击事件,所以要在qvw1里面重写相应的鼠标事件。
这样就完成了对qvw1的双击全屏事件,qvw2的话也是同样的处理
>>单机暂停
对视频区域的双击全屏如上,那么也应该是可以在qvw1完成这样的操作,但是我们暂停播放的
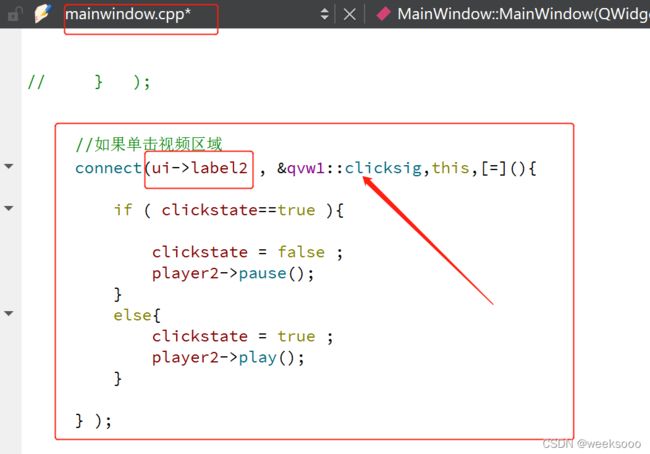
player->pause();中的player是定义在 其他文件里面的,这里就不能直接调用,于是我们可以换个思路,我们在qvw1的点击事件发一个信号。因为前面的label2是提升为qvw1,也就是相当于qvw1的一个实例化的对象,那么lable2是有这个信号的。
在对应的.h文件声明 点击状态 控制的clickstate
![]()
至此在视频区域的单击暂停播放和双击全屏功能实现。
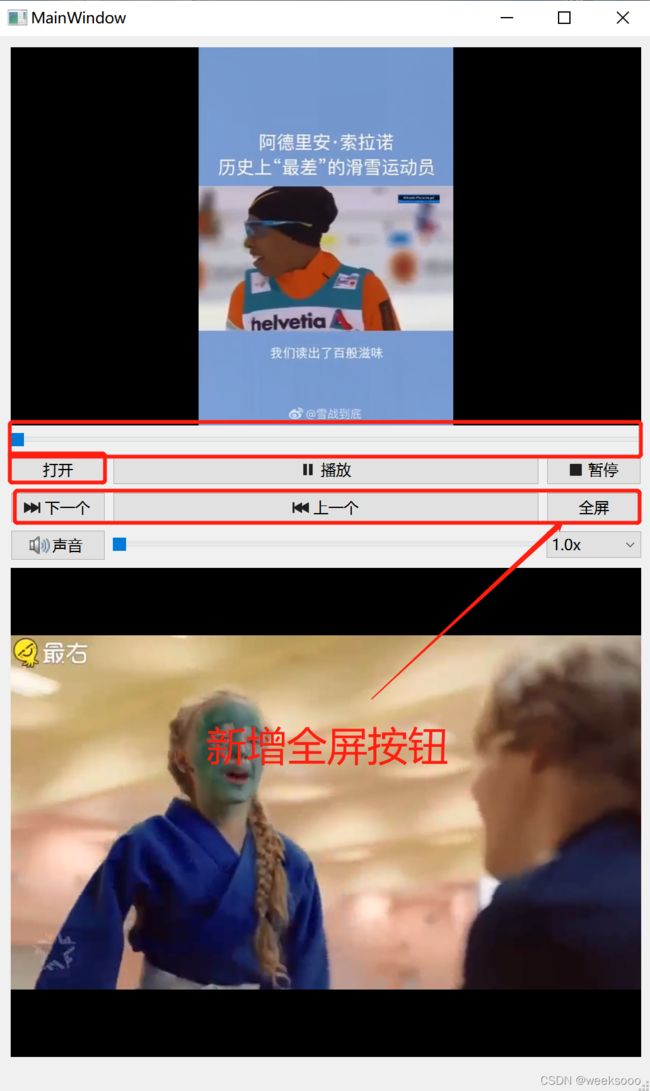
>>全屏按钮
> 至此下面红色按钮还没有实现功能
>>退出全屏
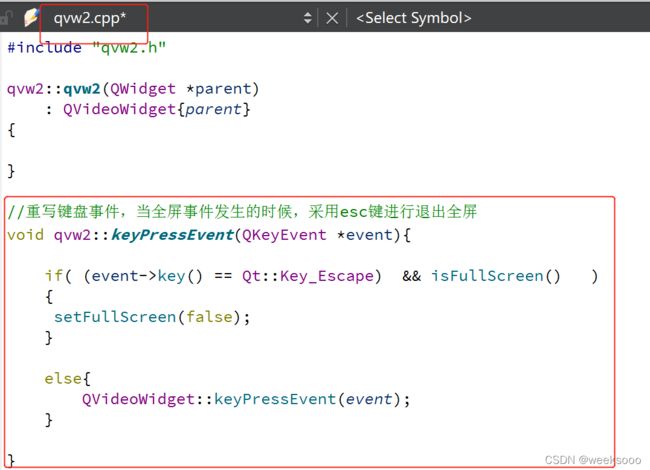
针对上面的qvw2我们并没有定义进行双击全屏事件,对于qvw2的实例化对象widget而言,如果我们在上面应用按钮指向widget全屏的话,发现退不出去了。
解决方案:因为全屏是qvw2 ,所以我们在qvw2要么定义双击全屏事件,要么就重写键盘或鼠标事件退出,我们这里采用重写键盘事件进行退出。
>>视频进度条显示和时长进度显示
#include
.cpp文件
>>拉动滑条,视频快进后退功能
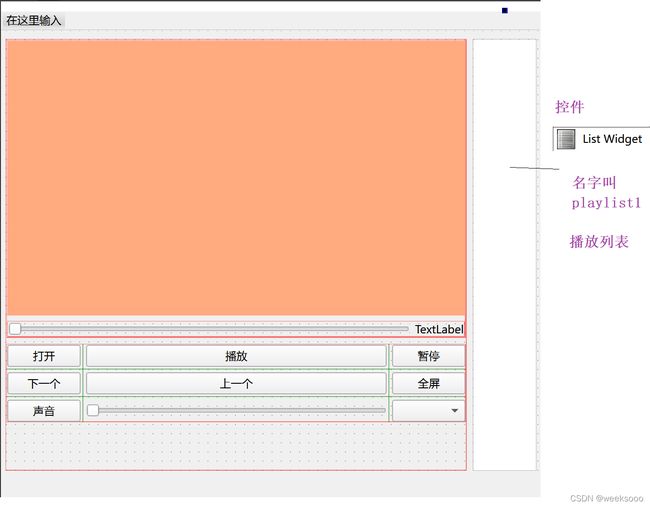
>>选择文件,将选中的文件的名字加入到播放列表中
.cpp文件
#include
#include
#include
对应的.h文件的申明
![]()
>>选择播放列表中的播放
.h文件
.cpp文件中
#include "mainwindow.h"
#include "ui_mainwindow.h"

//QMediaPlayer 类是高级媒体播放类。可用于回放歌曲、电影及互联网广播内容。
#include

//这个是控制声音相关的
#include

//QVideoWidget可以用于QMediaPlayer为渲染视频和QMdeidaPlaylist为访问播放列表的功能
#include

#include

#include

#include
#include
#include


MainWindow::MainWindow(QWidget *parent)
    : QMainWindow(parent)
    , ui(new Ui::MainWindow)
{
    ui->setupUi(this);


     //设置播放图标 ,这个图标是qt中提供的
     ui->play1->setIcon(style()->standardIcon(QStyle::SP_MediaPlay));

     //设置停止图标
     ui->stop1->setIcon(style()->standardIcon(QStyle::SP_MediaStop));

     //设置下一个按钮
     ui->down1->setIcon(style()->standardIcon(QStyle::SP_MediaSkipForward));

     //设置前一个按钮
     ui->up1->setIcon(style()->standardIcon(QStyle::SP_MediaSkipBackward));

     //设置声音按钮
     ui->voice1->setIcon(style()->standardIcon(QStyle::SP_MediaVolume));
     //设置声音滑动范围
     ui->voicenum1->setRange(0, 100);

     //设置变速选项
     ui->speed1->addItem("0.5x" , QVariant(0.5)); //0.5倍数
     ui->speed1->addItem("1.0x" , QVariant(1.0) ); //1.0倍数
     ui->speed1->addItem("1.25x", QVariant(1.25)); //2.0倍数
     ui->speed1->addItem("1.5x", QVariant(1.5)); //2.0倍数
     ui->speed1->addItem("2.0x", QVariant(2.0)); //2.0倍数
     ui->speed1->addItem("3.0x", QVariant(3.0)); //2.0倍数
     ui->speed1->setCurrentIndex(1); //设置当前的倍数是哪一个index


     ui->stop1->setEnabled(false); //首先设置停止状态的按钮不能被按

     player = new  QMediaPlayer(this);  //创建一个播放对象
     player->setSource(QUrl::fromLocalFile("E://img1//1.mp4"));//设置视频打开路径
     //QVideoWidget *videoOutput = new QVideoWidget;  //定义视频输出窗口对象
     player->setVideoOutput(ui->widget);  //设置播放对象的输出窗口
     //设置声音1
     audioOutput1 = new QAudioOutput(this);
     player->setAudioOutput(audioOutput1);

     player2 = new  QMediaPlayer(this);  //创建一个播放对象
     player2->setSource(QUrl::fromLocalFile("E://img1//6.mp4"));//设置视频打开路径
     player2->setVideoOutput(ui->label2);  //设置播放对象的输出窗口
     //设置声音2
     //audioOutput2 = new QAudioOutput(this);
     //player2->setAudioOutput(audioOutput2);

     //点击播放按钮,执行播放


     player3 = new  QMediaPlayer(this);  //创建一个播放对象
     player5= new  QMediaPlayer(this);  //创建一个播放对象
     player3->setLoops(10);//设置循环播放次数为10
     player5->setLoops(10);//设置循环播放次数为10

     connect(ui->play1,  &QPushButton::clicked ,  this, [=](){


         if( PlayerState1 ==QMediaPlayer::PlayingState ){

             //如果是现在处于播放状态,你一点击,就应该是暂停了
             PlayerState1 = QMediaPlayer::PausedState;
             //暂停
             player->pause();
             player2->pause();

             //状态为暂停 ,图标就是播放
             ui->play1->setIcon(style()->standardIcon(QStyle::SP_MediaPlay));
         }

         else {

             //否则的话,就是暂停状态或停止状态 , 那么一点击就应该播放了
             PlayerState1 = QMediaPlayer::PlayingState;

             //ui->widget->show(); //展示
             player->play(); // 播放
             //ui->label2->show(); //展示
             player2->play(); // 播放
             player->setLoops(10);//设置循环播放次数为10
             player2->setLoops(10);//设置循环播放次数为10

             ui->stop1->setEnabled(true);   //播放以后设置停止状态为可点击
             ui->play1->setIcon(style()->standardIcon(QStyle::SP_MediaPause)); //设置播放的按钮为暂停暂停的图标
         }
     }) ;

     //停止的功能
     connect(ui->stop1 , &QPushButton::clicked ,  this , [=]() {

         //如果是停止的状态的,那么应该就将stop1的按钮设置不可点击 ,与此同时,应该停止播放并将  播放图标设置播放
         ui->stop1->setEnabled(false);

         //暂停
         player->stop();
         player2->stop();

         //状态为暂停 ,图标就是播放
         ui->play1->setIcon(style()->standardIcon(QStyle::SP_MediaPlay));
     });


     //设置声音的按钮
     connect( ui->voice1 ,  &QPushButton::clicked,  this ,  [=](){

         if(  mutedcontrol1 == true  ){

             //如果静音控制按钮为true ,表示静音  , 那么一点击 ,就不是静音了
             audioOutput1->setMuted(false);

             //控制静音状态的 变量为false
             mutedcontrol1=false;

             //设置声音按钮,正常声音图标
             ui->voice1->setIcon(style()->standardIcon(QStyle::SP_MediaVolume));
         }
         else{
             //如果一开始不是静音状态 ,也就是为false ,那么我们一点击,它应该变静音
             //设置为静音
             audioOutput1->setMuted(true);

             //状态改变
             mutedcontrol1 =  true ;

             //设置声音按钮的图标为静音图标
             ui->voice1->setIcon(style()->standardIcon(QStyle::SP_MediaVolumeMuted));
         }

     });


     //设置声音滑动
     //前面已经设置声音滑动范围0-100
     //ui->voicenum1->setRange(0, 100);
     connect(  ui->voicenum1 , &QSlider::valueChanged , this, [=](){

         //主要是将声音进行了一个线性
         qreal linearVolume =  QAudio::convertVolume( ui->voicenum1->value() / qreal(100),
                                                     QAudio::LogarithmicVolumeScale,
                                                     QAudio::LinearVolumeScale);
         //设置媒体的声音
         audioOutput1->setVolume( linearVolume) ;

     } );


     //设置播放速度
     //设置变速选项,前面已经定义过
//     ui->speed1->addItem("0.5x" , QVariant(0.5)); //0.5倍数
//     ui->speed1->addItem("1.0x" , QVariant(1.0) ); //1.0倍数
//     ui->speed1->addItem("1.25x" , QVariant(1.0) ); //1.25倍数
//     ui->speed1->addItem("1.5x" , QVariant(1.0) ); //1.5倍数
//     ui->speed1->addItem("2.0x", QVariant(2.0)); //2.0倍数
//     ui->speed1->addItem("3.0x", QVariant(3.0)); //3.0倍数
//     ui->speed1->setCurrentIndex(1); //设置当前的倍数是哪一个index
     connect(  ui->speed1 , QOverload::of(&QComboBox::activated), this , [=](){

        //设置速度
        player->setPlaybackRate( ui->speed1->itemData( ui->speed1->currentIndex() ).toDouble()  );
        player2->setPlaybackRate( ui->speed1->itemData( ui->speed1->currentIndex() ).toDouble()  );

     });


     connect(player , &QMediaPlayer::durationChanged , this ,  [=](){
         //如果player的持续时间在改变
         videoduration1 = player->duration() /1000 ;  //palyer->duration可获取视频的总时长
         ui->huadong1->setMaximum(videoduration1);    //设置视频滑动条的最大滑动值

     } );


     connect( player , &QMediaPlayer::positionChanged, this , [=](){

         currentvideotime  = player->position();         //可获取媒体当前的播放到哪里了
         currentvideotime = currentvideotime/1000;  //将当前的时间进行转换


         if (!ui->huadong1->isSliderDown())   //这个就相当于如果滑动并未滑动,就把滑动的位置设置为当前的播放进度
         {
           //设置滑动块的位置
           ui->huadong1->setValue(currentvideotime);
          }

         //下面显示播放时间进度
         QString  tStr ;

         if ( currentvideotime || videoduration1   )
         {

             //例如有一个总时长为6分03秒的视频共计363s ,  那么视频读取时长为363000ms ,经过上面的/1000d的转换 videoduration的值应该是363
             //363%3600是看有几个小时 , 0小时   ;  363/60 %60 就是看看有多少分钟  6
             //363%60 看看剩余多少秒 3秒 ,   0

             QTime currentTime((currentvideotime / 3600) % 60, (currentvideotime / 60) % 60,
                 currentvideotime % 60, (currentvideotime * 1000) % 1000);              //这个显示的是当前的播放时间

             QTime totalTime((videoduration1 / 3600) % 60, (videoduration1 / 60) % 60,
                 videoduration1 % 60, (videoduration1 * 1000) % 1000);     //这个是总时间的转换  ,例如363
             QString format = "mm:ss";
             if (videoduration1 > 3600)
                 format = "hh:mm:ss";
             tStr = currentTime.toString(format) + " / " + totalTime.toString(format);

         }
         ui->timeshow1->setText(tStr);

     } );


       //拉动视频滑块,能够进行快进和后退的功能
       connect(ui->huadong1 , &QSlider::sliderMoved,this , [=](){

          //在前面我们设置了滑块的大小为视频的总时长 ,这个视频总时长是经过/1000处理的
          //例如视频的总时长是6分3秒 。共计363s ,滑块范围也是【0-363】, 但是对于player而言是363000ms
          //所以我们要进行滑块的滑动,那么时长应该也是*1000

         player->setPosition(ui->huadong1->value()*1000);

        });

     //如果单击视频区域
     connect(ui->label2 , &qvw1::clicksig,this,[=](){

         if ( clickstate==true ){

             clickstate = false ;
             player2->pause();
         }
         else{
             clickstate = true ;
             player2->play();
         }

     } );

     //全屏按钮 quanping1
     connect( ui->quanping1 ,  &QPushButton::clicked ,  this, [=](){

         //指定label2进行全屏
        // ui->label2->setFullScreen(!isFullScreen());

         //指定下面的widget为全屏
         ui->widget->setFullScreen(!isFullScreen());
         //实践证明,全屏按钮最好写一个双击视频全屏事件 ,要不然不好退出
     }) ;

     //打开文件
     connect(ui->open1 ,  &QPushButton::clicked , this , [=](){

       //打开文件,获取选择的文件的路径
         QString filepath = QFileDialog::getOpenFileName ( this ,  "请选择文件" , "d\\" );
         if( filepath.isEmpty() == true  ){
             QMessageBox::warning (this  ,   "警告" , "文件打开失败");
         }

         //定义一个列表,然后写入路径信息 ,  在playlist1里面加入文件的名字
         QFileInfo qfi1(filepath);

         //定义一个数组savepalylist用来存放 选择文件的全路径
         saveplaylistpath.append(filepath);

         //播放列表中加入文件名字
         ui->playlist1->addItem(qfi1.fileName());

     });


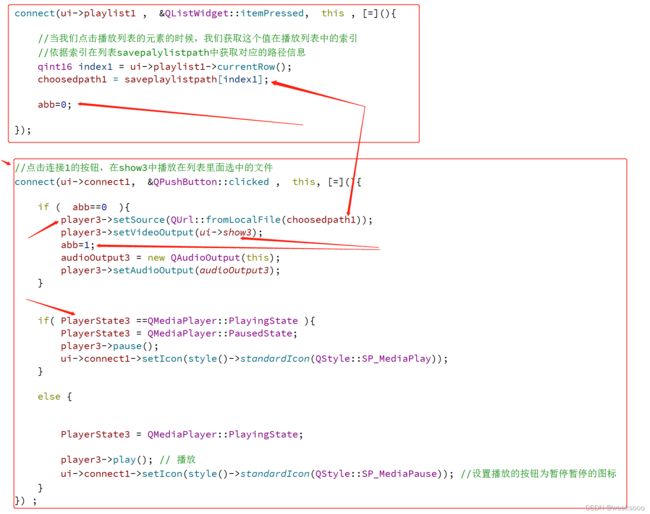
     connect(ui->playlist1 ,  &QListWidget::itemPressed,  this , [=](){

         //当我们点击播放列表的元素的时候,我们获取这个值在播放列表中的索引
         //依据索引在列表savepalylistpath中获取对应的路径信息
         qint16 index1 = ui->playlist1->currentRow();
         choosedpath1 = saveplaylistpath[index1];

         abb=0;

     });


     //点击连接1的按钮,在show3中播放在列表里面选中的文件
     connect(ui->connect1,  &QPushButton::clicked ,  this, [=](){

         if (  abb==0  ){
             player3->setSource(QUrl::fromLocalFile(choosedpath1));
             player3->setVideoOutput(ui->show3);
             abb=1;
             audioOutput3 = new QAudioOutput(this);
             player3->setAudioOutput(audioOutput3);
         }


         if( PlayerState3 ==QMediaPlayer::PlayingState ){
             PlayerState3 = QMediaPlayer::PausedState;
             player3->pause();
             ui->connect1->setIcon(style()->standardIcon(QStyle::SP_MediaPlay));
         }

         else {


             PlayerState3 = QMediaPlayer::PlayingState;

             player3->play(); // 播放
             ui->connect1->setIcon(style()->standardIcon(QStyle::SP_MediaPause)); //设置播放的按钮为暂停暂停的图标
         }
     }) ;


     //点击连接2的按钮,进行连接选中的播放源
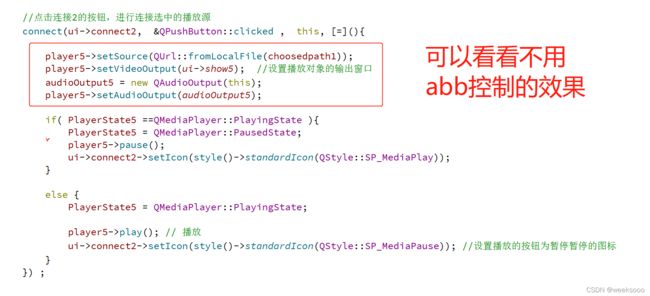
     connect(ui->connect2,  &QPushButton::clicked ,  this, [=](){

         player5->setSource(QUrl::fromLocalFile(choosedpath1));
         player5->setVideoOutput(ui->show5);  //设置播放对象的输出窗口
         audioOutput5 = new QAudioOutput(this);
         player5->setAudioOutput(audioOutput5);

         if( PlayerState5 ==QMediaPlayer::PlayingState ){
             PlayerState5 = QMediaPlayer::PausedState;
             player5->pause();
             ui->connect2->setIcon(style()->standardIcon(QStyle::SP_MediaPlay));
         }

         else {
             PlayerState5 = QMediaPlayer::PlayingState;

             player5->play(); // 播放
             ui->connect2->setIcon(style()->standardIcon(QStyle::SP_MediaPause)); //设置播放的按钮为暂停暂停的图标
         }
     }) ;


    setWindowTitle("全球小精灵emo系统");

}

MainWindow::~MainWindow()
{
    delete ui;

}
.h文件
#ifndef MAINWINDOW_H
#define MAINWINDOW_H

#include
#include
#include


QT_BEGIN_NAMESPACE
namespace Ui { class MainWindow; }
QT_END_NAMESPACE

class MainWindow : public QMainWindow
{
    Q_OBJECT

public:
    MainWindow(QWidget *parent = nullptr);
    ~MainWindow();
    QMediaPlayer * player;
    QMediaPlayer * player2;
    QMediaPlayer * player3;
    QMediaPlayer * player5;

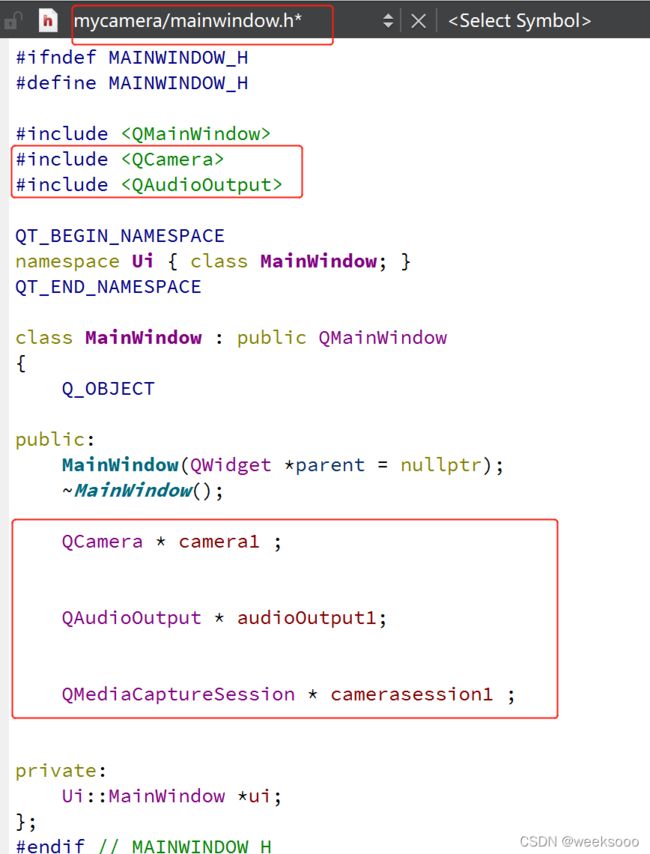
    QAudioOutput * audioOutput1;
    QAudioOutput * audioOutput2;
    QAudioOutput * audioOutput3;
    QAudioOutput * audioOutput5;

    QList saveplaylistpath ;
    QString  choosedpath1 ;
    qint16 abb;

    //播放的状态,设置初始播放状态为结束状态,就是结束播放
    QMediaPlayer::PlaybackState PlayerState1 = QMediaPlayer::StoppedState;
    QMediaPlayer::PlaybackState PlayerState3 = QMediaPlayer::StoppedState;
    QMediaPlayer::PlaybackState PlayerState5 = QMediaPlayer::StoppedState;

    bool mutedcontrol1 = false;     //静音 控制变量
    bool clickstate = true;


    qint64  videoduration1; //定义获取总时长时间的变量
    qint64  currentvideotime ; //设置当前播放时间变量

private:
    Ui::MainWindow *ui;
};
#endif // MAINWINDOW_H
>>下一个
>>上一个
至此视频的讲解结束,实现都是最基础的功能,当然如果想获取视频的声道,视频编码等属性,需要去探究qt6中的作者提供的例子player工程
…
day06
知识点三十九:QT摄像头—>基础
相应的.pro文件
#include
#include
#include
#include
我们可以查看摄像头的信息
控制台输出结果为
在上面我们打印的摄像头的名字 ,结果为HD Camera , 假如我们一开始就知道摄像头的名字,我们就可以不采用默认的,就用直接传入名字的方式打开。
在上面,我们仍然使用的是QVideoWidget类来实现摄像头的显示,当然和前面一样,这样方式不展示在ui界面中, 如果想要在UI界面中显示 ,可以用widget控件或lable控件提升为 QVideoWidget的重写类qvw1 ,重写qvw1如下
提升控件为qvw1
.h文件
知识点四十一:摄像头相关功能实现
>>获取与显示摄像头名字
>>摄像头开始、结束
>>退出系统
>>摄像头打开错误提示
>>从获取的摄像头名字中选择打开
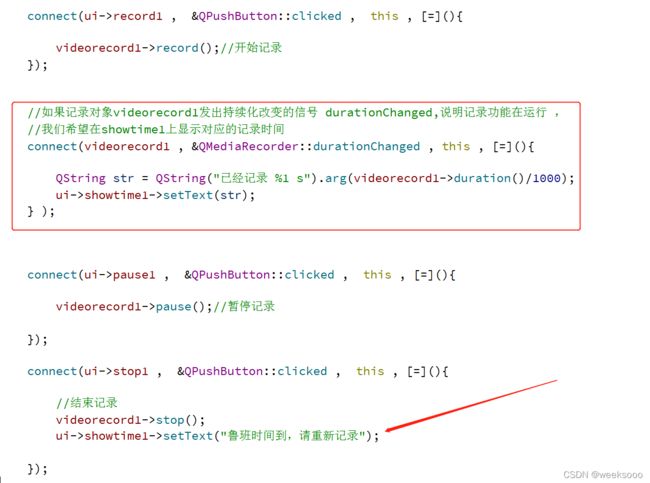
>>记录功能开始、暂停、结束
>>记录状态相应的按钮改变
>>功能优化1
于此同时,我们在上面的按钮的例如 摄像头的开始与停止当中,我们希望摄像头的结束 即 触发actionstop1的按钮的时候,相应的,如果记录功能开启的话,我们希望记录功能结束。
当我们从meuDevices下选择不同的设备的时候,我们也是同样的希望如果记录开启的话,我们希望记录也结束。
>>记录发生错误提示
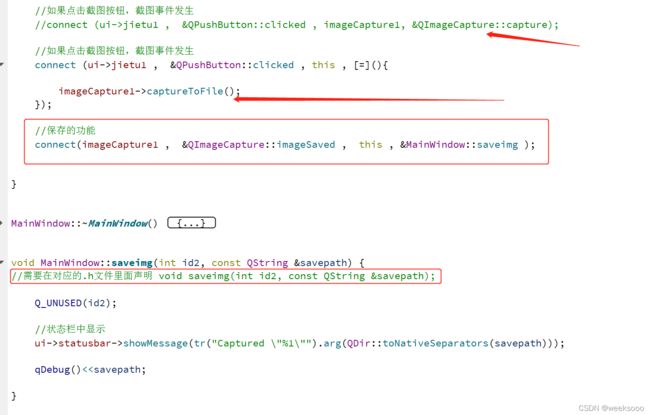
虽然我们没有写记录的保存,但是应该qt底层已经写好了,如果你开记录功能,那么就会自动保存。
>>静音功能
相机模型下
>>设置曝光
>>截图功能
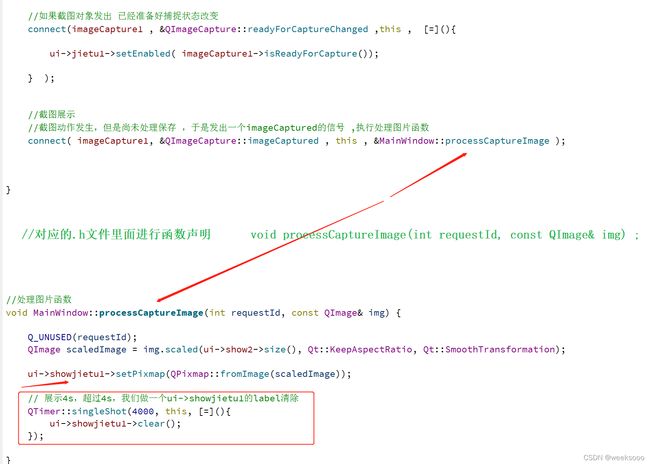
>>截图展示功能
不过好像路径都被qt官方写好了,这里只是一个调用显示。
>> 错误发生提示
>>优化
在前面的menuDevices下我们通过设备名字重新定义了session管理对象,所以我们应该要重新绑定
imageCapture1
至此摄像头到此结束,如果需要请移步至官网的给出的案例的camera案例中,如上面的设置 , 基础信息等
…
day07
知识点四十二:页面切换
页面切换
QT执行命令行
多线程
数据库
网络摄像头 rtsp
...
you did it
![]()


