R ggplot2
文章目录
- 1. ggplot2特点
- 2. ggplot2基本概念
- 3. ggplot2语法框架
-
- 3.1 共性映射与个性映射
- 3.2 几何对象与统计变换
- 3.3 aes与data参数
- 4 geom_xxx()几何对象
-
- 4.1 aesthetics specifications 美学参数
-
- 4.1.1 fill/color 颜色
- 4.1.2 linetype 线型
- 4.1.3 shape点型
- 4.1.4 family字体
- 4.1.5 Font face字型
- 4.1.6 vjust/hjust相对位置微调
- 4.2 position adjustment 位置调整参数
-
- 4.2.1 position_dodge(), position_dodge2() 水平并列
- 4.2.2 position_stack, position_fill 垂直堆积
- 4.2.3 position_jitter(), position_jitterdodge() 扰动错开
- 4.2.4 position_jitterdodge()
- 4.2.5 position_nudge 整体微调
- 5 stat_xxx()统计变换
-
- 5.1 stat_summary
- 5.2 stat_function
- 5.3 stat_smooth
- 6 coor_xxx()坐标系变换
-
- 6.1 coord_cartesian()笛卡尔坐标系
- 6.2 coord_fixed()修改纵横比坐标系
- 6.3 coord_flip()翻转坐标系
- 6.4 coord_polar()极坐标投影
-
- 6.4.1 风玫瑰图(一种常见的极坐标图形)
- 6.4.2 雷达图
- 6.5 coord_trans()变换笛卡尔坐标
- 6.6 coord_map()球面投影坐标系
- 7 scale_xxx()标度调整
-
- 7.1 坐标轴标度与scales包
- 7.2 颜色fill/color,灰度grey,色相hue, 色盲颜色
-
- 7.2.1 color/fill
- 7.2.2 透明度、色相、灰度
- 7.2.3 色盲友好色
- 7.3 shape点型,linetype线型
- 7.4 尺寸(size/area/radius)
- 7.5 时间轴
- 8 facet_xxx()分面系统
-
- 8.1 封装分面示例
- 8.2 网格分面示例:
- 8.3 labeller特殊字符分面标题
- 9 Guides图例与增加坐标轴
-
- 9.1 guide_colorbar
- 9.2 guide_legend
- 9.3 guides多个图例
- 9.4 多图例合并
- 9.5 新增坐标轴
- 10 themes主题系统
-
- 10.1 主题函数分类
- 10.2 ggThemeAssist包
- 10.3 套用主题模板
- 11 R进行绘图时输出希腊字符、上标、下标及数学公式
-
- 希腊字母
- 上下标
- paste
- 一个复杂的例子
- 数学公式
- Text
-
- Description
- Usage
- Arguments
- Details
- Aesthetics
- geom_label()
- Alignment
- Examples
- annotate {ggplot2} R Documentation
-
- Description
- Usage
- Arguments
- Details
- Examples
- 时间序列制图 geom_line()
1. ggplot2特点
-
采用图层的设计方式,有利于结构化思维
-
将表征数据和图形细节分开,能快速将图形表现出来,使创造性绘图更加容易,而不必纠结于图形的细节,细节可以后期慢慢调整
-
将常见的统计变换融入到了绘图中
-
有明确的起始(ggplot开始)与终止(一句话一个图层),图层之间的叠加是靠“+”实现的,越往后,其图层越在上方
-
图形美观,扩展包丰富,有专门调整字体和公式的包,有专门调整颜色的包,还有专门用按钮辅助调整主题的包,总之,应有尽有
2. ggplot2基本概念
-
Data数据, Mapping映射
-
Scale标度
-
Geometric几何对象
-
Statistics统计变换
-
Coordinate坐标系统
-
Layer图层
-
Facet分面
-
Legend图例
-
beautiful美化
3. ggplot2语法框架
ggplot(data, aes(x = , y = )) + # 基础图层,不出现任何图形元素,
geom_xxx()|stat_xxx() + # 几何图层或统计变换,出现图形元素
coord_xxx() + # 坐标变换,默认笛卡尔坐标系
scale_xxx() + # 标度调整,调整具体的标度
facet_xxx() + # 分面,将其中一个变量进行分面变换
guides() + # 图例调整
theme() # 主题系统
3.1 共性映射与个性映射
-
ggplot(data = NULL, mapping = aes())
-
geom_xxx(data = NULL, mapping = aes())
-
ggplot()内有data、mapping两个参数
具有全局优先级,可以被之后的所有geom_xxx对象或stat_xxx()所继承(前提是geom或stat未指定相关参数) -
而geom_xxx()或stat_xxx()内的参数属于局部参数,仅仅作用于内部
-
为了避免混乱,通常将共性映射的参数指定在ggplot(aes())aes内部,将个性映射的参数指定在geom_xxx(aes())或stat_xxx(aes())内部
3.2 几何对象与统计变换
-
几何对象geom_xxx(stat = ) 内有统计变换参数stat,统计变换stat_xxx(geom = )内也有几何对象参数geom
-
两种方法结果相同,几何对象更专注于结果,统计变换更专注于变换过程
library(ggplot2)
# 用几何对象作图
ggplot(data = NULL, mapping = aes(x = x, y = y)) + geom_point(color = "darked",
    stat = "identity")  # identity 表示没有任何统计变换
# 用统计变换作图
ggplot(data = NULL, mapping = aes(x = x, y = y)) + stat_identity(color = "darked",
    geom = "point")  # geom_point(stat = 'identity')与stat_identity(geom = 'point')结果一样
3.3 aes与data参数
-
aes参数用来指定要映射的变量,可以是多个变量,
-
data参数表示指定数据源,必须是data.frame格式,其坐标轴变量最好宽转长,只能指定一个x轴和y轴,多个x列或y列不能使用调整图例。
4 geom_xxx()几何对象
常用的几种几何对象函数:
| 几何对象函数 | 描述 | 其它 |
|---|---|---|
| geom_point | 点图 | geom_point(position = “jitter”) == geom_jitter() 避免重叠 |
| geom_line | 折线图 | 可以通过smooth参数平滑处理 |
| geom_bar | 柱形图 | x轴是离散变量 |
| geom_area | 面积图 | |
| geom_histogram | 直方图 | x轴数据是连续的 |
| geom_boxplot | 箱线图 | |
| geom_rect | 二维长方形图 | |
| geom_segment | 线段图 | |
| geom_path | 几何路径 | 由一组点按顺序连接 |
| geom_curve | 曲线 | |
| geom_abline | 斜线 | 有斜率和截距指定 |
| geom_hline | 水平线 | 常用于坐标轴绘制 |
| geom_vline | 竖线 | 常用于坐标轴绘制 |
| geom_text | 文本 |
ggplot2唯一不支持的常规平面图形是雷达图
其它几何对象查询:
ggplot2 part of the tidyverse
ggplot2 Quick Reference: geom
也可以用
ls(pattern = ‘^geom_’, env = as.environment(‘package:ggplot2’)) 查询,但是没有图形示例
library(ggplot2)
ls(pattern = "^geom_", env = as.environment("package:ggplot2"))
柱形图和散点图是关键,并且与极坐标变换紧密相连,着重介绍柱形图和散点图,其它的原理和参数都类似
4.1 aesthetics specifications 美学参数
能用作变量映射的包括:
| 美学参数 | 描述 |
|---|---|
| color/col/colour | 指定点、线和填充区域边界的颜色 |
| fill | 指定填充区域的颜色,如条形和密度区域, 第21到24号点也有填充色 |
| alpha | 指定颜色的透明度,从0(完全透明) 到 1(不透明) |
| size | 指定点的尺寸或线的宽度,单位为mm |
| angle | 角度,只有部分几何对象有,如geom_text文本的摆放角度, geom_spoke中短棒摆放角度 |
| linetype | 指定线条的类型 |
| shape | 点的形状, 为[0, 25]区间的26个整数 |
| vjust | 垂直位置微调,在(0, 1)区间的数字或位置字符串: 0=“buttom”, 0.5=“middle”, 1=“top” , 区间外的数字微调比例控制不均 |
| hjust | 水平位置微调,在(0, 1)区间的数字或位置字符串:0=“left”, 0.5=“center”, 1=“right” , 区间外的数字微调比例控制不均 |
| 不常映射的参数 | 描述 |
|---|---|
| binwidth | 直方图的宽度 |
| notch | 表示方块图是否应为缺口 |
| sides | 表示地毯图的安置位置(“b”底部, “l”左部, “t”顶部, “r”右部, “bl”左下角, 等等) |
| width | 箱线图或柱形图的宽度,从(0, 1), 柱形图默认0.9即90% |
| lineend | 表示指定宽线条端部形状,有3种:“round”半圆形,“square”增加方形, “butt”默认不变, 常用于geom_path和geom_line几何对象 |
| family | 字体(Font face),内置的只有3种:“sans”, “serif”, “mono” |
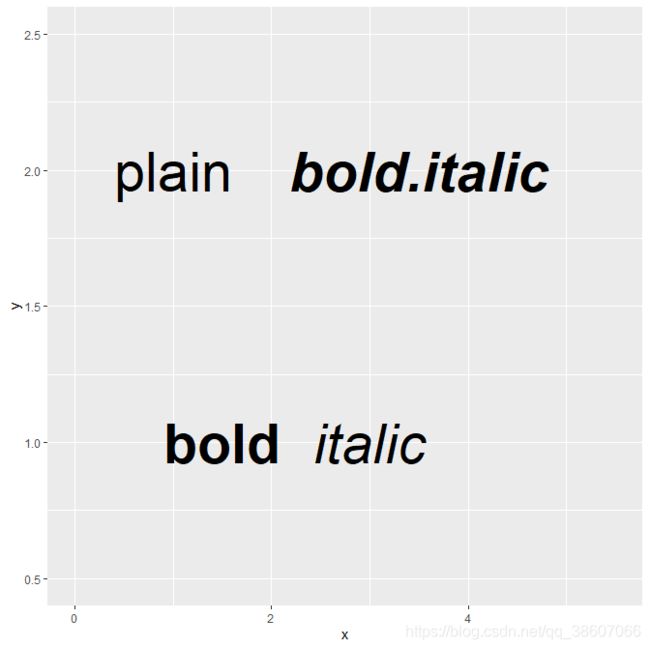
| fontface | 字型,分为: “plain”常规体, “bold”粗体, “italic”斜体, “bold.italic”粗斜体。常用于geom_text等文本对象 |
| lineheight | 长文本换行行距, 常用于geom_text等文本对象 |
4.1.1 fill/color 颜色
R自身自持很多种方式的颜色,“颜色名称”和“HEX色值”最常用和方便,其它的需要扩展包
颜色名称如:
“white”, “azure”, “bisque”, “blue”, “black”, “brown”, “chacolate”, “coral”, “cornsilk”, “cyan”, “gold” ,
“darkgolden”, “orange”, “orchild”, “gray”, “grey”, “tomato”, “violet”, “wheat”, “yellow”, “pink”,
“purple”, “red”, “salmon”, “seashell”, “ivory”,“magentia”,“navy”等系列。
所有的颜色名称见: R_Color_Chart(后台回复:颜色,可下载PDF版本)
如果对一组颜色进行映射的话,建议使用RColorBrewer等调色包,更加方便
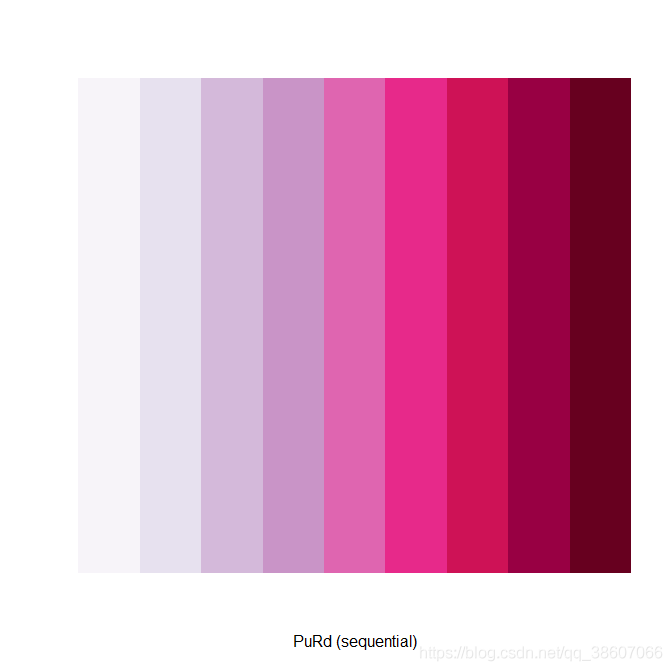
RColorBrewer颜色板如下,左边为字符串编号,上下分为3个版块,分别为渐变色板Sequential,离散对比色板Qualitative,两极色板Diverging
# colors() # 调用所有内置颜色编号,名称
scales::show_col(colors()[1:6])  # show_col函数可以将颜色名称或HEX色值向量显示出来
# RColorBrewer包使用
library("RColorBrewer")
display.brewer.all()  # 显示所有可用色板
display.brewer.all(type = "seq")  # 查看渐变色板

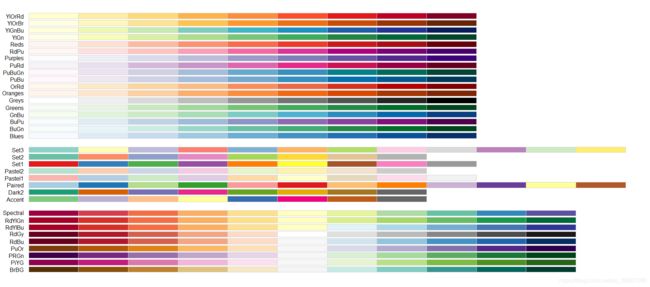
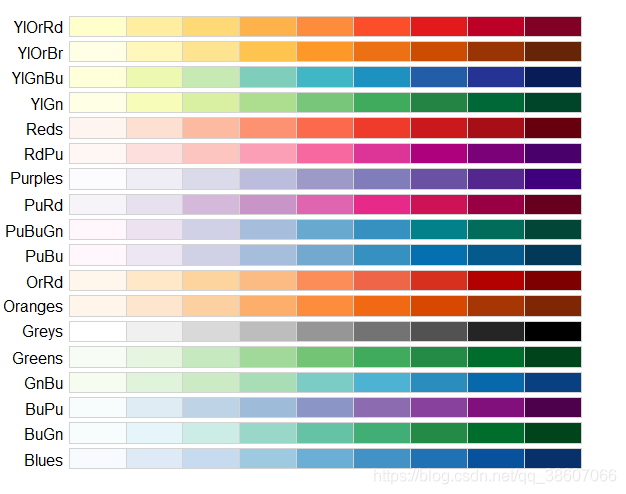
RColorBrewer使用方法:
通过函数brewer.pal(n, name)抽取色条名字为name的n种颜色,后面还可以用“[]”索引符号索取色块,
一个几何对象设置多种颜色只能在标度中设置,我们会在标度中继续讲解,例:
library("RColorBrewer")
display.brewer.pal(7, "PuRd")  # 抽取PuRd色条7种颜色,其颜色色值范围没有变,只是色值间隔增大了
display.brewer.pal(9, "PuRd")[11]  # 抽取PuRd色条11种颜色,其颜色色值范围没有变,指定色值间隔减小了
4.1.2 linetype 线型
线条形状通过名称或整数指定:
| 线型 | 描述 |
|---|---|
| 0=“blank” | 白线 |
| 1=“solid” | 实线 |
| 2=“dashed” | 短虚线 |
| 3=“dotted” | 点线 |
| 4=“dotdash” | 点横线 |
| 5=“longdash” | 长虚线 |
| 6=“twodash” | 短长虚线 |
自定义线型
通过1个十六进制的字符串来自定义,字符串长度为2、4、6或8。
第1个数字为代表闭合的长度,第2个数字代表缺口的长度,第3个数字又是闭合的长度,第4个数字是缺口的长度,如此交替排列。 然后作为一个整体重复排列
如:
- 字符串“33”代表开始3个单位长度闭合,产生短横线,然后缺口长度也是3个单位,这样作为一个整体进行重复排列
- 字符串“81”代表开始8个单位长度闭合,产生较长的横线,然后缺口长度为1个单位,这样作为一个整体重复排列
- 字符串“f8”表示开始16个单位长度闭合,产生长横线,然后缺口长度为8个单位,这样作为一个整体重复排列
- 字符串“357a”表示开始3个单位长度闭合,产生短横线,然后缺口5个单位,然后闭合7个单位,最后缺口11个单位,这样整体重复排列
library(ggplot2)
lty <- c("solid", "dashed", "dotted", "dotdash", "longdash", "twodash")
linetypes <- data.frame(
  y = seq_along(lty), # seq_along表示生成与对象同样长度的序列
  lty = lty
)
ggplot(linetypes, aes(0, y)) +
  geom_segment(aes(xend = 5, yend = y, linetype = lty)) +  # 将一个变量映射到线型
  scale_linetype_identity() +
  geom_text(aes(label = lty), hjust = 0, nudge_y = 0.2) +
  scale_x_continuous(NULL, breaks = NULL) +
  scale_y_reverse(NULL, breaks = NULL)

# 自定义线型
lty <- c("33", "18", "81", "f8", "5f", "357a", "5a73", "342167", "a23f45b6") # 自定义9种线型
linetypes <- data.frame(
  y = seq_along(lty),
  lty = lty
)
ggplot(linetypes, aes(0, y)) +
  geom_segment(aes(xend = 5, yend = y, linetype = lty)) + # 将一个变量映射到线型
  scale_linetype_identity() +
  geom_text(aes(label = lty), hjust = 0, nudge_y = 0.2) +
  scale_x_continuous(NULL, breaks = NULL) +
  scale_y_reverse(NULL, breaks = NULL)
4.1.3 shape点型
[0, 25]个序号代表26种点型, 只有21到26号点形能fill颜色,其它都只有轮廓颜色,
序号32:127对应ASCII字符
所有序号如图所示:
library("ggplot2")

d = data.frame(p = c(0:25, 32:127))
ggplot() + scale_y_continuous(name = "") + scale_x_continuous(name = "") + scale_shape_identity() +
    geom_point(data = d, mapping = aes(x = p%%16, y = p%/%16, shape = p), size = 5,
        fill = "red") + geom_text(data = d, mapping = aes(x = p%%16, y = p%/%16 +
    0.25, label = p), size = 3)
4.1.4 family字体
内置的只有3种,可以通过扩展包extrafont来将其它字体转换为ggplot2可识别的标准形式 还可以通过showtext包以图片的形式将字体插入到ggplot2图中,对于公式之类的特殊字体特别方便,比Latex容易爆了
library("ggplot2")

df <- data.frame(x = c(0.4, 0.6, 0.8), y = 1:3, family = c("sans", "serif",
    "mono"))
ggplot(df, aes(x, y)) + geom_text(aes(label = family, family = family), size = 15) +
    xlim(0.2, 1) + ylim(0, 4)
4.1.5 Font face字型
分为4类:“plain”常规体, “bold”粗体, “italic”斜体, “bold.italic”粗斜体
library("ggplot2")

df <- data.frame(x = c(1, 1.5, 3, 3.5), y = c(2, 1, 1, 2), fontface = c("plain",
    "bold", "italic", "bold.italic"))
ggplot(df, aes(x, y)) + geom_text(aes(label = fontface, fontface = fontface),
    size = 15) + xlim(0, 5.5) + ylim(0.5, 2.5)
4.1.6 vjust/hjust相对位置微调
vjust: “top” = 1, “middle” = 0.5, “bottom” = 0
hjust: “left” = 0, “center” = 0.5, “right” = 1
微调后,该几何对象还是在另一个几何对象周围
library("ggplot2")

just <- expand.grid(hjust = c(0, 0.5, 1), vjust = c(0, 0.5, 1))
just$label <- paste0(just$hjust, ", ", just$vjust)

ggplot(just, aes(hjust, vjust)) + geom_point(colour = "grey70", size = 5) +
    geom_text(aes(label = label, hjust = hjust, vjust = vjust))  # 也能进行映射,但很少用
4.2 position adjustment 位置调整参数
包括:
| 位置调整函数 | 描述 | 其它 |
|---|---|---|
| position_dodge() | 水平并列放置 | position_dodge(width = NULL, preserve = c(“total”, “single”)) 簇状柱形图 |
| position_dodge2() | 水平并列放置 | position_dodge2(…, padding = 0.1, reverse = FALSE) 簇状柱形图,多了2个参数 |
| position_identity() | 位置不变 | 对于散点图和折线图,可行,默认为identity,但对于多分类柱形图,序列间存在遮盖 |
| position_stack() | 垂直堆叠 | position_stack(vjust = 1, reverse = FALSE) 柱形图和面积图默认stack堆积 |
| position_fill() | 百分比填充 | position_fill(vjust = 1, reverse = FALSE) 垂直堆叠,但只能反映各组百分比 |
| position_jitter() | 扰动处理 | position_jitter(width = NULL, height = NULL, seed = NA)部分重叠, 用于点图 |
| position_jitterdodge() | 并列抖动 | position_jitterdodge(jitter.width = NULL,jitter.height = 0, dodge.width = 0.75,seed = NA) |
| position_nudge() | 整体位置微调 | position_nudge(x = 0, y = 0),整体向x和y方向平移的距离,常用于geom_text文本对象 |
position_xxx()内其它参数:padding, preserve, reverse, vjust, width, height 等
| 参数名称 | 值 | 描述 |
|---|---|---|
| preserve | c(“total”, “single”) | 当同一组柱子高度相同时,是保留单个柱子,还是保留所有柱子 |
| padding | 数字,(0, 1)区间 | 调整柱子间距(中心距离), 越大,则柱子宽度缩小越多, 间距越大,0.5表示宽度缩小50%以增大间距 |
| reverse | TRUE/FALSE | 是否翻转各组柱子内部的排列顺序,对于dodge2则水平顺序翻转,对于stack和fill则垂直顺序不同 |
| vjust | (0,1)区间 | 调整点和线的垂直位置,默认1顶部,0.5表示居中,0表示处于底部,折线的变化趋势会变平缓,默认1 |
| width | (0,1)区间 | 表示水平抖动的程度,因为存在正负方向,所有抖动的范围为其2倍,默认0.5 |
| height | (0,1)区间 | 表示垂直抖动的程度,因为存在正负方向,所以抖动的范围为其2倍, 默认0.5 |
| dodge.width | (0,1)区间 | 表示各组的点抖动总的水平宽度,默认0.75, 表示点分布在各组箱子75%宽度上 |
4.2.1 position_dodge(), position_dodge2() 水平并列
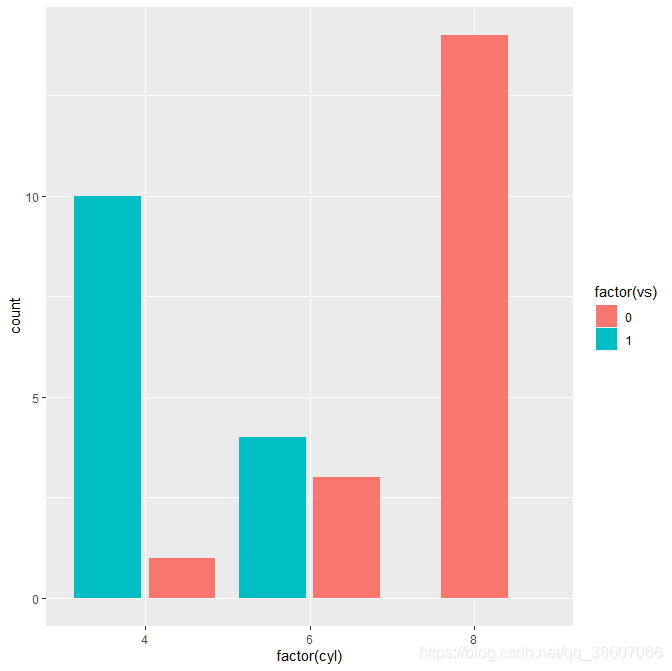
library(ggplot2)
ggplot(mtcars, aes(factor(cyl), fill = factor(vs))) + geom_bar(position = "dodge2")  # 水平并列柱形图,默认保留所有柱子

ggplot(mtcars, aes(factor(cyl), fill = factor(vs))) + geom_bar(position = position_dodge(preserve = "total"))  # 保留所有柱子

ggplot(mtcars, aes(factor(cyl), fill = factor(vs))) + geom_bar(position = position_dodge(preserve = "single"))  # 保留单个柱子

ggplot(mtcars, aes(factor(cyl), fill = factor(vs))) + geom_bar(position = position_dodge2(preserve = "single",
    reverse = T))  # 翻转各组柱子内部排列顺序

ggplot(mtcars, aes(factor(cyl), fill = factor(vs))) + geom_bar(position = position_dodge2(preserve = "single",
    padding = 0.5))  # 所有柱子宽度缩小50%
4.2.2 position_stack, position_fill 垂直堆积
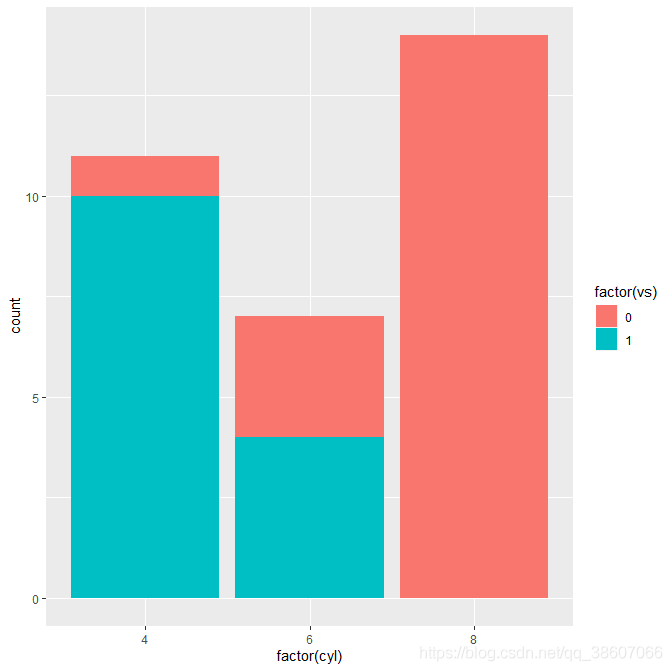
library(ggplot2)
ggplot(mtcars, aes(factor(cyl), fill = factor(vs))) + geom_bar()  # 柱形图默认stack堆积

ggplot(mtcars, aes(factor(cyl), fill = factor(vs))) + geom_bar(position = "fill")  # 百分比堆积

ggplot(mtcars, aes(factor(cyl), fill = factor(vs))) + geom_bar(position = position_stack(reverse = TRUE))  # 翻转各组内部垂直堆叠顺序

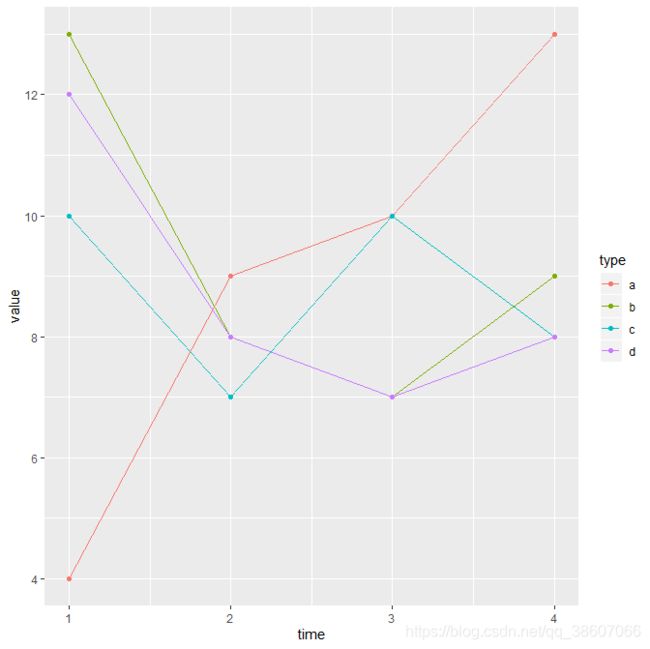
# 散点图 + 折线图
series <- data.frame(time = c(rep(1, 4), rep(2, 4), rep(3, 4), rep(4, 4)), type = rep(c("a",
    "b", "c", "d"), 4), value = rpois(16, 10))
ggplot(series, aes(time, value, group = type)) + geom_line(aes(colour = type)) +
    geom_point(aes(colour = type))  # 默认identity

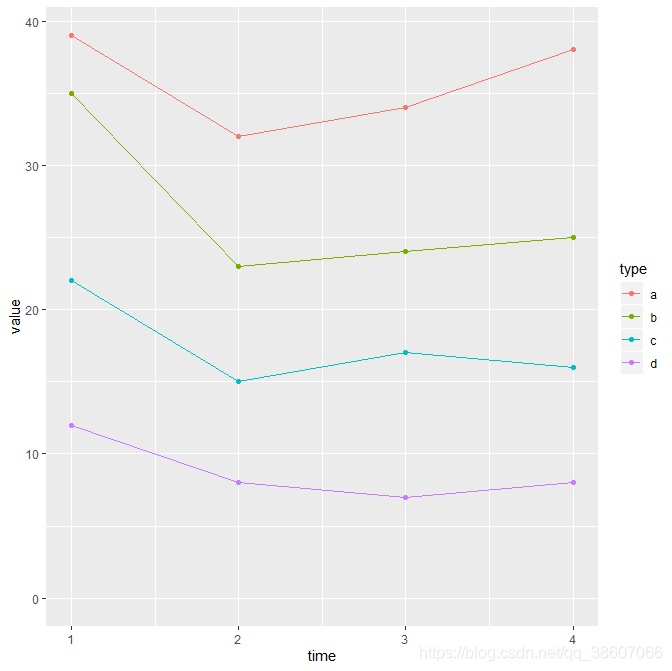
ggplot(series, aes(time, value, group = type)) + geom_line(aes(colour = type),
    position = "stack") + geom_point(aes(colour = type), position = "stack")  # stack堆积

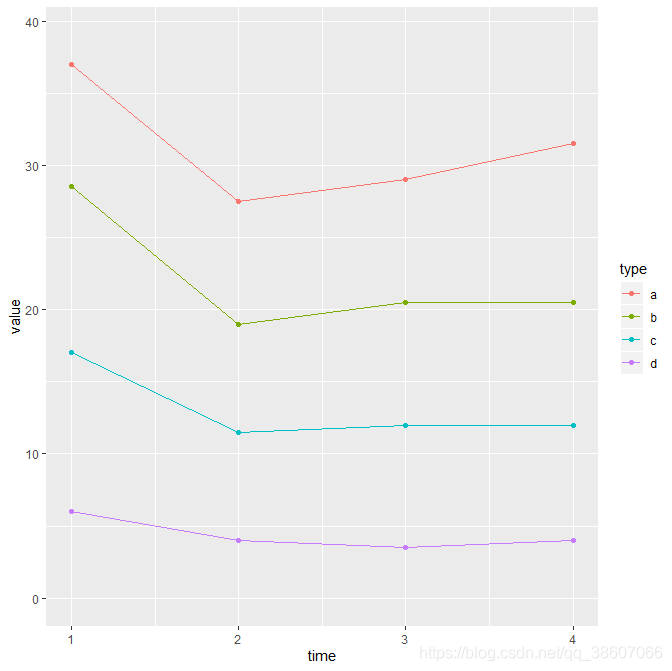
ggplot(series, aes(time, value, group = type)) + geom_line(aes(colour = type),
    position = position_stack(vjust = 0.5)) + geom_point(aes(colour = type),
    position = position_stack(vjust = 0.5))  # 向下移动半个单位,以最下面的元素为高度为基准

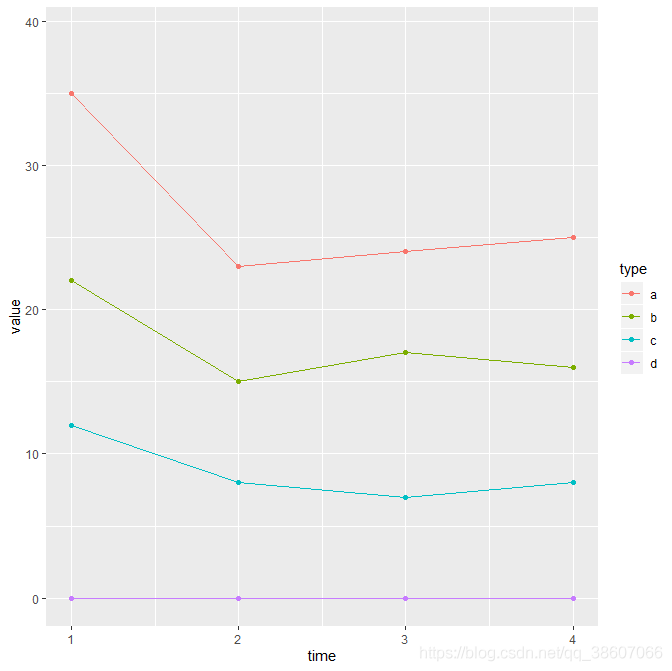
ggplot(series, aes(time, value, group = type)) + geom_line(aes(colour = type),
    position = position_stack(vjust = 0)) + geom_point(aes(colour = type), position = position_stack(vjust = 0))  # 向下移动到底,最下面的折线都拉直了
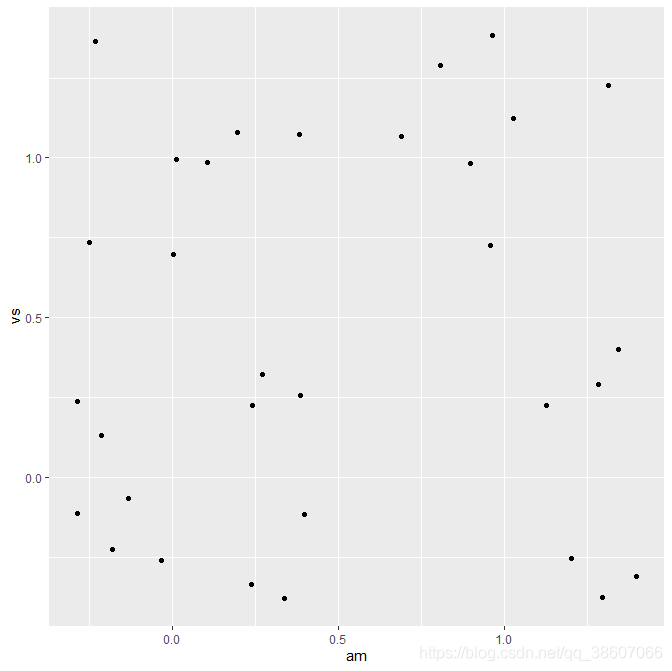
4.2.3 position_jitter(), position_jitterdodge() 扰动错开
library(ggplot2)
ggplot(mtcars, aes(am, vs)) +
  geom_jitter()

ggplot(mtcars, aes(am, vs)) +
  geom_jitter(width = 0.1, height = 0.1) # 增加水平抖动10%,垂直抖动10%

ggplot(mtcars, aes(am, vs)) +
  geom_point(position = position_jitter(width = 0.1, height = 0.1)) # 原理与上面一样,但是抖动是随机的,每次结果都可能不一样

ggplot(mtcars, aes(am, vs)) +
  geom_point(position = "jitter") + # 默认抖动50%
  geom_point(aes(am + 0.2, vs + 0.2), position = "jitter", color = "red" ) # 可以在映射里面进行简单的运算
4.2.4 position_jitterdodge()
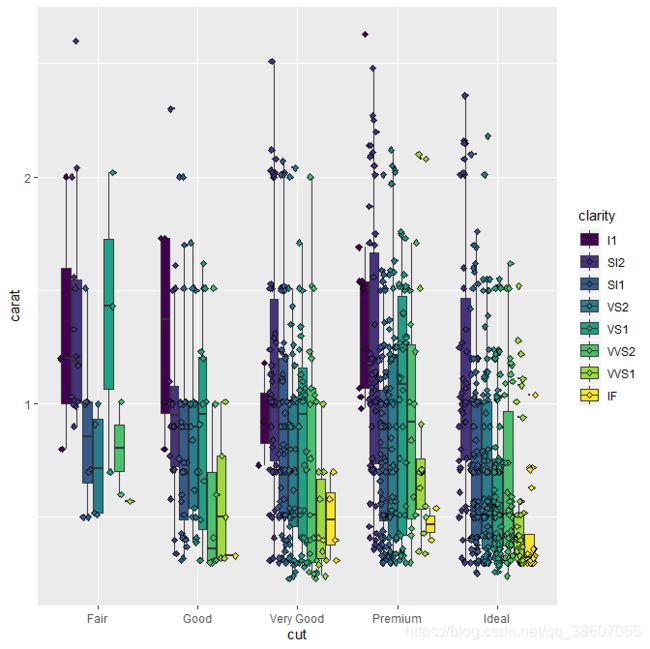
position_jitterdodge(jitter.width = NULL, jitter.height = 0, dodge.width = 0.75, seed = NA)
仅仅用于箱线图和点图在一起的情形,且有顺序的,必须箱子在前,点图在后,抖动只能用在散点几何对象中,
jitter.width 默认40%, jitter.height 默认0
library(ggplot2)
dsub <- diamonds[sample(nrow(diamonds), 1000), ]

ggplot(dsub, aes(x = cut, y = carat, fill = clarity)) + geom_boxplot(outlier.size = 0) +
    geom_point(shape = 23)  # 23号点形状为菱形

ggplot(dsub, aes(x = cut, y = carat, fill = clarity)) + geom_boxplot(outlier.size = 0) +
    geom_point(shape = 23, position = position_jitterdodge(dodge.width = 0.1))  # 点分布于各组箱子10%宽度上,默认点水平抖动错开

ggplot(dsub, aes(x = cut, y = carat, fill = clarity)) + geom_boxplot(outlier.size = 0) +
    geom_point(shape = 23, position = position_jitterdodge(dodge.width = 0.8))  # 点分布于各组箱子80%宽度上,默认点水平抖动错开
4.2.5 position_nudge 整体微调
library(ggplot2)
df <- data.frame(x = c(1, 3, 2, 5), y = c("a", "c", "d", "c"))

ggplot(df, aes(x, y)) + geom_point() + geom_text(aes(label = y))  # 文本对象位置与点重合,视觉效果不好

ggplot(df, aes(x, y)) + geom_point() + geom_text(aes(label = y), position = position_nudge(y = -0.1))  # 文本位置向下移动1%个单位,错开文本与点位置


————————————————
版权声明:本文为CSDN博主「R语言中文社区」的原创文章,遵循 CC 4.0 BY-SA 版权协议,转载请附上原文出处链接及本声明。
原文链接:https://blog.csdn.net/kMD8d5R/article/details/84312225
5 stat_xxx()统计变换
相比几何对象,增加了:
| 统计变换函数 | 描述 | 其它 |
|---|---|---|
| stat_bin | 直方图 | 分割数据,然后绘制直方图 |
| stat_function | 函数曲线 | 增加函数曲线图 |
| stat_qq | Q-Q图 | |
| stat_smooth | 平滑曲线 | |
| stat_ellipse | 椭圆 | 常用于椭圆形置信区间,带状置信区间用geom_ribbon |
| stat_spoke | 绘制有方向的数据点 | |
| stat_sum | 绘制不重复的取值之和 | |
| stat_summary | 分组汇总 | 可以求每组的均值,中位数等 |
| stat_unique | 绘制不同的数据,去掉重复值 | |
| stat_ecdf | 经验累计密度图 | |
| stat_xsline | 样条曲线拟合 | 见基础运算_3 |
查询其它的统计变换函数:
ggplot2 parts of the tidyverse
使用ls(pattern = ‘^stat_’, env = as.environment(‘package:ggplot2’))
library(ggplot2)
ls(pattern = "^stat_", env = as.environment("package:ggplot2"))
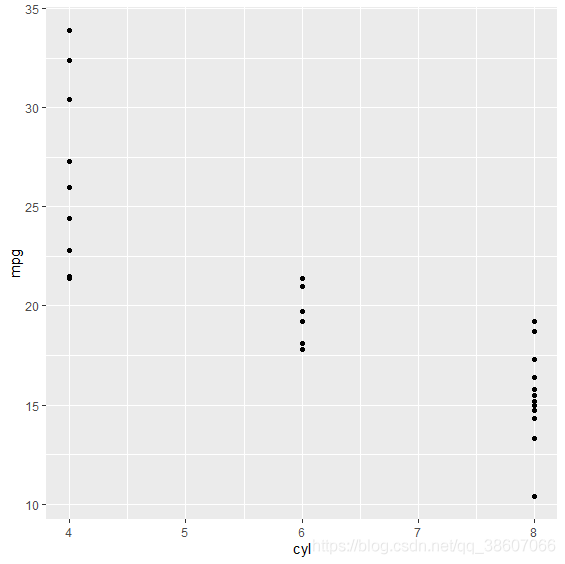
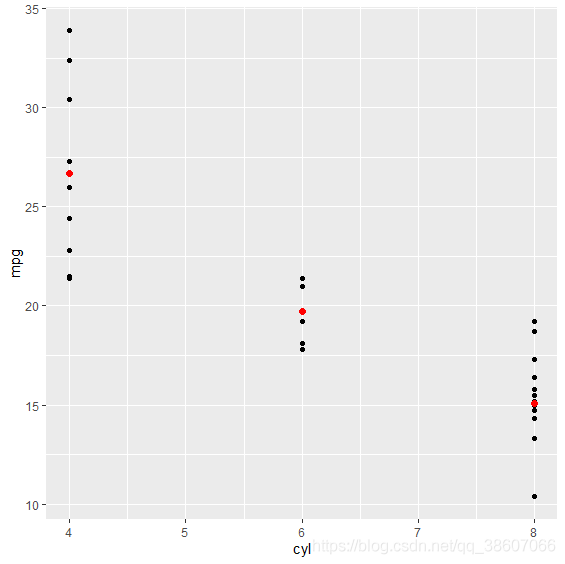
5.1 stat_summary
要求数据源的y能够被分组,每组不止一个元素, 或增加一个分组映射,即aes(x= , y = , group = )
stat_summary (mapping = NULL, data = NULL, geom = "pointrange", position = "identity",
    ..., fun.data = NULL, fun.y = NULL, fun.ymax = NULL, fun.ymin = NULL,
    fun.args = list(), na.rm = FALSE, show.legend = NA, inherit.aes = TRUE)
参数解释:
- fun.data 表示指定完整的汇总函数,输入数字向量,输出数据框,常见 4种: smean.cl.boot, smean.cl.normal, smean.sdl, smedian.hilow。 更多
- fun.y 表示指定对y的汇总函数,同样是输入数字向量,返回单个数字,这里的y通常会被分组,汇总后是每组返回1个数字
- fun.ymin 表示取y的最小值,输入数字向量,每组返回1个数字
- fun.ymax 表示取y的最大值,输入数字向量,每组返回1个数字
library(ggplot2)
library(Hmisc)

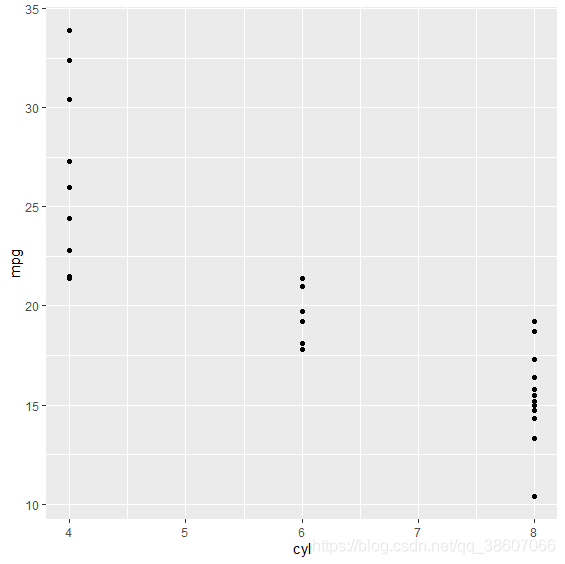
g <- ggplot(mtcars, aes(cyl, mpg)) + geom_point()
g + stat_summary(fun.data = "mean_cl_boot", color = "red", size = 2)  # 用mean_cl_bool对mpg进行运算,返回均值,最大值,最小值3个向量组成的矩阵

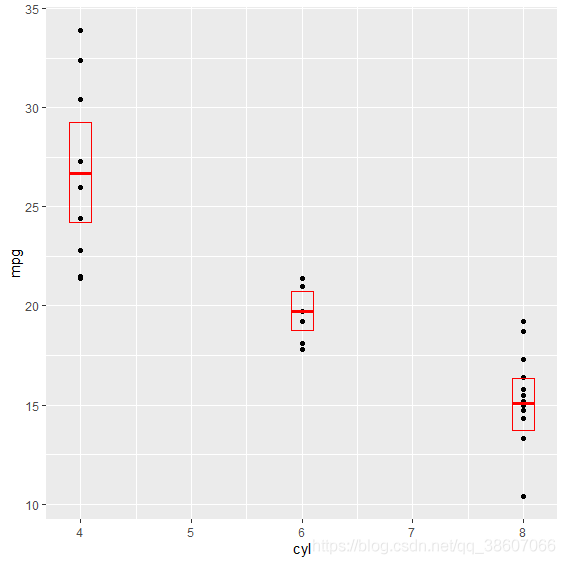
g + stat_summary(fun.y = "median", color = "red", size = 2, geom = "point")  # 计算各组中位数
g + stat_summary(fun.y = "mean", color = "red", size = 2, geom = "point")  # 计算各组均值
g + aes(color = factor(vs)) + stat_summary(fun.y = mean, geom = "line")  # 增加1组颜色变量映射,然后求均值并连线
g + stat_summary(fun.y = mean, fun.ymin = min, fun.ymax = max, color = "red")  # 计算各组均值,最值

# stat_summary_bin
g1 <- ggplot(diamonds, aes(cut))
g1 + geom_bar()  # 条形图 ,只有1个映射的时候默认为计数
g1 + stat_summary_bin(aes(y = price), fun.y = "mean", geom = "bar")  # 分组计算均值

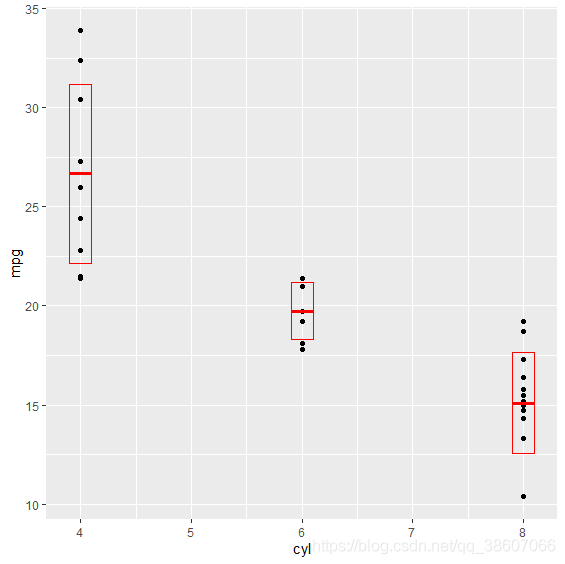
# stat_sum_df用矩形将最值与均值框起来
stat_sum_df <- function(fun, geom = "crossbar", ...) {
    stat_summary(fun.data = fun, color = "red", geom = geom, width = 0.2, ...)
}
g2 <- ggplot(mtcars, aes(cyl, mpg)) + geom_point()
g2 + stat_sum_df("mean_cl_boot", mapping = aes(group = cyl))  # 增加1个分组映射
g2 + stat_sum_df("mean_sdl", mapping = aes(group = cyl))
g2 + stat_sum_df("mean_sdl", fun.args = list(mult = 1), mapping = aes(group = cyl))
g2 + stat_sum_df("median_hilow", mapping = aes(group = cyl))
5.2 stat_function
需要2个映射变量aes(group = , y = )
stat_function(mapping = NULL, data = NULL, geom = "path", position = "identity",
    ..., fun, xlim = NULL, n = 101, args = list(), na.rm = FALSE,
    show.legend = NA, inherit.aes = TRUE)
参数解释:
- fun 表示要绘图的函数表达式
- xlim 表示要显示的x范围
- n 表示要差值的点数目
- args 表示其它要传递给fun的参数
library(ggplot2)
set.seed(1492)
df <- data.frame(
  x = rnorm(100)
)
x <- df$x
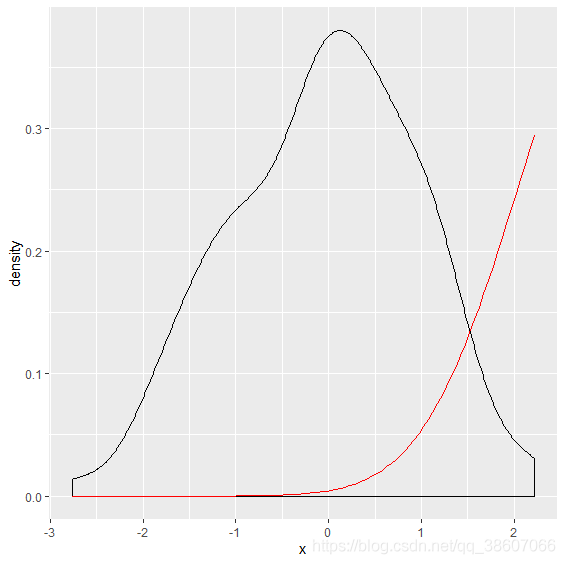
base <- ggplot(df, aes(x)) + geom_density() # 核密度图,展示变量分布规律,与频率分布直方图原理相同
base + stat_function(fun = dnorm, color = "red") # dnorm表示正态分布密度函数
base + stat_function(fun = dnorm, colour = "red", args = list(mean = 3)) # args传参给fun,生成均值为3的正态分布密度图

ggplot(data.frame(x = c(0, 2)), aes(x)) +
  stat_function(fun = exp, geom = "line") # 画e^x在(0, 2)区间的函数图形,数据点由插值产生
ggplot(data.frame(x = c(-5, 5)), aes(x)) +
  stat_function(fun = dnorm) # 画在区间(-5, 5)区间的正态分布密度图,数据点由插值产生
ggplot(data.frame(x = c(-5, 5)), aes(x)) +
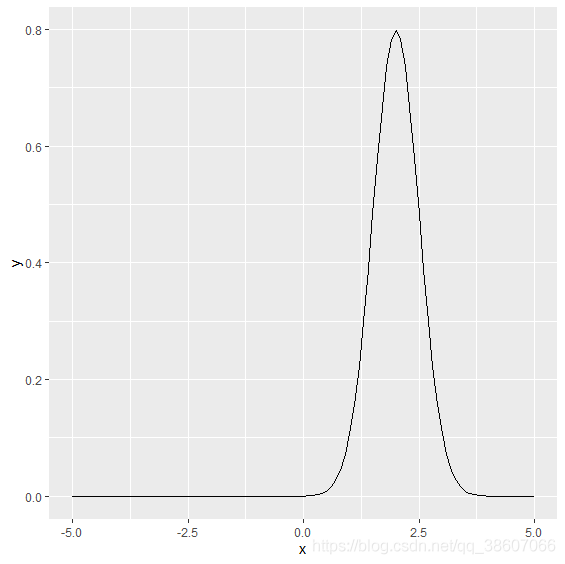
  stat_function(fun = dnorm, args = list(mean = 2, sd = .5)) # 画均值为2,标准差为0.5的正态分布密度图

f <- ggplot(data.frame(x = c(0, 10)), aes(x))
f + stat_function(fun = sin, color = "red") + # 绘制(0, 10)区间的正弦函数图形
  stat_function(fun = cos, color = "blue") # 绘制(0, 10)区间的余弦函数图形

myfunction <- function(x) {x^2 + x + 20}
f + stat_function(fun = myfunction) # 画自定义函数图像

fun1 <- function(x) {0.5 * x}
fun2 <- function(x) {x / (x +1)}
fun3 <- function(x) {0.5 * x - x*(x + 1)}
ggplot(data.frame(x = -5:5), aes(x)) + stat_function(fun = fun1, color = "red") +
  stat_function(fun = fun2, color = "blue") +
  stat_function(fun = fun3, color = "yellow", size = 4)
5.3 stat_smooth
stat_smooth (mapping = NULL, data = NULL, geom = "smooth", position = "identity",
    ..., method = "auto", formula = y ~ x, se = TRUE, n = 80,
    span = 0.75, fullrange = FALSE, level = 0.95, method.args = list(),
    na.rm = FALSE, show.legend = NA, inherit.aes = TRUE)
参数解释:
- method 表示指定平滑曲线的统计函数,如lm线性回归, glm广义线性回归, loess多项式回归, gam广义相加模型(mgcv包), rlm稳健回归(MASS包)
- formula 表示指定平滑曲线的方程,如 y~x, y~poly(x, 2), y~log(2) ,需要与method参数搭配使用
- se 表示是否显示平滑曲线的置信区间,默认TRUE显示
- n 表示产生平滑点的基点数
- span 表示多项式回归中的段数,段数越多约平滑
- level 表示置信区间水平
library(ggplot2)

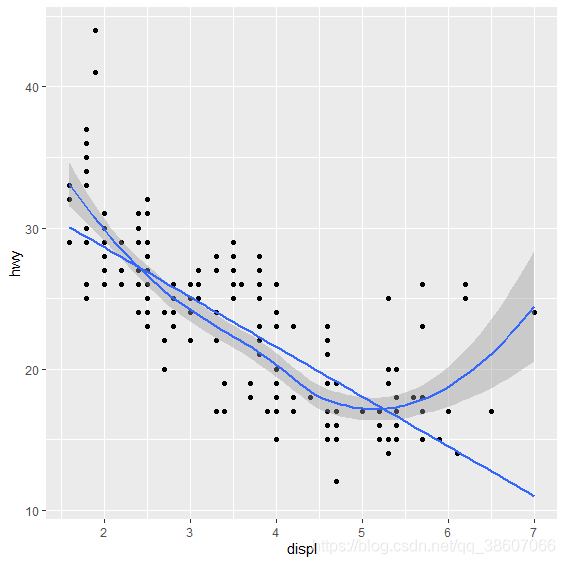
ggplot(mpg, aes(displ, hwy)) + geom_point() + geom_smooth() + stat_smooth(method = lm,
    se = FALSE)  # 不显示置信区间

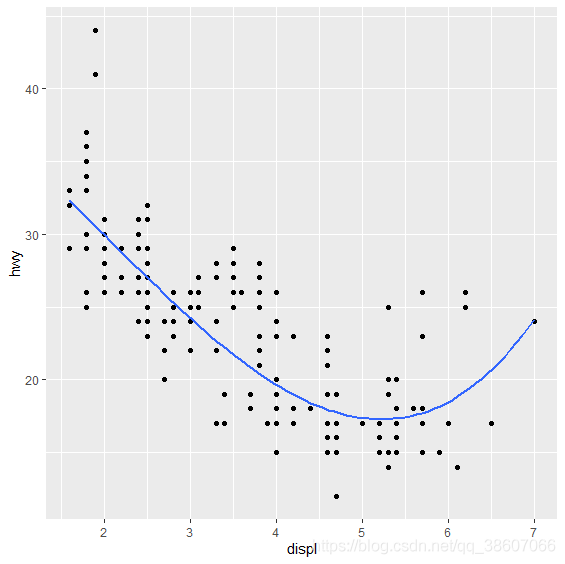
ggplot(mpg, aes(displ, hwy)) + geom_point() + geom_smooth(method = lm, formula = y ~
    splines::bs(x, 3), se = FALSE)

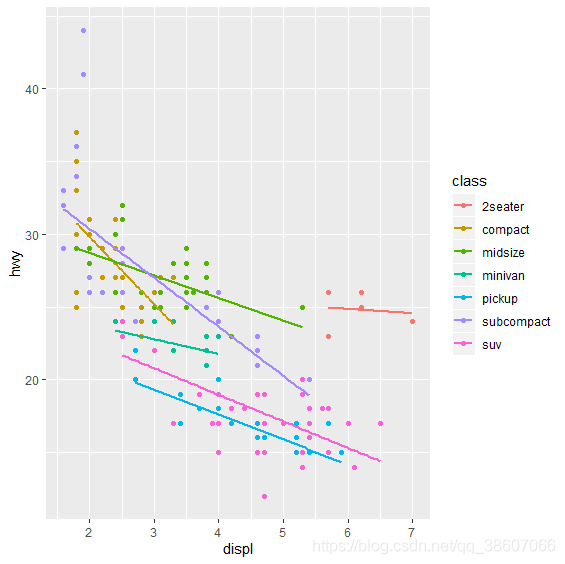
ggplot(mpg, aes(displ, hwy, color = class)) + geom_point() + geom_smooth(se = FALSE,
    method = lm)

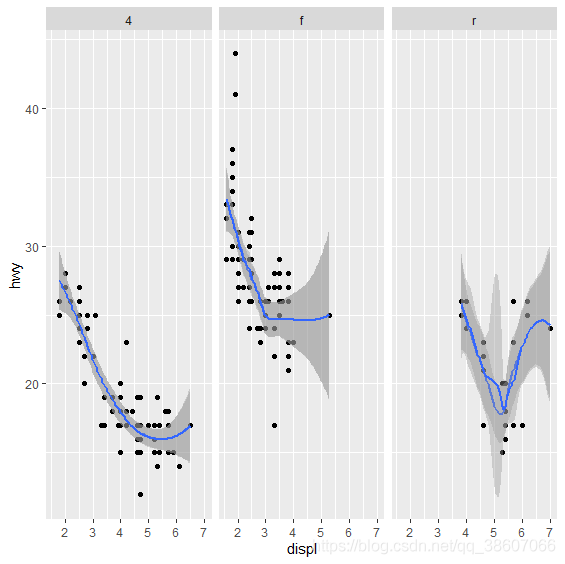
ggplot(mpg, aes(displ, hwy)) + geom_point() + geom_smooth(span = 0.8) + geom_smooth(method = loess,
    formula = y ~ x) + facet_wrap(~drv)
6 coor_xxx()坐标系变换
ggplot2默认为cartesian笛卡尔坐标系,其它坐标系都是通过笛卡尔坐标系画图,然后变换过来的,坐标函数如下:
| 坐标变换函数 | 描述 |
|---|---|
| coord_cartesian() | 笛卡尔坐标系 |
| coord_fixed() | 固定纵横比笛卡尔坐标系 |
| coord_flip() | 翻转坐标系 |
| coord_polar() | 极坐标投影坐标系 |
| coord_map(), coord_quickmap() | 地图投影(球面投影) |
| coord_trans() | 变比例笛卡尔坐标系 |
6.1 coord_cartesian()笛卡尔坐标系
注: 默认为笛卡尔坐标系,以下参数几乎用不上,可略过
coord_cartesian(xlim = NULL, ylim = NULL, expand = TRUE, default = FALSE, clip = “on”)
参数解释:
- xlim, ylim 表示设定x轴和y轴的绘图范围,如果同时设定clip=“off”则表示将不绘制在范围外的数据点,通常不进行设置,
而是后期从标度中更改显示范围 - expand 表示是否将扩展xlim和ylim,默认扩展以绘制可能出现在绘图范围以外的数据
- default 表示是否更改默认坐标系,默认FALSE不更改,TRUE则会变成另一个坐标系
6.2 coord_fixed()修改纵横比坐标系
coord_cartesian()为纵横比没有固定的坐标系,表示纵轴和横轴的相对单位长度没有固定,
增加数据,则原图形的比例会变,背景都是正方形格子
而coord_fixed()坐标系纵横比可以设置固定,纵横比可以用参数ratio自定义,背景为矩形格子,
固定纵横比后,无论什么图形,其比例都是一样的,常用于横轴,纵轴都是数字的情况
语法:
coord_fixed(ratio = 1, xlim = NULL, ylim = NULL, expand = TRUE, clip = "on")
参数ratio表示指定纵横比,默认为1表示固定纵横比为1, 纵横比越大,则同样尺寸,其纵轴视觉长度越长
library(ggplot2)
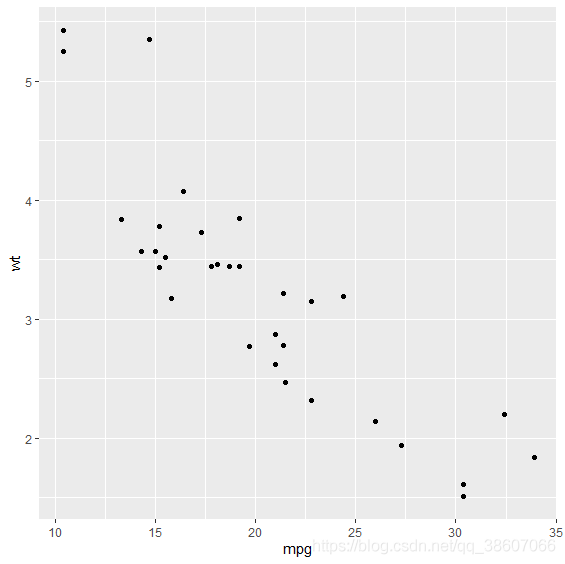
p <- ggplot(mtcars, aes(mpg, wt)) + geom_point()

p + coord_fixed(ratio = 1)  # 固定纵横比为1
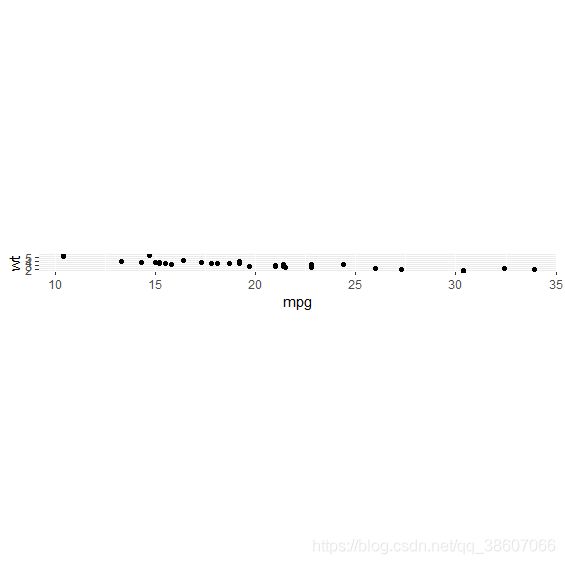
p + coord_fixed(ratio = 5)  # 固定纵横比为5,变高变窄
p + coord_fixed(ratio = 1/5)  # 纵横比小于1,变矮变宽
p + coord_fixed(xlim = c(15, 30))  # 默认纵横比为1,设定x轴显示范围为15到30
6.3 coord_flip()翻转坐标系
翻转坐标系指翻转笛卡尔坐标的横轴和纵轴位置,翻转后柱形图变成条形图
coord_flip(xlim = NULL, ylim = NULL, expand = TRUE, clip = "on") 内部参数与标准笛卡尔坐标系一样,不用介绍
翻转后横轴为y轴,纵轴为x轴
h <- ggplot(diamonds, aes(carat)) + geom_histogram()
h
h + coord_flip()  # 翻转坐标系
6.4 coord_polar()极坐标投影
能将笛卡尔坐标, coord_polar(theta = "x", start = 0, direction = 1, clip = "on")
参数解释:
- theta 表示要极坐标化的中心轴,即该轴转化为圆周,另一个轴转化为半径
- direction 表示排列方向,direction=1表示顺时针,direction=-1表示逆时针
- start 表示起始角度,以距离12点针的弧度衡量,具体位置与direction参数有关,
若direction为1则在顺时针start角度处,若direction为-1则在逆时针start角度处
极坐标转化比较耗费计算机资源,最好先用rm(list = ls()); gc()清空内存
rm(list = ls())
gc()  # 清空内存
library(ggplot2)

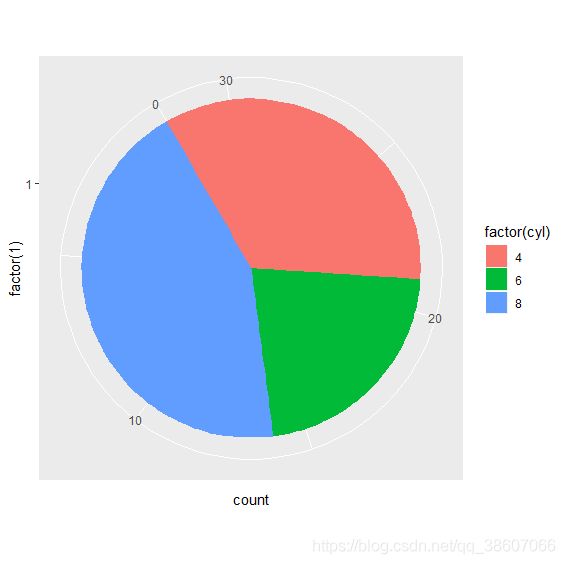
pie <- ggplot(mtcars, aes(x = factor(1), fill = factor(cyl))) + geom_bar(width = 1)
pie
pie + coord_polar(theta = "x")  # x轴极化, x刻度值都一样,所以变成多层圆环,y轴刻度值对应圆环半径
pie + coord_polar(theta = "y")  # y轴极化, y轴刻度值对应扇形弧度,x轴长度对应扇形半径
pie + coord_polar(theta = "y", start = pi/6, direction = 1)  # 起始位置为距离12点针方向30度,顺时针排列
pie + coord_polar(theta = "y", start = pi/6, direction = -1)  # 逆时针排列,起始位置与上面不一样
pie + coord_polar(theta = "y", start = -pi/6, direction = 1)  # 起始位置与上面一样,但排列顺序不一样
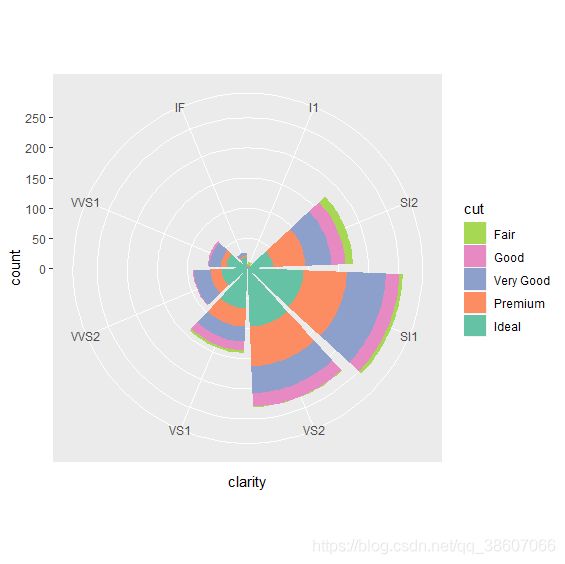
6.4.1 风玫瑰图(一种常见的极坐标图形)
rm(list = ls())
gc()  # 清空内存
library(ggplot2)
set.seed(42)
small <- diamonds[sample(nrow(diamonds), 1000), ]

ggplot(data = small) + geom_bar(aes(x = clarity, fill = cut)) + coord_polar() +
    scale_fill_brewer(type = "qual", palette = "Set2", direction = -1)
6.4.2 雷达图
ggplot2极坐标转化不能制作雷达图,可以用ggradar包,安装方法devtools::install_github(“ricardo-bion/ggradar”)
ggradar支持的数据形式与ggplot2有些区别,采用行分类,宽数据最好,好在雷达图的数据量都比较小
ggradar智能化程度非常高,导入适合的数据就能出图,后期美化可以慢慢来
rm(list = ls())
gc()  # 清空内存
library(ggradar)

mydata <- matrix(runif(40, 0, 1), 5, 8)  # 构造数据集,5行8列的矩阵
rownames(mydata) <- LETTERS[1:5]  # 大写字母为矩阵行命名
colnames(mydata) <- c("Apple", "Google", "Facebook", "Amozon", "Tencent", "Alibaba",
    "Baidu", "Twitter")  # 矩阵列命名
mynewdata <- data.frame(mydata)  # 将矩阵转化为数据框

Name <- c("USA", "CHN", "UK", "RUS", "JP")
mynewdata <- data.frame(Name, mynewdata)  # 增加一列字符串数据
mynewdata
# 单序列:
ggradar(mynewdata[2, ])  # 以列名为变量,对第2行数据进行绘图,显示各个公司在中国的业务

# 多序列:
ggradar(mynewdata)  # 对所有行同时作图
6.5 coord_trans()变换笛卡尔坐标
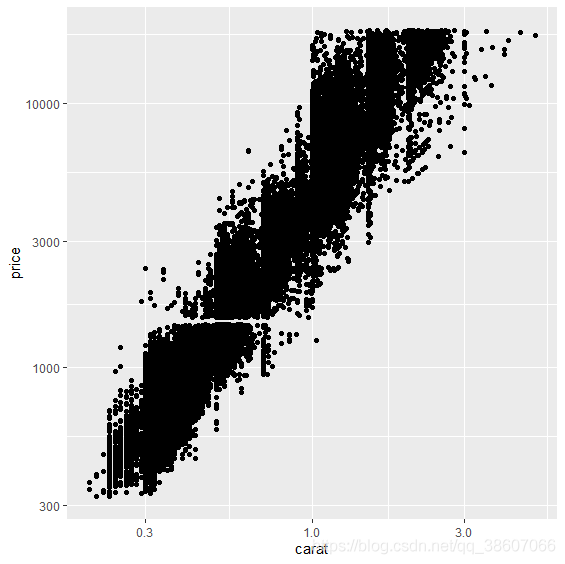
原始的笛卡尔坐标上,坐标轴上的刻度比例尺是不变的,而coord_trans轴上刻度比例尺是变化的,
这种坐标系应用很少,但不是没用, 可以将曲线变成直线显示, 如果数据点在某个轴方向的密集程度是变化的,这样不便于观察,可以通过改变比例尺来调节,使数据点集中显示,更加方便观察
语法: coord_trans(x = "identity", y = "identity", limx = NULL, limy = NULL, clip = "on", xtrans, ytrans)
参数解释:
- x,y 表示指定坐标轴比例尺变换的方式,默认identity不变化 *
library(ggplot2)

ggplot(diamonds, aes(log10(carat), log10(price))) +
  geom_point() # 正常笛卡尔坐标系

# 通过设置坐标轴标度,使坐标轴比例尺渐变
ggplot(diamonds, aes(carat, price)) +
  geom_point() +
  scale_x_log10() + # 坐标轴刻度对数变换
  scale_y_log10()

# 采用变换笛卡尔坐标轴,结果与上面一样
ggplot(diamonds, aes(carat, price)) +
  geom_point() +
  coord_trans(x = "log10", y = "log10")

# 线性拟合
d <- subset(diamonds, carat > 0.5)
ggplot(d, aes(carat, price)) +
  geom_point() +
  geom_smooth(method = "lm") +
  coord_trans(x = "log10", y = "log10") # lm线性拟合结果为直线,但变换坐标轴后变成了曲线

ggplot(d, aes(carat, price)) +
  geom_point() +
  geom_smooth(method = "lm") +
  scale_x_log10() +
  scale_y_log10() # 通过调整标度的方式,仍然为直线,点的位置并没有发生改变

df <- data.frame(a = abs(rnorm(26)),letters)
plot <- ggplot(df,aes(a,letters)) + geom_point()

plot + coord_trans(x = "log10") # 对x坐标轴比例尺对数运算
plot + coord_trans(x = "sqrt") # 对x轴坐标轴比例尺开方运算
6.6 coord_map()球面投影坐标系
地图投影需要特殊的数据源和很多扩展包,会在其它章节单独演示
7 scale_xxx()标度调整
标度用于控制变量映射到视觉对象的具体细节,如坐标轴标签和图例
视觉对象分为:
坐标轴,alpha透明度,color/fill颜色,date/time时间轴, hue色相, grey灰度,
shape点形, size尺寸, linetype线型, radius半径, area面积
它们都有相应的标度函数
分为简单函数和复合函数,复合函数内包含简单函数,简单函数如下:

复合标度函数:
除去默认的8个系统默认的标度scale_xxx_identity(),软件默认的一般用不上,用得上就不需要改了, 这8个分别是:
scale_color_identity(), scale_fill_identity(), scale_shape_identity(), scale_linetype_identity(),
scale_alpha_identity(), scale_size_identity(), scale_discrete_identity(), scale_continuous_identity()
还有一个手动处理任意离散变量的标度函数scale_discrete_manual(),其增加了1个映射参数,如aesthetics = c(“color”, “fill”)
现在还剩下11组标度函数,分类如下:
7.1 坐标轴标度与scales包
- name 表示指定坐标轴名称,也将作为对应的图例名称
- breaks 表示指定坐标轴刻度位置,即粗网格线位置
- labels 表示指定坐标轴刻度标签内容
- limits 表示指定坐标轴显示范围,支持反区间
- expand 表示扩展坐标轴显示范围,不能缩小
- trans 表示指定坐标轴变换函数,自带有“asn”,“atanh”,“boxcox”,“exp”,“identity”,“log”,“log10”,“log1p”,“log2”,“logit”,“probability”,“probit”,“reciprocal”。
还支持scales包内的其它变换函数,如scales::percent()百分比刻度,自定义scales::trans_new()
- position 表示指定坐标轴显示位置,x轴为“left”和“right”, y轴为“top”和“bottom”
- minor_breaks 表示指定细网格线对应位置,细网线没有标签对应,没有labels参数
- sec.axis 表示是否开启次坐标轴
例:
library(ggplot2)
p1 <- ggplot(mpg, aes(displ, hwy)) +
  geom_point()
p1

p1 +
  scale_x_continuous(name = "发动机排量/L", limits = c(2,6), breaks = c(2, 4, 6), labels = c("two", "four", "six"),
                     minor_breaks = c(3, 5)) + # 重新指定坐标轴名称, 只显示区间(2, 6)范围的元素, 更改坐标轴刻度和标签
  scale_y_continuous(name = "高速公路油耗" )  # 重新指定坐标轴名称

set.seed(14)
df <- data.frame(
  x = rnorm(10) * 100000,
  y = seq(0, 1, length.out = 10)
)

p2 <- ggplot(df, aes(x, y)) + geom_point(shape=21, color = "purple", fill = "cyan", size = 5)
p2 + scale_y_continuous(labels = scales::percent) # y轴百分号显示

p2 + scale_x_continuous(labels = scales::comma) + # 数字逗号分割,每3位数增加1个逗号
  scale_y_continuous(labels = scales::dollar) # y轴美元单位显示
7.2 颜色fill/color,灰度grey,色相hue, 色盲颜色
- type 在scale_color_continuous中表示指定变化类型,是普通渐变“gradient”还是色盲渐变“viridis”
在scale_xxx_distiller()中表示指定色板类型,是“seq”渐变,“qual”离散对比,还是“div”两极色板 - palette 表示指定色条类型,当type色板类型已经指定的情况下,可以用序号指定,若type未指定,则必须用色条名称指定
- direction 表示指定标度与变量的匹配方向,direction=-1表示方向翻转 在scale_xxx_hue()中,direction=1表示色轮的顺时针方向,direction=-1表示逆时针方向
- low, high表示渐变的颜色两极颜色名称或HEX色值,如果用颜色名称指定,则可用muted(“color”)指定某个暗色
- mid 表示指定渐变的中点颜色
- midpoint 表示指定渐变的中点对应的变量值
- colors/colours 多色渐变中,指定颜色向量, 如colour = terrain.colors(10)取10个地形图颜色作为渐变的基础色
- values 表示指定自定义颜色向量,如果变量为数字类型,则默认按数字大小顺序与values匹配,
如果变量为字符类型,则默认按变量字母顺序与values匹配,
为了按照想要的顺序匹配,可以给变量增加一个因子水平,然后自动按照因子水平与values匹配(自上而下,由低到高)
也可给values向量设置名称属性,名称与要映射的变量值一样,然后按照名称属性匹配 - range 表示指定指定显示的透明度范围,在[0, 1]区间内,0表示不透明,1表示不透明
- limits 表示设定显示范围
- breaks 表示设定图例刻度位置
- labels 表示指定图例刻度处显示标签
- h 表示指定色相范围,在区间[0, 360]内
- c 表示指定chroma(色度,鲜艳或是暗淡)值,最大值取决于hue和luminance
- l 表示指定luminance(亮度),在区间[0, 100]内
- start 表示指定灰度起点,从0到1,0表示白色,1表示黑色
- end 表示灰度结束点,通常end,默认end更黑,若设定start>end,则翻转标度
- end 表示灰度结束点,通常end,默认end更黑
- 其它公共参数:name图例名称,palette, breaks, labels, limits, expand, position(标签在图例的上)
- 只有连续的标度函数,如
scale_xxx_gradient^()才支持trans内置参数
7.2.1 color/fill
library(ggplot2)

# scale_fill_continuous
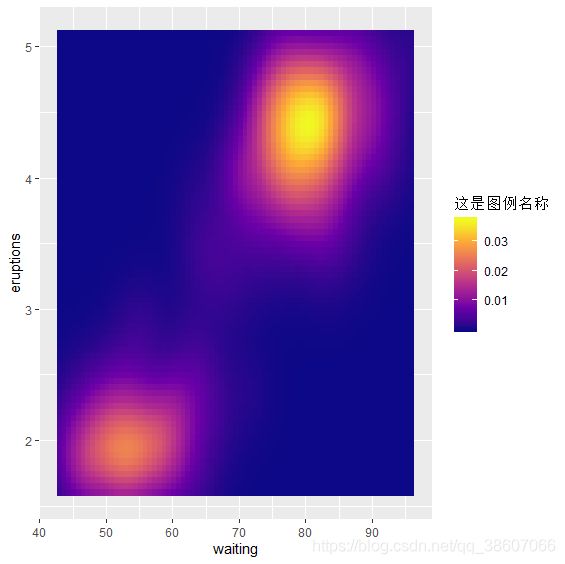
v <- ggplot(faithfuld, aes(waiting, eruptions, fill = density)) + geom_tile()
v
v + scale_fill_continuous(type = "gradient", name = "密度", breaks = c(0, 0.05,
    0.01, 0.02, 0.03, 0.04), labels = c(0, 0.05, 0.01, 0.02, 0.03, 0.04), position = "left")  # 更改图例名称,不支持刻度点,图例标签位置,匹配方向等参数
v + scale_fill_continuous(type = "viridis")  # 结果与scale_fill_viridis_c()一样

# scale_color_distiller
set.seed(19)
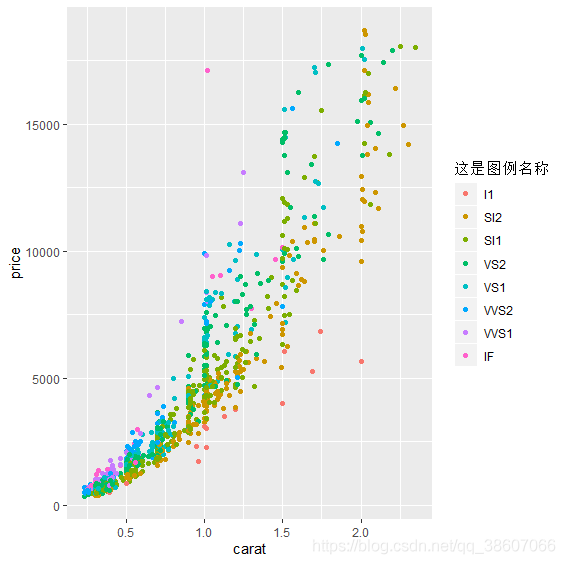
dsamp <- diamonds[sample(nrow(diamonds), 1000), ]
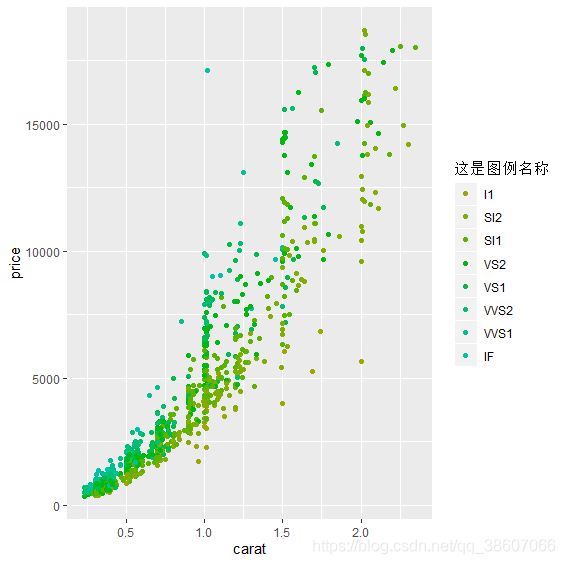
(d <- ggplot(dsamp, aes(carat, price)) + geom_point(aes(colour = clarity)))
v <- ggplot(faithfuld) + geom_tile(aes(waiting, eruptions, fill = density))
v
v + scale_fill_distiller(palette = "Spectral", breaks = c(0, 0.05, 0.01, 0.02,
    0.03, 0.04), labels = c(0, 0.05, 0.01, 0.02, 0.03, 0.04))  # 更改图例刻度及标签失败

# scale_xxx_gradient^()
set.seed(18)
df <- data.frame(x = runif(100), y = runif(100), z1 = rnorm(100), z2 = abs(rnorm(100)))

ggplot(df, aes(x, y)) + geom_point(aes(colour = z2))  # 默认从light blue到dark blue

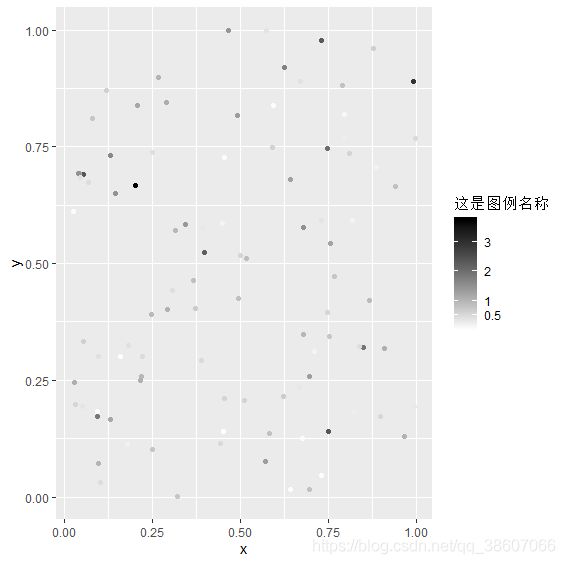
ggplot(df, aes(x, y)) + geom_point(aes(colour = z2)) + scale_colour_gradient(low = "white",
    high = "black", name = "这是图例名称", breaks = c(0, 0.5, 1, 2, 3, 4), labels = c(0,
        0.5, 1, 2, 3, 4))  # 灰度渐变,修改图例名称,图例刻度及刻度标签

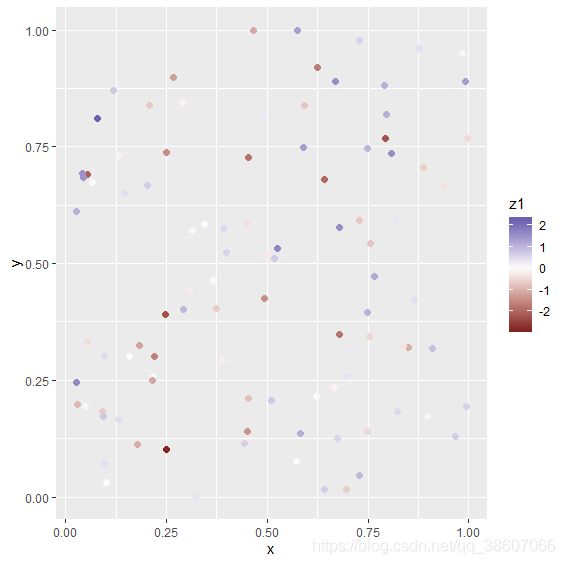
ggplot(df, aes(x, y)) + geom_point(aes(colour = z1), size = 2) + scale_colour_gradient2()  # 两极渐变,

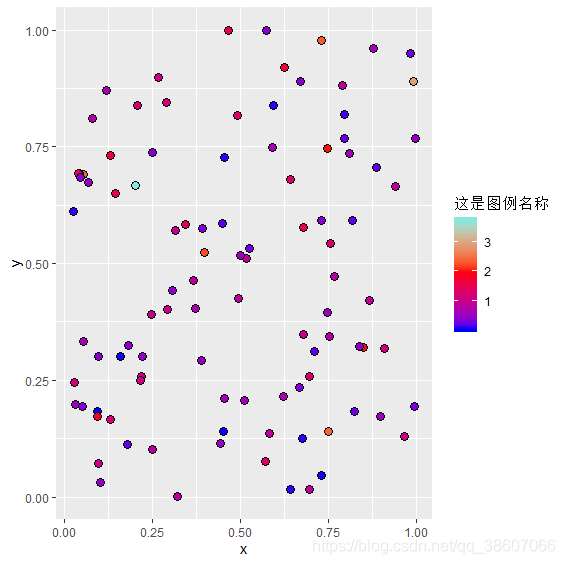
ggplot(df, aes(x, y)) + geom_point(aes(fill = z2), shape = 21, size = 3) + scale_fill_gradient2(low = "blue",
    mid = "red", midpoint = 2, high = "cyan", name = "这是图例名称")  # 修改基础颜色,

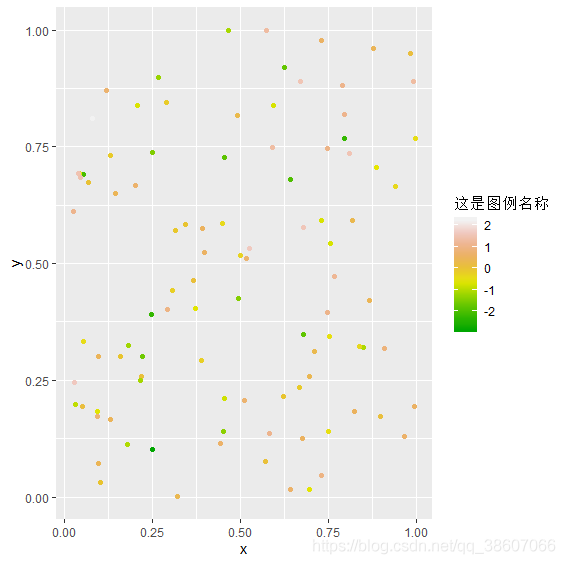
ggplot(df, aes(x, y)) + geom_point(aes(colour = z1)) + scale_colour_gradientn(colours = terrain.colors(10),
    name = "这是图例名称")  # 应用terrain.colors内置色板,更改标度方向失败
两极渐变:
修改基础颜色:
应用terrain.colors内置色板,更改标度方向失败:
library(ggplot2)

# scale_color_brewer
dsamp <- diamonds[sample(nrow(diamonds), 1000), ]
(d <- ggplot(dsamp, aes(carat, price)) + geom_point(aes(colour = clarity)))
d + scale_colour_brewer(name = "钻石透明度", palette = "Greens", direction = -1,
    position = "left")  # 更改图例名称,色板,标度方向,更改位置失败
d + scale_colour_brewer(palette = "Set1", name = "钻石透明度")  # 多种颜色也可以渐变,非常方便

# scale_color_manual
p <- ggplot(mtcars, aes(mpg, wt)) + geom_point(aes(colour = factor(cyl)))
p + scale_colour_manual(values = c("red", "blue", "green"))

# 按名称属性匹配
cols <- c(`8` = "red", `4` = "blue", `6` = "darkgreen", `10` = "orange")  # 设定名称属性
p + scale_colour_manual(values = cols)  # 名称属性匹配

p + scale_colour_manual(name = "这是图例名字", values = cols, breaks = c("4",
    "6", "8"), labels = c("four", "six", "eight"), limits = c("4", "6", "8",
    "10"))
7.2.2 透明度、色相、灰度
library(ggplot2)

p <- ggplot(mpg, aes(displ, hwy)) +
  geom_point(aes(alpha = year))
p
p + scale_alpha(range = c(0.4, 0.8), name = "这是图例名称") # 设定透明度范围为0.4到0.8

dsamp <- diamonds[sample(nrow(diamonds), 1000), ]
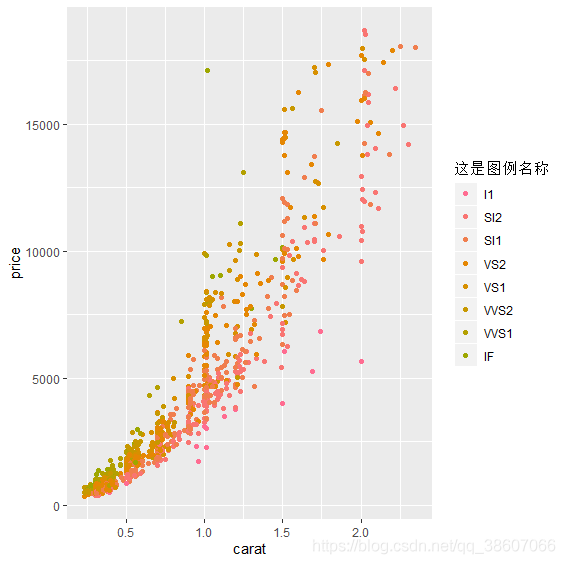
d <- ggplot(dsamp, aes(carat, price)) + geom_point(aes(colour = clarity))

d + scale_colour_hue(name = "这是图例名称") # 默认全色轮
d + scale_colour_hue(l = 70, c = 150, name = "这是图例名称")# 调整色度和亮度
d + scale_colour_hue(h = c(0, 90), "这是图例名称") # 设定色相范围,0代表红色与橙色的分界
d + scale_colour_hue(h = c(90, 180), "这是图例名称")
d + scale_colour_hue(h = c(270, 360), "这是图例名称")

# 灰度
p <- ggplot(mtcars, aes(mpg, wt)) + geom_point(aes(colour = factor(cyl)))
p + scale_colour_grey()
p + scale_colour_grey(start = 0.8, end = 0.2, name = "这是图例名称") # 修改灰度范围

# 灰度增加缺失值映射
miss <- factor(sample(c(NA, 1:5), nrow(mtcars), replace = TRUE))
ggplot(mtcars, aes(mpg, wt)) +
  geom_point(aes(colour = miss)) + # 若缺失向量是data数据的子集,则可以映射
  scale_colour_grey(na.value = "green", name = "这是图例名称") # 增加缺失值为绿色
7.2.3 色盲友好色
library(ggplot2)

# 离散变量
txsamp <- subset(txhousing, city %in% c("Houston", "Fort Worth", "San Antonio",
    "Dallas", "Austin"))
d <- ggplot(data = txsamp, aes(x = sales, y = median)) + geom_point(aes(colour = city))
d

d + scale_colour_viridis_d()  # 默认viridis色板
d + scale_colour_viridis_d(option = "plasma", name = "这是图例名称")  # 更改色板为plasma
d + scale_colour_viridis_d(option = "B", name = "这是图例名称")  # 更改色板为inferno
d + scale_colour_viridis_d(option = "magma", name = "这是图例名称")
d + scale_colour_viridis_d(option = "cividis", name = "这是图例名称")

# 连续变量
v <- ggplot(faithfuld) + geom_tile(aes(waiting, eruptions, fill = density))
v + scale_fill_viridis_c()
v + scale_fill_viridis_c(option = "plasma", name = "这是图例名称")
7.3 shape点型,linetype线型
- name 表示指定图例的名称
- breaks 表示指定图例的刻度位置
- labels 表示指定图例刻度的显示标签
- limits 表示指定该标度显示范围
- values 为向量,表示手动指定shape,通过给变量增加一个因子水平,然后就按因子水平与values对应顺序匹配
- direction 表示指定标度匹配顺序
set.seed(15)
dsmall <- diamonds[sample(nrow(diamonds), 100), ]
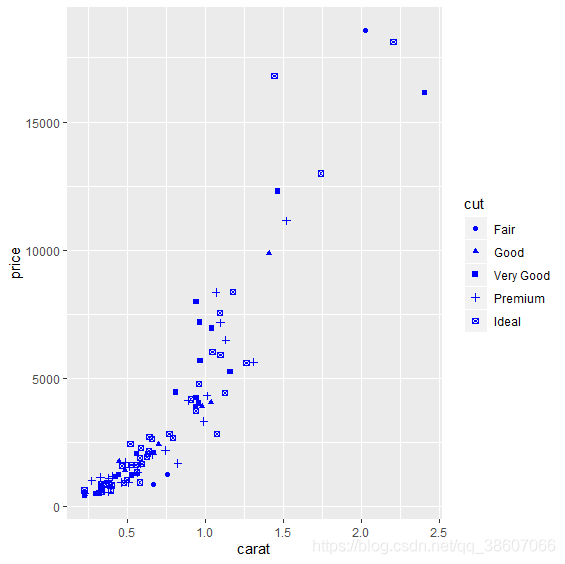
d <- ggplot(dsmall, aes(carat, price)) + geom_point(aes(shape = cut), color = "blue",
    position = position_jitter(width = 0.1, height = 0.3))
d
d + scale_shape(name = "钻石切割水平", breaks = c("Fair", "Good", "Very Good",
    "Premium", "Ideal"), labels = c("一般", "还行", "很好", "上好", "顶级"))  # 设置图例的名称和刻度标签

oneshape <- c(25:21)
levels(dsmall$cut) <- c("Fair", "Good", "Very Good", "Premium", "Ideal")  # 给要映射的变量增加因子水平,然后通过因子水平匹配
dsmall <- diamonds[sample(nrow(diamonds), 100), ]
d <- ggplot(dsmall, aes(carat, price)) + geom_point(aes(shape = cut), color = "blue",
    position = position_jitter(width = 0.1, height = 0.3))  #
d + scale_shape_manual(values = oneshape, name = "切割工艺")  # values的顺序与变量的因子水平一致
7.4 尺寸(size/area/radius)
- name 表示指定在所对应图例的标题内容
- limits 表示设置显示范围,其变量的范围,不是尺寸的范围
- breaks 表示指定图例刻度位置
- labels 表示指定图例刻度显示标签
- range 表示指定trans转化后半径/线宽后的尺寸显示范围,与limits参数不同
- trans 表示指定尺寸转化公式,指定后尺寸与变量不是线性关系
例:
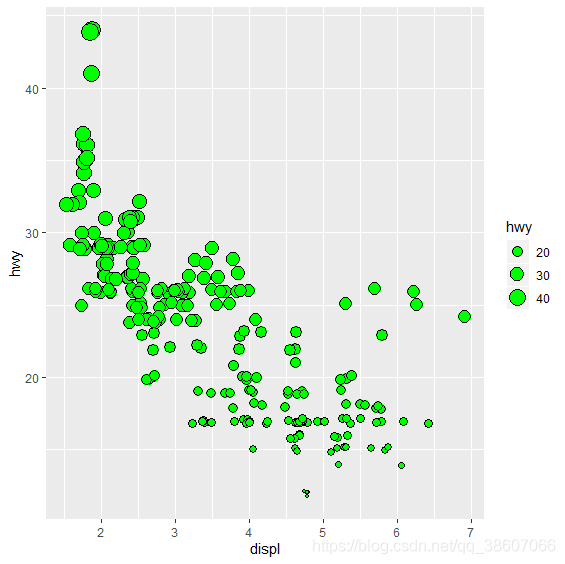
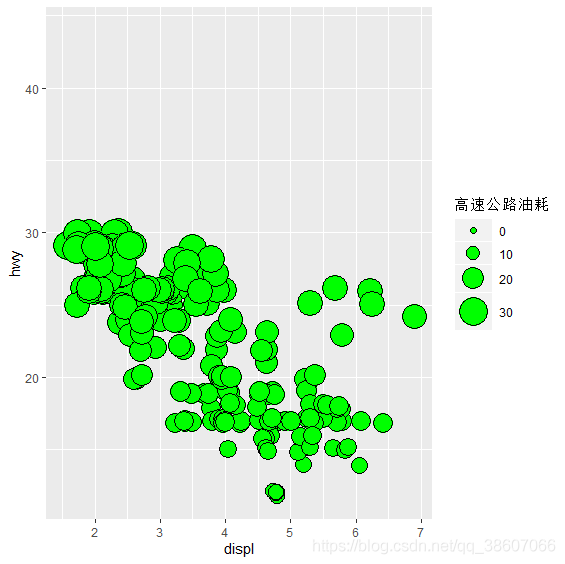
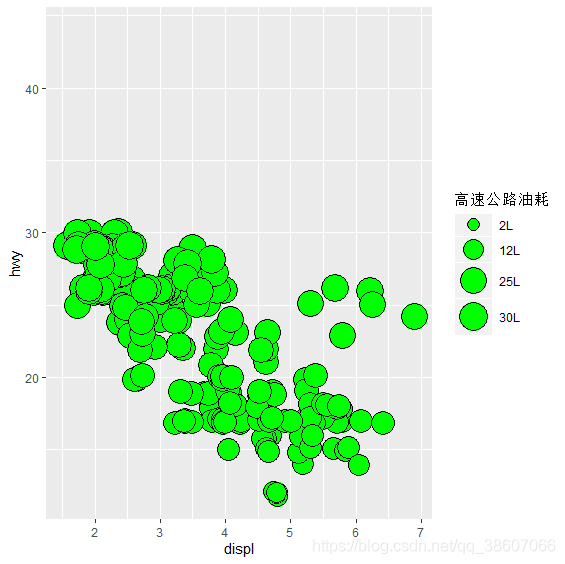
p <- ggplot(mpg, aes(displ, hwy, size = hwy)) + geom_point(position = position_jitter(width = 0.1,
    height = 0.2), shape = 21, fill = "green")
p
p + scale_radius(name = "高速公路油耗", range = c(2, 10), limits = c(0, 30))  # 指定半径从2变化到10,即最小半径为2,最大半径为10,只显示值小于30的数据点
p + scale_size(name = "高速公路油耗", range = c(2, 10), limits = c(0, 30), breaks = c(2,
    12, 25, 30), labels = c("2L", "12L", "25L", "30L"))  # 设置图例刻度及标签
p + scale_size_area(name = "高速公路油耗", max_size = 8, breaks = c(2, 12, 25,
    30), labels = c("2L", "12L", "25L", "30L"))  # 指定最大面积为8,最小面积从0开始
7.5 时间轴
- scale_xxx_date() 要求变量是Date格式
- scale_xxx_datetime() 要求变量是POSIXct格式
- scale_xxx_time() 要求变量是hms格式
参数解释: - name 表示指定坐标轴名称
- breaks 表示指定坐标轴刻度位置,即粗网格线位置, Date/POSIXct向量格式
- labels 表示指定坐标轴刻度显示标签,即breaks点显示文字内容
- date_breaks 表示指定时间跨度(如“2 weeks”, “10 years”),当与breaks同时指定时,优先级高于breaks
- date_labels 刻度显示标签, strftime()格式, 如果与labels同时指定,优先级高于labels
- minor_breaks 表示细网格刻度位置,与breaks类型相同
- date_minor_breaks 与date_breaks类型相同,表示细网格跨度
- limits 表示指定显示范围
- expand 表示扩展显示范围
- position 表示时间轴位置,x为“top”或“bottom”, y为“left”和“right”
- timezone 表示切换时区,默认为原时间时区
- obb 表示指定处理在limits之外是时间函数, 默认为NA
例:
library(ggplot2)
last_month <- Sys.Date() - 0:29
set.seed(16)
df <- data.frame(date = last_month, price = runif(30))
base <- ggplot(df, aes(date, price)) + geom_line()

base + scale_x_date(name = "日期", date_labels = "%b %d")  # 格式化参数,%b表示月份英文缩小,%d表示月份中第几天
base + scale_x_date(name = "日期", date_breaks = "1 week", date_labels = "第%W周",
    date_minor_breaks = "1 day", limits = c(Sys.Date() - 7, NA))  # 时间跨度为1周,%W表示年内的星期数,第几周, 设定细网格时间跨度为1天, 设定显示范围为7天前至今
8 facet_xxx()分面系统
分面有2种函数:
- facet_grid() 网格分面
- facet_wrap() 封装分面,自动分成2x4, 3x2等版块
表达式: - facet_grid(rows = NULL, cols = NULL, scales = “fixed”, labeller = “label_value”, facets)
- facet_wrap(facets, nrow = NULL, labeller = “label_value”,strip.position = “top”)
参数解释: - rows 表示要进行行分面的变量,如rows = vars(drv)表示将变量drv作为维度进行行分面,可以使用多个分类变量
- cols 表示要进行列分面的变量,如cols = vars(drv)表示将变量drv作为维度进行列分面,可以使用多个分类变量
- scales 表示分面后坐标轴适应规则,下面会介绍
- facets 表示将哪些变量作为维度进行分面,,在网格分面中,尽量不使用,而使用rows和cols参数
网格分面:varname.按变量varname行分面;.varname按变量varname列分面; varname1 ~ varname2 表示按varname1行分,varname2列分
封装分面:~variable,或var(variable),可以使用多个变量 - nrow 表示封装分面排列时行数目
- labeller 表示指定分面标题内容,分为:“label_value”只显示分面变量值,“label_both”显示分面变量名称和变量值,
显示字符串及特殊字符,可以线增加特殊字符变量,然后按该变量分面,使用labeller = label_parsed将特殊字符解析出来,
用labeller = label_bquote()指定显示数学公式 - strip.position 表示指定分面标题放置位置,分为: “top”顶部,“bottom”底部

8.1 封装分面示例
library(ggplot2)

p <- ggplot(mpg, aes(displ, hwy)) + geom_point()
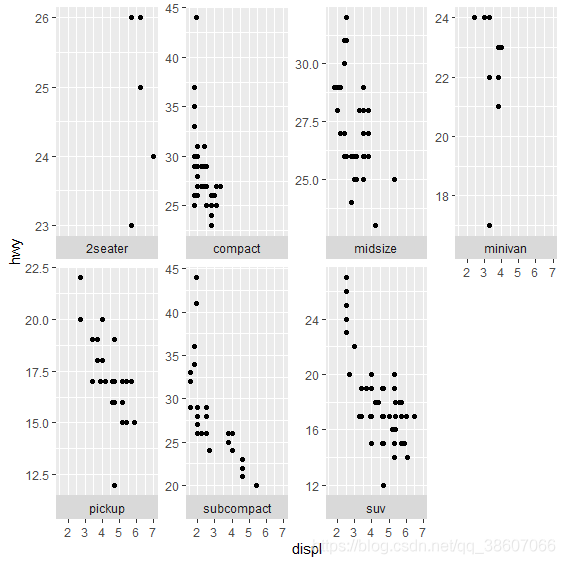
p + facet_wrap(vars(class))  # 封装分面,使用class变量作为分面维度
p + facet_wrap(~class)  # 与上面一样
p + facet_wrap(vars(class), nrow = 4)  # 重新排列分面,分4行排
p + facet_wrap(vars(cyl, drv))  # 高维分面,按cyl和drv两个变量分面
p + facet_wrap(c("cyl", "drv"), labeller = "label_both")  # 更改分面标题内容,显示分面变量名和变量值

p + facet_wrap(~class, scales = "free")  # 更改facets方式,设定x轴自适应
p + facet_wrap(~class, scales = "free_y", nrow = 2, strip.position = "bottom")  # 设定y轴自适应,2行排列,分面标题置于底部
8.2 网格分面示例:
library(ggplot2)
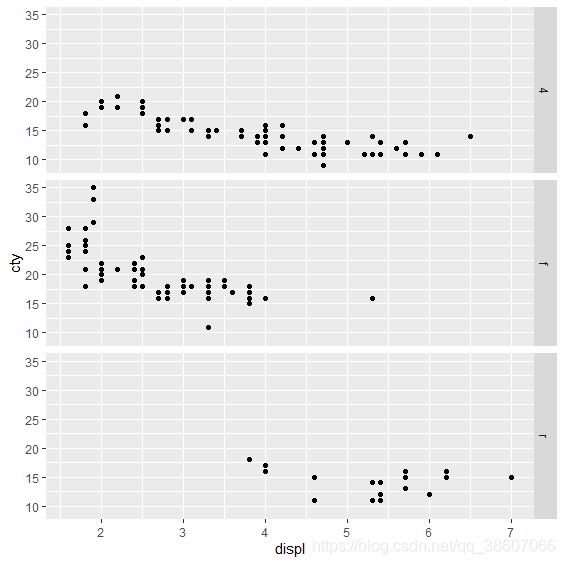
p <- ggplot(mpg, aes(displ, cty)) + geom_point()

p + facet_grid(rows = vars(drv))  # 以drv变量行分面
p + facet_grid(cols = vars(cyl))  # 以cyl变量列分面
p + facet_grid(vars(drv), vars(cyl))  # 同时行分面和列分面
p + facet_grid(. ~ cyl)  # 更改facets方式,以cyl列分面
p + facet_grid(drv ~ .)  # 以drv变量行分面
p + facet_grid(drv ~ cyl)  # 以drv变量行分,以cyl变量列分

mg <- ggplot(mtcars, aes(x = mpg, y = wt)) + geom_point()
mg + facet_grid(vs + am ~ gear, scales = "free_y")  # 高维分面,y轴自适应
8.3 labeller特殊字符分面标题
library(ggplot2)

# label_parsed解析
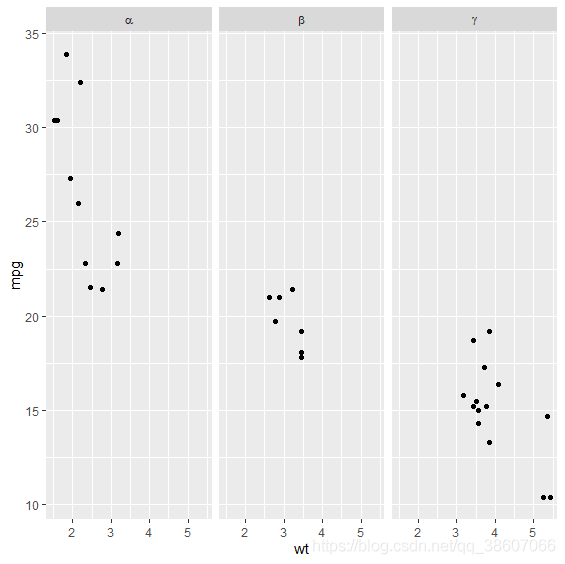
mtcars$cyl2 <- factor(mtcars$cyl, labels = c("alpha", "beta", "gamma"))  # 新增一个特殊字符向量
p <- ggplot(mtcars, aes(wt, mpg)) + geom_point()
p + facet_grid(. ~ cyl2, labeller = label_parsed)  # label_parsed解析

# label_bquote数学公式
p <- ggplot(mtcars, aes(wt, mpg)) + geom_point()
p + facet_grid(. ~ vs, labeller = label_bquote(cols = .(vs)^.(vs)))  # 变量指数形式显示
9 Guides图例与增加坐标轴
图例函数:
- guide_colorbar()/guide_colourbar() 用于连续变量的图例
- guide_legend() 用于离散变量的图例,也可以用于连续变量
- guides() 将_colorbar和_legend嵌套进去,方便映射,如guides(fill = guide_colorbar()) 可以在scale_xxx()标度中指定guide类型,guide = “colorbar”或guide = “legend”
9.1 guide_colorbar
library(ggplot2)
library(reshape2)
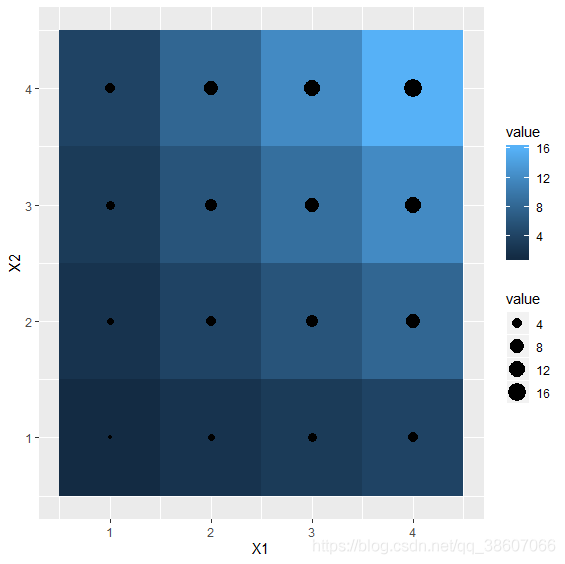
df <- melt(outer(1:4, 1:4), varnames = c("X1", "X2"))

p1 <- ggplot(df, aes(X1, X2)) + geom_tile(aes(fill = value))
p2 <- p1 + geom_point(aes(size = value))

p1 + scale_fill_continuous(guide = "colorbar") # 默认形式
p1 + guides(fill = guide_colorbar())  # 具体映射

p1 + scale_fill_distiller(palette = "YlGn", direction = 1) +
  guides(fill =  guide_colorbar(title = "值", nbin = 100, # 指定图例名称,水平放置,增加分箱数为100
                                  barwidth = 0.5, barheight = 10,# 指定图例箱体尺寸,宽为0.5mm,高为10mm
                                  ticks.colour = "red", # 更改刻度线颜色
                                  frame.colour = "blue",frame.linewidth = 0.5, # 增加箱体边框
                                  draw.ulim = TRUE, draw.llim = TRUE # 显示最大,最小刻度线
                                ))
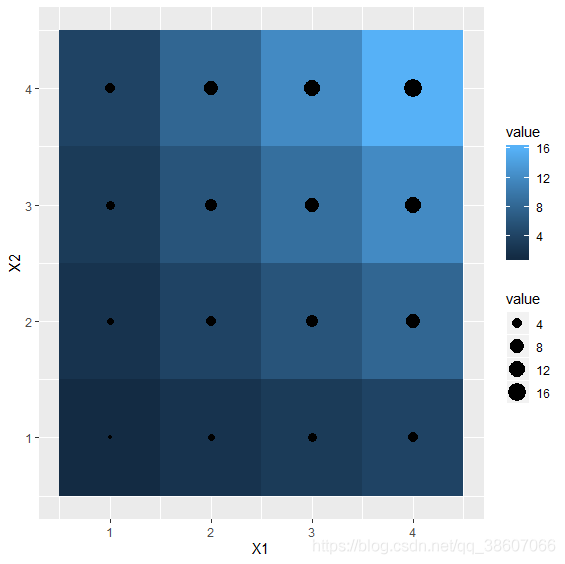
p2 + scale_fill_continuous(guide = "colorbar") + scale_size(guide = "legend") # 在标度中控制图例
p2 + guides(fill = "colorbar", size = "legend") # 与上面结果一样

p2 + scale_fill_continuous(guide = guide_colorbar(direction = "horizontal")) +
  scale_size(guide = guide_legend(direction = "vertical")) # 更改图例方向
9.2 guide_legend
library(ggplot2)
library(reshape2)
df <- melt(outer(1:4, 1:4), varnames = c("X1", "X2"))
p1 <- ggplot(df, aes(X1, X2)) + geom_tile(aes(fill = value))
p2 <- p1 + geom_point(aes(size = value))

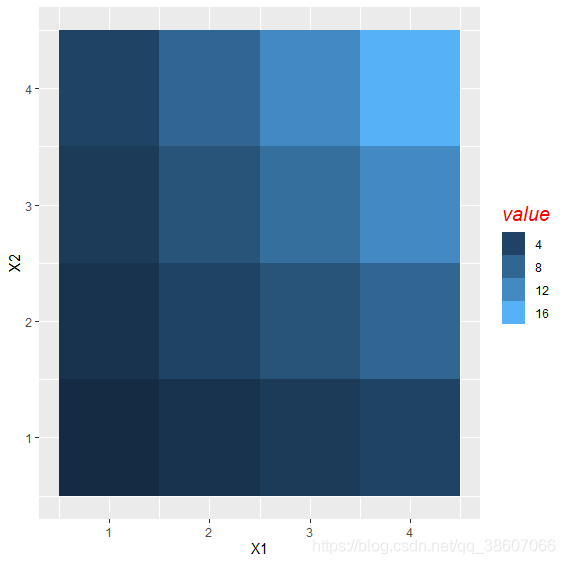
p1 + scale_fill_continuous(guide = guide_legend()) # 连续标度中设置离散图例
p1 + scale_fill_distiller(type = "qual", palette = "Set3") +
  guides(fill = guide_legend(title = "左", title.position = "left", # 指定图例名称为"左", 位置为箱体的左边
                             key.width = 5, key.height = 10, nrow = 2, ncol = 2, byrow = TRUE # 修改箱体尺寸,并矩形排列,按行排
                             ))

p1 + guides(fill = guide_legend(
  title.theme = element_text(size = 15, face = "italic", colour = "red", angle = 0)) # 在图例中修改图例主题,一般在主题函数内修改
  )

p1 + scale_fill_continuous(breaks = c(5, 10, 15),
  labels = paste("long", c(5, 10, 15)),
  guide = guide_legend(
    direction = "horizontal", # 水平排列箱体
    title.position = "top",  # 图例标题置于顶部
    label.position = "bottom", # 图例刻度标签置于底部
    label.hjust = 0.5, # 刻度标签水平位置偏移
    label.vjust = 1, # 刻度标签垂直位置偏移
    label.theme = element_text(angle = 90) # 图例主题中修改刻度标签角度
  )
)
9.3 guides多个图例
guides多个图例:
guides()内部嵌套guide_legend()和guide_colorbar(),添加一个映射参数,如:
guides(
   colour = guide_colourbar(order = 1),
   shape = guide_legend(order = 2),
   size = guide_legend(order = 3)
 )
library(ggplot2)
dat <- data.frame(x = 1:5, y = 1:5, p = factor(1:5), q = 1:5, r = factor(1:5))
p <- ggplot(dat, aes(x, y, colour = p, size = q, shape = r)) + geom_point()
p

p + guides(colour = guide_colorbar(), size = guide_legend(), shape = guide_legend()) # 默认按参数顺序排列多个图例
p + scale_colour_continuous(guide = "colorbar") +
  scale_size_discrete(guide = "legend") +
  scale_shape(guide = "legend") +
  guides(colour = "none") # 删除一个图例

# 设定多个图例
ggplot(mpg, aes(displ, cty)) +
  geom_point(aes(size = hwy, colour = cyl, shape = drv)) +
  guides(
   colour = guide_colourbar(order = 1), # order指定图例排列顺序
   shape = guide_legend(order = 2),
   size = guide_legend(order = 3)
 )
9.4 多图例合并
library(ggplot2)
# 图例合并: 多个不同标度图例合并:
# 当图例类型一致,图例标题一致时,会自动合并图例
dat <- data.frame(x = 1:5, y = 1:5, p = 1:5, q = factor(1:5), r = factor(1:5))
p <- ggplot(dat, aes(x, y, colour = p, size = q, shape = r)) + geom_point()
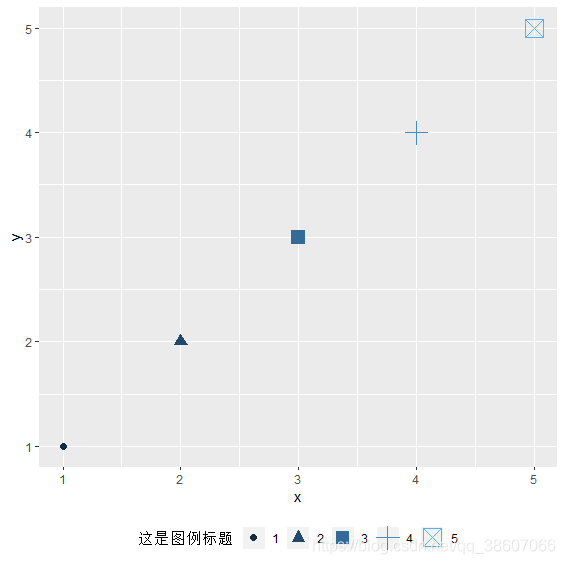
p + guides(colour = guide_legend("这是图例标题"), size = guide_legend("这是图例标题"),
    shape = guide_legend("这是图例标题")) + theme(legend.position = "bottom")  # 主题函数中调节图例位置

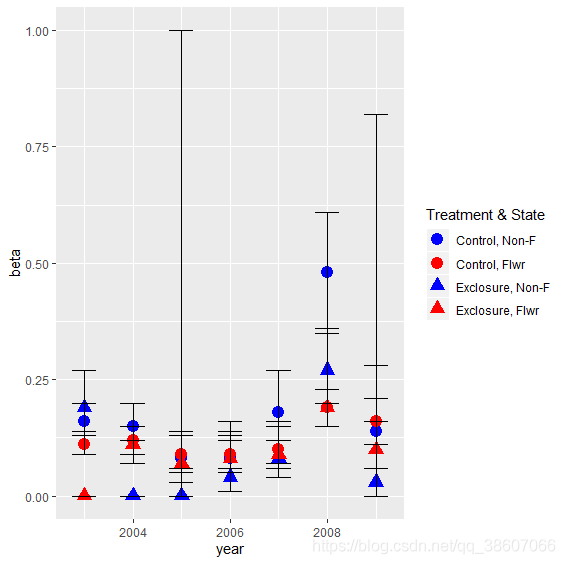
## 多种几何对象图例合并:
## 若都是同一个变量映射的,且标度类型一致,标度标题相同,标度values等长,给标度新增labels参数,labels相同,则会自动合并图例
state1 <- c(rep(c(rep("N", 7), rep("Y", 7)), 2))
year <- rep(c(2003:2009), 4)
group1 <- c(rep("C", 14), rep("E", 14))
group2 <- paste(state1, group1, sep = "")
beta <- c(0.16, 0.15, 0.08, 0.08, 0.18, 0.48, 0.14, 0.19, 0, 0, 0.04, 0.08,
    0.27, 0.03, 0.11, 0.12, 0.09, 0.09, 0.1, 0.19, 0.16, 0, 0.11, 0.07, 0.08,
    0.09, 0.19, 0.1)
lcl <- c(0.13, 0.12, 0.05, 0.05, 0.12, 0.35, 0.06, 0.13, 0, 0, 0.01, 0.04, 0.2,
    0, 0.09, 0.09, 0.06, 0.06, 0.07, 0.15, 0.11, 0, 0.07, 0.03, 0.05, 0.06,
    0.15, 0.06)
ucl <- c(0.2, 0.2, 0.13, 0.14, 0.27, 0.61, 0.28, 0.27, 0, 1, 0.16, 0.16, 0.36,
    0.82, 0.14, 0.15, 0.13, 0.13, 0.15, 0.23, 0.21, 0, 0.15, 0.14, 0.12, 0.12,
    0.23, 0.16)
data <- data.frame(state1, year, group1, group2, beta, lcl, ucl)

ggplot(data = data, aes(x = year, y = beta, colour = group2, shape = group2)) +
    geom_point(size = 4) + geom_errorbar(aes(ymin = lcl, ymax = ucl), colour = "black",
    width = 0.5) + scale_colour_manual(name = "Treatment & State", labels = c("Control, Non-F",
    "Control, Flwr", "Exclosure, Non-F", "Exclosure, Flwr"), values = c("blue",
    "red", "blue", "red")) + scale_shape_manual(name = "Treatment & State",
    labels = c("Control, Non-F", "Control, Flwr", "Exclosure, Non-F", "Exclosure, Flwr"),
    values = c(19, 19, 17, 17))

### 映射变量相同,在标度labs函数中设置相同的标度名称
ggplot(iris) + aes(x = Sepal.Length, y = Sepal.Width, color = Species, linetype = Species,
    shape = Species) + geom_line() + geom_point() + labs(color = "Guide name",
    linetype = "Guide name", shape = "Guide name")

### 下一个例子
x <- seq(0, 10, by = 0.2)
y1 <- sin(x)
y2 <- cos(x)
y3 <- cos(x + pi/4)
y4 <- sin(x + pi/4)
df1 <- data.frame(x, y = y1, Type = as.factor("sin"), Method = as.factor("method1"))
df2 <- data.frame(x, y = y2, Type = as.factor("cos"), Method = as.factor("method1"))
df3 <- data.frame(x, y = y3, Type = as.factor("cos"), Method = as.factor("method2"))
df4 <- data.frame(x, y = y4, Type = as.factor("sin"), Method = as.factor("method2"))

df.merged <- rbind(df1, df2, df3, df4)

y5 <- sin(x - pi/4)
df5 <- data.frame(x, y = y5, Type = as.factor("sin"), Method = as.factor("method3"))
df.merged <- rbind(df1, df2, df3, df4, df5)

df.merged$int <- paste(df.merged$Type, df.merged$Method, sep = ".")  # 给数据源新增一列变量

ggplot(df.merged, aes(x, y, colour = int, linetype = int, shape = int)) + geom_line() +
    geom_point() + scale_colour_discrete("") + scale_linetype_manual("", values = c(1,
    2, 1, 2, 3)) + scale_shape_manual("", values = c(17, 17, 16, 16, 15))
9.5 新增坐标轴
所有的新增坐标轴都是基于现有坐标轴变换而来的
- sec_axis(trans = NULL, name = waiver(), breaks = waiver(), labels = waiver())
- dup_axis(trans = ~., name = derive(), breaks = derive(), labels = derive())
- derive()
参数解释:
- trans 表示指定变换公式
- name 表示指定新增坐标轴的名称
- breaks 表示指定新增坐标轴刻度点位置
- labels 表示指定新增坐标轴刻度标签 * derive 表示继承现有坐标轴,基本上就是复制,没有变换关系,如果有变换关系,还是用sec_axis()吧
library(ggplot2)
p <- ggplot(mtcars, aes(cyl, mpg)) + geom_point()
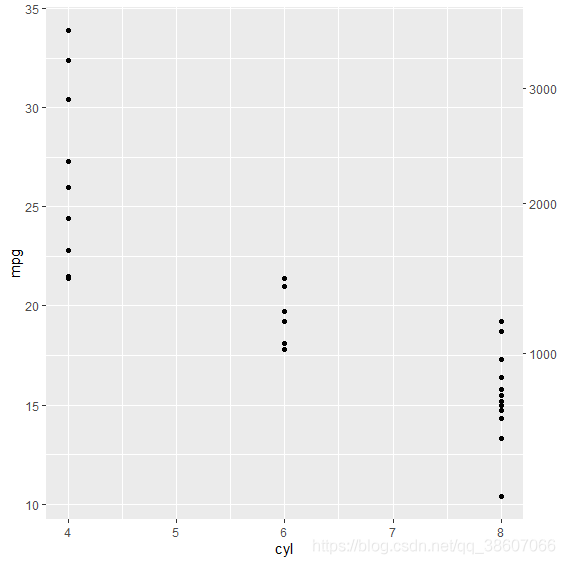
p + scale_y_continuous(sec.axis = sec_axis(~. + 10))  # 在标度函数中新增第2个y轴,变换关系为:原y轴 + 10
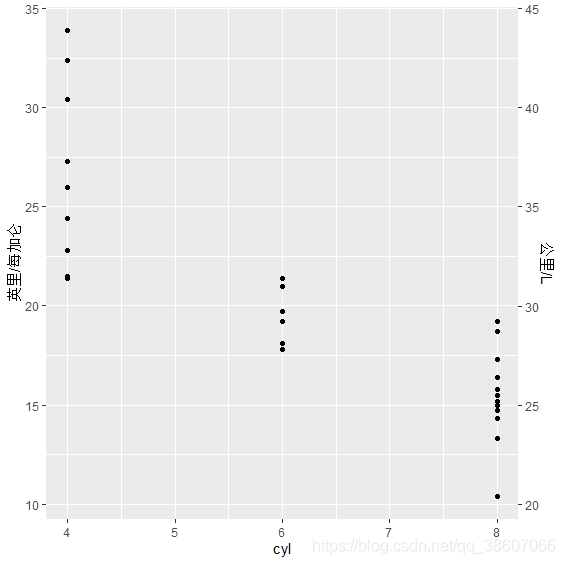
p + scale_y_continuous("英里/每加仑", sec.axis = sec_axis(~. + 10, name = "公里/L"))  # 新增y轴,轴名称为:公里每升,原y轴为:英里/加仑
p + scale_y_continuous(sec.axis = ~.^2)  # 变换关系为:平方
p + scale_y_continuous(sec.axis = ~.^2 * 3 + 4 * .)  # 变换关系为:3*y^2 + 4*y
10 themes主题系统
内部函数及参数非常多,跟present data没有一点关系,新手不建议学,会搅乱思路
针对新手,建议使用ggThemeAssist包进行主题设置,用鼠标而不是代码,更加方便,或者套用主题模板,下面会介绍
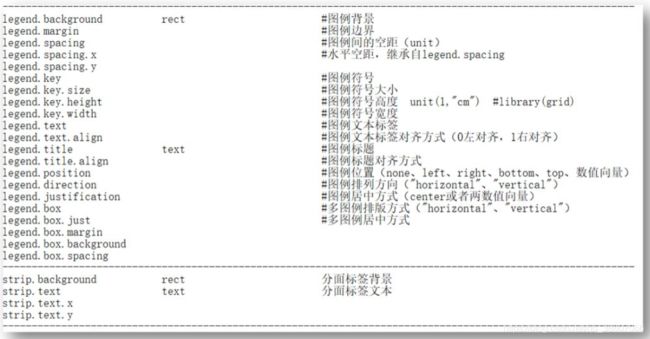
10.1 主题函数分类
- element_text()
- element_rect()
- element_line()
- element_blank() 清空任意主题对象,默认返回默认主题
10.2 ggThemeAssist包
需要安装shiny包 安装好该包后,RStudio界面就会出现“Addins”下拉菜单
使用方法:首先运行函数要画图的ggplot2代码,以加载到内存
然后选中该画图函数,如gg, 然后点击Addins下拉菜单,
点击“ggplot Theme Assistant”,就会出现一个交互式的shiny弹窗,然后在该弹窗上用鼠标操作 在交互弹窗中处理完后,点击右上角的“Done”按钮,然后就将主题代码输出到需要的位置了 最后进行对代码进行微调,有的地方可能会少括号或引号
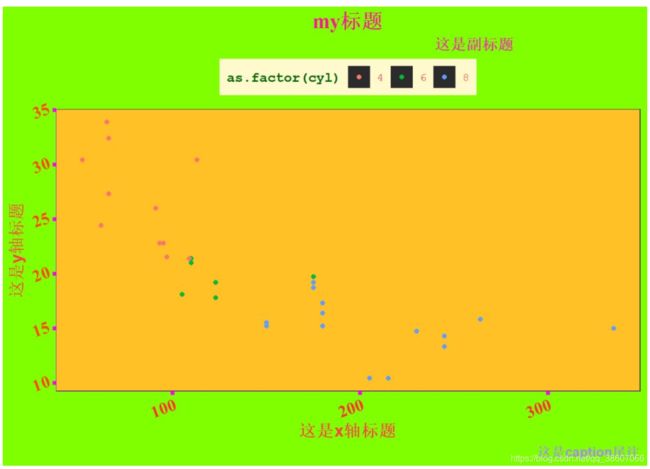
如图所示,真的非常简单

rm(list = ls())
gc()
library(ggplot2)
gg <- ggplot(mtcars, aes(x = hp, y = mpg, colour = as.factor(cyl))) + geom_point() +
    theme_bw()
# 运行以上代码,然后选中下一行代码中的'gg'函数,
gg + theme(plot.subtitle = element_text(size = 12, face = "bold", colour = "maroon2",
    hjust = 0.75), plot.caption = element_text(size = 10, face = "bold", colour = "mediumpurple1"),
    axis.line = element_line(colour = "darkorchid", size = 0.3, linetype = "solid"),
    axis.ticks = element_line(colour = "magenta", size = 1.5), panel.grid.major = element_line(linetype = "blank"),
    panel.grid.minor = element_line(linetype = "blank"), axis.title = element_text(size = 13,
        face = "bold", colour = "brown1"), axis.text = element_text(family = "serif",
        size = 13, face = "bold", colour = "orangered", hjust = 1, vjust = 0.25,
        angle = 20), axis.text.x = element_text(colour = "firebrick1"), plot.title = element_text(family = "serif",
        size = 16, face = "bold", colour = "deeppink", hjust = 0.5), legend.text = element_text(family = "mono",
        colour = "brown2"), legend.title = element_text(face = "bold", family = "mono",
        colour = "darkgreen"), panel.background = element_rect(fill = "goldenrod1",
        colour = "white", linetype = "solid"), plot.background = element_rect(fill = "chartreuse1",
        colour = NA), legend.key = element_rect(fill = "gray17"), legend.background = element_rect(fill = "lemonchiffon"),
    legend.position = "top", legend.direction = "horizontal") + labs(title = "my标题",
    x = "这是x轴标题", y = "这是y轴标题", subtitle = "这是副标题", caption = "这是caption尾注")  # 选中该代码,然后点击Addins下拉菜单, 在shiny弹窗中进行操作
10.3 套用主题模板
主题模板包,包括ggthemes, ggtech, ggthemer, ggsci,
有很多种风格:
对于著名科技公司,如谷歌,twiter等
著名可视化软件,如D3,Tableau等, 还有著名学术期刊,如SCI,柳叶刀等
还有著名出版物,如华尔街日报等
总之,应有尽有
在套用主题模板前,先看几个主题修改函数:
- theme() 主题函数,自定义主题
- theme_get() 获取当前默认主题的所有参数(激活主题) * theme_set(new) 设置新主题(同时静默返回旧主题以便还原系统默认主题)
- theme_update() theme()函数内部的参数会替换theme_get()内部的同名参数, theme_update()直接作用于当前主题
- theme_replace() theme_replace()等价于theme_get() %+replace% theme(),
theme()函数内部的参数会替换theme_get()内部的同名参数,未声明的参数全部初始化为NULL。
下次使用主题时,就会更新时才调用这次更新的theme()参数 - e1% + replace% e2 系统预设主题:
- theme_grey/theme_gray
- theme_bw
- theme_linedraw
- theme_light
- theme_dark
- theme_minimal
- theme_classic
- theme_void
具体见章节:颜色及主题模板
11 R进行绘图时输出希腊字符、上标、下标及数学公式
希腊字母
使用希腊字符、上标、下标及数学公式,都需要利用一个函数:expression(),具体使用方式如下:
plot(cars)
title(main = expression(Sigma))
上下标
expression()中的下标为[],上标为^,空格为~,连接符为*。示例代码如下:
plot(cars)
title(main = expression(Sigma[1]~'a'*'n'*'d'~Sigma^2))
paste
想达到上面的效果,我们其实可以使用paste()与expression()进行组合,不需要上述繁琐的过程,也能够达到我们上述一模一样的输出,并且方便快捷:
plot(cars)
title(main = expression(paste(Sigma[1], ' and ', Sigma^2)))
一个复杂的例子
目标:
![]()
代码:
expression(paste((frac(1, m)+frac(1, n))^-1, ABCD[paste(m, ',', n)]))
数学公式
最后的数学公式,只需要在expression()中进行相应的符号连接即可,具体要求可参考:Mathematical Annotation in R,这里不再进行赘述。
Text
geom_label {ggplot2} R Documentation
Text
Description
geom_text() adds text directly to the plot. geom_label() draws a rectangle behind the text, making it easier to read.
Usage
geom_label(mapping = NULL, data = NULL, stat = "identity",
  position = "identity", ..., parse = FALSE, nudge_x = 0,
  nudge_y = 0, label.padding = unit(0.25, "lines"),
  label.r = unit(0.15, "lines"), label.size = 0.25, na.rm = FALSE,
  show.legend = NA, inherit.aes = TRUE)
geom_text(mapping = NULL, data = NULL, stat = "identity",
  position = "identity", ..., parse = FALSE, nudge_x = 0,
  nudge_y = 0, check_overlap = FALSE, na.rm = FALSE,
  show.legend = NA, inherit.aes = TRUE)
Arguments
- mapping
Set of aesthetic mappings created by aes() or aes_(). If specified and inherit.aes = TRUE (the default), it is combined with the default mapping at the top level of the plot. You must supply mapping if there is no plot mapping. - data
The data to be displayed in this layer. There are three options:
If NULL, the default, the data is inherited from the plot data as specified in the call to ggplot().
A data.frame, or other object, will override the plot data. All objects will be fortified to produce a data frame. See fortify() for which variables will be created.
A function will be called with a single argument, the plot data. The return value must be a data.frame, and will be used as the layer data. A function can be created from a formula (e.g. ~ head(.x, 10)). - stat
The statistical transformation to use on the data for this layer, as a string. - position
Position adjustment, either as a string, or the result of a call to a position adjustment function. - …
Other arguments passed on to layer(). These are often aesthetics, used to set an aesthetic to a fixed value, like colour = “red” or size = 3. They may also be parameters to the paired geom/stat.
parse
If TRUE, the labels will be parsed into expressions and displayed as described in ?plotmath. - nudge_x, nudge_y
Horizontal and vertical adjustment to nudge labels by. Useful for offsetting text from points, particularly on discrete scales. - label.padding
Amount of padding around label. Defaults to 0.25 lines. - label.r
Radius of rounded corners. Defaults to 0.15 lines. - label.size
Size of label border, in mm. - na.rm
If FALSE, the default, missing values are removed with a warning. If TRUE, missing values are silently removed. - show.legend
logical. Should this layer be included in the legends? NA, the default, includes if any aesthetics are mapped. FALSE never includes, and TRUE always includes. It can also be a named logical vector to finely select the aesthetics to display. - inherit.aes
If FALSE, overrides the default aesthetics, rather than combining with them. This is most useful for helper functions that define both data and aesthetics and shouldn’t inherit behaviour from the default plot specification, e.g. borders(). - check_overlap
If TRUE, text that overlaps previous text in the same layer will not be plotted.
Details
Note that the “width” and “height” of a text element are 0, so stacking and dodging text will not work by default, and axis limits are not automatically expanded to include all text. Obviously, labels do have height and width, but they are physical units, not data units. The amount of space they occupy on the plot is not constant in data units: when you resize a plot, labels stay the same size, but the size of the axes changes.
geom_text() and geom_label() add labels for each row in the data, even if coordinates x, y are set to single values in the call to geom_label() or geom_text(). To add labels at specified points use annotate() with annotate(geom = “text”, …) or annotate(geom = “label”, …).
Aesthetics
geom_text() understands the following aesthetics (required aesthetics are in bold):
-
x
-
y
-
label
-
alpha
-
angle
-
colour
-
family
-
fontface
-
group
-
hjust
-
lineheight
-
size
-
vjust
Learn more about setting these aesthetics in vignette(“ggplot2-specs”).
geom_label()
Currently geom_label() does not support the angle aesthetic and is considerably slower than geom_text(). The fill aesthetic controls the background colour of the label.
Alignment
You can modify text alignment with the vjust and hjust aesthetics. These can either be a number between 0 (right/bottom) and 1 (top/left) or a character (“left”, “middle”, “right”, “bottom”, “center”, “top”). There are two special alignments: “inward” and “outward”. Inward always aligns text towards the center, and outward aligns it away from the center.
Examples
p <- ggplot(mtcars, aes(wt, mpg, label = rownames(mtcars)))

p + geom_text()
# Avoid overlaps
p + geom_text(check_overlap = TRUE)
# Labels with background
p + geom_label()
# Change size of the label
p + geom_text(size = 10)

# Set aesthetics to fixed value
p + geom_point() + geom_text(hjust = 0, nudge_x = 0.05)
p + geom_point() + geom_text(vjust = 0, nudge_y = 0.5)
p + geom_point() + geom_text(angle = 45)
## Not run:
# Doesn't work on all systems
p + geom_text(family = "Times New Roman")

## End(Not run)

# Add aesthetic mappings
p + geom_text(aes(colour = factor(cyl)))
p + geom_text(aes(colour = factor(cyl))) +
  scale_colour_discrete(l = 40)
p + geom_label(aes(fill = factor(cyl)), colour = "white", fontface = "bold")

p + geom_text(aes(size = wt))
# Scale height of text, rather than sqrt(height)
p + geom_text(aes(size = wt)) + scale_radius(range = c(3,6))

# You can display expressions by setting parse = TRUE.  The
# details of the display are described in ?plotmath, but note that
# geom_text uses strings, not expressions.
p + geom_text(aes(label = paste(wt, "^(", cyl, ")", sep = "")),
  parse = TRUE)

# Add a text annotation
p +
  geom_text() +
  annotate("text", label = "plot mpg vs. wt", x = 2, y = 15, size = 8, colour = "red")


# Aligning labels and bars --------------------------------------------------
df <- data.frame(
  x = factor(c(1, 1, 2, 2)),
  y = c(1, 3, 2, 1),
  grp = c("a", "b", "a", "b")
)

# ggplot2 doesn't know you want to give the labels the same virtual width
# as the bars:
ggplot(data = df, aes(x, y, group = grp)) +
  geom_col(aes(fill = grp), position = "dodge") +
  geom_text(aes(label = y), position = "dodge")
# So tell it:
ggplot(data = df, aes(x, y, group = grp)) +
  geom_col(aes(fill = grp), position = "dodge") +
  geom_text(aes(label = y), position = position_dodge(0.9))
# Use you can't nudge and dodge text, so instead adjust the y position
ggplot(data = df, aes(x, y, group = grp)) +
  geom_col(aes(fill = grp), position = "dodge") +
  geom_text(
    aes(label = y, y = y + 0.05),
    position = position_dodge(0.9),
    vjust = 0
  )

# To place text in the middle of each bar in a stacked barplot, you
# need to set the vjust parameter of position_stack()
ggplot(data = df, aes(x, y, group = grp)) +
 geom_col(aes(fill = grp)) +
 geom_text(aes(label = y), position = position_stack(vjust = 0.5))

# Justification -------------------------------------------------------------
df <- data.frame(
  x = c(1, 1, 2, 2, 1.5),
  y = c(1, 2, 1, 2, 1.5),
  text = c("bottom-left", "bottom-right", "top-left", "top-right", "center")
)
ggplot(df, aes(x, y)) +
  geom_text(aes(label = text))
ggplot(df, aes(x, y)) +
  geom_text(aes(label = text), vjust = "inward", hjust = "inward")
annotate {ggplot2} R Documentation
Create an annotation layer
Description
This function adds geoms to a plot, but unlike typical a geom function, the properties of the geoms are not mapped from variables of a data frame, but are instead passed in as vectors. This is useful for adding small annotations (such as text labels) or if you have your data in vectors, and for some reason don’t want to put them in a data frame.
Usage
annotate(geom, x = NULL, y = NULL, xmin = NULL, xmax = NULL,
  ymin = NULL, ymax = NULL, xend = NULL, yend = NULL, ...,
  na.rm = FALSE)
Arguments
- geom
name of geom to use for annotation - x, y, xmin, ymin, xmax, ymax, xend, yend
positioning aesthetics - you must specify at least one of these. - …
Other arguments passed on to layer(). These are often aesthetics, used to set an aesthetic to a fixed value, like colour = “red” or size = 3. They may also be parameters to the paired geom/stat. - na.rm
If FALSE, the default, missing values are removed with a warning. If TRUE, missing values are silently removed.
Details
Note that all position aesthetics are scaled (i.e. they will expand the limits of the plot so they are visible), but all other aesthetics are set. This means that layers created with this function will never affect the legend.
Examples
p <- ggplot(mtcars, aes(x = wt, y = mpg)) + geom_point()
p + annotate("text", x = 4, y = 25, label = "Some text")
p + annotate("text", x = 2:5, y = 25, label = "Some text")
p + annotate("rect", xmin = 3, xmax = 4.2, ymin = 12, ymax = 21,
  alpha = .2)
p + annotate("segment", x = 2.5, xend = 4, y = 15, yend = 25,
  colour = "blue")
p + annotate("pointrange", x = 3.5, y = 20, ymin = 12, ymax = 28,
  colour = "red", size = 1.5)

p + annotate("text", x = 2:3, y = 20:21, label = c("my label", "label 2"))

p + annotate("text", x = 4, y = 25, label = "italic(R) ^ 2 == 0.75",
  parse = TRUE)
p + annotate("text", x = 4, y = 25,
  label = "paste(italic(R) ^ 2, \" = .75\")", parse = TRUE)
时间序列制图 geom_line()
library(ggplot2)
head(economics)
head(economics_long)
## geom_line() 擅长时间序列作图
# geom_line() is suitable for time series
ggplot(economics, aes(date, unemploy)) + geom_line()
ggplot(economics_long, aes(date, value01, colour = variable)) +
  geom_line()

# geom_step() is useful when you want to highlight exactly when
# the y value changes
recent <- economics[economics$date > as.Date("2013-01-01"), ]
ggplot(recent, aes(date, unemploy)) + geom_line()
ggplot(recent, aes(date, unemploy)) + geom_step()

# geom_path lets you explore how two variables are related over time,
# e.g. unemployment and personal savings rate
m <- ggplot(economics, aes(unemploy/pop, psavert))
m + geom_path()
m + geom_path(aes(colour = as.numeric(date)))


# Changing parameters ----------------------------------------------
ggplot(economics, aes(date, unemploy)) +
  geom_line(colour = "red")

# Use the arrow parameter to add an arrow to the line
# See ?arrow for more details
c <- ggplot(economics, aes(x = date, y = pop))
c + geom_line(arrow = arrow())
c + geom_line(
  arrow = arrow(angle = 15, ends = "both", type = "closed")
)

# Control line join parameters
df <- data.frame(x = 1:3, y = c(4, 1, 9))
base <- ggplot(df, aes(x, y))
base + geom_path(size = 10)
base + geom_path(size = 10, lineend = "round")
base + geom_path(size = 10, linejoin = "mitre", lineend = "butt")

# You can use NAs to break the line.
df <- data.frame(x = 1:5, y = c(1, 2, NA, 4, 5))
ggplot(df, aes(x, y)) + geom_point() + geom_line()


# Setting line type vs colour/size
# Line type needs to be applied to a line as a whole, so it can
# not be used with colour or size that vary across a line
x <- seq(0.01, .99, length.out = 100)
df <- data.frame(
  x = rep(x, 2),
  y = c(qlogis(x), 2 * qlogis(x)),
  group = rep(c("a","b"),
              each = 100)
)
p <- ggplot(df, aes(x=x, y=y, group=group))
# These work
p + geom_line(linetype = 2)
p + geom_line(aes(colour = group), linetype = 2)
p + geom_line(aes(colour = x))
# But this doesn't
should_stop(p + geom_line(aes(colour = x), linetype=2))


