SpringBoot 高级进阶
目录标题
- SpringBoot 高级
-
- 1、RabbitMQ概述
-
- (1)RabbitMQ简介
-
- 消息服务中两个重要概念
- 消息队列主要有两种形式的目的地
- 异步处理
- 应用解耦
- 流量削峰
- 核心概念
- (2)RabbitMQ运行机制
- (3)RabbitMQ安装
- 2、Springboot 集成RabbitMQ
-
- (1)引入Maven依赖
- (2)application.yml配置
- (3)消息发送
- (4)消息接收
- (5)消息反序列化
- (6)监听消息队列
- (7)自动创建Exchange
- 3、检索ElasticSearch
-
- (1)Elasticsearch 环境搭建
- (2)kibana 环境搭建
- (3)测试
- 4、SpringBoot与任务
-
- (1)异步任务
- (2)定时任务
- (3)邮件任务
- 5、SpringSecurity
-
- (1)简介
- (2)搭建环境
- (3)认证和授权
- (4)权限控制和注销
- (5)记住我功能
- (6)完整配置代码
SpringBoot 高级
1、RabbitMQ概述
(1)RabbitMQ简介
消息服务中两个重要概念
消息代理(message broker)和目的地(destination)
当消息发送者发送消息以后,将由消息代理接管,消息代理保证消息传递到指定目
的地
消息队列主要有两种形式的目的地
- 队列(queue):点对点消息通信(point-to-point)
- 主题(topic):发布(publish)/订阅(subscribe)消息通信
异步处理
[外链图片转存失败,源站可能有防盗链机制,建议将图片保存下来直接上传


应用解耦

流量削峰

核心概念
Message
- 消息,消息是不具名的,它由消息头和消息体组成。消息体是不透明的,而消息头则由一系列的可选属性组
成,这些属性包括routing-key(路由键)、priority(相对于其他消息的优先权)、delivery-mode(指出
该消息可能需要持久性存储)等。
Publisher
- 消息的生产者,也是一个向交换器发布消息的客户端应用程序。
Exchange
- 交换器,用来接收生产者发送的消息并将这些消息路由给服务器中的队列。
Exchange有4种类型:direct(默认),fanout, topic, 和headers,不同类型的Exchange转发消息的策略有
所区别
Queue
- 消息队列,用来保存消息直到发送给消费者。它是消息的容器,也是消息的终点。一个消息
可投入一个或多个队列。消息一直在队列里面,等待消费者连接到这个队列将其取走。
Binding
- 绑定,用于消息队列和交换器之间的关联。一个绑定就是基于路由键将交换器和消息队列连
接起来的路由规则,所以可以将交换器理解成一个由绑定构成的路由表。
Exchange 和Queue的绑定可以是多对多的关系。
Connection
- 网络连接,比如一个TCP连接。
Channel
- 信道,多路复用连接中的一条独立的双向数据流通道。信道是建立在真实的TCP连接内的虚
拟连接,AMQP 命令都是通过信道发出去的,不管是发布消息、订阅队列还是接收消息,这
些动作都是通过信道完成。因为对于操作系统来说建立和销毁 TCP 都是非常昂贵的开销,所
以引入了信道的概念,以复用一条 TCP 连接。
Consumer
- 消息的消费者,表示一个从消息队列中取得消息的客户端应用程序。
Virtual Host
- 虚拟主机,表示一批交换器、消息队列和相关对象。虚拟主机是共享相同的身份认证和加
密环境的独立服务器域。每个 vhost 本质上就是一个 mini 版的 RabbitMQ 服务器,拥有
自己的队列、交换器、绑定和权限机制。vhost 是 AMQP 概念的基础,必须在连接时指定,
RabbitMQ 默认的 vhost 是 / 。
Broker
- 表示消息队列服务器实体
[外链图片转存失败,源站可能有防盗链机制,建议将图片保存下来直接上传(img-RF2Lxfhr-1654754609250)(D:\学习笔记\assets\1654066489993.png)]
(2)RabbitMQ运行机制
RabbitMQ是AMQP的实现
AMQP 中的消息路由
- AMQP 中消息的路由过程和 Java 开发者熟悉的 JMS 存在一些差别,AMQP 中增加了 Exchange 和 Binding 的角色。生产者把消息发布到 Exchange 上,消息最终到达队列并被消费者接收,而 Binding 决定交换器的消息应该发送到那个队列。

Exchange 类型
- Exchange分发消息时根据类型的不同分发策略有区别
- 目前共四种类型:direct、fanout、topic、headers 。headers 匹配 AMQP 消息的 header 而不是路由键, headers 交换器和 direct 交换器完全一致,但性能差很多,目前几乎用不到了,所以直接看另外三种类型:
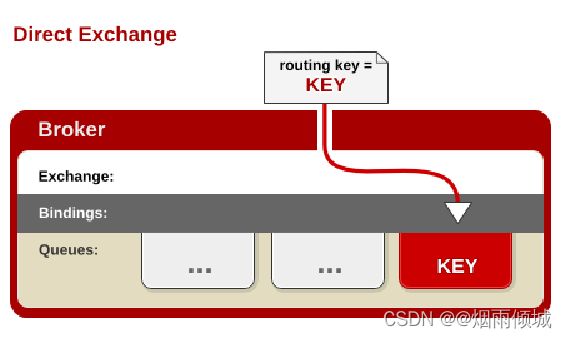
消息中的路由键(routing key)如果和 Binding 中的 binding key 一致, 交换器就将消息发到对应的队列中。路由键与队列名完全匹配,如果一个队列绑定到交换机要求路由键为“dog”,则只转发 routing key 标记为“dog”的消息,不会转发“dog.puppy”,也不会转发“dog.guard”等等。它是完全匹配、单播的模式。

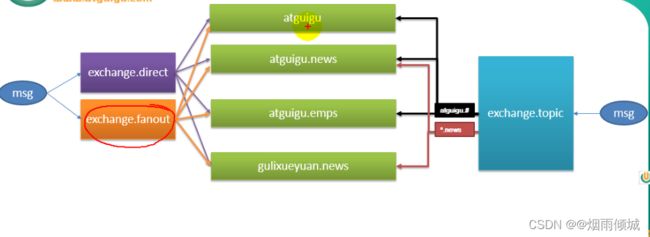
每个发到 fanout 类型交换器的消息都会分到所有绑定的队列上去。fanout 交换器不处理路由键,只是简单的将队列绑定到交换器上,每个发送到交换器的消息都会被转发到与该交换器绑定的所有队列上。很像子网广播,每台子网内的主机都获得了一份复制的消息。fanout 类型转发消息是最快的。

topic 交换器通过模式匹配分配消息的路由键属性,将路由键和某个模式进行匹配,此时队列需要绑定到一个模式上。它将路由键和绑定键的字符串切分成单词,这些单词之间用点隔开。它同样也会识别两个通配符:符号“#”和符号“*”。#匹配0个或多个单词,*匹配一个单词。
(3)RabbitMQ安装

[root@hcz666 ~]# docker ps
CONTAINER ID   IMAGE                                                                           COMMAND                  CREATED             STATUS             PORTS                                                                                                                                NAMES
f3e300612aff   registry.cn-shanghai.aliyuncs.com/springcloud-imooc/rabbitmq:3.8.2-management   "docker-entrypoint.s…"   About an hour ago   Up About an hour   4369/tcp, 5671/tcp, 0.0.0.0:5672->5672/tcp, :::5672->5672/tcp, 15671/tcp, 25672/tcp, 0.0.0.0:15672->15672/tcp, :::15672->15672/tcp   frosty_brahmagupta
6e046839475b   portainer/portainer                                                             "/portainer"             6 months ago        Up 2 hours         0.0.0.0:8088->9000/tcp, :::8088->9000/tcp                                                                                            nervous_jepsen
[root@hcz666 ~]#
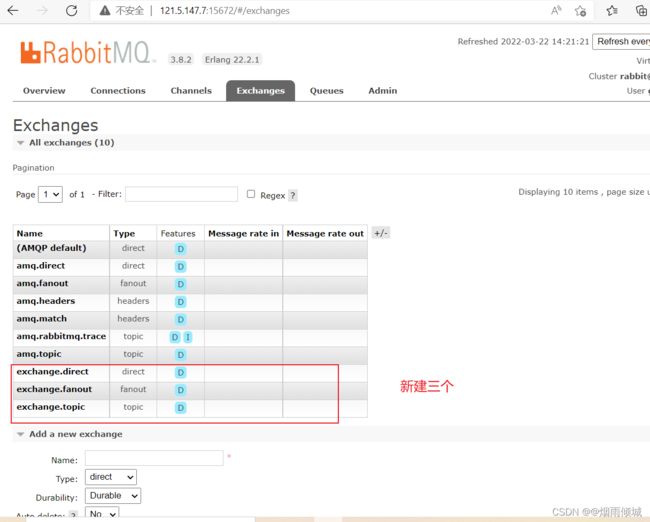

绑定关系:


exchange.direct 发送消息:

接受消息:


exchange.fanout发送消息

接受消息:

exchange.topic发送消息:

接受消息:

2、Springboot 集成RabbitMQ
(1)引入Maven依赖
<parent>
		<groupId>org.springframework.bootgroupId>
		<artifactId>spring-boot-starter-parentartifactId>
		<version>2.3.1.RELEASEversion>
		<relativePath/>
	parent>
	<groupId>com.hczgroupId>
	<artifactId>springboot-02-amqpartifactId>
	<version>0.0.1-SNAPSHOTversion>
	<name>springboot-02-amqpname>

	<properties>
		<java.version>1.8java.version>
	properties>
	<dependencies>
		<dependency>
			<groupId>org.springframework.bootgroupId>
			<artifactId>spring-boot-starter-amqpartifactId>
		dependency>
		<dependency>
			<groupId>org.springframework.bootgroupId>
			<artifactId>spring-boot-starter-webartifactId>
		dependency>

		<dependency>
			<groupId>org.springframework.bootgroupId>
			<artifactId>spring-boot-starter-testartifactId>
			<scope>testscope>
		dependency>
	dependencies>

	<build>
		<plugins>
			<plugin>
				<groupId>org.springframework.bootgroupId>
				<artifactId>spring-boot-maven-pluginartifactId>
			plugin>
		plugins>
	build>
(2)application.yml配置
spring.rabbitmq.host=121.5.147.7
spring.rabbitmq.username=guest
spring.rabbitmq.password=guest
(3)消息发送
@SpringBootTest
class Springboot02AmqpApplicationTests {

	@Autowired
	RabbitTemplate rabbitTemplate;

	/**
	 * 1、单播(点对点)
	 */
	@Test
	void contextLoads() {
		//Message需要自己构造一个;定义消息体内容和消息头
		//rabbitTemplate.send(exchange,routeKey,message);

		//Object默认当成消息体,只需要传入要发送对象,自动序列化发送给rabbitmq
		//rabbitTemplate.convertAndSend(exchange,routeKey,object);

		Map<String,Object> map = new HashMap<>();
		map.put("msg","这是一个消息");
		map.put("data", Arrays.asList("helloworld",123,true));
		//对象被默认序列化以后发送出去
        rabbitTemplate.convertAndSend("exchange.direct","atguigu.news",map);


	}

}
/**
	 * 2、广播机制
	 */
	@Test
	public void sendMessage(){
		rabbitTemplate.convertAndSend("exchange.fanout","",new Book("西游记","吴承恩"));
	}
(4)消息接收
单点机制:


/**
* 接收消息
*/
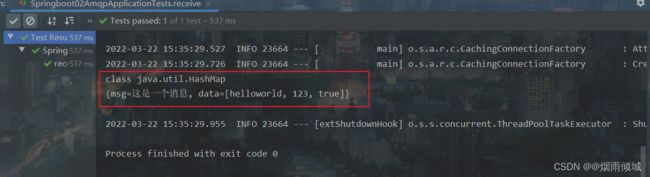
@Test
public void receive(){
Object o = rabbitTemplate.receiveAndConvert("atguigu.news");
System.out.println(o.getClass());
System.out.println(o);
}
广播机制:


(5)消息反序列化
/**
 * 将发送的消息序列化
 */
@Configuration
public class MyAMQPConfig {

    @Bean
    public MessageConverter messageConverter() {
        return new Jackson2JsonMessageConverter();
    }
}

(6)监听消息队列
当在测试类中发送消息时,控制台中会自动接收到发送的消息,只要消息队列中有消息都能接收到消息
/**
     * 监听消息队列
     * @param book
     */
@Service
public class BookService {

    @RabbitListener(queues = "atguigu.news")
    public void receive(Book book){
        System.out.println("收到消息:"+ book);
    }
}


/**
     * 监听消息头
     */
    @RabbitListener(queues = "atguigu")
    public void receive02(Message message){
        System.out.println(message.getBody());
        System.out.println(message.getMessageProperties());
    }

(7)自动创建Exchange
	@Autowired
	AmqpAdmin amqpAdmin;

	@Test
	public void createExchange(){
		amqpAdmin.declareExchange(new DirectExchange("amqpadmin.exchange"));
		System.out.println("创建完成。。。。。。");

        amqpAdmin.declareQueue(new Queue("amqpadmin.queue",true));
		System.out.println("创建成功。。");

        //创建绑定规则
		amqpAdmin.declareBinding(new Binding("amqpadmin.queue",Binding.DestinationType.QUEUE,"amqpadmin.exchange","ampq.haha",null));
	}


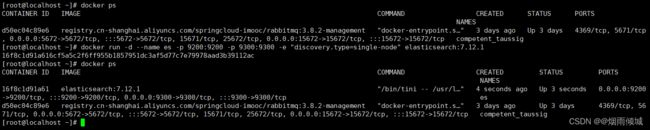
3、检索ElasticSearch
(1)Elasticsearch 环境搭建
[root@localhost bin]# docker pull elasticsearch

[root@localhost bin]# docker images
REPOSITORY                                                     TAG                IMAGE ID       CREATED       SIZE
registry.cn-shanghai.aliyuncs.com/springcloud-imooc/rabbitmq   3.8.2-management   db695e07d0d7   2 years ago   181MB
elasticsearch

[root@localhost bin]# docker run -e ES_JAVA_OPTS="-Xms256m -Xmx256m" -d -p 9200:9200 -p 9300:9300 --name ES01 5acf0e8da90b
a79b4559b27ac3bd50f025ed08808d053dc8f35ac88c3351f03baaa27b919baf
[root@localhost bin]# docker ps
CONTAINER ID   IMAGE                                                                           COMMAND                  CREATED          STATUS          PORTS                                                                                                                                NAMES
a79b4559b27a   5acf0e8da90b                                                                    "/docker-entrypoint.…"   13 seconds ago   Up 12 seconds   0.0.0.0:9200->9200/tcp, :::9200->9200/tcp, 0.0.0.0:9300->9300/tcp, :::9300->9300/tcp                                                 ES01
d50ec04c89e6   registry.cn-shanghai.aliyuncs.com/springcloud-imooc/rabbitmq:3.8.2-management   "docker-entrypoint.s…"   25 hours ago     Up 25 hours     4369/tcp, 5671/tcp, 0.0.0.0:5672->5672/tcp, :::5672->5672/tcp, 15671/tcp, 25672/tcp, 0.0.0.0:15672->15672/tcp, :::15672->15672/tcp   competent_taussig

第一步、创建网络
// 创建网络
docker network create es-net
第二步、拉取 Elasticsearch 镜像
// 查看镜像
docker images

第三步、配置参数
docker run -d \
   --name es \
   -e "ES_JAVA_OPTS=-Xms512m -Xmx512m" \
   -e "discovery.type=single-node" \
   -v es-data:/usr/share/elasticsearch/data \
   -v es-plugins:/usr/share/elasticsearch/plugins \
   --privileged \
   --network es-net \
   -p 9200:9200 \
   -p 9300:9300 \
elasticsearch:7.12.1
第四步、防火墙设置
// 防火墙
firewall-cmd --zone=public --add-port=9200/tcp --permanent
// 刷新端口
firewall-cmd --reload
第五步、浏览器访问


docker ps
// 重启镜像
docker start es
(2)kibana 环境搭建
第一步、拉取镜像
注意:版本要与 Elasticsearch 保持一致,防止出现意想不到的错误。
// 拉取镜像
docker pull kibana:7.12.1

第二步、设置参数
docker run -d  \
--name kibana \
-e ELASTICSEARCH_HOSTS=http://es:9200 \
--network=es-net \
-p 5601:5601 \
kibana:7.12.1
首先我们查看 ElasticSearch 的容器内部 ip:
docker inspect ES容器id

然后进入 Kibana 容器内部,修改 kibana.yml 中的ip
$ docker exec -it kibana容器id /bin/bash
$ cd config
$ vi kibana.yml
进入kibana容器中
#
# ** THIS IS AN AUTO-GENERATED FILE **
#
# Default Kibana configuration for docker target
server.name: kibana
server.host: "0"
elasticsearch.hosts: [ "http://elasticsearch:9200" ]
xpack.monitoring.ui.container.elasticsearch.enabled: true
只需要将上面的 "http://elasticsearch:9200" 中的 elasticsearch 替换成上一步的ES容器内部ip就可以了。
修改完成之后退出容器,重新启动即可 docker restart kibana容器id
第三步、启动 kibana
// 启动kibana
docker start kibana
// 查看启动日志
docker logs -f kibana
第四步、防火墙设置
// 防火墙
firewall-cmd --zone=public --add-port=5601/tcp --permanent
// 刷新端口
firewall-cmd --reload
第五步、浏览器访问
(3)测试
[外链图片转存失败,源站可能有防盗链机制,建议将图片保存下来直接上传(img-IHO7rlku-1654754609270)(D:\学习笔记\assets\1648543830182.png)]
http://192.168.128.129:9200/megacorp/employee/1
{
    "first_name": "Join",
    "last_name": "hcz",
    "age": 18,
    "aboue": "helloworld",
    "interests": ["sports","music"]
}
http://192.168.128.129:9200/megacorp/employee/2
{
    "first_name": "Join2",
    "last_name": "hcz2",
    "age": 19,
    "aboue": "helloworld2",
    "interests": ["sports2","music2"]
}
http://192.168.128.129:9200/megacorp/employee/3
{
    "first_name": "Join3",
    "last_name": "hcz3",
    "age": 22,
    "aboue": "helloworld3",
    "interests": ["sports3","music3"]
}

查询全部

4、SpringBoot与任务
(1)异步任务

service编写
/**
 * 异步任务
 */
@Service
public class AsyncService {

    @Async  //告诉Spring这是一个异步方法
    public void hello() {
        try {
            Thread.sleep(3000);
        } catch (InterruptedException e) {
            e.printStackTrace();
        }
        System.out.println("处理中。。。。");
    }
}
controller编写
@RestController
public class AsyncController {

    @Autowired
    AsyncService asyncService;

    @GetMapping("/hello")
    public String hello() {
        asyncService.hello();
        return "响应成功";
    }
}

(2)定时任务

/**
 * 定时任务
 */
@Service
public class ScheduleService {

    @Scheduled(cron = "0 * * * * MON-SAT")
    public void hello(){
        System.out.println("定时任务。。。");
    }
}


(3)邮件任务
5、SpringSecurity
(1)简介
- Spring Security是一个框架,侧重于为 Java 应用程序提供身份验证和授权。
- 用户认证一般要求用户提供用户名和密码,系统通过校验用户名和密码来完成认证过程。
- 用户授权指的是验证某个用户是否有权限执行某个操作。
在一个系统中,不同用户所具有的权限是不同的。比如对一个文件来说,有的用户只能进行读取,而有的用户可以进行修改。一般来说,系统会为不同的用户分配不同的角色,而每个角色则对应一系列的权限。
(2)搭建环境
- 新建一个初始的springboot项目web模块,thymeleaf模块
- 导入静态资源

- Controller层
@Controller
public class RouterController {

    @RequestMapping({"/","/index"})
    public String index() {
        return "index";
    }

    @RequestMapping("/toLogin")
    public String toLongin(){
        return "views/login";
    }

    @RequestMapping("/level1/{id}")
    public String level1(@PathVariable("id") int id) {
        return "views/level1/" + id;
    }

    @RequestMapping("/level2/{id}")
    public String level2(@PathVariable("id") int id) {
        return "views/level2/" + id;
    }

    @RequestMapping("/level3/{id}")
    public String level3(@PathVariable("id") int id) {
        return "views/level3/" + id;
    }
}
(3)认证和授权
- 引入 Spring Security 模块
<dependency>
    <groupId>org.springframework.bootgroupId>
    <artifactId>spring-boot-starter-securityartifactId>
dependency>
- 编写 Spring Security 配置类
@EnableWebSecurity
public class SecurityConfig extends WebSecurityConfigurerAdapter {

    /**
     * 授权
     */
    @Override
    protected void configure(HttpSecurity http) throws Exception {

    }
}
- 定制请求的授权规则
/**
 * 授权
 */
@Override
protected void configure(HttpSecurity http) throws Exception {
    //首页所有人可以访问,功能页面只有对应全向的人才能访问
    //请求授权的规则
    http.authorizeRequests()
        .antMatchers("/").permitAll()
        .antMatchers("/level1/**").hasRole("vip1")
        .antMatchers("/level2/**").hasRole("vip2")
        .antMatchers("/level3/**").hasRole("vip3");
}
-
测试一下:发现除了首页都进不去了!因为我们目前没有登录的角色,因为请求需要登录的角色拥有对应的权限才可以!
-
在configure()方法中加入以下配置,开启自动配置的登录功能!
// 开启自动配置的登录功能
// /login 请求来到登录页
// /login?error 重定向到这里表示登录失败
http.formLogin();
-
测试一下:发现,没有权限的时候,会跳转到登录的页面!
-
可以定义认证规则,重写configure(AuthenticationManagerBuilder auth)方法
//定义认证规则
@Override
protected void configure(AuthenticationManagerBuilder auth) throws Exception {

   //在内存中定义,也可以在jdbc中去拿....
   auth.inMemoryAuthentication()
          .withUser("hcz").password("123456").roles("vip2","vip3")
          .and()
          .withUser("root").password("123456").roles("vip1","vip2","vip3")
          .and()
          .withUser("guest").password("123456").roles("vip1","vip2");
}
- 测试,我们可以使用这些账号登录进行测试!发现会报错!
There is no PasswordEncoder mapped for the id “null”
- 原因,我们要将前端传过来的密码进行某种方式加密,否则就无法登录,修改代码
//定义认证规则
@Override
protected void configure(AuthenticationManagerBuilder auth) throws Exception {
   //在内存中定义,也可以在jdbc中去拿....
   //Spring security 5.0中新增了多种加密方式,也改变了密码的格式。
   //要想我们的项目还能够正常登陆,需要修改一下configure中的代码。我们要将前端传过来的密码进行某种方式加密
   //spring security 官方推荐的是使用bcrypt加密方式。

   auth.inMemoryAuthentication().passwordEncoder(new BCryptPasswordEncoder())
          .withUser("hcz").password(new BCryptPasswordEncoder().encode("123456")).roles("vip2","vip3")
          .and()
          .withUser("root").password(new BCryptPasswordEncoder().encode("123456")).roles("vip1","vip2","vip3")
          .and()
          .withUser("guest").password(new BCryptPasswordEncoder().encode("123456")).roles("vip1","vip2");
}
- 测试,发现,登录成功,并且每个角色只能访问自己认证下的规则!
(4)权限控制和注销
- 开启自动配置的注销的功能
//定制请求的授权规则
@Override
protected void configure(HttpSecurity http) throws Exception {
   //
    ....
   //开启自动配置的注销的功能
      // /logout 注销请求
   http.logout();
}
- 我们在前端,增加一个注销的按钮,index.html 导航栏中
<a class="item" th:href="@{/logout}">
   <i class="address card icon">i> 注销
a>
- 测试一下,登录成功后点击注销,发现注销完毕会跳转到登录页面!
- 但是,我们想让他注销成功后,依旧可以跳转到首页,该怎么处理呢?
// .logoutSuccessUrl("/"); 注销成功来到首页
http.logout().logoutSuccessUrl("/");
-
测试,注销完毕后,发现跳转到首页OK
-
我们现在又来一个需求:用户没有登录的时候,导航栏上只显示登录按钮,用户登录之后,导航栏可以显示登录的用户信息及注销按钮!还有就是,比如 hcz 这个用户,它只有 vip2,vip3功能,那么登录则只显示这两个功能,而vip1的功能菜单不显示!这个就是真实的网站情况了!该如何做呢?
我们需要结合thymeleaf中的一些功能sec:authorize=“isAuthenticated()”:是否认证登录!来显示不同的页面
Maven依赖:
<dependency>
   <groupId>org.thymeleaf.extrasgroupId>
   <artifactId>thymeleaf-extras-springsecurity5artifactId>
   <version>3.0.4.RELEASEversion>
dependency>
- 修改我们的 前端页面,导入命名空间
xmlns:sec="http://www.thymeleaf.org/thymeleaf-extras-springsecurity5"
- 修改导航栏,增加认证判断
<div class="right menu">


   <div sec:authorize="!isAuthenticated()">
       <a class="item" th:href="@{/login}">
           <i class="address card icon">i> 登录
       a>
   div>


   <div sec:authorize="isAuthenticated()">
       <a class="item">
           <i class="address card icon">i>
          用户名:<span sec:authentication="principal.username">span>
          角色:<span sec:authentication="principal.authorities">span>
       a>
   div>

   <div sec:authorize="isAuthenticated()">
       <a class="item" th:href="@{/logout}">
           <i class="address card icon">i> 注销
       a>
   div>
div>
-
重启测试,我们可以登录试试看,登录成功后确实,显示了我们想要的页面;
-
如果注销404了,就是因为它默认防止csrf跨站请求伪造,因为会产生安全问题,我们可以将请求改为post表单提交,或者在spring security中关闭csrf功能;我们试试:在 配置中增加
http.csrf().disable();
http.csrf().disable();//关闭csrf功能:跨站请求伪造,默认只能通过post方式提交logout请求
http.logout().logoutSuccessUrl("/");
- 我们继续将下面的角色功能块认证完成!
<div class="column" sec:authorize="hasRole('vip1')">
   <div class="ui raised segment">
       <div class="ui">
           <div class="content">
               <h5 class="content">Level 1h5>
               <hr>
               <div><a th:href="@{/level1/1}"><i class="bullhorn icon">i> Level-1-1a>div>
               <div><a th:href="@{/level1/2}"><i class="bullhorn icon">i> Level-1-2a>div>
               <div><a th:href="@{/level1/3}"><i class="bullhorn icon">i> Level-1-3a>div>
           div>
       div>
   div>
div>

<div class="column" sec:authorize="hasRole('vip2')">
   <div class="ui raised segment">
       <div class="ui">
           <div class="content">
               <h5 class="content">Level 2h5>
               <hr>
               <div><a th:href="@{/level2/1}"><i class="bullhorn icon">i> Level-2-1a>div>
               <div><a th:href="@{/level2/2}"><i class="bullhorn icon">i> Level-2-2a>div>
               <div><a th:href="@{/level2/3}"><i class="bullhorn icon">i> Level-2-3a>div>
           div>
       div>
   div>
div>

<div class="column" sec:authorize="hasRole('vip3')">
   <div class="ui raised segment">
       <div class="ui">
           <div class="content">
               <h5 class="content">Level 3h5>
               <hr>
               <div><a th:href="@{/level3/1}"><i class="bullhorn icon">i> Level-3-1a>div>
               <div><a th:href="@{/level3/2}"><i class="bullhorn icon">i> Level-3-2a>div>
               <div><a th:href="@{/level3/3}"><i class="bullhorn icon">i> Level-3-3a>div>
           div>
       div>
   div>
div>
- 权限控制和注销搞定!
(5)记住我功能
- 我们只要登录之后,关闭浏览器,再登录,就会让我们重新登录,但是很多网站的情况,就是有一个记住密码的功能,这个该如何实现呢?
//定制请求的授权规则
@Override
protected void configure(HttpSecurity http) throws Exception {
	//
    。。。。。。。。。。。
   //记住我
   http.rememberMe();
}
(6)完整配置代码
@EnableWebSecurity
public class SecurityConfig extends WebSecurityConfigurerAdapter {

    /**
     * 授权
     */
    @Override
    protected void configure(HttpSecurity http) throws Exception {
        //首页所有人可以访问,功能页面只有对应全向的人才能访问
        //请求授权的规则
        http.authorizeRequests()
                .antMatchers("/").permitAll()
                .antMatchers("/level1/**").hasRole("vip1")
                .antMatchers("/level2/**").hasRole("vip2")
                .antMatchers("/level3/**").hasRole("vip3");

        //没有授权默认会跳转到登录页面,需要开启登录的页面
        http.formLogin().loginPage("/toLogin").usernameParameter("username")
        .passwordParameter("password").loginProcessingUrl("/login");

        //开启注销功能,之后跳到首页
        http.csrf().disable();  //关闭csrf功能
        http.logout().logoutSuccessUrl("/");

        //开启“记住我”功能,自定义接受前端的参数
        http.rememberMe().rememberMeParameter("remember");
    }

    /**
     * 认证
     */
    @Override
    protected void configure(AuthenticationManagerBuilder auth) throws Exception {
        auth.inMemoryAuthentication().passwordEncoder(new BCryptPasswordEncoder())
                .withUser("hcz").password(new BCryptPasswordEncoder().encode("111")).roles("vip1")
                .and()
                .withUser("admin").password(new BCryptPasswordEncoder().encode("111")).roles("vip1","vip2","vip3");

    }
}