Camunda入门(二) - 启动Camunda管理平台
目录
- 1. 安装Camunda Platform社区版、Camunda Modeler
- 2. SpringBoot集成Camunda Platform Webapps
-
- 2.1 集成Mysql
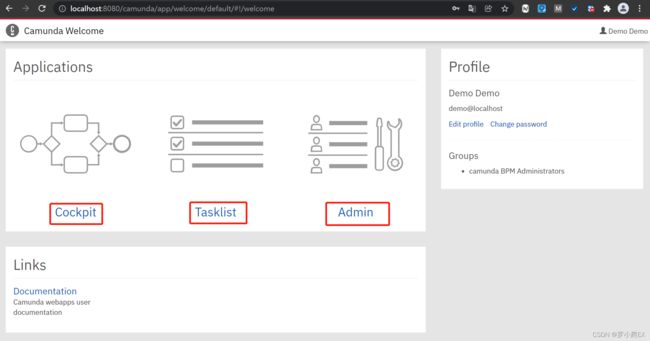
启动Camunda管理平台,即提供Web管理界面,管理界面主要功能包括:
- Cockpit - 管理流程process及流程实例process instances
- Tasklist - 管理流程process中的具体任务task(导航到具体task、提供表单form输入、修复流程实例等)
- Admin - 管理用户users、组织group、授权authorizations
且管理平台和后续的流程应用ProcessApplication需依赖相同的RMDB,
关于Camunda管理平台的启动提供了2种方式:
- 独立启动包 - 1. 安装Camunda Platform社区版、Camunda Modeler
- 内嵌到springboot应用中启动 - 2. SpringBoot集成Camunda Platform Webapps
接下来会重点讲解这两种启动方式。
除了管理平台,本文还记录了Camunda官方提供的建模器的安装:
- Modeler - 独立安装的建模器([windows、linux、mac]
1. 安装Camunda Platform社区版、Camunda Modeler
参见:https://docs.camunda.org/get-started/quick-start/install/
注: 要求JDK1.8+
(1)下载Camunda Platform社区版、Camunda Modeler
下载界面:https://camunda.com/download
注:
这里提到的Camunda Platform即为之前提到的Web Applications集合,
Camunda Modeler即对应之前提到的Modeler。
首选下载Camunda Platform Run社区版,如下图选择ZIP格式,

关于Modeler可以根据对应的操作系统进行选择,比如在Win10下选择Windows 64bit版本。

下载后ZIP文件如下:

(2)启动Camunda Platform社区版
解压缩camunda-bpm-run-7.16.0.zip

执行如下启动命令:
# Unix环境
start.sh

# Windows环境
start.bat
启动成功后默认访问页面:
http://localhost:8080/
账号/密码:demo/demo(登录成功后可修改)
登录成功后可访问之前提到的相应管管界面:
- Cockpit - 管理流程process及流程实例process instances
- Tasklist - 管理流程process中的具体任务task(导航到具体task、提供表单form输入、修复流程实例等)
- Admin - 管理用户users、组织group、授权authorizations
注:
由于Camunda默认启动采用的预置的H2数据库,
若想改用Mysql数据库,可参见:Camunda Platform社区版 - 如何配置和使用mysql数据库【转载】
(3)启动Camunda Modeler
解压缩camunda-modeler-4.11.1-win-x64.zip

双击执行Camunda Modeler.exe。

BPMN设计界面

DMN设计界面

Form设计界面

2. SpringBoot集成Camunda Platform Webapps
关于通过SpringBoot集成启动Camunda Platform的详细过程可参见:
Get Started/SpringBoot/Get started with Camunda and the Spring Boot
官方提供的SpringBoot工程下载链接:camunda-get-started-spring-boot-Step-3.zip
亦可通过Camunda官方提供的Camunda Platform Initializr - https://start.camunda.com/来创建Camunda启动工程。
可通过如下图Camunda Platform Intializr设置来初始创建一个Camunda Webapp(内嵌tomcat容器、H2数据库)启动程序。

点击GENERATE PROJECT按钮后生成工程如下图:
以上工程可直接运行,Camunda platform默认运行在8080端口,且使用内置H2内存数据库,
直接可通过http://localhost:8080进行访问。
2.1 集成Mysql
参考:
https://docs.camunda.org/manual/latest/user-guide/process-engine/database/
https://docs.camunda.org/manual/latest/user-guide/process-engine/database/database-schema/
Camunda默认启动采用的预置H2数据库,也可以集成我们平时使用更多的Mysql数据库,
目前官网显示支持的RMDB如下图,具体Mysql支持5.7/8.0版本,实际测试时使用的Mysql 5.7.27版本。

(1)新建Msyql数据库(空库)

(2)添加maven依赖
<dependency>
  <groupId>org.springframework.bootgroupId>
  <artifactId>spring-boot-starter-jdbcartifactId>
dependency>


<dependency>
  <groupId>mysqlgroupId>
  <artifactId>mysql-connector-javaartifactId>
dependency>
完整maven pom文件如下:
<project xmlns="http://maven.apache.org/POM/4.0.0"
         xmlns:xsi="http://www.w3.org/2001/XMLSchema-instance"
         xsi:schemaLocation="http://maven.apache.org/POM/4.0.0 http://maven.apache.org/xsd/maven-4.0.0.xsd">

  <modelVersion>4.0.0modelVersion>

  <groupId>com.luo.camunda.platformgroupId>
  <artifactId>camunda-platformartifactId>
  <version>1.0.0-SNAPSHOTversion>

  <properties>
    <project.build.sourceEncoding>UTF-8project.build.sourceEncoding>
    <maven.compiler.source>8maven.compiler.source>
    <maven.compiler.target>8maven.compiler.target>
  properties>

  <dependencyManagement>
    <dependencies>
      <dependency>
        <groupId>org.springframework.bootgroupId>
        <artifactId>spring-boot-dependenciesartifactId>
        <version>2.5.4version>
        <type>pomtype>
        <scope>importscope>
      dependency>

      <dependency>
        <groupId>org.camunda.bpmgroupId>
        <artifactId>camunda-bomartifactId>
        <version>7.16.0version>
        <scope>importscope>
        <type>pomtype>
      dependency>
    dependencies>
  dependencyManagement>

  <dependencies>
    <dependency>
      <groupId>org.camunda.bpm.springbootgroupId>
      <artifactId>camunda-bpm-spring-boot-starter-restartifactId>
    dependency>

    <dependency>
      <groupId>org.camunda.bpm.springbootgroupId>
      <artifactId>camunda-bpm-spring-boot-starter-webappartifactId>
    dependency>


    <dependency>
      <groupId>org.springframework.bootgroupId>
      <artifactId>spring-boot-starter-jdbcartifactId>
    dependency>


    <dependency>
      <groupId>mysqlgroupId>
      <artifactId>mysql-connector-javaartifactId>
    dependency>

  dependencies>

  <build>
    <plugins>
      <plugin>
        <groupId>org.springframework.bootgroupId>
        <artifactId>spring-boot-maven-pluginartifactId>
        <version>2.5.4version>
      plugin>
    plugins>
  build>

project>
(3)修改application.yaml配置(额外添加spring.datasource mysql配置,可根据需要调整)
# ====================================================
# ================ Camunda配置 ========================
# ====================================================
# 此处可设置Camunda启动端口
server.port: 8888
camunda.bpm:
  admin-user:
    id: luo
    password: 123456
  filter:
    create: All tasks
  database:
    schema-update: true
# ====================================================
# ================ Camunda Mysql数据库配置 =============
# ====================================================
spring:
  # 数据库配置
  datasource:
    type: com.zaxxer.hikari.HikariDataSource
    driverClassName: com.mysql.cj.jdbc.Driver
    url: jdbc:mysql://localhost:3306/camunda_716?useUnicode=true&characterEncoding=utf-8&useSSL=false
    username: root
    password: 123456
    # Hikari 连接池配置
    hikari:
      # 最小空闲连接数量
      minimum-idle: 5
      # 空闲连接存活最大时间,默认600000(10分钟)
      idle-timeout: 180000
      # 连接池最大连接数,默认是10
      maximum-pool-size: 10
      # 此属性控制从池返回的连接的默认自动提交行为,默认值:true
      auto-commit: true
      # 连接池名称
      pool-name: Camunda-HK-CP
      # 此属性控制池中连接的最长生命周期,值0表示无限生命周期,默认1800000即30分钟
      max-lifetime: 1800000
      # 数据库连接超时时间,默认30秒,即30000
      connection-timeout: 30000
      connection-test-query: SELECT 1
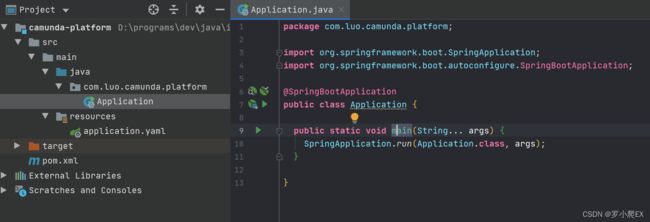
(4)启动Camunda并自动初始化Mysql数据库
启动Application.java后,即可通过http://localhost:8888访问,
同时查看对应数据库即可发现Camunda相关的表都已被初始化创建。

参考:
https://docs.camunda.org/manual/latest/
https://docs.camunda.org/get-started/
https://docs.camunda.org/manual/latest/introduction/architecture/