理想国SpringCloud微服务入门教程(图文+源码详解)
01.简介
what:是什么
- SpringCloud 是分布式系统开发的工具套件
- SpringBoot是SpringCloud的基石
- 主要部分:注册中心,负载均衡,熔断器,远程调用,网关,配置中心,消息总线等
- SpringCloud并没有重复造轮子
- SpringCloud对于中小型互联网公司来说是一种福音,SpringCloud从架构层面,降低了对大型分布式系统构建的要求和难度,使我们以非常低的成本(技术或硬件)搭建一套高效,分布式,容错的平台
why:为什么使用
- 高薪就业的前提
- 面试都要问
where:在哪里使用
- 小项目不适合使用
- 适合大型分布式项目的使用
when:什么时候使用
- 当需要做大型分布式项目的时候
how:如何使用
- 边学边做,边做边学
02.版本
SpringCloud是一系列框架组合,为了避免与框架版本产生混淆,采用全新的命名方式
- 大版本名+子版本名称
- 大版本名用伦敦地铁站名
- 子版本名称有三种
- SNAPSHOT:快照版本,尝鲜版,随时可能修改
- M版本,MileStone,M1表示第一个里程碑版本,一般同时标注PRE,表示预览版
- SR,Service Release,SR1表示第一个正式版本,同时标注GA(Generally Available),稳定版
版本查看地址:https://spring.io/projects/spring-cloud
我们选用的版本是:Spring Cloud Hoxton.SR5 + Spring boot 2.3.7.RELEASE
03.微服务业务场景的构建
概述
- 在开发过程中,服务间关系概括起来其实是生产者和消费者关系
- 目标:我们模拟一个最简单的微服务调用场景,微服务提供者(Provider)和微服务调用者(Consumer)
准备数据
-- 创建数据库
drop database  if exists  springcloud;
create database springcloud character set utf8 collate utf8_general_ci;
-- 使用springcloud数据库
use springcloud;
-- ----------------------------
-- table structure for tb_user
-- ----------------------------
create table `tb_user` (
                           `id` int(11) not null auto_increment,
                           `username` varchar(100) default null comment '用户名',
                           `password` varchar(100) default null comment '密码',
                           `name` varchar(100) default null comment '姓名',
                           `age` int(11) default null comment '年龄',
                           `sex` int(11) default null comment '性别,1男,2女',
                           `birthday` date default null comment '出生日期',
                           `created` date default null comment '创建时间',
                           `updated` date default null comment '更新时间',
                           `note` varchar(1000) default null comment '备注',
                           primary key (`id`)
) engine=innodb auto_increment=2 default charset=utf8 comment='用户信息表';
-- ----------------------------
-- records of tb_user
-- ----------------------------
insert into `tb_user` values ('1', 'zhangsan', '123456', '张三', '13', '1', '2006-08-01', '2019-05-16', '2019-05-16', '张三');
insert into `tb_user` values ('2', 'lisi', '123456', '李四', '13', '1', '2006-08-01', '2019-05-16', '2019-05-16', '李四');
实现步骤
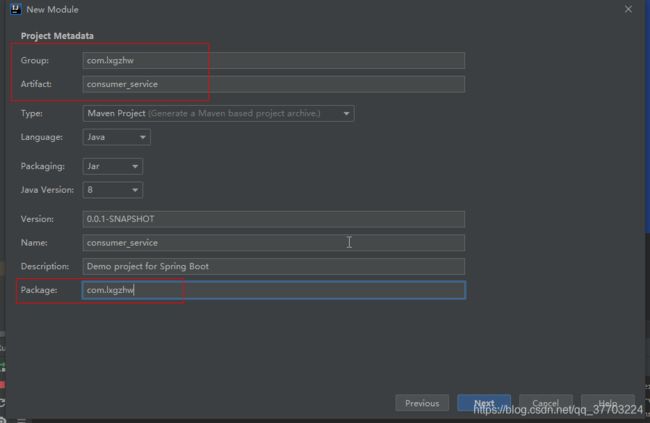
- 创建服务的父工程(lxgzhw_parent)
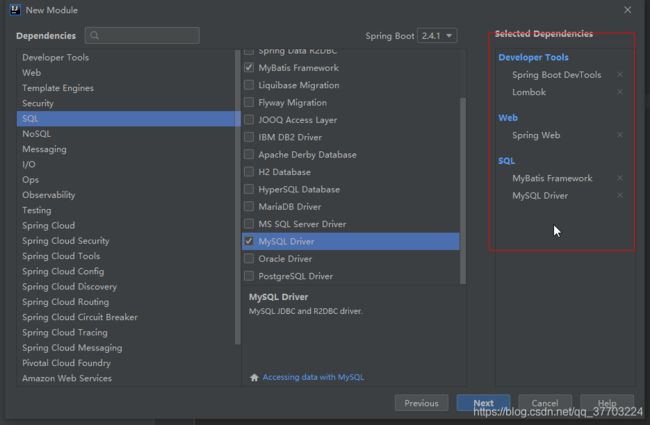
- 创建服务提供者(provider)工厂:SpringBoot + Mybatis + web
- 创建服务消费者(consumer)工厂:SpringBoot +web
04.创建服务提供者
配置信息:application.yml
# 端口
server.port: 9091
# 数据库连接配置信息
spring.datasource.driver-class-name: com.mysql.cj.jdbc.Driver
spring.datasource.url: jdbc:mysql://127.0.0.1:3306/springcloud?useUnicode=true&characterEncoding=UTF-8&serverTimezone=UTC
spring.datasource.password: root
spring.datasource.username: root
User
package com.lxgzhw.pojo;

import lombok.Data;
import java.util.Date;

@Data
public class User {
    private Integer id;//主键id
    private String username;//用户名
    private String password;//密码
    private String name;//姓名
    private Integer age;//年龄
    private Integer sex;//性别 1男性,2女性
    private Date birthday; //出生日期
    private Date created; //创建时间
    private Date updated; //更新时间
    private String note;//备注
    //getter setter
}
UserService
package com.lxgzhw.service;

import com.lxgzhw.pojo.User;

public interface UserService {
    User findById(Integer id);
}
UserServiceImpl
package com.lxgzhw.service.impl;

import com.lxgzhw.mapper.UserMapper;
import com.lxgzhw.pojo.User;
import com.lxgzhw.service.UserService;
import org.springframework.beans.factory.annotation.Autowired;
import org.springframework.stereotype.Service;

@Service
public class UserServiceImpl implements UserService {

    @Autowired
    private UserMapper userMapper;

    @Override
    public User findById(Integer id) {
        return userMapper.findById(id);
    }
}
UserMapper
package com.lxgzhw.mapper;

import com.lxgzhw.pojo.User;
import org.apache.ibatis.annotations.Mapper;
import org.apache.ibatis.annotations.Select;
import org.springframework.stereotype.Repository;

@Mapper
@Repository
public interface UserMapper {
    @Select("select *from tb_user where id = #{id}")
    User findById(Integer id);
}
UserController
package com.lxgzhw.controller;

import com.lxgzhw.pojo.User;
import com.lxgzhw.service.UserService;
import org.springframework.beans.factory.annotation.Autowired;
import org.springframework.web.bind.annotation.GetMapping;
import org.springframework.web.bind.annotation.RequestMapping;
import org.springframework.web.bind.annotation.RequestParam;
import org.springframework.web.bind.annotation.RestController;

@RestController
@RequestMapping("/user")
public class UserController {
    @Autowired
    private UserService userService;

    @GetMapping("/findById")
    public User findById(@RequestParam("id") Integer id) {
        return userService.findById(id);
    }
}
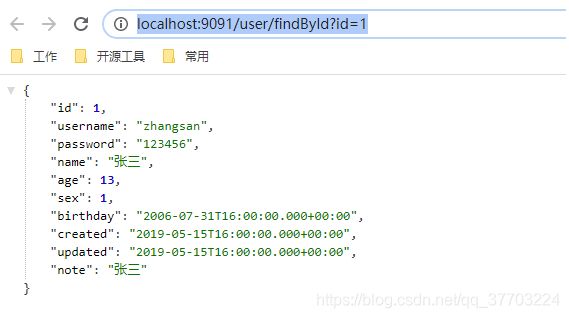
启动服务器测试:http://localhost:9091/user/findById?id=1
05.创建服务消费者
启动类
package com.lxgzhw;

import org.springframework.boot.SpringApplication;
import org.springframework.boot.autoconfigure.SpringBootApplication;
import org.springframework.context.annotation.Bean;
import org.springframework.web.client.RestTemplate;

@SpringBootApplication
public class ConsumerServiceApplication {

    public static void main(String[] args) {
        SpringApplication.run(ConsumerServiceApplication.class, args);
    }

    // 相当于application.xml中的一个bean标签
    @Bean
    public RestTemplate restTemplate(){
        return new RestTemplate();
    }
}
User实体类
package com.lxgzhw.pojo;

import lombok.Data;
import java.util.Date;

@Data
public class User {
    private Integer id;//主键id
    private String username;//用户名
    private String password;//密码
    private String name;//姓名
    private Integer age;//年龄
    private Integer sex;//性别 1男性,2女性
    private Date birthday; //出生日期
    private Date created; //创建时间
    private Date updated; //更新时间
    private String note;//备注
    //getter setter
}
ConsumerController类
package com.lxgzhw.controller;

import com.lxgzhw.pojo.User;
import org.springframework.beans.factory.annotation.Autowired;
import org.springframework.web.bind.annotation.*;
import org.springframework.web.client.RestTemplate;

@RestController
@RequestMapping("/consumer")
public class ConsumerController {
    @Autowired
    private RestTemplate restTemplate;

    /**
     * 模拟发送一次请求
     */
    @GetMapping("/{id}")
    public User consumerSendRequest(@PathVariable("id") Integer id){
        String url = "http://localhost:9091/user/findById?id="+id;
        User user = restTemplate.getForObject(url, User.class);
        return user;
    }
}
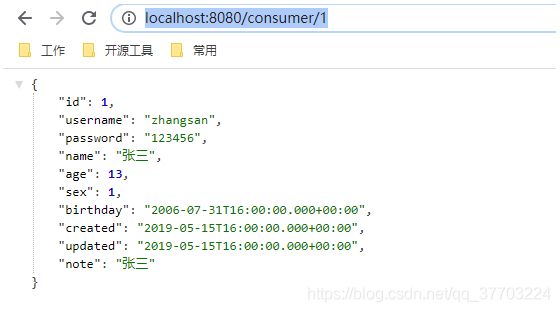
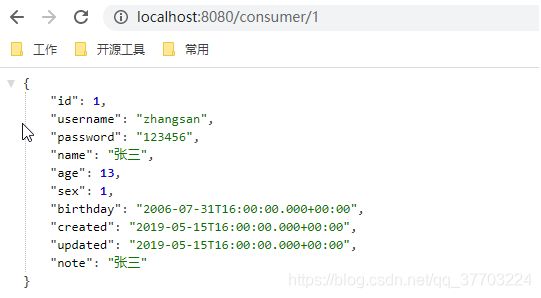
启动服务器测试:http://localhost:8080/consumer/1
05.思考问题
- provider_service:对外提供用户查询接口
- consumer_service:通过RestTemplate访问接口查询用户数据
存在的问题:
- 在消费者服务中,访问提供者服务URL地址硬编码,万一地址端口变化了怎么办?提供者服务死掉了消费者怎么才能知道?
- 在消费者服务中,是不清楚服务提供者状态的!
- 为了增加服务并发访问量,我们搭建集群,集群的负载均衡怎么实现?
- 服务提供者如果出现故障,会不会向用户抛出异常页面,该不该抛出错误页面?
- RestTemplate这种请求调用方式是否还有优化空间?复用,管理,可读性角度来思考
- 多服务权限拦截如何实现?怎么保证所有微服务服务的安全性?
- 众多微服务的配置文件,每次都修改很多个,是不是很麻烦!?
其实上面说的部分问题,概括一下就是微服务架构必然面临的一些问题。
- 服务管理:自动注册与发现、状态监管
- 服务负载均衡
- 熔断
- 面向接口的远程调用
- 网关拦截、路由转发
- 统一配置修改
06.注册中心 Spring Cloud Eureka
what:是什么
- Spirng Cloud Eureka使用Netflix Eureka来实现服务注册与发现(服务治理)
- 它既包含了服务端组件,也包含了客户端组件,并且服务端与客户端均采用java编写
- 所以Eureka主要适用于通过java实现的分布式系统,或是JVM兼容语言构建的系统。
- Eureka服务端组件
- 即服务注册中心。
- 它同其他服务注册中心一样,支持高可用配置。
- 依托于强一致性提供良好的服务实例可用性,可以应对多种不同的故障场景。
- Eureka客户端组件
- 主要处理服务的注册和发现。
- 客户端服务通过注册和参数配置的方式,嵌入在客户端应用程序的代码中。
- 在应用程序启动时,Eureka客户端向服务注册中心注册自身提供的服务,并周期性的发送心跳来更新它的服务租约。
- 同时,他也能从服务端查询当前注册的服务信息并把它们缓存到本地,并周期性的刷新服务状态。
why:为什么要使用注册中心
- 解决url地址硬编码问题
- 对各个服务进行统一的注册,管理,维护,更加简便
where:在哪里使用
- 在基于SpringCloud的微服务项目中使用
when:什么时候使用
- 注册中心伴随着每一个微服务项目,是最最基础的组件之一
- 只要是微服务项目,都应该想到要使用注册中心
how:如何使用
- 需要导入依赖,进行客户端注册和服务端注册
- 有一个管理面板
07.整合注册中心Eureka
基本步骤
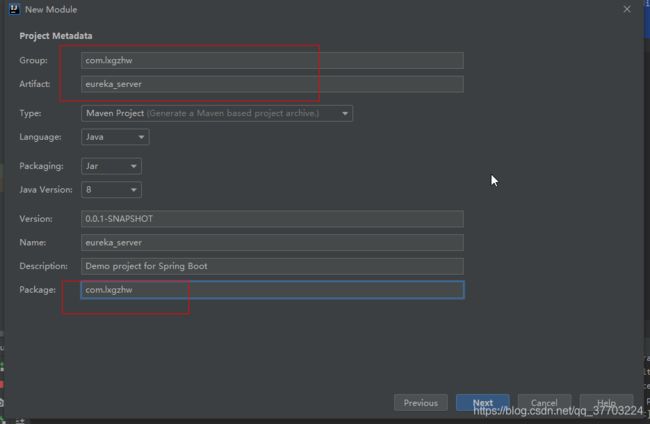
- 第一步:搭建eureka服务,创建eureka_server工程
- 第二步:服务提供者provider_service,注册到eureka注册中心
- 第三步:服务消费者consumer_service,注册到eureka注册中心
创建注册中心模块
基本配置:application.yml
# 端口
server.port: 10086
# 应用名称,会在Eureka中作为服务的id标识(serviceId)
spring.application.name: eureka-server
# EurekaServer的地址,现在是自己的地址,如果是集群,需要写其它Server的地址。
eureka.client.service-url.defaultZone: http://127.0.0.1:10086/eureka
# 是否抓取注册列表
eureka.client.fetch-registry: false
# 是否注册服务中心Eureka
eureka.client.register-with-eureka: false
启动类
package com.lxgzhw;

import org.springframework.boot.SpringApplication;
import org.springframework.boot.autoconfigure.SpringBootApplication;
import org.springframework.cloud.netflix.eureka.server.EnableEurekaServer;

@SpringBootApplication
@EnableEurekaServer //开启EurekaServer端的自动配置
public class EurekaServerApplication {

    public static void main(String[] args) {
        SpringApplication.run(EurekaServerApplication.class, args);
    }

}
在pom.xml中添加以下插件解决点击install时失败的问题
<plugin>
    <groupId>org.apache.maven.pluginsgroupId>
    <artifactId>maven-resources-pluginartifactId>
    <version>2.4.3version>
plugin>
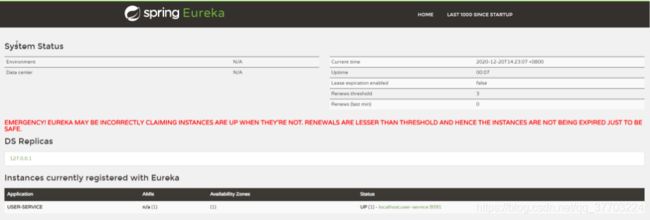
启动服务器测试:http://127.0.0.1:10086/
08.消费者和提供者关联注册中心
服务提供者-注册到eureka
- 在服务提供者provider_service工程中添加Eureka客户端依赖
<dependencies>
    <dependency>
        <groupId>org.springframework.cloudgroupId>
        <artifactId>spring-cloud-starter-netflix-eureka-clientartifactId>
    dependency>
dependencies>

<dependencyManagement>
    <dependencies>
        <dependency>
            <groupId>org.springframework.cloudgroupId>
            <artifactId>spring-cloud-dependenciesartifactId>
            <version>Hoxton.SR5version>
            <type>pomtype>
            <scope>importscope>
        dependency>
    dependencies>
dependencyManagement>
- 在启动类上开启Eureka客户端发现功能
@EnableDiscoveryClient
package com.lxgzhw;

import org.springframework.boot.SpringApplication;
import org.springframework.boot.autoconfigure.SpringBootApplication;
import org.springframework.cloud.client.discovery.EnableDiscoveryClient;

@SpringBootApplication
@EnableDiscoveryClient // 将服务交给Eureka注册中心管理
public class ProviderServerApplication {

    public static void main(String[] args) {
        SpringApplication.run(ProviderServerApplication.class, args);
    }

}
- 修改配置文件:spring.application.name指定应用名称,作为服务ID使用
# 端口
server.port: 9091
# DB 配置
spring.datasource.driver-class-name: com.mysql.cj.jdbc.Driver
spring.datasource.url: jdbc:mysql://127.0.0.1:3306/springcloud?useUnicode=true&characterEncoding=UTF-8&serverTimezone=UTC
spring.datasource.password: root
spring.datasource.username: root

# 应用名称
spring.application.name: user-service
# 注册中心地址
eureka.client.service-url.defaultZone: http://127.0.0.1:10086/eureka
- 完成之后重启项目
- 客户端代码会自动把服务注册到EurekaServer中,在Eureka监控页面可以看到服务注册成功信息
服务消费者-注册到eureka
- 在服务消费者consumer_service工程中添加Eureka客户端依赖
<dependency>
    <groupId>org.springframework.cloudgroupId>
    <artifactId>spring-cloud-starter-netflix-eureka-clientartifactId>
dependency>

<dependencyManagement>
    <dependencies>
        <dependency>
            <groupId>org.springframework.cloudgroupId>
            <artifactId>spring-cloud-dependenciesartifactId>
            <version>Hoxton.SR5version>
            <type>pomtype>
            <scope>importscope>
        dependency>
    dependencies>
dependencyManagement>
- 在启动类开启Eureka客户端
@EnableDiscoveryClient
package com.lxgzhw;

import org.springframework.boot.SpringApplication;
import org.springframework.boot.autoconfigure.SpringBootApplication;
import org.springframework.cloud.client.discovery.EnableDiscoveryClient;
import org.springframework.context.annotation.Bean;
import org.springframework.web.client.RestTemplate;

@SpringBootApplication
@EnableDiscoveryClient
public class ConsumerServerApplication {

    public static void main(String[] args) {
        SpringApplication.run(ConsumerServerApplication.class, args);
    }

    // 相当于application.xml中的一个bean标签
    @Bean
    public RestTemplate restTemplate(){
        return new RestTemplate();
    }
}
- 修改配置文件:加入EurekaServer地址
# 端口
server.port: 8080
# 应用名称
spring.application.name: consumer-server
# 注册中心地址
eureka.client.service-url.defaultZone: http://127.0.0.1:10086/eureka
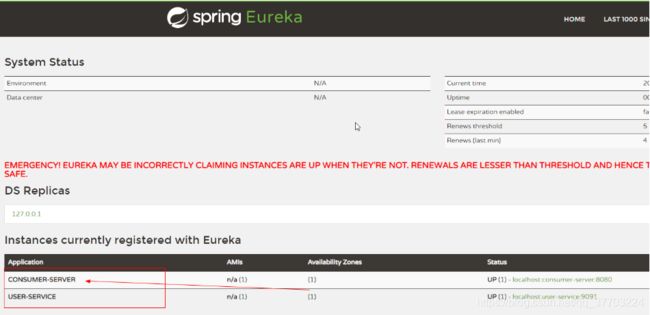
- 重启消费者服务器
- 查看Eureka注册中心:http://127.0.0.1:10086/
09.Eureka客户端与服务端交互过程
服务注册(register
- Eureka Client会通过发送REST请求的方式,向Eureka Server注册自己的服务。
- 注册时,提供自身的元数据,比如ip地址、端口、运行状况指标、主页地址等信息。
- Eureka Server接收到注册请求后,就会把这些元数据信息存储在一个双层的Map中。
服务续约(renew)
- 在服务注册后,Eureka Client会维护一个心跳来持续通知Eureka Server,说明服务一直处于可用状态,防止被剔除。
- 默认每隔30秒
eureka.instance.lease-renewal-interval-in-seconds发送一次心跳来进行服务续约。
配置消费者或服务提供者
# 租约续约间隔时间,默认30秒
eureka.instance.lease-renewal-interval-in-seconds: 30
获取服务列表(get registry)
- 服务消费者(Eureka Client)在启动的时候,会发送一个REST请求给Eureka Server,获取注册中心的服务清单,并且缓存在客户端本地。
- 同时,为了性能及安全性考虑,Eureka Server会每隔30秒更新一次缓存中的服务清单。
配置消费者或服务提供者
# 每隔多久获取服务中心列表,(只读备份)
eureka.client.registry-fetch-interval-seconds: 30
服务调用
- 服务消费者在获取到服务清单后,可以根据清单中的服务信息,查找到该服务的地址,从而进行访问(远程调用)。
服务下线(cancel)
- 当Eureka Client需要关闭或重启时,就不希望在这个时间段内再有请求进来,所以,就需要提前先发送REST请求给Eureka Server,告诉Eureka Server自己要下线了
- Eureka Server在收到请求后,就会把该服务状态置为下线(DOWN),并把该下线事件传播出去。
失效剔除(evict)
- 服务实例可能会因为网络故障等原因,导致不能提供服务,而此时该实例也没有发送请求给Eureka Server来进行服务下线。
- 所以,还需要有服务剔除的机制。
- Eureka Server在启动的时候会创建一个定时任务,每隔一段时间(默认60秒),从当前服务清单中把超时没有续约(默认90秒
eureka.instance.lease-expiration-duration-in-seconds)的服务剔除。
配置消费者或服务提供者
# 租约到期,服务时效时间,默认值60秒
eureka.instance.lease-expiration-duration-in-seconds: 90
自我保护
- 既然Eureka Server会定时剔除超时没有续约的服务,那就有可能出现一种场景,网络一段时间内发生了异常,所有的服务都没能够进行续约,Eureka Server就把所有的服务都剔除了,这样显然不太合理。
- 所以,就有了自我保护机制。自我保护机制是,当在短时间内,统计续约失败的比例,如果达到一定阈值,则会触发自我保护的机制
- 在该机制下,Eureka Server不会剔除任何的微服务,等到正常后,再退出自我保护机制。
- 自我保护开关(eureka.server.enable-self-preservation: false)
配置到注册中心
#向Eureka服务中心集群注册服务
eureka.server.enable-self-preservation: false # 关闭自我保护模式(默认值是打开)
- Eureka会统计服务实例最近15分钟心跳续约的比例是否低于85%,如果低于则会触发自我保护机制
- 自我保护模式下,不会剔除任何服务实例
- 自我保护模式能够保证绝大多数服务的可用性
10.使用注册中心解决url硬编码问题
修改消费者服务的ConsumerController类
package com.lxgzhw.controller;

import com.lxgzhw.pojo.User;
import org.springframework.beans.factory.annotation.Autowired;
import org.springframework.cloud.client.ServiceInstance;
import org.springframework.cloud.client.discovery.DiscoveryClient;
import org.springframework.web.bind.annotation.*;
import org.springframework.web.client.RestTemplate;

import java.util.List;

@RestController
@RequestMapping("/consumer")
public class ConsumerController {
    @Autowired
    private RestTemplate restTemplate;

    /**
     * 模拟发送一次请求
     */
    //@GetMapping("/{id}")
    public User consumerSendRequest1(@PathVariable("id") Integer id) {
        String url = "http://localhost:9091/user/" + id;
        User user = restTemplate.getForObject(url, User.class);
        return user;
    }

    @Autowired
    private DiscoveryClient discoveryClient; // 服务发现对象

    @GetMapping("/{id}")
    public User consumerSendRequest(@PathVariable("id") Integer id) {
        // 动态获取URL 和 端口号
        List<ServiceInstance> instances = discoveryClient.getInstances("user-service");
        // 获取集合的第一个元素
        ServiceInstance serviceInstance = instances.get(0);
        // 获取服务的host地址
        String host = serviceInstance.getHost();
        // 获取服务的port端口
        int port = serviceInstance.getPort();
        // 动态拼接访问地址
        String url = "http://" + host + ":" + port + "/user/" + id;
        // 发送请求的方式不变
        User user = restTemplate.getForObject(url, User.class);
        return user;
    }

}
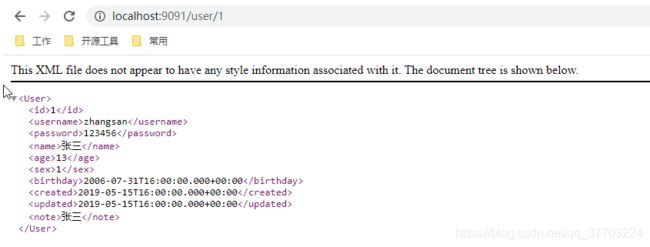
重启消费者服务器测试:http://localhost:8080/consumer/1
问题
- 这里的返回值是xml格式的,但是使用的还是@RestController
- 解决方案:将@GetMapping 修改为
@GetMapping(value = "/{id}", produces = "application/json; charset=UTF-8")
11.Spring Cloud Ribbon 负载均衡
what:是什么
- Ribbon是一个工具框架,实现了HTTP和TCP的客户端负载均衡的工具,它基于Netflix Ribbon实现。
- 通过Spring Cloud的封装,可以让我们轻松地将面向服务的REST模版请求自动转换成客户端负载均衡的服务调用。
- 它不是一个微服务,需要独立部署,但是它**几乎存在于每一个Spring Cloud构建的微服务和基础设施中**。
- 因为微服务间的调用,API网关的请求转发等内容,实际上都是通过Ribbon来实现的,包括明天我们将要介绍的Feign,它也是基于Ribbon实现的工具。
- 所以,对Spring Cloud Ribbon的理解和使用,对于我们使用Spring Cloud来构建微服务非常重要。
why:为什么使用
- 几乎存在于每一个Spring Cloud构建的微服务和基础设施中
- 微服务间的调用,API网关的请求转发等内容,实际上都是通过Ribbon来实现的
where:在哪里使用
- 在每一个微服务项目中都可以使用
when:什么时候使用
- 当出现集群,需要做负载均衡的时候使用
how:如何使用
- 看下文
12.IDEA模拟服务器集群
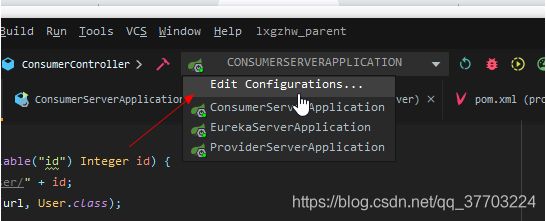
编辑配置
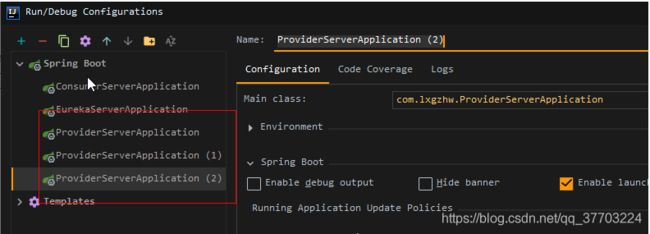
复制几个提供者服务
修改配置文件:动态注入端口号
# 端口
server.port: ${port:9091}
编辑配置里面动态传入参数,分别为
-Dport=9091
-Dport=9092
-Dport=9093
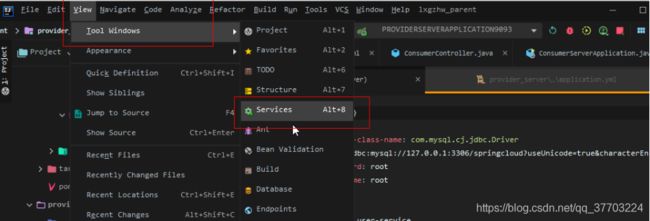
13.IDEA调出仪盘表
从configure里面找到springboot
14.消费者服务实现负载均衡
基本步骤
- 在RestTemplate的配置方法上添加@LoadBalanced注解
- 修改ConsumerController调用方式,不再手动获取ip和端口,而是直接通过服务名称调用
- 重启消费者服务器测试,并在9091和9092和9093的控制台查看执行情况
具体修改
- 修改消费者服务的启动类
package com.lxgzhw;

import org.springframework.boot.SpringApplication;
import org.springframework.boot.autoconfigure.SpringBootApplication;
import org.springframework.cloud.client.discovery.EnableDiscoveryClient;
import org.springframework.cloud.client.loadbalancer.LoadBalanced;
import org.springframework.context.annotation.Bean;
import org.springframework.web.client.RestTemplate;

@SpringBootApplication
@EnableDiscoveryClient
public class ConsumerServerApplication {

    public static void main(String[] args) {
        SpringApplication.run(ConsumerServerApplication.class, args);
    }

    // 相当于application.xml中的一个bean标签
    @Bean
    @LoadBalanced //开启消费者负载均衡
    public RestTemplate restTemplate() {
        return new RestTemplate();
    }
}
- 修改消费者服务的ConsumerController类
package com.lxgzhw.controller;

import com.lxgzhw.pojo.User;
import org.springframework.beans.factory.annotation.Autowired;
import org.springframework.cloud.client.ServiceInstance;
import org.springframework.cloud.client.discovery.DiscoveryClient;
import org.springframework.web.bind.annotation.*;
import org.springframework.web.client.RestTemplate;

import java.util.List;

@RestController
@RequestMapping("/consumer")
public class ConsumerController {
    @Autowired
    private RestTemplate restTemplate;

    /**
     * 模拟发送一次请求
     */
    //@GetMapping("/{id}")
    public User consumerSendRequest1(@PathVariable("id") Integer id) {
        String url = "http://localhost:9091/user/" + id;
        User user = restTemplate.getForObject(url, User.class);
        return user;
    }

    @Autowired
    private DiscoveryClient discoveryClient; // 服务发现对象

    //@GetMapping(value = "/{id}", produces = "application/json; charset=UTF-8")
    public User consumerSendRequest2(@PathVariable("id") Integer id) {
        // 动态获取URL 和 端口号
        List<ServiceInstance> instances = discoveryClient.getInstances("user-service");
        // 获取集合的第一个元素
        ServiceInstance serviceInstance = instances.get(0);
        // 获取服务的host地址
        String host = serviceInstance.getHost();
        // 获取服务的port端口
        int port = serviceInstance.getPort();
        // 动态拼接访问地址
        String url = "http://" + host + ":" + port + "/user/" + id;
        // 发送请求的方式不变
        User user = restTemplate.getForObject(url, User.class);
        return user;
    }

    /**
     * 负载均衡的调用方式
     * @param id 请求id
     * @return 用户对象json字符串
     */
    @GetMapping(value = "/{id}", produces = "application/json; charset=UTF-8")
    public User consumerSendRequest(@PathVariable("id") Integer id) {
        // 使用负载均衡的方式访问: 会从集群中按照算法指定的方式返回一个服务器的数据
        String url = "http://user-service/user/" + id;
        // 发送请求的方式不变
        User user = restTemplate.getForObject(url, User.class);
        return user;
    }

}
- 重启消费者服务测试:http://localhost:8080/consumer/1
15.Spring Cloud Hystrix 熔断器
what:是什么
- Hystrix,英文意思是豪猪,全身是刺,刺是一种保护机制。Hystrix也是Netflix公司的一款组件。
- 在分布式环境中,许多服务依赖项中的部分服务必然有概率出现失败。
- Hystrix是一个库,通过添加延迟和容错逻辑,来帮助你控制这些分布式服务之间的交互。
- Hystrix通过隔离服务之间的访问点阻止级联失败,通过提供回退选项来实现防止级联出错。提高了系统的整体弹性。
- 与Ribbon并列,也几乎存在于每个Spring Cloud构建的微服务和基础设施中。
- Hystrix被设计的目标是:
- 对通过第三方客户端库访问的依赖项(通常是通过网络)的延迟和故障进行保护和控制。
- 在复杂的分布式系统中阻止雪崩效应。
- 快速失败,快速恢复。
- 回退,尽可能优雅地降级。
why:为什么使用
- 微服务最基础的组件之一,遍布每一个微服务项目
- 微服务开发者必知必会
- 能帮我们解决服务雪崩,失败统一处理等问题
where:在哪里使用
- 在任何一个微服务项目中都可以使用
when:什么时候使用
- 当需要处理微服务项目中抛出的异常错误的时候使用
how:怎么使用
- 引入熔断的starter依赖坐标
- 开启熔断的注解@EnableCircuitBreaker
- 编写服务降级处理的方法
- 配置熔断的策略
- 模拟异常代码
- 测试熔断服务效果
什么是雪崩效应?
- 微服务中,一个请求可能需要多个微服务接口才能实现,会形成复杂的调用链路。
- 如果某服务出现异常,请求阻塞,用户得不到响应,容器中线程不会释放,于是越来越多用户请求堆积,越来越多线程阻塞。
- 单服务器支持线程和并发数有限,请求如果一直阻塞,会导致服务器资源耗尽,从而导致所有其他服务都不可用,从而形成雪崩效应;
- Hystrix解决雪崩问题的手段,主要是服务降级**(兜底)**,线程隔离;
16.熔断案例
引入熔断的依赖坐标:consumer_service中加入依赖
<dependency>
    <groupId>org.springframework.cloudgroupId>
    <artifactId>spring-cloud-starter-netflix-hystrixartifactId>
dependency>
开启熔断的注解:修改消费者服务的启动类
package com.lxgzhw;

import org.springframework.boot.SpringApplication;
import org.springframework.boot.autoconfigure.SpringBootApplication;
import org.springframework.cloud.client.SpringCloudApplication;
import org.springframework.cloud.client.circuitbreaker.EnableCircuitBreaker;
import org.springframework.cloud.client.discovery.EnableDiscoveryClient;
import org.springframework.cloud.client.loadbalancer.LoadBalanced;
import org.springframework.context.annotation.Bean;
import org.springframework.web.client.RestTemplate;

//注解简化写法:微服务中,注解往往引入多个,简化注解可以使用组合注解。@SpringCloudApplication =等同于@SpringBootApplication+@EnableDiscoveryClient+@EnableCircuitBreaker
@SpringCloudApplication
//@SpringBootApplication
//@EnableDiscoveryClient//开启服务发现
//@EnableCircuitBreaker//开启熔断
public class ConsumerServerApplication {

    public static void main(String[] args) {
        SpringApplication.run(ConsumerServerApplication.class, args);
    }

    // 相当于application.xml中的一个bean标签
    @Bean
    @LoadBalanced //开启消费者负载均衡
    public RestTemplate restTemplate() {
        return new RestTemplate();
    }
}
编写服务降级处理方法:使用@HystrixCommand定义fallback方法。修改消费者服务的ConsumerController类
package com.lxgzhw.controller;

import com.lxgzhw.pojo.User;
import com.netflix.hystrix.contrib.javanica.annotation.HystrixCommand;
import org.springframework.beans.factory.annotation.Autowired;
import org.springframework.cloud.client.ServiceInstance;
import org.springframework.cloud.client.discovery.DiscoveryClient;
import org.springframework.web.bind.annotation.*;
import org.springframework.web.client.RestTemplate;

import java.util.List;

@RestController
@RequestMapping("/consumer")
public class ConsumerController {
    @Autowired
    private RestTemplate restTemplate;

    /**
     * 模拟发送一次请求
     */
    //@GetMapping("/{id}")
    public User consumerSendRequest1(@PathVariable("id") Integer id) {
        String url = "http://localhost:9091/user/" + id;
        User user = restTemplate.getForObject(url, User.class);
        return user;
    }

    @Autowired
    private DiscoveryClient discoveryClient; // 服务发现对象

    //@GetMapping(value = "/{id}", produces = "application/json; charset=UTF-8")
    public User consumerSendRequest2(@PathVariable("id") Integer id) {
        // 动态获取URL 和 端口号
        List<ServiceInstance> instances = discoveryClient.getInstances("user-service");
        // 获取集合的第一个元素
        ServiceInstance serviceInstance = instances.get(0);
        // 获取服务的host地址
        String host = serviceInstance.getHost();
        // 获取服务的port端口
        int port = serviceInstance.getPort();
        // 动态拼接访问地址
        String url = "http://" + host + ":" + port + "/user/" + id;
        // 发送请求的方式不变
        User user = restTemplate.getForObject(url, User.class);
        return user;
    }

    /**
     * 负载均衡的调用方式
     * @param id 请求id
     * @return 用户对象json字符串
     */
    //@GetMapping(value = "/{id}", produces = "application/json; charset=UTF-8")
    public User consumerSendRequest(@PathVariable("id") Integer id) {
        // 使用负载均衡的方式访问: 会从集群中按照算法指定的方式返回一个服务器的数据
        String url = "http://user-service/user/" + id;
        // 发送请求的方式不变
        User user = restTemplate.getForObject(url, User.class);
        return user;
    }

    /**
     * 负债均衡+服务熔断的写法
     * @param id 用户id
     * @return 用户对象
     */
    @GetMapping(value = "/{id}", produces = "application/json; charset=UTF-8")
    @HystrixCommand(fallbackMethod ="queryByIdFallback")
    public String queryById(@PathVariable Long id){
        String url = String.format("http://user-service/user/%d", id);
        return restTemplate.getForObject(url,String.class);
    }

    /**
     * 服务熔断处理方法
     * @param id 用户id,熔断方法的参数必须与请求方法的参数保持一致
     * @return 错误处理信息
     */
    public String queryByIdFallback(Long id){
        return "对不起,网络太拥挤了!";
    }
}
配置熔断策略:常见熔断策略配置。修改消费者服务的配置文件
- 熔断后休眠时间:sleepWindowInMilliseconds
- 熔断触发最小请求次数:requestVolumeThreshold
- 熔断触发错误比例阈值:errorThresholdPercentage
- 熔断超时时间:timeoutInMilliseconds
# 配置熔断策略:
# 强制打开熔断器 默认false关闭的。测试配置是否生效
hystrix.command.default.circuitBreaker.forceOpen: false
# 触发熔断错误比例阈值,默认值50%
hystrix.command.default.circuitBreaker.errorThresholdPercentage: 20
# 熔断后休眠时长,默认值5秒
hystrix.command.default.circuitBreaker.sleepWindowInMilliseconds: 60000
# 熔断触发最小请求次数,默认值是20
hystrix.command.default.circuitBreaker.requestVolumeThreshold: 5
# 熔断超时设置,默认为1秒
hystrix.command.default.execution.isolation.thread.timeoutInMilliseconds: 2000
模拟异常代码:修改ConsumerController中的请求方法
/**
 * 负债均衡+服务熔断的写法
 * @param id 用户id
 * @return 用户对象
 */
@GetMapping(value = "/{id}", produces = "application/json; charset=UTF-8")
@HystrixCommand(fallbackMethod ="queryByIdFallback")
public String queryById(@PathVariable Long id){
    //如果参数为1抛出异常,否则 执行REST请求返回user对象
    if (id == 1){
        throw new RuntimeException("too busy!!!");
    }
    String url = String.format("http://user-service/user/%d", id);
    return restTemplate.getForObject(url,String.class);
}
重启消费者服务,访问测试:http://localhost:8080/consumer/1
17.全局服务降级方法
实现步骤
- 在控制器类上添加
@DefaultProperties(defaultFallback = "defaultFallback")注解 - 在请求方法上添加
@HystrixCommand注解 - 编写降级方法
public String defaultFallback(){}
实例代码:修改消费者服务的ConsumerController类
package com.lxgzhw.controller;

import com.lxgzhw.pojo.User;
import com.netflix.hystrix.contrib.javanica.annotation.DefaultProperties;
import com.netflix.hystrix.contrib.javanica.annotation.HystrixCommand;
import org.springframework.beans.factory.annotation.Autowired;
import org.springframework.cloud.client.ServiceInstance;
import org.springframework.cloud.client.discovery.DiscoveryClient;
import org.springframework.web.bind.annotation.*;
import org.springframework.web.client.RestTemplate;

import java.util.List;

@RestController
@RequestMapping("/consumer")
@DefaultProperties(defaultFallback = "defaultFallback")//开启默认的FallBack,统一失败降级方法(兜底)
public class ConsumerController {
    @Autowired
    private RestTemplate restTemplate;

    /**
     * 模拟发送一次请求
     */
    //@GetMapping("/{id}")
    public User consumerSendRequest1(@PathVariable("id") Integer id) {
        String url = "http://localhost:9091/user/" + id;
        User user = restTemplate.getForObject(url, User.class);
        return user;
    }

    @Autowired
    private DiscoveryClient discoveryClient; // 服务发现对象

    //@GetMapping(value = "/{id}", produces = "application/json; charset=UTF-8")
    public User consumerSendRequest2(@PathVariable("id") Integer id) {
        // 动态获取URL 和 端口号
        List<ServiceInstance> instances = discoveryClient.getInstances("user-service");
        // 获取集合的第一个元素
        ServiceInstance serviceInstance = instances.get(0);
        // 获取服务的host地址
        String host = serviceInstance.getHost();
        // 获取服务的port端口
        int port = serviceInstance.getPort();
        // 动态拼接访问地址
        String url = "http://" + host + ":" + port + "/user/" + id;
        // 发送请求的方式不变
        User user = restTemplate.getForObject(url, User.class);
        return user;
    }

    /**
     * 负载均衡的调用方式
     * @param id 请求id
     * @return 用户对象json字符串
     */
    //@GetMapping(value = "/{id}", produces = "application/json; charset=UTF-8")
    public User consumerSendRequest(@PathVariable("id") Integer id) {
        // 使用负载均衡的方式访问: 会从集群中按照算法指定的方式返回一个服务器的数据
        String url = "http://user-service/user/" + id;
        // 发送请求的方式不变
        User user = restTemplate.getForObject(url, User.class);
        return user;
    }

    /**
     * 负债均衡+服务熔断的写法
     * @param id 用户id
     * @return 用户对象
     */
    @GetMapping(value = "/{id}", produces = "application/json; charset=UTF-8")
    //@HystrixCommand(fallbackMethod ="queryByIdFallback")
    @HystrixCommand //使用全局默认的降级方法
    public String queryById(@PathVariable Long id){
        //如果参数为1抛出异常,否则 执行REST请求返回user对象
        if (id == 1){
            throw new RuntimeException("too busy!!!");
        }
        String url = String.format("http://user-service/user/%d", id);
        return restTemplate.getForObject(url,String.class);
    }

    /**
     * 服务熔断处理方法
     * @param id 用户id,熔断方法的参数必须与请求方法的参数保持一致
     * @return 错误处理信息
     */
    public String queryByIdFallback(Long id){
        return "对不起,网络太拥挤了!";
    }

    /**
     * 默认降级方法,不需要任何参数
     */
    public String defaultFallback(){
        return "默认提示:对不起,网络太拥挤了!";
    }
}
重启消费者服务,访问:http://localhost:8080/consumer/1
源码下载:https://download.csdn.net/download/qq_37703224/13738563
想要学习Python或者Java的同学可以加我微信18010070052,第一次添加我微信可以免费获得本文对应源码哦


