SpringBoot入门
文章目录
- 1、SpringBoot简介
- 2、SpringBoot快速入门
-
- ✈步骤一:创建新项目
- ✈步骤二:创建BookController类
- ✈步骤三:启动服务器
- 3、官网构建SpringBoot工程
- 4、SpringBoot工程快速启动
-
- ✈步骤一:打包
- ✈步骤二:启动
- 5、SpringBoot起步依赖
- 6、SpringBoot切换Web服务器
- 7、基础配置
-
- 7.1、配置文件格式
-
- ✈ 更改服务器默认端口
- ✈ 配置文件中没有提示
- ✈ 三种配置文件的优先级
- ✈ 配置日志级别
- 7.2、yaml
-
-
- 7.3.1、yaml格式
- 7.3.2、yaml语法规格
-
- 7.3、yaml配置文件数据读取
- 7.4、多环境启动
-
- 7.4.1、yaml文件
- 7.4.2、properties文件
- 7.4.3、命令行启动参数设置
- 7.4.4、多环境开发兼容性问题
-
- 7.4.4.1、未按Maven中设置的环境启动
- 7.4.4.2、按Maven中设置的环境启动
- 7.5、配置文件分类
-
- 7.5.1、 `SpringBoot` 中4级配置文件放置位置:
- 8、SpringBoot整合Junit
-
- 8.1、回顾 `Spring` 整合 `junit`
- 8.2、SpringBoot整合Junit
- 9、SpringBoot整合Mybatis
-
- 9.1、回顾Spring整合Mybatis
- 9.2、SpringBoot整合Mybatis
- 9.3、使用Druid数据源
1、SpringBoot简介
SpringBoot是由Pivotal团队提供的全新框架。- 其设计目的是用来简化
Spring应用的初始搭建以及开发过程。
2、SpringBoot快速入门
✈步骤一:创建新项目
Spring Initializr URL:https://start.spring.io换成https://start.aliyun.com/速度会更快。
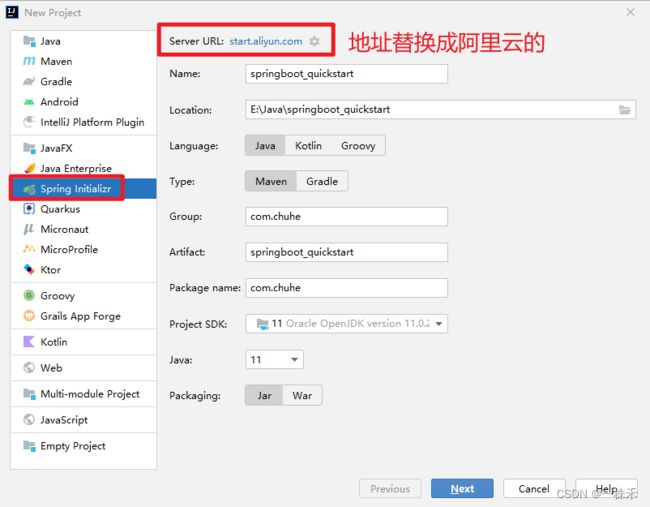
注意:打包方式这里需要设置为
Jar


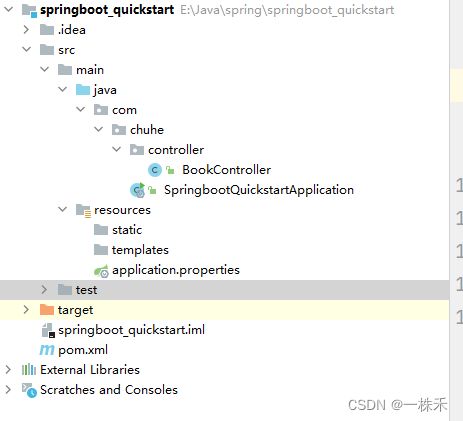
创建好的项目会自动生成其他的一些文件,而这些文件目前对我们来说没有任何作用,所以可以将这些文件删除。
可以删除的目录和文件如下:
.mvn.gitignoreHELP.mdmvnwmvnw.cmd
✈步骤二:创建BookController类
package com.chuhe.controller;

import org.springframework.web.bind.annotation.GetMapping;
import org.springframework.web.bind.annotation.PathVariable;
import org.springframework.web.bind.annotation.RequestMapping;
import org.springframework.web.bind.annotation.RestController;

@RestController
@RequestMapping("/books")
public class BookController {
    @GetMapping("/{id}")
    public String getById(@PathVariable Integer id){
        System.out.println(id);
        return "Hello,spring boot!";
    }
}
✈步骤三:启动服务器
运行 SpringBoot 工程不需要使用本地的 Tomcat 和 插件,只运行项目 SpringbootQuickstartApplication 类,可以在控制台看出如下信息:

3、官网构建SpringBoot工程
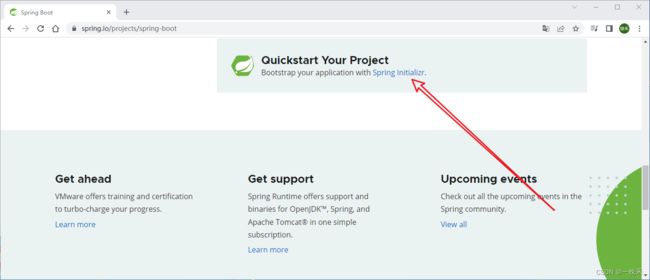
官网地址:https://spring.io/projects/spring-boot
-
进入官网,后点击
Spring Initializr
-
和
Idea界面一致
-
选择依赖

-
生成工程


4、SpringBoot工程快速启动
- 后端和前端开发人员协同开发,而前端开发人员需要测试前端程序就需要后端开启服务器,这就受制于后端开发人员。为了摆脱这个受制,前端开发人员尝试着在自己电脑上安装
Tomcat和Idea,在自己电脑上启动后端程序,这显然不现实。 - 后端可以将
SpringBoot工程打成jar包,该jar包运行不依赖于Tomcat和Idea这些工具也可以正常运行,只是这个jar包在运行过程中连接和程序相同的Mysql数据库即可。
✈步骤一:打包
在构建 SpringBoot 工程时已经在 pom.xml 中配置了如下插件
<plugin>
    <groupId>org.springframework.bootgroupId>
    <artifactId>spring-boot-maven-pluginartifactId>
plugin>
只需要使用 Maven 的 package 指令打包就会在 target 目录下生成对应的 Jar 包。

注意:该插件必须配置,不然打好的
jar包也是有问题的。
✈步骤二:启动
E:\Java\spring\springboot_quickstart\target下找到打好的jar包,并运行如下指令
java jar -jar springboot_quickstart-0.0.1-SNAPSHOT.jar

该项目已被成功启动

5、SpringBoot起步依赖
6、SpringBoot切换Web服务器
启动工程使用的是tomcat服务器,能不能不使用tomcat而使用jetty服务器?
<dependency>
    <groupId>org.springframework.bootgroupId>
    <artifactId>spring-boot-starter-webartifactId>
    <exclusions>
        <exclusion>
            <groupId>org.springframework.bootgroupId>
            <artifactId>spring-boot-starter-tomcatartifactId>
        exclusion>
    exclusions>
dependency>

<dependency>
    <groupId>org.springframework.bootgroupId>
    <artifactId>spring-boot-starter-jettyartifactId>
dependency>
启动后发现,tomcat已换成了jetty

实际开发
使用任意坐标时,仅书写GAV中的G和A,V由SpringBoot提供
G:groupid
A:artifactId
V:version
如发生坐标错误,再指定version(要小心版本冲突)
7、基础配置
7.1、配置文件格式
✈ 更改服务器默认端口
-
方式一:
application.propertiesserver.port=80 -
方式二:
application.ymlserver: port: 80 -
方式三:
application.yamlserver: port: 80
注意: 在
:后,数据前一定要加空格。

✈ 配置文件中没有提示
2.7.0开始已经自动变成配置文件了,一般都有语法提示。
application.yml或application.yaml如果没有语法提示,可进行如下操作解决:

✈ 三种配置文件的优先级
三种配置文件的优先级是:
application.properties > application.yml > application.yaml
✈ 配置日志级别
注意:
SpringBoot核心配置文件名为application
SpringBoot内置属性过多,且所有属性集中在一起修改,在使用时,通过提示键+关键字修改属性例如要设置日志的级别时,可以在配置文件中书写
logging,就会提示出来。配置内容如下
logging:
  level:
    root: warn
    com: info
7.2、yaml
7.3.1、yaml格式
YAML(YAML Ain’t Markup Language),一种数据序列化格式。 这种格式的配置文件在近些年已经占有主导地位。
三种常见配置文件格式:
-
xml,格式如下:<enterprise> <name>唐青枫name> <age>20age> <tel>13100000001tel> enterprise> -
properties类型的配置文件如下enterprise.name=唐青枫 enterprise.age=20 enterprise.tel=13100000001 -
yaml类型的配置文件内容如下enterprise: name: itcast age: 16 tel: 4006184000
7.3.2、yaml语法规格
-
大小写敏感。
-
属性层级关系使用多行描述,每行结尾使用冒号结束。
-
使用缩进表示层级关系,同层级左侧对齐,只允许使用空格(不允许使用Tab键)。
空格的个数并不重要,只要保证同层级的左侧对齐即可。
-
属性值前面添加空格(属性名与属性值之间使用冒号+空格作为分隔)。
-
# 表示注释。
-
核心规则:数据前面要加空格与冒号隔开。
-
数组数据在数据书写位置的下方使用减号作为数据开始符号,每行书写一个数据,减号与数据间空格分隔,例如
enterprise:
  name: 唐青枫
  age: 20
  tel: 13100000001
  subject:
    - Java
    - 前端
    - 大数据
7.3、yaml配置文件数据读取
- application.yml中写入如下内容
lesson: SpringBoot server: port: 80 enterprise: name: 唐青枫 age: 20 tel: 13100000001 subject: - Java - C++ - Python - BookControler中读取:
-
方式一:
@RestController @RequestMapping("/books") public class BookController { @Value("${lesson}") private String lesson; @Value("${server.port}") private int port; @Value("${enterprise.subject[0]}") private String subject; @GetMapping("/{id}") public String getById(@PathVariable Integer id){ System.out.println(lesson); System.out.println(port); System.out.println(subject); return "Hello,spring boot!"; } } -
方式二:Environment对象
@RestController
@RequestMapping("/books")
public class BookController {
    @Autowired
    private Environment env;

    @GetMapping("/{id}")
    public String getById(@PathVariable Integer id){
        System.out.println(env.getProperty("lesson"));
        System.out.println(env.getProperty("server.port"));
        System.out.println(env.getProperty("enterprise.subject[0]"));
        return "Hello,spring boot!";
    }
}
注意:这种方式,配置文件内有大量数据,在开发中我们很少使用。
-
方式三:自定义对象
com.chuhe.domain下定义Enterprise实体类package com.chuhe.domain; import org.springframework.boot.context.properties.ConfigurationProperties; import org.springframework.stereotype.Component; import java.util.Arrays; @Component @ConfigurationProperties(prefix = "enterprise") public class Enterprise { private String name; private int age; //tel如果定义成int,application.yml文件中该字段如果写11位数字会报错, //因位超过了Int的范围 private String tel; private String[] subject; //getter、setter方法略 }BookControler中读取
@RestController
@RequestMapping("/books")
public class BookController {
    @Autowired
    private Enterprise ent;

    @GetMapping("/{id}")
    public String getById(@PathVariable Integer id){
        System.out.println(ent);
        return "Hello,spring boot!";
    }
}
使用第三种方式,在实体类上有如下警告提示
 这个警告提示解决是在
 pom.xml中添加如下依赖即可<dependency> <groupId>org.springframework.bootgroupId> <artifactId>spring-boot-configuration-processorartifactId> <optional>trueoptional> dependency> ```
-
7.4、多环境启动
7.4.1、yaml文件
-
在
application.yml中使用---来分割不同的配置,内容如下#设置启用的环境 spring: profiles: active: dev #开发 spring: profiles: dev #给开发环境起的名字 server: port: 80 --- #生产 spring: profiles: pro #给生产环境起的名字 server: port: 81 --- #测试 spring: profiles: test #给测试环境起的名字 server: port: 82 ---注意:
- 在上面配置中给不同配置起名字的
spring.profiles配置项已经过时。 - 最新用来起名字的配置项如下:
#开发
spring:
 config:
   activate:
     on-profile: dev
注意:
打包时最好设置成UTF-8

- 在上面配置中给不同配置起名字的
7.4.2、properties文件
✈properties 类型的配置文件配置多环境需要定义不同的配置文件
-
application-dev.properties是开发环境的配置文件。我们在该文件中配置端口号为80server.port=80 -
application-test.properties是开发环境的配置文件。我们在该文件中配置端口号为81server.port=81 -
application-pro.properties是生产环境的配置文件。我们在该文件中配置端口号为82server.port=82 -
SpringBoot只会默认加载名为application.properties的配置文件,所以需要在application.properties配置文件中设置启用哪个配置文件,配置如下:spring.profiles.active=pro
7.4.3、命令行启动参数设置
-
使用
SpringBoot开发的程序以后都是打成jar包,通过java -jar xxx.jar的方式启动服务。 -
配置文件已经打到jar包里了,如何切换环境呢。
-
SpringBoot提供了在运行jar时设置开启指定的环境的方式,如下:java –jar xxx.jar --spring.profiles.active=test -
临时修改端口号
java –jar xxx.jar --server.port=88 -
同时设置多个配置,比如即指定启用哪个环境配置,又临时指定端口,如下
java –jar springboot.jar –-server.port=88 –-spring.profiles.active=test -
测试后就会发现命令行设置的端口号优先级高(也就是使用的是命令行设置的端口号)。配置的优先级
SpringBoot官网已经进行了说明,参见:https://docs.spring.io/spring-boot/docs/current/reference/html/spring-boot-features.html#boot-features-external-config

注意:
打包时要先clean再package

7.4.4、多环境开发兼容性问题
Maven和SpringBoot中同时设置环境,应该以Maven中配置的环境启动。
7.4.4.1、未按Maven中设置的环境启动
-
步骤一:pom.xml中,设置启动的是test环境
<profiles> <profile> <id>devid> <properties>properties> profile> <profile> <id>testid> <properties>properties> <activation> <activeByDefault>trueactiveByDefault> activation> profile> profiles> -
步骤二:application.yma中,设置启动的是dev环境
# 启用开发环境 spring: profiles: active: dev --- #开发环境 Spring: profiles: dev server: port: 80 --- #测试环境 Spring: profiles: test server: port: 81 -
步骤三:启动后发现,启动的是开发环境,即yaml中的设置生效

7.4.4.2、按Maven中设置的环境启动
- 步骤一:pom.xml中,设置
dev <profiles> <profile> <id>devid> <properties> <profile.active>devprofile.active> properties> profile> <profile> <id>testid> <properties> <profile.active>devprofile.active> properties> <activation> <activeByDefault>trueactiveByDefault> activation> profile> profiles> - 步骤二:application.yml中设置
${profile.active}# 启用开发环境 spring: profiles: active: ${profile.active} --- #开发环境 Spring: profiles: dev server: port: 80 --- #测试环境 Spring: profiles: test server: port: 81 - 步骤三:启动发现端口运行的是8080

原因:
- package打包后,查看`application.yml${profile.active}并未被解析
- 设置的
属性,只能在pom.xml中使用,不能在yaml配置文件中使用。dev


解决方法:
- 要想application.yml配置文件中读取pom.xml设置的变量,需使用一个插件。
 <build>
     <plugins>

         <plugin>
             <groupId>org.apache.maven.pluginsgroupId>
             <artifactId>maven-resources-pluginartifactId>
             <version>2.6version>
         plugin>
     plugins>
 build>
这样启动时就会按照Maven中设置的环境启动了。
7.5、配置文件分类
开发完毕后需要测试人员进行测试,由于测试环境和开发环境的很多配置都不相同,所以测试人员在运行工程时需要临时修改很多配置,如下:
java –jar springboot.jar –-spring.profiles.active=test --server.port=85 --server.servlet.context-path=/heima --server.tomcat.connection-timeout=-1 …… …… …… …… ……
针对这种情况,SpringBoot 定义了配置文件不同的放置的位置;而放在不同位置的优先级时不同的。
7.5.1、 SpringBoot 中4级配置文件放置位置:
- 1级:classpath:application.yml
- 2级:classpath:config/application.yml
- 3级:file :application.yml
- 4级:file :config/application.yml
说明:
- 级别越高优先级越高
- 1级、2级配置文件位置如下图,这两个配置文件会被打进jar包。
- package打包后


注意:
- SpringBoot 2.5.0版本存在一个bug,我们在使用这个版本时,需要在
jar所在位置的config
目录下创建一个任意名称的文件夹。- 2.4.6版本中也存在这个bug.
8、SpringBoot整合Junit
8.1、回顾 Spring 整合 junit
@RunWith(SpringJUnit4ClassRunner.class)
@ContextConfiguration(classes = SpringConfig.class)
public class UserServiceTest {

    @Autowired
    private BookService bookService;

    @Test
    public void testSave(){
        bookService.save();
    }
}
✈ 使用 @RunWith 注解指定运行器,使用 @ContextConfiguration 注解来指定配置类或者配置文件。
✈ 而 SpringBoot 整合 junit 特别简单,分为以下三步完成
- 在测试类上添加
@SpringBootTest注解。 - 使用
@Autowired注入要测试的资源。 - 定义测试方法进行测试。
8.2、SpringBoot整合Junit
✈步骤一:创建SpringBoot工程

✈步骤二:com.chuhe.service下增加BookService接口
package com.chuhe.service;

public interface BookService {
    public void save();
}
✈步骤三:com.chuhe.service.impl下增加实现类
import com.chuhe.service.BookService;
import org.springframework.stereotype.Service;

@Service
public class BookServiceImpl implements BookService {
    @Override
    public void save() {
        System.out.println("book service is running...");
    }
}
✈步骤四:测试类
package com.chuhe;

import com.chuhe.service.BookService;
import org.junit.jupiter.api.Test;
import org.springframework.beans.factory.annotation.Autowired;
import org.springframework.boot.test.context.SpringBootTest;

@SpringBootTest
class SpringbootTestApplicationTests {
    @Autowired
    private BookService bookService;
    @Test
    public void save() {
        bookService.save();
    }

}
注意:
这里的引导类所在包必须是测试类所在包及其子包。 例如:
- 引导类所在包是
com.chuhe- 测试类所在包是
com.chuhe- 如果不满足这个要求的话,就需要在使用
@SpringBootTest注解时,使用classes属性指定引导类的字节码对象。如@SpringBootTest(classes = Springboot07TestApplication.class)
9、SpringBoot整合Mybatis
9.1、回顾Spring整合Mybatis
Spring 整合 Mybatis 需要定义很多配置类
-
SpringConfig配置类-
导入
JdbcConfig配置类 -
导入
MybatisConfig配置类@Configuration @ComponentScan("com.itheima") @PropertySource("classpath:jdbc.properties") @Import({JdbcConfig.class,MyBatisConfig.class}) public class SpringConfig { }
-
-
JdbcConfig配置类public class JdbcConfig { @Value("${jdbc.driver}") private String driver; @Value("${jdbc.url}") private String url; @Value("${jdbc.username}") private String userName; @Value("${jdbc.password}") private String password; @Bean public DataSource getDataSource(){ DruidDataSource ds = new DruidDataSource(); ds.setDriverClassName(driver); ds.setUrl(url); ds.setUsername(userName); ds.setPassword(password); return ds; } } -
MybatisConfig配置类
-
定义
SqlSessionFactoryBean -
定义映射配置
@Bean
public MapperScannerConfigurer getMapperScannerConfigurer(){
    MapperScannerConfigurer msc = new MapperScannerConfigurer();
    msc.setBasePackage("com.itheima.dao");
    return msc;
}

@Bean
public SqlSessionFactoryBean getSqlSessionFactoryBean(DataSource dataSource){
    SqlSessionFactoryBean ssfb = new SqlSessionFactoryBean();
    ssfb.setTypeAliasesPackage("com.itheima.domain");
    ssfb.setDataSource(dataSource);
    return ssfb;
}
9.2、SpringBoot整合Mybatis
✈步骤一:创建项目

选择当前模块需要使用的技术集(MyBatis、MySQL)

✈步骤二:创建Book实体类
package com.chuhe.domain;

public class Book {
    private Integer id;
    private String name;
    private String type;
    private String description;

	//getter和setter省略...
}
✈步骤三:com.chuhe.dao下创建BookDao接口
@Mapper
public interface BookDao {
    @Select("select * from tbl_book where id=#{id}")
    public Book getById(Integer id);
}
@Mapper不加会报如下错误
- 错误信息显示在
Spring容器中没有BookDao类型的bean。为什么会出现这种情况呢?- 原因是
Mybatis会扫描接口并创建接口的代码对象交给Spring管理,但是现在并没有告诉Mybatis哪个是dao接口。而我们要解决这个问题需要在BookDao接口上使用@Mapper,BookDao接口改进为

✈步骤四:application.yml配置文件中写入参数
spring:
  datasource:
    driver-class-name: com.mysql.jdbc.Driver
    url: jdbc:mysql://localhost:3306/ssm_db?serverTimezone=UTC
    username: root
    password: "1234"
注意:
SpringBoot版本低于2.4.3(不含),Mysql驱动版本大于8.0时,需要在url连接串中配置时区
jdbc:mysql://localhost:3306/ssm_db?serverTimezone=UTC,或在MySQL数据库端配置时区解决此问题- 密码如果是纯数字,需要加引号。
✈步骤五:测试类中测试
@SpringBootTest
class SpringbootMybatisApplicationTests {
    @Autowired
    private BookDao bookDao;


    @Test
    void contextLoads() {
        Book book=bookDao.getById(1);
        System.out.println(book);
    }


}
9.3、使用Druid数据源
✈步骤一:导入Druid依赖
        <dependency>
            <groupId>com.alibabagroupId>
            <artifactId>druidartifactId>
            <version>1.1.12version>
        dependency>
✈步骤二:通过 spring.datasource.type 来配置使用什么数据源。
spring:
  datasource:
    driver-class-name: com.mysql.cj.jdbc.Driver
    url: jdbc:mysql://localhost:3306/ssm_db?serverTimezone=UTC
    username: root
    password: "1234"
    type: com.alibaba.druid.pool.DruidDataSource