H2O自动化机器学习框架介绍与搭建笔记
引言
H2O 是一个用于分布式、可扩展机器学习的内存平台。H2O 使用熟悉的界面,如 R、Python、Scala、Java、JSON 和 Flow notebook/web 界面,并与 Hadoop 和 Spark 等大数据技术无缝协作。H2O 提供了许多流行算法的实现,例如广义线性模型 (GLM)、梯度提升机(包括 XGBoost)、随机森林、深度神经网络、堆叠集成、朴素贝叶斯、广义加性模型 (GAM)、Cox 比例风险、K- Means、PCA、Word2Vec,以及全自动机器学习算法(H2O AutoML)。
GitHub链接:https://github.com/h2oai/h2o-3
download地址:http://h2o-release.s3.amazonaws.com/h2o/latest_stable.html
本文是在Ubuntu 18.04下,对python方式进行了安装与测试,关于h2o,目前是支持3种使用方式,分别为R、python以及Hadoop,下面就对python方式的进行相关说明。
H2O介绍与安装
h2o安装
安装地址:https://docs.h2o.ai/h2o/latest-stable/h2o-docs/downloading.html#install-in-python
python安装整体非常简单,按照官网说法,直接pip安装预编译版本就很简单了。
pip install requests
pip install tabulate
pip install future

pip install -f http://h2o-release.s3.amazonaws.com/h2o/latest_stable_Py.html h2o
安装完成无任何错误,还需要安装Java环境,因为底层是Java所写,不然demo无法运行,当在测试环境前如果没有Java,h2o.init()会失败为:
Checking whether there is an H2O instance running at http://localhost:54321 ..... not found.
Attempting to start a local H2O server...
Traceback (most recent call last):
File "/home/anaconda3/envs/py_h2o/lib/python3.6/site-packages/h2o/h2o.py", line 263, in init
strict_version_check=svc)
File "/home/anaconda3/envs/py_h2o/lib/python3.6/site-packages/h2o/backend/connection.py", line 385, in open
conn._cluster = conn._test_connection(retries, messages=msgs)
File "/home/anaconda3/envs/py_h2o/lib/python3.6/site-packages/h2o/backend/connection.py", line 682, in _test_connection
% (self._base_url, max_retries, "\n".join(errors)))
h2o.exceptions.H2OConnectionError: Could not establish link to the H2O cloud http://localhost:54321 after 5 retries
[21:59.43] H2OConnectionError: Unexpected HTTP error: HTTPConnectionPool(host='localhost', port=54321): Max retries exceeded with url: /3/Metadata/schemas/CloudV3 (Caused by NewConnectionError(': Failed to establish a new connection: [Errno 111] Connection refused' ,))
[21:59.63] H2OConnectionError: Unexpected HTTP error: HTTPConnectionPool(host='localhost', port=54321): Max retries exceeded with url: /3/Metadata/schemas/CloudV3 (Caused by NewConnectionError(': Failed to establish a new connection: [Errno 111] Connection refused' ,))
[21:59.84] H2OConnectionError: Unexpected HTTP error: HTTPConnectionPool(host='localhost', port=54321): Max retries exceeded with url: /3/Metadata/schemas/CloudV3 (Caused by NewConnectionError(': Failed to establish a new connection: [Errno 111] Connection refused' ,))
[22:00.04] H2OConnectionError: Unexpected HTTP error: HTTPConnectionPool(host='localhost', port=54321): Max retries exceeded with url: /3/Metadata/schemas/CloudV3 (Caused by NewConnectionError(': Failed to establish a new connection: [Errno 111] Connection refused' ,))
[22:00.25] H2OConnectionError: Unexpected HTTP error: HTTPConnectionPool(host='localhost', port=54321): Max retries exceeded with url: /3/Metadata/schemas/CloudV3 (Caused by NewConnectionError(': Failed to establish a new connection: [Errno 111] Connection refused' ,))
During handling of the above exception, another exception occurred:
Traceback (most recent call last):
File "" , line 1, in <module>
File "/home/anaconda3/envs/py_h2o/lib/python3.6/site-packages/h2o/h2o.py", line 279, in init
bind_to_localhost=bind_to_localhost)
File "/home/anaconda3/envs/py_h2o/lib/python3.6/site-packages/h2o/backend/server.py", line 142, in start
bind_to_localhost=bind_to_localhost, log_dir=log_dir, log_level=log_level, max_log_file_size=max_log_file_size)
File "/home/anaconda3/envs/py_h2o/lib/python3.6/site-packages/h2o/backend/server.py", line 272, in _launch_server
java = self._find_java()
File "/home/anaconda3/envs/py_h2o/lib/python3.6/site-packages/h2o/backend/server.py", line 444, in _find_java
raise H2OStartupError("Cannot find Java. Please install the latest JRE from\n"
h2o.exceptions.H2OStartupError: Cannot find Java. Please install the latest JRE from
http://docs.h2o.ai/h2o/latest-stable/h2o-docs/welcome.html#java-requirements
在Java环境安装好后,就可以进入python交互环境或者jupyter notebook测试:
import h2o
h2o.init()
h2o.demo("glm")
上面三句代码,第二句是查看h2o的状态,比如我将我下面所打印的h2o_cluster的详细输出进行了打印,这里还会有一个问题,就是XGBoost可能需要提前下载好预编译版本,即pip install拉下so文件,我发现h2o在开始是会去找的,如果没找到可能就报错了。但我之前已经装好,如果没装应该也没啥影响。
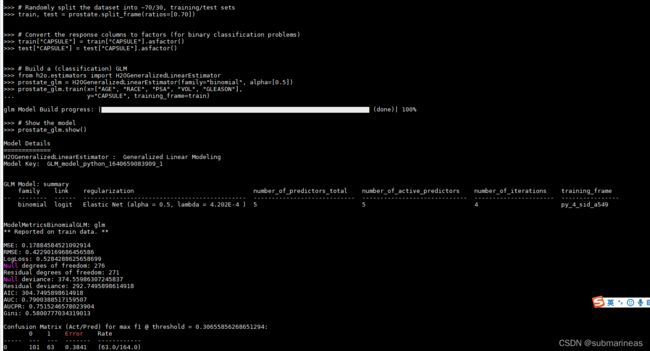
第三句是直接载入h2o包里的GLM的算法demo,这句在jupyter notebook无法进行,因为需要交互式命令不断按键让它自动输入代码,具体效果可以看我下面截图,算是一个比较完整的automl的demo。
Python 3.6.5 |Anaconda, Inc.| (default, Apr 29 2018, 16:14:56)
[GCC 7.2.0] on linux
Type "help", "copyright", "credits" or "license" for more information.
>>> import h2o
>>> h2o.init()
Checking whether there is an H2O instance running at http://localhost:54321 . connected.
--------------------------  ------------------------------------------------------------------
H2O_cluster_uptime:         55 secs
H2O_cluster_timezone:       Asia/Shanghai
H2O_data_parsing_timezone:  UTC
H2O_cluster_version:        3.34.0.7
H2O_cluster_version_age:    6 days
H2O_cluster_name:           H2O_from_python_root_6wla5i
H2O_cluster_total_nodes:    1
H2O_cluster_free_memory:    10.90 Gb
H2O_cluster_total_cores:    96
H2O_cluster_allowed_cores:  96
H2O_cluster_status:         locked, healthy
H2O_connection_url:         http://localhost:54321
H2O_connection_proxy:       {"http": null, "https": null}
H2O_internal_security:      False
H2O_API_Extensions:         Amazon S3, XGBoost, Algos, AutoML, Core V3, TargetEncoder, Core V4
Python_version:             3.6.5 final
--------------------------  ------------------------------------------------------------------
>>> h2o.demo("glm")
-------------------------------------------------------------------------------
Demo of H2O's Generalized Linear Estimator.

This demo uploads a dataset to h2o, parses it, and shows a description.
Then it divides the dataset into training and test sets, builds a GLM
from the training set, and makes predictions for the test set.
Finally, default performance metrics are displayed.
-------------------------------------------------------------------------------

>>> # Connect to H2O
>>> h2o.init()

这里需要做的就是不断按回车,然后终端便会不断演示从拉下数据到最终得到预测值的一系列代码与打印输出,个人观感还是很不错。
h2o测试demo
还是以kaggle中Titanic数据为分析例子,在这之前有写过一篇关于泰坦尼克数据分析与建模的例子,里面详细介绍了对于这份数据分析的过程与步骤,链接为:
kaggle(一):随机森林与泰坦尼克
这里不再对此赘述,直接用Titanic建模,我们先导入数据:
import h2o
import pandas as pd
h2o.init()

# h2o导入方式
# train_1 = h2o.import_file("/home/data/train.csv")
# test_1 = h2o.import_file("/home/data/test.csv")

# pandas导入方式
train = pd.read_csv("/home/data/train.csv")
test = pd.read_csv("/home/data/test.csv")
这里本来是想全部用h2o进行一次建模,但我找官网没找到一个明确的文档对标pandas的各种操作,另外它本来就带有pandas以及sklearn的很多功能,我研究得不深,去找了一篇kaggle notebook进行参考,如果是个新手,刚开始接触数据处理,我还是比较推荐h2o的,感觉它的api更贴近于国人理解,但是对我这种用惯pandas的选手,有点不习惯了。
然后我们就可以进行相关分析:
train_indexs = train.index
test_indexs = test.index
print(len(train_indexs), len(test_indexs))
# (891, 418)

df =  pd.concat(objs=[train, test], axis=0).reset_index(drop=True)
df = df.drop('PassengerId', axis=1)
train = df.loc[train_indexs]
test = df[len(train_indexs):]
test = test.drop(labels=["Survived"], axis=1)
数据处理完成后,于是我们便可以进行h2o的Modeling:
from h2o.automl import H2OAutoML

hf = h2o.H2OFrame(train)
test_hf = h2o.H2OFrame(test)
hf.head()

# 选择预测变量和目标
hf['Survived'] = hf['Survived'].asfactor()
predictors = hf.drop('Survived').columns
response = 'Survived'

# 切分数据集,添加停止条件参数为最大模型数和最大时间,然后训练
train_hf, valid_hf = hf.split_frame(ratios=[.8], seed=1234)
aml = H2OAutoML(
    max_models=20,
    max_runtime_secs=300,
    seed=1234,
)

aml.train(x=predictors,
        y=response,
        training_frame=hf,
)
"""
......

ModelMetricsBinomialGLM: stackedensemble
** Reported on train data. **

MSE: 0.052432901181573156
RMSE: 0.22898231630755497
LogLoss: 0.19414205126074563
Null degrees of freedom: 890
Residual degrees of freedom: 885
Null deviance: 1186.6551368246774
Residual deviance: 345.9611353466487
AIC: 357.9611353466487
AUC: 0.9815107745076109
AUCPR: 0.9762820080059409
Gini: 0.9630215490152219
......

"""

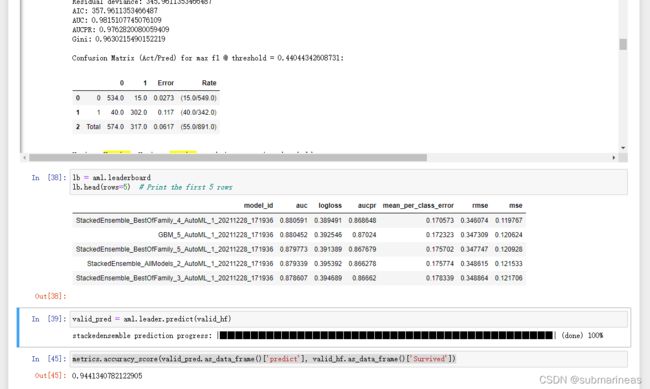
lb = aml.leaderboard
lb.head(rows=5)
"""
model_id	auc	logloss	aucpr	mean_per_class_error	rmse	mse
StackedEnsemble_BestOfFamily_4_AutoML_1_20211228_171936	0.880591	0.389491	0.868648	0.170573	0.346074	0.119767
GBM_5_AutoML_1_20211228_171936	0.880452	0.392546	0.87024	0.172323	0.347309	0.120624
StackedEnsemble_BestOfFamily_5_AutoML_1_20211228_171936	0.879773	0.391389	0.867679	0.175702	0.347747	0.120928
StackedEnsemble_AllModels_2_AutoML_1_20211228_171936	0.879339	0.395392	0.866278	0.175774	0.348615	0.121533
StackedEnsemble_BestOfFamily_3_AutoML_1_20211228_171936	0.878607	0.394689	0.86662	0.178339	0.348864	0.121706

"""

valid_pred = aml.leader.predict(valid_hf)
metrics.accuracy_score(valid_pred.as_data_frame()['predict'], valid_hf.as_data_frame()['Survived'])
"""
0.9441340782122905
"""
下面是我运行的结果,可以看到相关acc竟然还要高于我之前的笔记用到的随机森林,h2o确实有它的优势所在,并且大大简化了代码操作,在关系不太复杂的表格数据下,表现得非常优异,除了我个人体验train得有点慢之外。

H2O flow
H2O的产品大概有:
H2O Flow:开源的分布式的机器学习框架,可以通过web页面快速构建模型;
Deep Water:自动化机器学习框架,后端支持TensorFlow、MXNet以及Caffe.
Sparkling Water:可扩展的H2O的机器学习算法与Spark的功能相结合。 使用Sparkling Water,用户可以从Scala / R / Python驱动计算,并利用H2O Flow UI,为应用程序开发人员提供了理想的机器学习平台。
Stream:实时机器学习智能应用解决方案;
Driverless AI:无人驾驶技术平台;
引用自下载页面:https://www.h2o.ai/download/
上面写的用python搭建的方式还是需要代码,同R和Hadoop一样,但H2O flow基本算是完全web了,基本不用代码。
H2O flow安装
首先需要确保服务器自带了Java环境,因为h2o的底层就是Java:
root@R740:/home/program# java -version
openjdk version "1.8.0_312"
OpenJDK Runtime Environment (build 1.8.0_312-8u312-b07-0ubuntu1~18.04-b07)
OpenJDK 64-Bit Server VM (build 25.312-b07, mixed mode)
在有Java环境下,直接在上面的下载链接中,找到最新的h2o flow安装包,上述5个服务,除了Driverless AI其它皆开源,然后我们将其scp到服务器上,解压然后直接用命令启动就行了:
>> unzip h2o-3.34.0.7.zip
>> cd h2o-3.34.0.7/
>> java -jar h2o.jar

如果没有问题,它最后的日志里会提供一个地址,http://localhost:54323,进入这个地址,就能直接进入h2o flow页面,没有密码验证。

上面的Assistance分别为:
- importFiles(读取数据集)
- importSqlTables(读取SQL表)
- getFrames(查看已经读取的数据集)
- SplitFrame(将一个数据集分成多份数据集)
- mergeFrame(将两个数据集进行列组合或行组合)
- getModels(查看所有训练好的模型)
- getGrids(查看网格搜索的结果)
- getPredicitons(查看模型预测结果)
- getJobs(查看目前模型训练的任务)
- runAutoML(自动建模)
- buildModel(手动建立模型)
- importModel(从本地读取模型)
- predict(使用模型进行预测)
他们的步骤和正常的建模过程一样,有一定前置顺序,比如说如果没有相应的数据集,直接点最后的predict是没办法找到相关记录与模型进行的,它的下拉列表里没有任何可选择model与dataset,所以要玩好这个web,确实是需要下一番力气去学习,这里我引出官方更为详细的readme,是一个可查阅的手册:
https://github.com/h2oai/h2o-3/blob/master/h2o-docs/src/product/flow/README.md
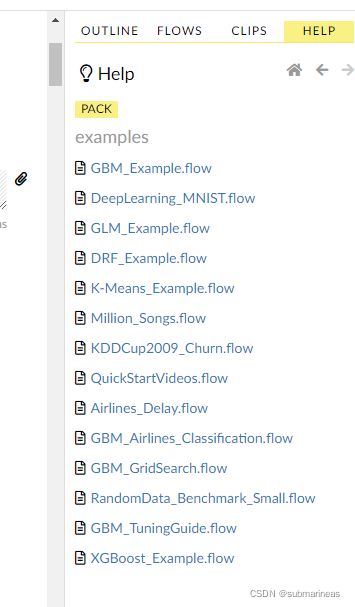
如果我们想直接一边做一边学,页面最右边的help里的pack有提供GitHub里的测试demo,我们可以直接进行运行和观察输出结果:

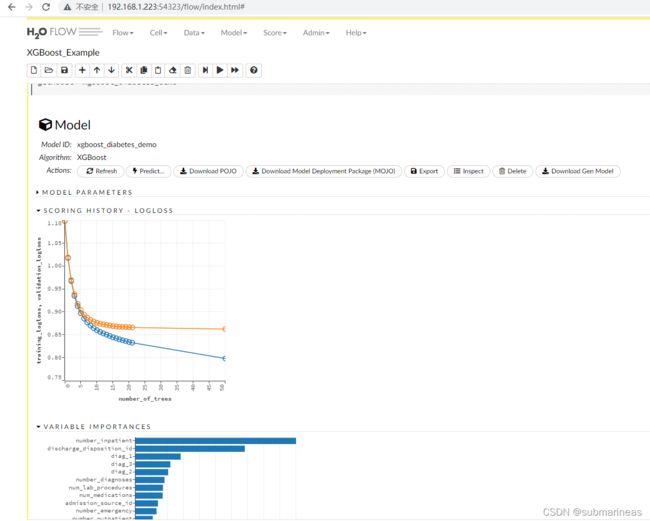
比如我这里使用的xgboost_example.flow,载入后,运行整个文件,便可以看到当前分析的所有图表。

参考文献:
[1]. https://github.com/h2oai/h2o-3/blob/master/h2o-docs/src/product/flow/README.md
[2]. h2o flow初探
[3]. 深度解析AutoML框架——H2O:小白也能使用的自动机器学习平台
[4]. 自动化建模 | H2O开源工具介绍
[5]. https://cs.uwaterloo.ca/~tozsu/courses/CS848/W19/projects/Singla,%20Rao%20-%20SparkMLvsSparklingWater.pdf
[6]. The H2O Python Module
[7]. https://www.kaggle.com/andreshg/titanic-dicaprio-s-safety-guide-h2o-automl