操作系统实验——进程创建与进程间通信
操作系统实验——进程创建与进程间通信
文章目录
- 操作系统实验——进程创建与进程间通信
-
- 实验目的
- 实验内容
-
- 一、创建进程树
- 二、vfork以及execl的使用
- 三、创建进程以及进程间通信(管道)的综合运用
- 实验代码和报告
实验报告在和代码在文章底部
实验目的
- 理解PCB以及系统调用的概念。
- 理解进程创建以及进程并发执行的过程。
- 掌握fork系统调用和exec系统调用的用法。
- 掌握使用fork创建多个子进程以及进程树的方法。
- 了解进程间通信的常用方法。
实验内容
一、创建进程树
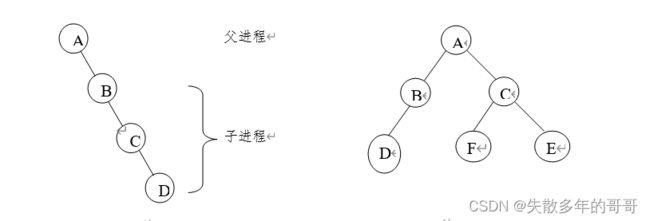
编写程序创建进程树如图1和图2所示,在每个进程中显示当前进程标识getpid()和父进程标识getppid()。
创建流程是先由a创建b进程,b进程创建c进程,c进程创建d进程
代码如下:
#include
#include
#include
#include
#include

int main()
{
  pid_t pida,pidb,pidc,pidd;
  while((pidb=fork())==-1);
  if(pidb>0)
    {
    	wait(0);
      	printf("Apid=%d,ppid=%d\n",getpid(),getppid());
    }
  else  //p
   {
     while((pidc=fork())==-1);
     if(pidc>0)
       	{
       	 wait(0);
         printf("Bpid=%d,pidd=%d\n",getpid(),getppid());
		}
     else //p
       {
		while((pidd=fork())==-1);
	     	if(pidd >0)   //p2
	      	{
	      		wait(0);
				printf("Cpid=%d,pidd=%d\n",getpid(),getppid());
			}
	     	else //p
	        {
				printf("Dpid=%d,pidd=%d\n",getpid(),getppid());
			}
	    }
    }

}
运行结果:
同样的思路,图二中的创建流程为:
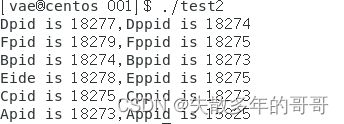
由父进程a同时建立b,c子进程,再由b进程创建d子进程,c子进程再创建e、f子进程
运行结果如下:
二、vfork以及execl的使用
实验要求一:
统计创建的子进程的数量,并在主进程中正确显示
代码如下:
#include
#include
#include
#include
#include
#include
int main(){
	signal(SIGCHLD,SIG_IGN);
	int num = 0;
	pid_t pid1,pid2,pid3,pid4,pid5;
	while((pid1 = vfork()) == -1);
	if(pid1 == 0)
	{
		while((pid2=vfork())==-1);
		if(pid2 == 0)
		{
			wait(0);
			num++;
			printf("Dpid is %d , Dppid is %d\n",getpid(),getppid());
			_exit(0);
		}
		else
		{
			wait(0);
			num++;
			printf("Bpid is %d , Bppid is %d\n",getpid(),getppid());
			_exit(0);
		}
	}
	else
	{
		while((pid3=vfork())==-1);
		if(pid3 == 0)
		{
			while((pid4=vfork())==-1);
			if(pid4 == 0)
			{
				wait(0);
				num++;
				printf("Fpid is %d , Fppid is %d\n",getpid(),getppid());
				_exit(0);
			}
			else
			{
				while((pid5=vfork())==-1);
				if(pid5 == 0)
				{
					wait(0);
					num++;
					printf("Epid is %d , Eppid is %d\n",getpid(),getppid());
					_exit(0);
				}
				else
				{
					wait(0);
					num++;
					printf("Cpid is %d , Cppid is %d\n",getpid(),getppid());
					_exit(0);
				}
			}
		}
		else
		{
			wait(0);
			printf("Apid is %d , Appid is %d\n",getpid(),getppid());
			printf("childnum is %d\n",num);
		}
	}
}
实验结果:
实验要求二:
创建一个子进程,并在后台运行上述任意一个可执行文件,观察程序的运行结果。
代码如下:
#include
#include
#include
#include
#include
#include
int main(){
	pid_t pid1;
	while((pid1=fork())==-1);
	if(pid1==0)
	{
		wait(0);
		printf("This is child\n");
	}
	else
	{
		printf("This is father\n");
		execlp("./test3","5a",NULL);
	}
}
实验结果:
三、创建进程以及进程间通信(管道)的综合运用
实验要求:
主进程输入一个字符串,然后创建两个子进程:一个是发送进程,通过管道向另一个子进程发送一个字符串;另一个是接收进程,该子进程接收字符串后,启动一个后台加密程序对字符串进行加密并输出密文。
提示:需要使用系统调用fork(), execl(),pipe(),wait()/waitpid()
加密代码:
//encrypt.c

#include
#include
#include
#include
int main(int argc,char * argv[])
{
   int i=0;
   int len;
   if(argc<=1) {printf("%d\n",argc);return 0;}
   char * s =argv[1];
   printf("启动后台加密进程,进程号:%d\n",getpid());
   len = strlen(s);//取长度
   for(i=0;i64 && s[i]<91) || (s[i]>96 && s[i]<123)){ //字符串加密
             if(s[i]=='z') s[i]='A';
             else if(s[i]=='Z') s[i]='a';
             else s[i] = s[i] + 1;
         }
         else s[i] = s[i];
    }
    printf("加密后:%s\n",s);
    return 1;
}
具体代码:
见底部文件
实验结果:
实验代码和报告
文件下载地址


