首先创建springBoot项目,jdk选择1.8
然后倒入mybaties的相关依赖
我们用的springBoot,当然spring全家桶里面含有mybaties,所以我们直接使用升级版的mybaties-plus。
引入这3个
lombok省的我每次创建对象,都需要get、set方法,以及toString
(IDEA里面也要安装lombok插件-》file->setting->plugin->搜索lombok安装,完后重启idea,这样lombok在idea中不报错)
mybatis-plus,mybaties的相关jar
mysql-connector-java 基本的jdbc驱动链接mysql,mybatis也要依赖他
		1.8
		3.4.2


		com.baomidou
		mybatis-plus-boot-starter
		${mybatis-plus.version}


            mysql
            mysql-connector-java
            runtime


			org.projectlombok
			lombok
			1.18.4
			provided
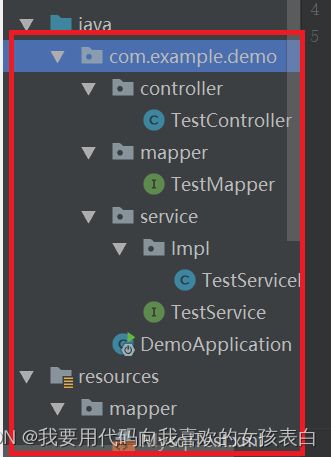
然后像我这样,假设我们要搭建一个非常2的大工程,建立这几个目录和文件
controller->TestController.java(class)
mapper->TestMapper.java(interface)
service->impl->TestServiceImpl.java(class)
service->TestService.java(interface)
resources->mapper->TestMapper.xml(映射xml)
接下来我们需要一个SqlSessionFactory,去解析一个个sql.xml。
而sqlSessionFactory,由SqlSessionFactoryBuilder 构建,构建一个SqlSessionFactoryBuilder ,需要链接mysql的账号密码地址。所以要读取你的账号密码,那在resource目录下创建一个xml用于他去读取。
我在resources下的mapper里面创建一个mybaties-config.xml
创建一个domain包,用来与mysql做相关映射,我在里面创建了一个实体类,与数据库做映射
@Data的就是我第一次导入的那个包,能够自动通过@Data注解,生成这个实体类的get、set方法以及toString方法。
package com.example.demo.domain;
import lombok.Data;
@Data
public class BZGG {
    String req_date;
    String stock_code;
    String stock_name;
    double fNextIncrease;
    double fNextAvgIncrease;
    String updatetime;
    public BZGG(String req_date, String stock_code, String stock_name, double fNextIncrease, double fNextAvgIncrease, String updatetime) {
        this.req_date = req_date;
        this.stock_code = stock_code;
        this.stock_name = stock_name;
        this.fNextIncrease = fNextIncrease;
        this.fNextAvgIncrease = fNextAvgIncrease;
        this.updatetime = updatetime;
    }
    public BZGG() {
    }
}
在mapper中的TestMapper中编写一个地址,并且加上Mapper映射
package com.example.demo.mapper;
import com.example.demo.domain.BZGG;
import org.apache.ibatis.annotations.Mapper;
import java.util.List;
@Mapper
public interface TestMapper {
    List getBZGGonTime(String req_date);
}
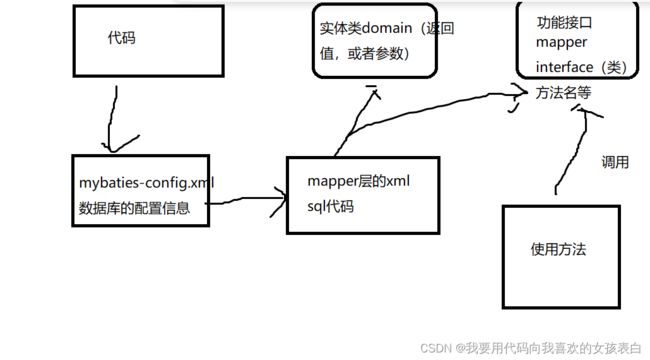
mybaties的代码流程图
resources中的sql配置(TestMapper.xml)
controller层代码(你到时候可以自己分离service),为了突出mybaties暂时写到一起了
package com.example.demo.controller;
import com.example.demo.domain.BZGG;
import com.example.demo.mapper.TestMapper;
import org.apache.ibatis.io.Resources;
import org.apache.ibatis.session.SqlSession;
import org.apache.ibatis.session.SqlSessionFactory;
import org.apache.ibatis.session.SqlSessionFactoryBuilder;
import org.springframework.web.bind.annotation.*;
import java.io.IOException;
import java.io.InputStream;
import java.util.List;
@RestController
public class TestController {
    @RequestMapping(value = "/Test", method = RequestMethod.GET)
    @ResponseBody
    public String getDemo(@RequestParam("num") int i) {
        String resource = "mapper/mybatis-config.xml";
        InputStream inputStream = null;
        try {
            inputStream = Resources.getResourceAsStream(resource);
        } catch (IOException e) {
            e.printStackTrace();
        }
        SqlSessionFactory sqlSessionFactory = new SqlSessionFactoryBuilder().build(inputStream);
        SqlSession sqlSession = sqlSessionFactory.openSession();
        TestMapper mapper = sqlSession.getMapper(TestMapper.class);
        List bzgGonTime = mapper.getBZGGonTime("2022-04-08");
        return bzgGonTime.toString();
    }
}
另外SpringApplication启动类,因为导入了mybaties,所以要启动时加载某个类,否则会出现url找不到等错误。
将@springBootApplication改成下面的
@SpringBootApplication(exclude = { DataSourceAutoConfiguration.class, DataSourceTransactionManagerAutoConfiguration.class })
package com.example.demo;
import org.springframework.boot.SpringApplication;
import org.springframework.boot.autoconfigure.SpringBootApplication;
import org.springframework.boot.autoconfigure.jdbc.DataSourceAutoConfiguration;
import org.springframework.boot.autoconfigure.jdbc.DataSourceTransactionManagerAutoConfiguration;
//在启动类的@SpringBootApplication加上
//避免冲突,加入exclude
@SpringBootApplication(exclude = { DataSourceAutoConfiguration.class, DataSourceTransactionManagerAutoConfiguration.class })
public class DemoApplication {
	public static void main(String[] args) {
		SpringApplication.run(DemoApplication.class, args);
	}
}
测试:

到此这篇关于springBoot详细讲解使用mybaties案例的文章就介绍到这了,更多相关springBoot mybaties内容请搜索脚本之家以前的文章或继续浏览下面的相关文章希望大家以后多多支持脚本之家!