前言
在上一篇文章中,我们分析了Spring中Bean的实例化过程,在结尾我们知道了虽然bean的实例化完成了,但是其中的属性还没有被注入,今天我们就接着来分析属性是如何被注入的。
属性填充
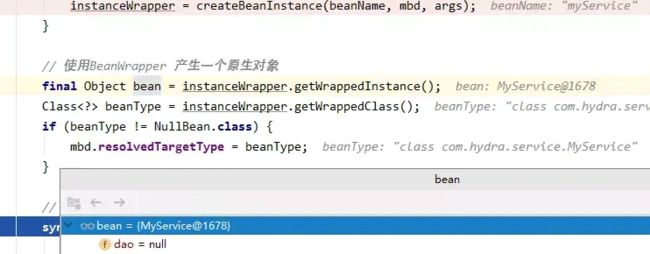
实例化完成后,回到上面第3条的doCreateBean方法中,看一下用BeanWrapper产生的原生对象,里面dao这个属性还是null值。
回归一下之前的代码,接下来要调用populateBean方法进行属性的填充:
Object exposedObject = bean;
try {
  populateBean(beanName, mbd, instanceWrapper);
  exposedObject = initializeBean(beanName, exposedObject, mbd);
}
看一下populateBean中的核心代码:
for (BeanPostProcessor bp : getBeanPostProcessors()) {
  if (bp instanceof InstantiationAwareBeanPostProcessor) {
    InstantiationAwareBeanPostProcessor ibp = (InstantiationAwareBeanPostProcessor) bp;
    pvs = ibp.postProcessPropertyValues(pvs, filteredPds, bw.getWrappedInstance(), beanName);
    if (pvs == null) {
      return;
    }
  }
}
这里通过getBeanPostProcessors方法获得当前注册的所有后置处理器,如果属于InstantiationAwareBeanPostProcessor类型,则调用它的postProcessPropertyValues方法。通过遍历,可以知道当前spring中存在7个后置处理器:
我们主要来看一下AutowiredAnnotationBeanPostProcessor,因为它负责对添加了 @Autowired、@Value等注解的属性进行依赖的填充。进入它的postProcessPropertyValues方法:
public PropertyValues postProcessPropertyValues(
  PropertyValues pvs, PropertyDescriptor[] pds, Object bean, String beanName) throws BeanCreationException {
  InjectionMetadata metadata = findAutowiringMetadata(beanName, bean.getClass(), pvs);
  try {
    metadata.inject(bean, beanName, pvs);
  }
 //异常处理代码省略...
  return pvs;
}
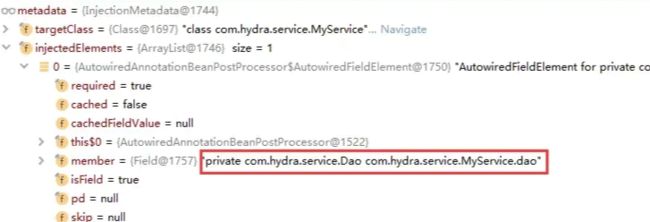
这里的InjectionMetadata可以理解为要注入的属性的元数据,在它里面维护了一个Collection,来存放所有需要注入的bean:
private final CollectioninjectedElements;
进入findAutowiringMetadata方法:
private InjectionMetadata findAutowiringMetadata(String beanName, Class clazz, @Nullable PropertyValues pvs) {
 String cacheKey = (StringUtils.hasLength(beanName) ? beanName : clazz.getName());
 InjectionMetadata metadata = this.injectionMetadataCache.get(cacheKey);
  //省略非重要代码...
 return metadata;
}
在执行完这一步后,就把需要填充的属性放进了刚才提到的injectedElements中:
接下来,继续执行InjectionMetadata的inject方法,在其中遍历所有需要注入的属性的列表,遍历调用AutowiredAnnotationBeanPostProcessor的inject方法:
protected void inject(Object bean, @Nullable String beanName, @Nullable PropertyValues pvs) throws Throwable {
      Field field = (Field) this.member;
      Object value;
      if (this.cached) {
        value = resolvedCachedArgument(beanName, this.cachedFieldValue);
      }
      else {
        DependencyDescriptor desc = new DependencyDescriptor(field, this.required);
        desc.setContainingClass(bean.getClass());
        Set autowiredBeanNames = new LinkedHashSet<>(1);
        Assert.state(beanFactory != null, "No BeanFactory available");
        TypeConverter typeConverter = beanFactory.getTypeConverter();
        try {//用beanFactory解决依赖
          value = beanFactory.resolveDependency(desc, beanName, autowiredBeanNames, typeConverter);
        }
   //后面代码省略...
这里创建了一个DependencyDescriptor,用来维护注入属性与它的容器类containingClass的关系,里面最重要的就是存放了注入属性的类型、名称,以及containingClass的类型等信息。
调用resolveDependency方法,其中没有做什么实质性的工作,继续调用了doResolveDependency方法:
public Object doResolveDependency(DependencyDescriptor descriptor, @Nullable String beanName,
    @Nullable Set autowiredBeanNames, @Nullable TypeConverter typeConverter) throws BeansException {
  InjectionPoint previousInjectionPoint = ConstructorResolver.setCurrentInjectionPoint(descriptor);
  try {
    Object shortcut = descriptor.resolveShortcut(this);
    if (shortcut != null) {
      return shortcut;
    }
    //依赖的属性值的类型
    Class type = descriptor.getDependencyType();
    Object value = getAutowireCandidateResolver().getSuggestedValue(descriptor);
    if (value != null) {
      if (value instanceof String) {
        String strVal = resolveEmbeddedValue((String) value);
        BeanDefinition bd = (beanName != null && containsBean(beanName) ? getMergedBeanDefinition(beanName) : null);
        value = evaluateBeanDefinitionString(strVal, bd);
      }
      TypeConverter converter = (typeConverter != null ? typeConverter : getTypeConverter());
      return (descriptor.getField() != null ?
          converter.convertIfNecessary(value, type, descriptor.getField()) :
          converter.convertIfNecessary(value, type, descriptor.getMethodParameter()));
    }

    Object multipleBeans = resolveMultipleBeans(descriptor, beanName, autowiredBeanNames, typeConverter);
    if (multipleBeans != null) {
      return multipleBeans;
    }
    //把匹配的值和类型拿出来,放到一个map中
    Map matchingBeans = findAutowireCandidates(beanName, type, descriptor);
    if (matchingBeans.isEmpty()) {
      if (isRequired(descriptor)) {
        raiseNoMatchingBeanFound(type, descriptor.getResolvableType(), descriptor);
      }
      return null;
    }

    String autowiredBeanName;
    Object instanceCandidate;
    //如果有超过一个匹配的,可能会有错误
    if (matchingBeans.size() > 1) {
      autowiredBeanName = determineAutowireCandidate(matchingBeans, descriptor);
      if (autowiredBeanName == null) {
        if (isRequired(descriptor) || !indicatesMultipleBeans(type)) {
          return descriptor.resolveNotUnique(type, matchingBeans);
        }
        else {
          return null;
        }
      }
      instanceCandidate = matchingBeans.get(autowiredBeanName);
    }
    else {
      Map.Entry entry = matchingBeans.entrySet().iterator().next();
      autowiredBeanName = entry.getKey();
      instanceCandidate = entry.getValue();
    }

    if (autowiredBeanNames != null) {
      //把找到的bean的名字放到set中
      autowiredBeanNames.add(autowiredBeanName);
    }
    if (instanceCandidate instanceof Class) {
      // 实际获取注入的bean
      instanceCandidate = descriptor.resolveCandidate(autowiredBeanName, type, this);
    }
    Object result = instanceCandidate;
    if (result instanceof NullBean) {
      if (isRequired(descriptor)) {
        raiseNoMatchingBeanFound(type, descriptor.getResolvableType(), descriptor);
      }
      result = null;
    }
    if (!ClassUtils.isAssignableValue(type, result)) {
      throw new BeanNotOfRequiredTypeException(autowiredBeanName, type, instanceCandidate.getClass());
    }
    return result;
  }
  finally {
    ConstructorResolver.setCurrentInjectionPoint(previousInjectionPoint);
  }
}
通过findAutowireCandidates方法,获取与注入属性匹配的值和类型,放到一个Map当中,再通过它的beanName,调用resolveCandidate方法,实际获取注入的bean实例。这一操作底层调用的也是BeanFactory的getBean方法。
回到inject方法,使用反射将注入的bean实例赋值给属性:
ReflectionUtils.makeAccessible(field);
field.set(bean, value);
在执行完populateBean方法后,依赖的属性已经被注入成功了。
执行回调方法及后置处理器
在bean实例化完成后,执行各种回调和后置管理器方法:
protected Object initializeBean(final String beanName, final Object bean, @Nullable RootBeanDefinition mbd) {
if (System.getSecurityManager() != null) {
AccessController.doPrivileged((PrivilegedAction
具体执行内容:
- 1、若bean实现了
BeanNameAware、BeanClassLoaderAware、BeanFactoryAware接口,执行回调方法 - 2、执行所有后置处理器的
postProcessBeforeInitialization方法 - 3、执行bean生命周期回调中的
init-method,若bean实现了InitializingBean接口,执行afterPropertiesSet方法 - 4、执行所有后置处理器的
postProcessAfterInitialization方法
在这一步完成后,bean的实例化过程全部结束。最后执行一下refresh方法中的finishRefresh方法,进行广播事件等操作。到这,一个完整的AnnotationConfigApplicationContext初始化就完成了。
到此这篇关于Spring源码解析 Bean属性填充的文章就介绍到这了,更多相关Spring Bean属性填充内容请搜索脚本之家以前的文章或继续浏览下面的相关文章希望大家以后多多支持脚本之家!


