【语义分割系列:七】Attention Unet 论文阅读翻译笔记 医学图像 python实现
Attention U-Net
2018 CVPR
Ozan Oktay, Jo Schlemper, Loic Le Folgoc, Matthew Lee
Attention U-Net: Learning Where to Look for the Pancreas
1、Introduce
什么是attention?
Attention 即为注意力机制,举例就是在复杂场景文字识别中,使用Attention把注意力集中在需要识别的数字上。
在医疗图像中,就是把注意力集中到对特定任务有用的显著特征(比如说相关组织或者是器官),抑制输入图像中的不相关区域。在级联神经网络中,需要明确的外部组织/器官定位模块,而使用Attention就不需要了。
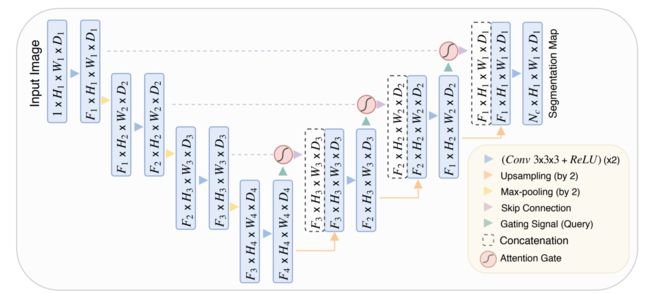
论文中是以U-net为基础进行集成,在decoder部分使用了Attention Gates ,得到了Attention U-Net模型。实验表明,融入AG后,Unet模型的精度更高了。
本文提出的 Attention
- 提出了grid-based gating ,使attention coefficients 更具体到局部区域。
- 在一个 feed-forward CNN模型中使用soft-attention技术
提出的attention gate可以替代图像分类中使用的注意方法和图像分割框架中使用的外部器官定位模型。 - 提高模型对 foreground 像素的敏感度
FCN (Fully Convolutional Network) 优于传统方法是因为:
(I) 利用随机梯度下降(SGD)优化学习域特定图像特征
(II) 学习的核在所有像素之间共享
(III) 图像卷积操作很好地利用了医学图像中的结构信息
cascaded CNNs方法:
- an initial coarse-level model (e.g. U-Net or Regression Forest) is used to obtain a ROI
- then a cropped ROI is used for segmentation refinement by a second model.
- dense connections
- sparse convolutions
Attention 分类:
- hard-attention
如 iterative region proposal and cropping ,往往是不可微的 non-differentiable,依赖于参数更新的 reinforcement learning,使得模型训练更加困难。 - soft-attention
is probabilistic and utilises standard back-propagation without need for Monte Carlo sampling.
2、Methodology
Attention-Unet模型是以Unet模型为基础的,可以从上图看出,Attention-Unet和U-net的区别就在于decoder时,从encoder提取的部分进行了Attention Gate再进行decoder。
在对 encoder 每个分辨率上的特征与 decoder 中对应特征进行拼接之前,使用了一个AGs,重新调整了encoder的输出特征。该模块生成一个门控信号,用来控制不同空间位置处特征的重要性,如上图中红色圆圈所示。
Attention Gates 和 多阶段CNNs的定位模型 相比:
- 不需要训练多个模型和大量额外的模型参数。
- 可以抑制不相关背景区域的特征响应,不需要裁剪网络间的ROI
下图 红色 Attention Gate 解析:
该方法的注意力模块内部如图所示
-
该模块通过1x1x1的卷积分别与ReLU和Sigmoid结合,生成一个权重图

-
AGs输出为 :
element-wise multiplication of encoder input feature-maps and
Attention coefficients 倾向于在目标器官区域取得大的值,在背景区域取得较小的值,有助于提高图像分割的精度。
3、Train
class AttU_Net(nn.Module):
    def __init__(self,img_ch=3,output_ch=1):
        super(AttU_Net,self).__init__()

        self.Maxpool = nn.MaxPool2d(kernel_size=2,stride=2)

        self.Conv1 = conv_block(ch_in=img_ch,ch_out=64)
        self.Conv2 = conv_block(ch_in=64,ch_out=128)
        self.Conv3 = conv_block(ch_in=128,ch_out=256)
        self.Conv4 = conv_block(ch_in=256,ch_out=512)
        self.Conv5 = conv_block(ch_in=512,ch_out=1024)

        self.Up5 = up_conv(ch_in=1024,ch_out=512)
        self.Att5 = Attention_block(F_g=512,F_l=512,F_int=256)
        self.Up_conv5 = conv_block(ch_in=1024, ch_out=512)

        self.Up4 = up_conv(ch_in=512,ch_out=256)
        self.Att4 = Attention_block(F_g=256,F_l=256,F_int=128)
        self.Up_conv4 = conv_block(ch_in=512, ch_out=256)

        self.Up3 = up_conv(ch_in=256,ch_out=128)
        self.Att3 = Attention_block(F_g=128,F_l=128,F_int=64)
        self.Up_conv3 = conv_block(ch_in=256, ch_out=128)

        self.Up2 = up_conv(ch_in=128,ch_out=64)
        self.Att2 = Attention_block(F_g=64,F_l=64,F_int=32)
        self.Up_conv2 = conv_block(ch_in=128, ch_out=64)

        self.Conv_1x1 = nn.Conv2d(64,output_ch,kernel_size=1,stride=1,padding=0)


    def forward(self,x):
        # encoding path
        x1 = self.Conv1(x)

        x2 = self.Maxpool(x1)
        x2 = self.Conv2(x2)

        x3 = self.Maxpool(x2)
        x3 = self.Conv3(x3)

        x4 = self.Maxpool(x3)
        x4 = self.Conv4(x4)

        x5 = self.Maxpool(x4)
        x5 = self.Conv5(x5)

        # decoding + concat path
        d5 = self.Up5(x5)
        x4 = self.Att5(g=d5,x=x4)
        d5 = torch.cat((x4,d5),dim=1)
        d5 = self.Up_conv5(d5)

        d4 = self.Up4(d5)
        x3 = self.Att4(g=d4,x=x3)
        d4 = torch.cat((x3,d4),dim=1)
        d4 = self.Up_conv4(d4)

        d3 = self.Up3(d4)
        x2 = self.Att3(g=d3,x=x2)
        d3 = torch.cat((x2,d3),dim=1)
        d3 = self.Up_conv3(d3)

        d2 = self.Up2(d3)
        x1 = self.Att2(g=d2,x=x1)
        d2 = torch.cat((x1,d2),dim=1)
        d2 = self.Up_conv2(d2)

        d1 = self.Conv_1x1(d2)

        return d1


class Attention_block(nn.Module):
    def __init__(self,F_g,F_l,F_int):
        super(Attention_block,self).__init__()
        self.W_g = nn.Sequential(
            nn.Conv2d(F_g, F_int, kernel_size=1,stride=1,padding=0,bias=True),
            nn.BatchNorm2d(F_int)
            )

        self.W_x = nn.Sequential(
            nn.Conv2d(F_l, F_int, kernel_size=1,stride=1,padding=0,bias=True),
            nn.BatchNorm2d(F_int)
        )

        self.psi = nn.Sequential(
            nn.Conv2d(F_int, 1, kernel_size=1,stride=1,padding=0,bias=True),
            nn.BatchNorm2d(1),
            nn.Sigmoid()
        )

        self.relu = nn.ReLU(inplace=True)

    def forward(self,g,x):

        g1 = self.W_g(g)
        x1 = self.W_x(x)
        psi = self.relu(g1+x1)
        psi = self.psi(psi)


        return x*psi

# self.Att4 = Attention_block(F_g=256,F_l=256,F_int=128)
# g=torch.Size([1, 256, 48, 64])
# x=torch.Size([1, 256, 48, 64])
# g1=torch.Size([1, 128, 48, 64])
# x1=torch.Size([1, 128, 48, 64])
# psi=torch.Size([1, 128, 48, 64])
# psi=torch.Size([1, 1, 48, 64])
# x*psi=torch.Size([1, 256, 48, 64])
4、Reference
https://blog.csdn.net/qq_41352018/article/details/80551737
https://blog.csdn.net/qingmeiann/article/details/80555981


