Python网络爬虫
目录
百度翻译爬取
思路
过程
代码实现
代码一
结果
代码二
结果
代码解析
urllib
发送请求
1.urlopen()
百度翻译爬取
思路
在百度翻译上,进行翻译,点开检查F12,可以在网络那边看到数据传输情况,看到后台的翻译网址,我们可以伪装前台的百度翻译网站,发送一样的数据给翻译后台,然后获取后台传输回来的翻译信息。百度翻译这边需要伪装下发送信息,伪装自己是个浏览器。不过有道翻译就不需要伪装是浏览器了。
过程
先小翻译

找到POST
右侧有相应翻译的POST

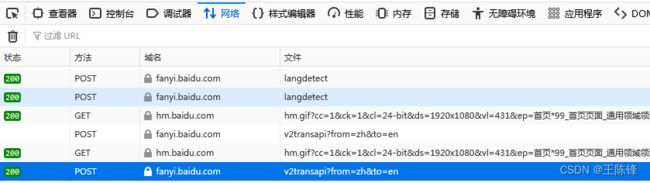
获取后台翻译网址

获取请求字段

代码实现
代码一
from urllib import request,parse
import json
headers={'User-Agent': 'Mozilla/5.0 (Windows NT 10.0; Win64; x64) AppleWebKit/537.36 (KHTML, like Gecko) '
'Chrome/68.0.3440.75 Safari/537.36'}
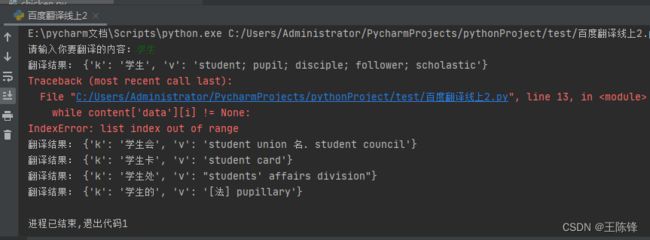
content=input('请输入你要翻译的内容:')
dict={'kw':content}#需要翻译的内容
new_name=parse.urlencode(dict)#进行转码
url='https://fanyi.baidu.com/sug'#url 连接
response=request.Request(url,headers=headers,data=bytes(new_name,encoding='utf-8'))#进行封装
text=request.urlopen(response).read().decode('utf-8')#爬取数据
content=json.loads(text)
print('翻译结果:',content['data'][0])在实现的时候,会发生超出边界的问题。
结果
代码二
from urllib import request,parse
import json
headers={'User-Agent': 'Mozilla/5.0 (Windows NT 10.0; Win64; x64) AppleWebKit/537.36 (KHTML, like Gecko) '
                       'Chrome/68.0.3440.75 Safari/537.36'}
content=input('请输入你要翻译的内容:')
dict={'kw':content}#需要翻译的内容
new_name=parse.urlencode(dict)#进行转码
url='https://fanyi.baidu.com/sug'#url 连接
response=request.Request(url,headers=headers,data=bytes(new_name,encoding='utf-8'))#进行封装
text=request.urlopen(response).read().decode('utf-8')#爬取数据
content=json.loads(text)

print('翻译结果:',content['data'][:-1])
为了解决代码一的超出边界问题,我采取了直接用-1做索引,限定了最后的边界。
结果

代码解析:我大概是系统性记录下,网络爬虫的常用语句
代码解析
在python2中,有urllib与urllib2两个库来实现请求的发送。而在python3中已经统一了urllib与urllib2,合并为urllib。
urllib
urllib库是python内置的http请求库,也就是说不需要额外安装即可使用。
它包含着如下几个模块:
| request |
最基本的HTTP请求模块,可以用来模拟发送请求。就像在浏览器里输入网站然后回车一样,只需要给库方法传入URL以及额外参数,就可以模拟实现这个过程。 |
| error | 异常处理模块,如果出现请求错误,我们可以捕获这些异常,然后进行重试或其他操作以保证程序不会意外终止。 |
| parse | 工具模块,提供许多URL处理方法,比如拆分,解析,合并等。 |
| robotparser | 主要用来识别网站的robot.txt文件,然后判断那些网站可以爬,哪些网站不能爬,它其实用的比较少 |
发送请求
1.urlopen()
以CSDN网站为例:
import urllib.request
response=urllib.request.urlopen('https://blog.csdn.net')
print(response.read().decode('utf-8'))
运行结果:

可以看到,它返回了网站的源代码。
用type的方法输出响应类型:
import urllib.request
response=urllib.request.urlopen('https://blog.csdn.net')
#print(response.read().decode('utf-8'))
print(type(response))
运行结果:

response=urllib.request.urlopen('https://blog.csdn.net')返回的是一个HTTPRespons类型对象,主要包含read()、readinto()、getheader(name)、getheaders()、fileno()等方法,以及msg、version、status、reason、debuglevel、closed等属性。
我们可以利用response变量进行使用这些方法,进而获取信息。
例如使用read()方法:
import urllib.request
response=urllib.request.urlopen('https://blog.csdn.net')

print(response.status)#输出状态码
print(response.getheaders())#响应头信息
print(response.getheader('Server'))
'''
传递一个参数Server获取了响应头中的Server值,结果是openresty,
意思是服务器是用openresty搭建
'''
利用最基本的urlopen()方法,便可以完成最基本的简单网页的GET请求抓取。
urlopen函数的API:
urllib.request.uropen(url,data=None)
data参数
data参数是可选的,如果需要添加该参数,需要使用bytes()方法将参数转化为字节流编码格式的内外,即bytes类型。
传递此参数了话,它的请求方式就不是GET方式,而是POST方式。
import urllib.request
import urllib.parse
data=bytes(urllib.parse.urlencode({'word':'hello'}),encoding='utf-8')
response=urllib.request.urlopen('https://httpbin.org/post',data)
print(response.read().decode('utf-8'))