哈工大2022软件构造Lab1
说明
此博客内容为哈工大2022春季学期软件构造Lab1:Fundamental Java Programming and Testing,文章为个人记录,不保证正确性,仅供练习和思路参考,请勿抄袭。实验所需文件可以从这里获取(若打不开可以复制到浏览器)。
实验环境:IntelliJ IDEA 2022.1(Ultimate Edition)
一、Magic Squares
给定一个矩阵,判断其是否是一个幻方。矩阵以文件形式给出,同一行数字之间用制表符分隔。幻方需要满足:
(1)它是一个 n n n阶方阵,且元素是 1 1 1到 n 2 n^2 n2的一个排列;(排列这个要求好像可以不考虑,代码里考虑进去了)
(2)它的每行之和、每列之和、主副对角线之和相等。

注意:当遇到文件数据不符合定义(如行列数不相等,不是矩阵,数字不是正整数,数字之间不以制表符分隔等),需要返回false并在控制台输出错误信息。
函数原型
static boolean isLegalMagicSquare(String filename) throws FileNotFoundException {
}
文件输入并检查
int row = 0,col = 0;
ArrayList<String> nums;
HashSet<Integer> S = new HashSet<Integer>();
ArrayList<ArrayList<Integer>> matrix = new ArrayList<ArrayList<Integer>>();
Scanner input = new Scanner(new File(filename));

while(input.hasNextLine()) {
    nums = new ArrayList<String>(List.of(input.nextLine().split("\t")));

    if(col == 0) col = nums.size();
    else if(col != nums.size()) {
        System.out.println("The column of the rows are not equal!(Or, the numbers are not divided by '\\t')");
        return false;
    }
    try {
        for (int i = 0; i < nums.size(); i++) {
        	int value = Integer.parseInt(nums.get(i));
            matrix.get(row).add(value);
            if(value <= 0) {
                System.out.println("One of the numbers in the matrix is not a positive integer!");
                return false;
           	}
           	if(S.contains(value) || value > col * col) {
                System.out.println("The numbers are not an arrangement of n*n!");
                return false;
            }
            S.add(value);
        }
    } catch(NumberFormatException e) {
        System.out.println("One of the numbers in the matrix is not an integer!");
        return false;
    }
    row++;
}
if(row != col) {
    System.out.println("The row of the matrix and the column are not equal!");
}
判断幻方
int sum = 0,sum1 = 0, sum2 = 0, sum_diag1 = 0, sum_diag2 = 0;

for(int i = 0; i < row; i++) {

    sum1 = sum2 = 0;
    sum_diag1 += matrix.get(i).get(i);
    sum_diag2 += matrix.get(i).get(row - i - 1);
    for(int j = 0; j < col; j++) {
        sum1 += matrix.get(i).get(j);
        sum2 += matrix.get(j).get(i);
    }

    if(sum == 0) sum = sum1;
    if(sum1 != sum2) return false;
    if(sum1 != sum) return false;
}
//判断对角线
if(sum_diag1 != sum_diag2 || sum_diag1 != sum) return false;

return true;
生成幻方
这个生成方法是罗伯法:(以下口诀来自百度百科)
1 居上行正中央——数字 1 放在首行最中间的格子中;
依次斜填切莫忘——向右上角斜行,依次填入数字;
上出框界往下写——如果右上方向出了上边界,就以出框后的虚拟方格位置为基准,将数字竖直降落至底行对应的格子中;
右出框时左边放——同上,向右出了边界,就以出框后的虚拟方格位置为基准,将数字平移至最左列对应的格子中;
重复便在下格填——如果数字 N N N 右上的格子已被其它数字占领,就将 N + 1 N+1 N+1填写在 N N N 下面的格子中;
右上重复一个样——如果朝右上角出界,和“重复”的情况做同样处理.
//判断不合法的情况:n为偶数或n<=0
if(n % 2 == 0) {
    System.out.println("n should be odd!");
    return false;
}
if(n <= 0) {
    System.out.println("n should be positive!");
    return false;
}
int magic[][] = new int[n][n];
int row = 0, col = n / 2, i, j, square = n * n;

//每次循环填入一个数;初始化当前位置为第0行的中间
for(i = 1; i <= square; i++) {
    //在当前位置填入数字
    magic[row][col] = i;
    //若i是n的倍数,行+1(等价于右上角被占住)
    if(i % n == 0)
        row++;
        else {
            //若出界,就换到幻方的另一边
            if(row == 0)
                row = n - 1;
            //否则,向右上去
            else
                row--;
            //若出界,换到另一边
            if(col == (n - 1))
                col = 0;
            //否则向右上去
            else
                col++;
    }
}

PrintWriter output = new PrintWriter("src/P1/txt/6.txt");

for(i = 0; i < n; i++) {
    for(j = 0; j < n; j++) {
        System.out.print(magic[i][j] + "\t");
        output.print(magic[i][j] + "\t");
    }
    System.out.println();
    output.print("\n");
}

output.close();
return true;
二、Turtle Graphics
原实验为MIT的实验。
任务:
下载turtle相关类,放于P2包中。实现TurtleSoup中的各个方法,控制turtle绘制图案并通过JUnit中的测试。下面对于git部分的problem不加以说明。
*注意:由于要把Turtle放入P2包中,Turtle中package需要加上P2。
package P2.turtle;
Problem 3
调用已经实现的forward和turn函数,实现TurtleSoup.java中的drawSquare方法,在main函数中测试其功能。
函数原型
//已经被实现,使turtle向前走units个单位
public void forward(int units) {
}
//已经被实现,使turtle顺时针转弯degrees度(角度制)
public void turn(double degrees) {
}
//需要实现
public static void drawSquare(Turtle turtle, int sideLength) {
}
实现
实现很简单,只需要向前走sideLength,转弯90°即可。
public static void drawSquare(Turtle turtle, int sideLength) {
    for(int i = 0; i < 4; i++) {
        turtle.forward(sideLength);
        turtle.turn(90);
    }
}
Problem 5
用turn和forward实现画正多边形的三个方法,并通过JUnit的测试。
函数原型
//给定正多边形边数,计算其内角角度
public static double calculateRegularPolygonAngle(int sides) {
}
//给定正多边形角度,计算其边数
public static int calculatePolygonSidesFromAngle(double angle) {
}
//画正多边形
public static void drawRegularPolygon(Turtle turtle, int sides, int sideLength) {
}
实现
思维难度不高,用初中数学知识算一下就行。
public static double calculateRegularPolygonAngle(int sides) {
    return 180.0 - 360.0 / sides;
}
//为了保证准确度,四舍五入
public static int calculatePolygonSidesFromAngle(double angle) {
    return (int)Math.round(360 / (180 - angle));
}
public static void drawRegularPolygon(Turtle turtle, int sides, int sideLength) {
    double angle = calculateRegularPolygonAngle(sides);
    for(int i = 0; i < sides; i++) {
        turtle.forward(sideLength);
        turtle.turn(180 - angle);
    }
}
JUnit单元测试
在IDEA下若TurtleSoupTest.java报错,在提示的窗口中自动fix下载即可。
测试方法:实现方法后,在TurtleSoup.java中的对应测试旁点击小箭头后直接运行该测试。


测试通过:

Problem 6
实现方法calculateBearingToPoint和calculateBearings,并通过JUnit测试。
calculateBearingToPoint方法:
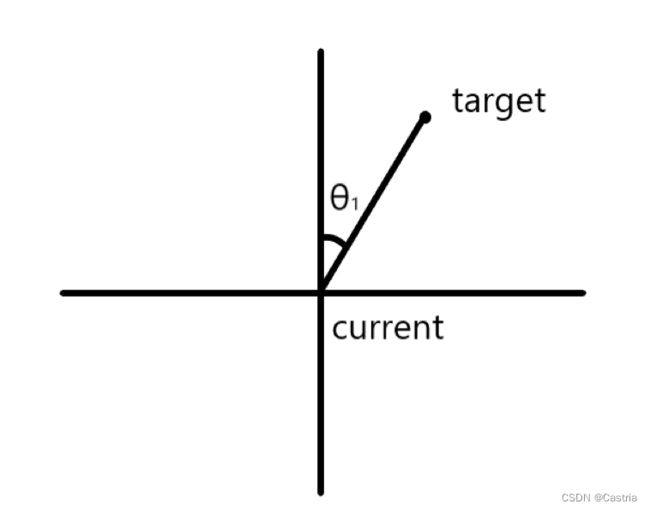
给定当前朝向(以正北方向为0°,顺时针方向),坐标和目的地,计算旋转角度的大小(始终向顺时针旋转,旋转角度在 [ 0 , 360 ° ) [0,360\degree) [0,360°)中)
calculateBearings方法:
给定两个List xCoords和yCoords,分别含有一系列横坐标和纵坐标,且个数相同(记为 n n n);设最初turtle的朝向为正北并在(xCoords[0], yCoords[0])处,计算 n − 1 n-1 n−1次转向的角度。当 n = = 0 n==0 n==0,返回空列表。
函数原型
public static double calculateBearingToPoint(double currentBearing, int currentX, int currentY,
                                             int targetX, int targetY) {
}
实现
对于每个target坐标,先计算它相对于当前位置的偏转角 θ 1 \theta_1 θ1(代码中的targetBearing),可以通过Math库中的反三角函数实现(弧度制要转化成角度制);此外,由于反三角函数返回 [ − π 2 , π 2 ] [-\frac{\pi}{2},\frac{\pi}{2}] [−2π,2π]中的值,无法区分 30 ° 30\degree 30°和 150 ° , 150\degree, 150°,需要判断一下target的相对位置(在current的上方还是下方,注意坐标轴的情况)

public static double calculateBearingToPoint(double currentBearing, int currentX, int currentY,
                                             int targetX, int targetY) {
    double deltaX = targetX - currentX;
    double deltaY = targetY - currentY;
    double dist = Math.sqrt(deltaX * deltaX + deltaY * deltaY);

	//相同点, return 0.0
    if(dist == 0) return 0;
    double targetBearing = Math.toDegrees(Math.asin((targetX - currentX) / dist));
    if(targetX >= currentX) { // right
        if(targetY < currentY) { // right, down
            targetBearing = 180 - targetBearing;
        }
        /*
        特殊情况:
        when theta == 0, asin = 0;
        when theta == 90, asin = 1;
        when theta == 180, asin = 0.
        */
    }
    else {
    	/*
    	特殊情况:
    	when theta == 270, asin = -1.(180 - (-90) = 270)
    	*/
        if(targetY <= currentY) {
            targetBearing = 180 - targetBearing;
        }
        else {
            targetBearing = 360 - targetBearing;
        }
    }

    targetBearing -= currentBearing;
    //由于只能顺时针转,对两角之差的正负讨论一下
    return targetBearing >= 0? targetBearing: targetBearing + 360;
}
calculateBearings用calculateBearingToPoint很好实现。记录当前位置和朝向,不断调用calculateBearings即可。
*List是抽象类,需要返回其子类ArrayList。
public static List<Double> calculateBearings(List<Integer> xCoords, List<Integer> yCoords) {
    if(xCoords.size() == 0) {
        return new ArrayList<>();
    }
    ArrayList<Double> ld = new ArrayList<Double>();
    int currentX = xCoords.get(0), currentY = yCoords.get(0);
    double currentBearing = 0;
    for(int i = 1; i < xCoords.size(); i++) {
        currentBearing = calculateBearingToPoint(currentBearing, currentX, currentY, xCoords.get(i), yCoords.get(i));
        ld.add(currentBearing);
        currentX = xCoords.get(i);
        currentY = yCoords.get(i);
    }
    return ld;
}
Problem 7
实现convexHull方法(计算点集的凸包),并通过JUnit测试。文件中提示了一种Gift-wrapping算法( O ( n 2 ) O(n^2) O(n2));由于篇幅较长,另一种算法(Graham扫描法, O ( n l o g n ) O(nlogn) O(nlogn))单独放在了我的另一篇博客中。
Problem 8
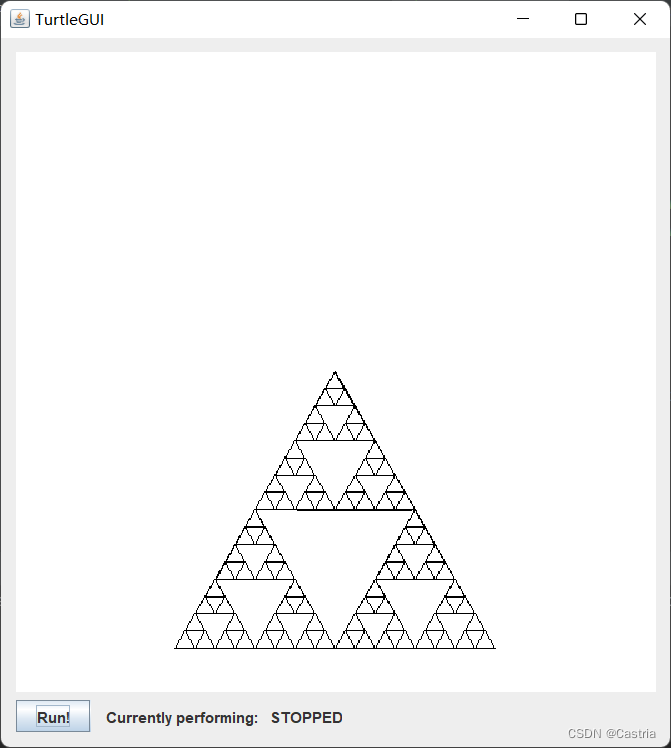
用前面实现的方法绘制自己的Personal Art。这一阶段我绘制了一个谢尔宾斯基三角形,主要考虑到用递归实现比较简洁美观,而且还不涉及弧线。
public static void drawSierpinskiTriangle(Turtle turtle, int rank, int sideLength) {
    if(rank == 1) {
        drawRegularPolygon(turtle, 3, sideLength);
        return;
    }
    drawSierpinskiTriangle(turtle, rank - 1, sideLength / 2);
    turtle.forward(sideLength / 2);
    drawSierpinskiTriangle(turtle, rank - 1, sideLength / 2);
    turtle.turn(120);
    turtle.forward(sideLength / 2);
    turtle.turn(240);
    drawSierpinskiTriangle(turtle, rank - 1, sideLength / 2);
    turtle.turn(240);
    turtle.forward(sideLength / 2);
    turtle.turn(120);
}
public static void drawPersonalArt(Turtle turtle) {
    int rank = 5,minLength = 8; // rank:the rank of the triangle; minLength: the minimum triangle's length
    int sideLength = minLength * (1 << rank);
    turtle.turn(150);
    drawSierpinskiTriangle(turtle, rank, sideLength);
}
可以通过调节rank和minLength的值来改变三角形的阶数和边长。效果:

三、Social Network
实现FriendshipGraph和Person类,其中FriendshipGraph应该有方法addVertex(加点),addEdge(加单向边),getDistance(返回二人最短距离,若不连通返回-1);Person类有一个String型的name成员。
Person类
简单地设置一下构造函数和getter/setter。由于有要求需要判断是否有两个人同名,我们在Person类里加一个静态的集合用于存所有人的名字。若有两个人同名则直接输出信息并exit。
public class Person {
    private String name;
    static private HashSet<String> nameTable;

    public Person(String name) {
    	if(nameTable == null) nameTable = new HashSet<String>();
        if(nameTable.contains(name)) {
            System.out.println("There is already a person named " + name + "!");
            System.exit(1);
        }
        this.name = name;
        nameTable.add(name);
    }

    public String getName() {
        return name;
    }

    public void setName(String name) {
        this.name = name;
    }

}
FriendshipGraph类
addVertex方法
这里采用邻接表存图:用一个从Person到ArrayList
private HashMap<Person, ArrayList<Person>> adjList;
//构造方法
public FriendshipGraph() {
    adjList = new HashMap<Person, ArrayList<Person>>();
}
public void addVertex(Person p) {
    if(!adjList.containsKey(p)) {
        adjList.put(p, new ArrayList<Person>());
    }
    else {
        System.out.println("There is already a person named " + p.getName() + "!");
    }
}
addEdge方法
直接在邻接表中添加对应项即可。这里没有判断重边:邻接表判断重边需要 O ( n ) O(n) O(n)时间,重边也不影响getDistance的结果。
public void addEdge(Person from, Person to) {
    if(!adjList.containsKey(from)) {
        System.out.println("There is no person named " + from.getName() + "!");
        return;
    }
    if(!adjList.containsKey(to)) {
        System.out.println("There is no person named " + to.getName() + "!");
        return;
    }
    adjList.get(from).add(to);
}
getDistance方法
直接进行一次BFS即可。这里用了一个私有内部类pair来记录到当前状态步数。
public int getDistance(Person from, Person to) {
    if(!adjList.containsKey(from)) {
        System.out.println("There is no person named " + from.getName() + "!");
    }
    if(!adjList.containsKey(to)) {
        System.out.println("There is no person named " + to.getName() + "!");
    }

	//队列
    LinkedList<pair> Q = new LinkedList<pair>();
    //记录是否访问过
    HashMap<Person, Boolean> visit = new HashMap<Person, Boolean>();

    //从第一个人开始,步数为0
    Q.add(new pair(from, 0));

    while(!Q.isEmpty()) {
        pair now = Q.pollFirst();
        visit.put(now.getPerson(), true);
        if(now.equals(to)) {
            return now.getStep();
        }
        for(Person p: adjList.get(now.getPerson())) {
            if(!visit.containsKey(p)) {
                Q.add(new pair(p, now.getStep() + 1));
            }
        }
    }

    return -1;
}
运行结果
public static void main(String[] args) {
    FriendshipGraph graph = new FriendshipGraph();
    Person rachel = new Person("Rachel");
    Person ross = new Person("Ross");
    Person ben = new Person("Ben");
    Person kramer = new Person("Kramer");
    graph.addVertex(rachel);
    graph.addVertex(ross);
    graph.addVertex(ben);
    graph.addVertex(kramer);
    graph.addEdge(rachel, ross);
    graph.addEdge(ross, rachel);
    graph.addEdge(ross, ben);
    graph.addEdge(ben, ross);
    System.out.println(graph.getDistance(rachel, ross));//should return 1
    System.out.println(graph.getDistance(rachel, ben));//should return 2
    System.out.println(graph.getDistance(rachel, rachel));//should return 0
    System.out.println(graph.getDistance(rachel, kramer));//should return -1
}
JUnit测试
本实验要求如下目录结构:

在IDEA下创建一个与src并列的directory(test),在其中再新建一个directory(P3),再新建一个File(FriendshipGraphTest.java):

这时应该会提示java file outside of source root,只需要右键test->Mark Directory as->Sources root即可。可以发现test变成了蓝色,里面的P3也变成了package图标。


可以仿照P2的JUnit写测试用例。
package P3;

import org.junit.Test;

import static org.junit.Assert.assertEquals;

public class FriendshipGraphTest {
    @Test
    public void getDistanceTest1() {
        FriendshipGraph graph = new FriendshipGraph();
        Person rachel = new Person("Rachel");
        Person ross = new Person("Ross");
        Person ben = new Person("Ben");
        Person kramer = new Person("Kramer");
        graph.addVertex(rachel);
        graph.addVertex(ross);
        graph.addVertex(ben);
        graph.addVertex(kramer);
        graph.addEdge(rachel, ross);
        graph.addEdge(ross, rachel);
        graph.addEdge(ross, ben);
        graph.addEdge(ben, ross);
        assertEquals(1, graph.getDistance(rachel, ross));
        //should return 1
        assertEquals(2, graph.getDistance(rachel, ben));
        //should return 2
        assertEquals(0, graph.getDistance(rachel, rachel));
        //should return 0
        assertEquals(-1, graph.getDistance(rachel, kramer));
    }
}
这里是指导书中给的测试用例。如果想要新建一个测试用例,只需要写一个原型如下的方法:
@Test
public void newGetDistanceTest() {
}


