AlexNet-pytorch转onnx后,利用tensorRT7.0调用并加速
目前完成了一个小任务,具体内容大致是,利用pytorch版的alexnet训练了一个分类网络,分类效果差强人意,由于python是一门解释性语言,在编译速度方面效果较差,考虑到后期需要实际部署到机器上进行分类检测的,所以需要转为c++程序来执行分类任务,而tensorRT可以同时满足实时性和优化加速的需求。
由于网上的流程写的都不够完整,所以我想写个日志记录一下我的实现方法
大致流程:pytorch>onnx>trt>tensorRT
贴几个参考的教程:
1.pytorch/tensorflow版的alexnet等模型开源代码
https://github.com/WZMIAOMIAO/deep-learning-for-image-processing
2.下载onnx-tensorrt-release-7.0
https://github.com/onnx/onnx-tensorrt/releases
3.tensorrt-inference,该地址包含各类模型的tensorrt推理demo
https://github.com/linghu8812/tensorrt_inference
4.yolov5转tensorrt博客
https://blog.csdn.net/linghu8812/article/details/109322729
本机环境:
ubuntu18.04
pytorch1.7.1(Alexnet)
cuda10.2
cudnn7.6.5
tensorRT7.0
onnx(ONNX是一种针对机器学习所设计的开放式的文件格式,用于存储训练好的模型。它使得不同的人工智能框架(如Pytorch, MXNet)可以采用相同格式存储模型数据并交互。)
onnx-tensorRT
opencv3.4
yaml-cpp 0.6.3
step1.pytorch转onnx
(怎么用pytorch训练alexnet模型这里就不叙述了,可以自行百度教程很多)
利用pytorch训练好的alexnet模型,首先要转为我们可用的onnx模型
import os
import json

import torch
from PIL import Image
from torchvision import transforms
import matplotlib.pyplot as plt
import time

from model1 import AlexNet
from torch.autograd import Variable


def main():
    device = torch.device("cuda:0" if torch.cuda.is_available() else "cpu")

    data_transform = transforms.Compose(
        [transforms.Resize((224, 224)),
         transforms.ToTensor(),
         transforms.Normalize((0.5, 0.5, 0.5), (0.5, 0.5, 0.5))])


    # create model
    model = AlexNet(num_classes=4)

    # load model weights
    weights_path = "./AlexNet.pth"
    assert os.path.exists(weights_path), "file: '{}' dose not exist.".format(weights_path)
    model.load_state_dict(torch.load(weights_path))

    onnx_path = "./AlexNet_export.onnx"
    test_input = Variable(torch.randn([1, 3, 224, 224]))
    torch.onnx.export(model, test_input, onnx_path, export_params=True, verbose=True)


if __name__ == '__main__':
    main()

"""

"""
利用以上.py脚本可以将我们训练得到的.pth模型转换为后续所需要的onnx模型
step2.
安装tensorRT7.0
到官网自行下载自己cuda所对应版本的tensorRT
将tensorRT7.0添加到本机换机变量
gedit ~/.bashrc
export你的tensorrt7.0的lib目录 ,保存并退出
step3.onnx转trt,并利用tensorRT c++ 推理模型
这里的话有两种方法,一种是直接利用onnx2trt工具将,onnx转换为trt模型,如果你只需要trt模型的话可以利用这种方法;还有一种方法是利用tensorRT脚本,配合config.yaml,lable.txt来完成onnx>trt并执行推理。
方法1.onnx2trt
首先下载onnx-tensorrt7.0-release版本
地址:https://github.com/onnx/onnx-tensorrt/tree/7.0
然后在这个github地址中,将third-party里的onnx内容单独下载好,放置我们的third-party文件夹中
ONNX下载地址:https://github.com/onnx/onnx/tree/553df22c67bee5f0fe6599cff60f1afc6748c635
然后进行正常编译, cd onnx-tensorrt-release-7.0
mkdir biuld
cd biuld
cmake ..
cmake .. -DTENSORRT_ROOT=~/TensorRT-7.0.0.11
make -j8
sudo make install
完成onnx-tensorrt编译,之后就可以在任意带有onnx文件的目录下,利用onnx2trt命令将其转化为我们tensorrt所需要的engine文件.trt了
然后如果你的开发板上装有tensorrt的话就可以直接调用trt文件进行推理了
方法2.利用tensorRT-inference demo来完成整个过程
需要安装的依赖包括,cuda,cudnn,opencv,yaml-cpp,tensorrt
tensorrt-inference下载目录:https://github.com/linghu8812/tensorrt_inference
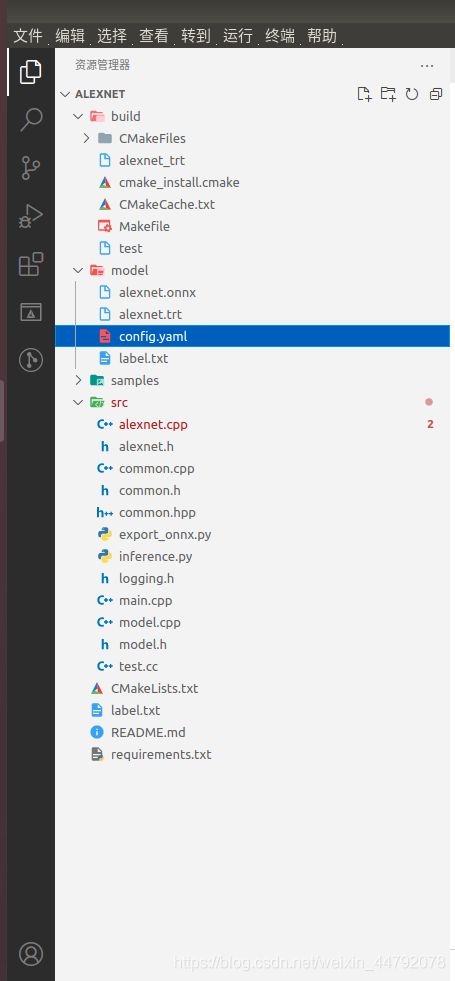
这是我编写的目录结构,src里面放所有项目相关的cpp文件,model里放.onnx模型、标签lable和config.yaml配置文件
根据自己的实际情况,编写yaml和lable标签,然后编辑好alexnet.cpp
#include "alexnet.h"
#include "yaml-cpp/yaml.h"
#include "common.h"
#include
#include

using namespace std;


int activation_function_softmax(vector &src, vector &dst)
{
    float denominator = 0.0f;

    for (int i = 0; i < src.size(); i++) {
        // dst[i] = std::exp(src[i]);
        dst.push_back(exp(src[i]));
        denominator += exp(src[i]);
    }

    for (int i = 0; i < src.size(); ++i) {
        dst[i] /= denominator;
    }

    return 0;
}

AlexNet::AlexNet(const std::string &config_file) {
    YAML::Node root = YAML::LoadFile(config_file);
    YAML::Node config = root["alexnet"];
    onnx_file = config["onnx_file"].as();
    engine_file = config["engine_file"].as();
    labels_file = config["labels_file"].as();
    BATCH_SIZE = config["BATCH_SIZE"].as();
    INPUT_CHANNEL = config["INPUT_CHANNEL"].as();
    IMAGE_WIDTH = config["IMAGE_WIDTH"].as();
    IMAGE_HEIGHT = config["IMAGE_HEIGHT"].as();
    img_mean = config["img_mean"].as>();
    img_std = config["img_mean"].as>();
    imagenet_labels = readImageNetLabel(labels_file);
}

AlexNet::~AlexNet() = default;

bool AlexNet::InferenceFolder(const std::string &folder_name) {
    std::vector sample_images = readFolder(folder_name);
    //get context
    assert(engine != nullptr);
    context = engine->createExecutionContext();
    assert(context != nullptr);

    //get buffers
    assert(engine->getNbBindings() == 2);
    void *buffers[2];
    std::vector bufferSize;
    int nbBindings = engine->getNbBindings();
    bufferSize.resize(nbBindings);

    for (int i = 0; i < nbBindings; ++i) {
        nvinfer1::Dims dims = engine->getBindingDimensions(i);
        nvinfer1::DataType dtype = engine->getBindingDataType(i);
        int64_t totalSize = volume(dims) * 1 * getElementSize(dtype);
        bufferSize[i] = totalSize;
        std::cout << "binding" << i << ": " << totalSize << std::endl;
        cudaMalloc(&buffers[i], totalSize);
    }

    //get stream
    cudaStream_t stream;
    cudaStreamCreate(&stream);

    int outSize = bufferSize[1] / sizeof(float) / BATCH_SIZE;

    EngineInference(sample_images, outSize, buffers, bufferSize, stream);

    // release the stream and the buffers
    cudaStreamDestroy(stream);
    cudaFree(buffers[0]);
    cudaFree(buffers[1]);

    // destroy the engine
    context->destroy();
    engine->destroy();
}

void AlexNet::EngineInference(const std::vector &image_list, const int &outSize, void **buffers,
                              const std::vector &bufferSize, cudaStream_t stream) {
    int index = 0;
    int batch_id = 0;
    std::vector vec_Mat(BATCH_SIZE);
    float total_time = 0;
    for (const std::string &image_name : image_list)
    {
        index++;
        std::cout << "Processing: " << image_name << std::endl;
        cv::Mat src_img = cv::imread(image_name);
        if (src_img.data)
        {
            cv::cvtColor(src_img, src_img, cv::COLOR_BGR2RGB);
            vec_Mat[batch_id] = src_img.clone();
            batch_id++;
        }
        if (batch_id == BATCH_SIZE or index == image_list.size())
        {
            auto t_start_pre = std::chrono::high_resolution_clock::now();
            std::cout << "########################################" << std::endl;
            std::cout << "prepareImage" << std::endl;
            std::vectorcurInput = prepareImage(vec_Mat);
            auto t_end_pre = std::chrono::high_resolution_clock::now();
            float total_pre = std::chrono::duration(t_end_pre - t_start_pre).count();
            std::cout << "prepare image take: " << total_pre << " ms." << std::endl;
            total_time += total_pre;
            batch_id = 0;
            if (!curInput.data()) {
                std::cout << "prepare images ERROR!" << std::endl;
                continue;
            }
            // DMA the input to the GPU,  execute the batch asynchronously, and DMA it back:
            std::cout << "host2device" << std::endl;
            cudaMemcpyAsync(buffers[0], curInput.data(), bufferSize[0], cudaMemcpyHostToDevice, stream);

            // do inference
            std::cout << "execute" << std::endl;
            auto t_start = std::chrono::high_resolution_clock::now();
            context->execute(BATCH_SIZE, buffers);
            auto t_end = std::chrono::high_resolution_clock::now();
            float total_inf = std::chrono::duration(t_end - t_start).count();
            std::cout << "Inference take: " << total_inf << " ms." << std::endl;
            total_time += total_inf;
            std::cout << "execute success" << std::endl;
            std::cout << "device2host" << std::endl;
            std::cout << "post process" << std::endl;
            auto r_start = std::chrono::high_resolution_clock::now();
            float out[outSize * BATCH_SIZE];
            cudaMemcpyAsync(out, buffers[1], bufferSize[1], cudaMemcpyDeviceToHost, stream);
            cudaStreamSynchronize(stream);

            for (int i = 0; i < BATCH_SIZE; i++)
            {
                float *ptr = out + i * outSize;
                vector src_scores, dst_scores;
                for (size_t j = 0; j < outSize; j++)
                {
                    src_scores.push_back(ptr[j]);
                }
                activation_function_softmax(src_scores, dst_scores);

                auto result = std::max_element(out + i * outSize, out + (i + 1) * outSize);
                std::string result_name = imagenet_labels[result - (out + i * outSize)];
                std::cout << "result: " << result_name;
                cout << ", score: " << dst_scores[result - (out + i * outSize)] << std::endl;
            }

            auto r_end = std::chrono::high_resolution_clock::now();
            float total_res = std::chrono::duration(r_end - r_start).count();
            std::cout << "Post process take: " << total_res << " ms." << std::endl;
            std::cout << "########################################" << std::endl;
            total_time += total_res;
            vec_Mat = std::vector(BATCH_SIZE);
        }
    }
    std::cout << "Average processing time is " << total_time / image_list.size() << "ms" << std::endl;
}

std::vector AlexNet::prepareImage(std::vector &vec_img) {
    std::vector result(BATCH_SIZE * IMAGE_WIDTH * IMAGE_HEIGHT * INPUT_CHANNEL);
    float *data = result.data();
    for (const cv::Mat &src_img : vec_img)
    {
        if (!src_img.data)
            continue;
        cv::Mat flt_img;
        cv::resize(src_img, flt_img, cv::Size(IMAGE_WIDTH, IMAGE_HEIGHT));
        flt_img.convertTo(flt_img, CV_32FC3, 1.0 / 255);

        //HWC TO CHW
        std::vector split_img(INPUT_CHANNEL);
        cv::split(flt_img, split_img);

        int channelLength = IMAGE_WIDTH * IMAGE_HEIGHT;
        for (int i = 0; i < INPUT_CHANNEL; ++i)
        {
            split_img[i] = (split_img[i] - img_mean[i]) / img_std[i];
            memcpy(data, split_img[i].data, channelLength * sizeof(float));
            data += channelLength;
        }
    }
    return result;
}
编写cmakelists
# 声明要求的cmake最低版本
cmake_minimum_required(VERSION 3.5)
# 声明一个cmake工程
project(alexnet_trt)
# 添加c++标准支持
set(CMAKE_CXX_STANDARD 14)
add_definitions(-w)

# CUDA
find_package(CUDA REQUIRED)

# OpenCV
find_package(OpenCV REQUIRED)
#yaml-cpp
find_package(yaml-cpp REQUIRED)
# 头文件
include_directories(alexnet_trt
    ${YAML_INCLUDE_DIRS}
    ${CUDA_INCLUDE_DIRS}
    ${OpenCV_INCLUDE_DIRS}
    ${YAML_INCLUDE}
    /home/lichunlin16/TensorRT-7.0.0.11/include
)

link_directories(
    ${YAML_LIB_DIR}
    /home/lichunlin16/TensorRT-7.0.0.11/lib
)
# 将所有.cpp文件都放到src里面
file(GLOB sources src/*.cpp)
# 可执行文件生成
add_executable(alexnet_trt ${sources})
# 这个可执行文件所需的库(一般就是刚刚生成的工程的库)
target_link_libraries(alexnet_trt
    ${YAML_CPP_LIBRARIES}
    ${OpenCV_LIBRARIES}
    ${CUDA_LIBRARIES}
    nvinfer
    nvinfer_plugin
    nvonnxparser
    nvparsers
    yaml-cpp
)
# 可执行文件生成
add_executable(test src/test.cc)
编写好后
cd alexnet
mkdir biuld
cd biuld
cmake ..
make
sudo make install
编译无误
然后./alexnet_trt ../model/config.yaml ../samples/
此时在model目录下,会生成.trt文件
在biuld目录下,会生成alexnet_trt可执行文件
打印出你的分类结果和耗时
最终结果
在pytorch上检测一张图片耗时大概3ms一张,转到tensorRT后检测一张图片只需要0.6ms,实时性得到肉眼可见的提升


