SpringBoot发送邮件
目录
-
-
- 一、pom.xml
- 二、application.yml
-
- 1、QQ邮箱
- 2、163网易邮箱
- 3、支持SSL安全发送
- 三、代码
-
- 1、普通文本
- 2、附件
- 3、HTML
- 4、Thymeleaf模板
- 四、参考链接
-
一、pom.xml
<dependencies>
	<!-- 启动依赖 -->
    <dependency>
        <groupId>org.springframework.boot</groupId>
        <artifactId>spring-boot-starter</artifactId>
    </dependency>

	<!-- web项目依赖 -->
    <dependency>
        <groupId>org.springframework.boot</groupId>
        <artifactId>spring-boot-starter-web</artifactId>
    </dependency>

	<!-- 测试依赖 -->
    <dependency>
        <groupId>org.springframework.boot</groupId>
        <artifactId>spring-boot-starter-test</artifactId>
       	<!-- 范围:测试,只有测试的时候采用,打包的时候就不用了 -->
        <scope>test</scope>
    </dependency>

	<!-- thymeleaf依赖,html代码要用到 -->
    <dependency>
        <groupId>org.springframework.boot</groupId>
        <artifactId>spring-boot-starter-thymeleaf</artifactId>
    </dependency>

	<!-- springboot集成email发送依赖 -->
    <dependency>
        <groupId>org.springframework.boot</groupId>
        <artifactId>spring-boot-starter-mail</artifactId>
    </dependency>
</dependencies>
二、application.yml
1、QQ邮箱
application.xml:
spring:
  mail:
  	# 默认编码
    default-encoding: UTF-8
    # 发送邮件服务器主机名,定值,来自QQ邮箱官网
    host: smtp.qq.com
    # QQ邮箱账号,你自己的奥
    username: QQ邮箱账号
    # 来自QQ邮箱官网的授权码,不是QQ邮箱密码奥
    password: 授权码
例如(以下为伪数据,测试请使用自己的真实数据):
spring:
  mail:
    default-encoding: UTF-8
    host: smtp.qq.com
    username: 2194615008@qq.com
    password: ssuocdowsdffdvdj
解释授权码:
如果获取授权码过程中需要你进行手机认证或者QQ安全中心的手机令牌,去按照说明验证就是了,下面不在提醒。
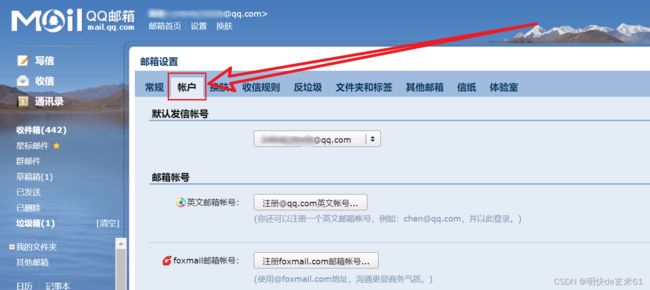
在百度上搜索 “QQ邮箱” ,进入官网并登录,点击 设置 ,如下图:

点击账户,如下:
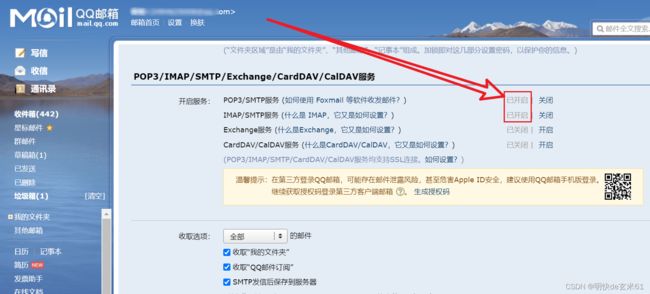
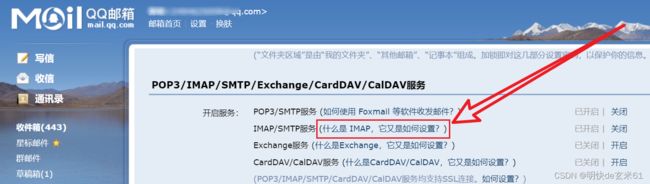
往下滑动页面,找到 “POP3/IMAP/SMTP/Exchange/CardDAV/CalDAV服务” ,开启 “POP3/SMTP服务” 和 “IMAP/SMTP服务”,如下图:
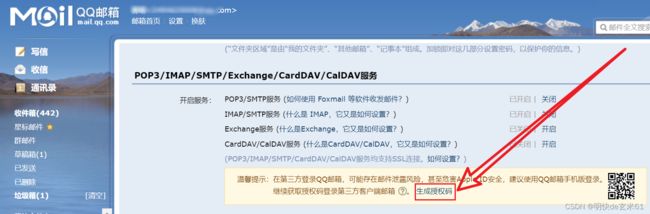
点击生成授权码,并复制授权码,如下:
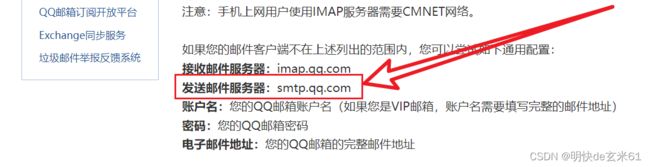
解释发送邮件服务器主机名:
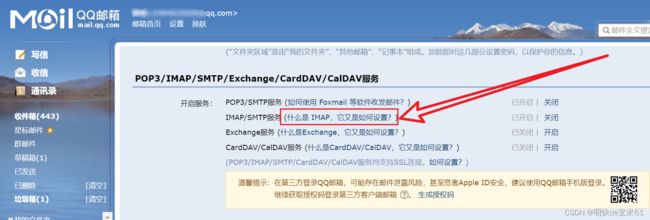
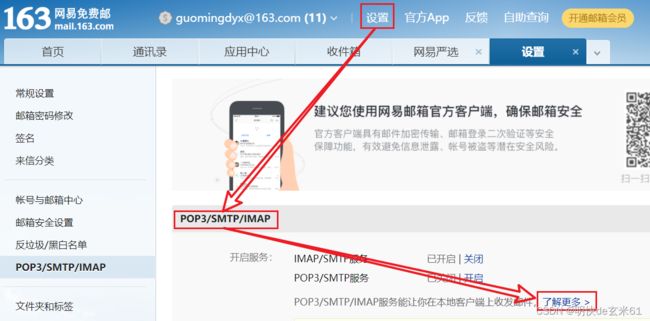
找到上面提到的开启服务的地方,点击链接如下图:
往下滑动,找到如下位置:
2、163网易邮箱
application.xml:
spring:
  mail:
  	# 默认编码
    default-encoding: UTF-8
    # 发送邮件服务器主机名,定值,来自163网易邮箱官网
    host: smtp.163.com
    # 163网易邮箱账号,你自己的奥
    username: QQ邮箱账号
    # 来自163网易邮箱官网的授权码,不是163网易邮箱密码奥
    password: 授权码
例如(以下为伪数据,测试请使用自己的真实数据):
spring:
  mail:
    default-encoding: UTF-8
    host: smtp.163.com
    username: gsfstngdffx@163.com
    password: OTRJJOOKLQDFETBE
解释授权码:
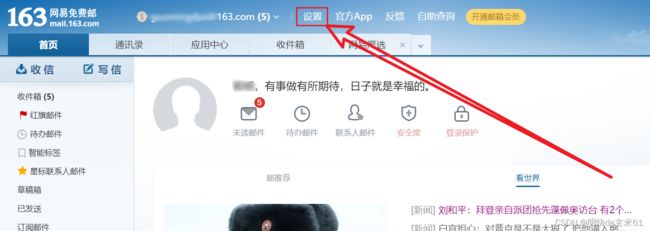
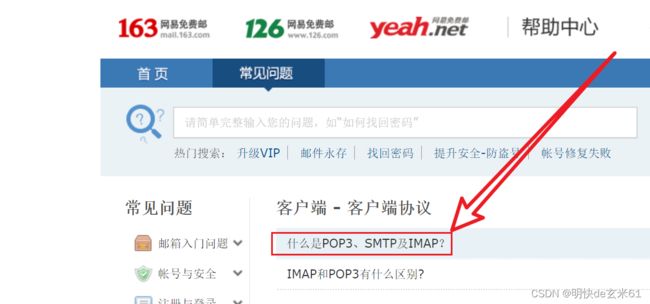
在百度上搜索 “163邮箱” ,进入官网并登录,点击 设置 ,如下图:
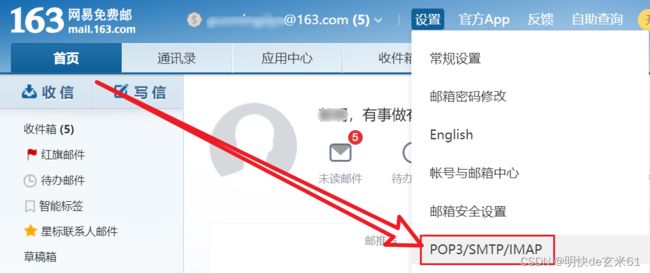
点击POP3/SMTP/IMAP,如下:
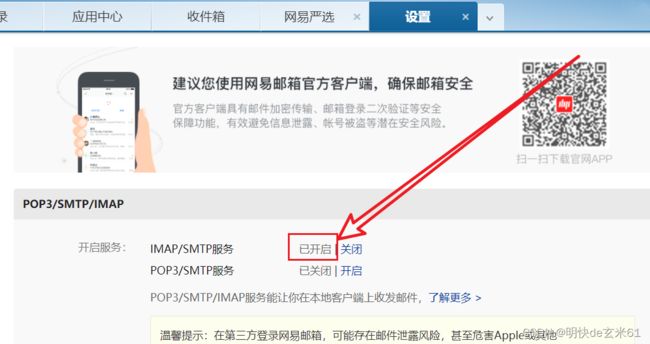
开启IMAP/SMTP服务,可能需要使用手机发送验证码,按照要求发送就是了,如下:
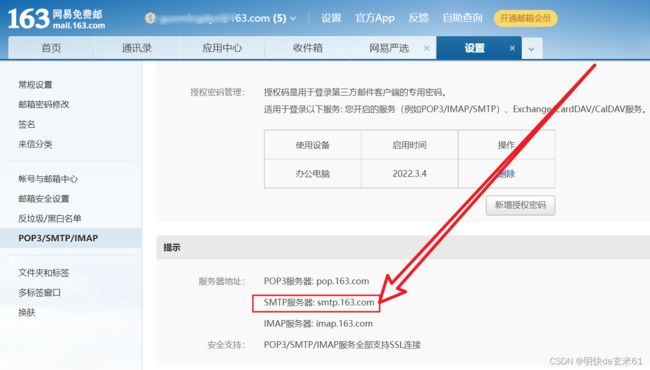
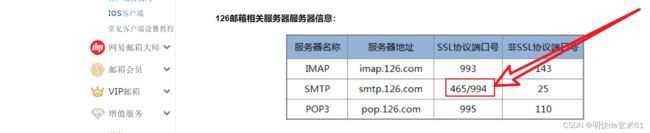
解释发送邮件服务器主机名:
依然是上面的页面,往下面滑动一下,即可看到如下内容:
3、支持SSL安全发送
QQ邮箱(相比上面伪例,增加了port和properties):
spring:
  mail:
    default-encoding: UTF-8
    host: smtp.qq.com
    username: 2194615008@qq.com
    password: ssuocdowsdffdvdj
    # 端口号465或587,但是经过我的测试,发现只有587能用
    port: 587
    # 使用SSL方式
    properties:
      mail:
        smtp:
          socketFactory:
            class: javax.net.ssl.SSLSocketFactory
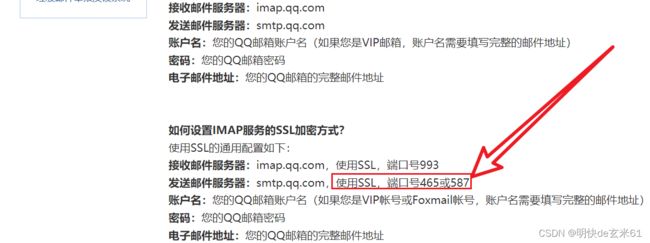
其中端口来自于:
往下滑动就可以看到如下内容:
网易邮箱(相比上面伪例,增加了port和properties):
spring:
  mail:
    default-encoding: UTF-8
    host: smtp.163.com
    username: gsfstngdffx@163.com
    password: OTRJJOOKLQDFETBE
    # 端口号465或944,但是经过我的测试,发现两个都能用
    port: 944
    # 使用SSL方式
    properties:
      mail:
        smtp:
          socketFactory:
            class: javax.net.ssl.SSLSocketFactory
其中端口来自于:
点击第一个,如下:
往下滑动,如下:
三、代码
说明:pom.xml 和 application.yml 在上面已经说过了,这里不在赘述
1、普通文本
代码:
@SpringBootTest
class EmailDemoApplicationTests {
@Autowired
private JavaMailSender mailSender;
// 发件人邮箱账号
private String from = "[email protected]";
// 收件人邮箱账号
private String[] to = {"[email protected]"};
// 抄送人邮箱账号
private String[] cc = {"[email protected]"};
// 隐秘抄送人邮箱账号
private String[] bcc = {"[email protected]"};
@Test
void testSimpleSend() throws ParseException {
SimpleMailMessage message = new SimpleMailMessage();
// 发件人,不能省略
message.setFrom(from);
// 收件人,可以是多个,不能省略
message.setTo(to);
// 邮件标题,可以省略,省略之后展示的是:<无标题>
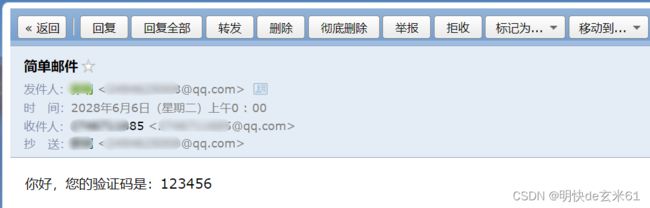
message.setSubject("简单邮件");
// 邮件正文,一定不能少,不然会报错,不能省略
message.setText("你好,您的验证码是:" + "123456");
// 设置邮件抄送人,可以有多个,可以省略
message.setCc(cc);
// 设置隐秘抄送人,可以有多个,可以省略
message.setBcc(bcc);
// 发送时间,这样设置的目的:告诉你可以自由设置,可以省略
message.setSentDate(new SimpleDateFormat("yyyy-MM-dd HH:mm:ss").parse("2028-06-06 00:00:00"));
// 发送
mailSender.send(message);
}
}
结果:
2、附件
代码:
@SpringBootTest
class EmailDemoApplicationTests {
@Autowired
private JavaMailSender mailSender;
// 发件人邮箱账号
private String from = "[email protected]";
// 收件人邮箱账号
private String[] to = {"[email protected]"};
@Test
void testEnclosureSend() throws Exception {
// 复杂邮件对象
MimeMessage message = mailSender.createMimeMessage();
// MimeMessageHelper对象,用来组装复杂邮件,其中构建方法中第二个参数为true,代表支持替代文本、内联元素和附件
MimeMessageHelper helper = new MimeMessageHelper(message, true);
// 发件人,不能省略
helper.setFrom(from);
// 收件人,可以是多个,不能省略
helper.setTo(to);
// 邮件标题,可以省略,省略之后展示的是:<无标题>
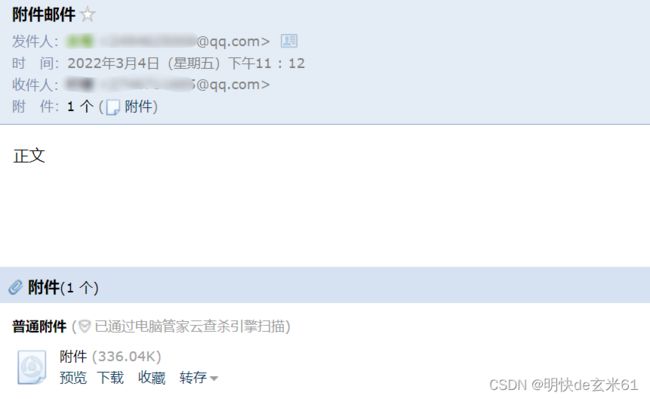
helper.setSubject("附件邮件");
// 邮件正文,一定不能少,不然会报错,不能省略
helper.setText("正文");
// 添加附件,第一个参数是附件名称,第二个参数是附件对象
helper.addAttachment("附件", new File("C:\\Users\\mingming\\Pictures\\Camera Roll\\infinity-5510936.jpg"));
// 发送
mailSender.send(message);
}
}
结果:
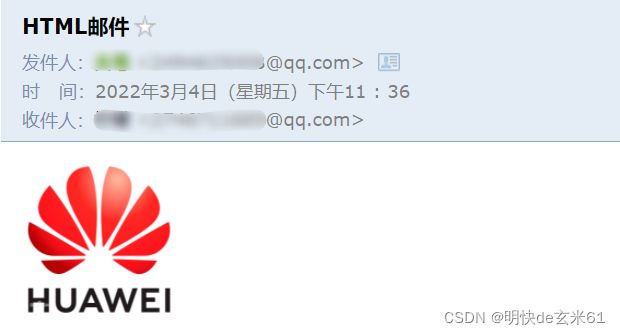
3、HTML
代码:
@SpringBootTest
class EmailDemoApplicationTests {
@Autowired
private JavaMailSender mailSender;
// 发件人邮箱账号
private String from = "[email protected]";
// 收件人邮箱账号
private String[] to = {"[email protected]"};
@Test
void testComplexSend() throws Exception {
// 复杂邮件对象
MimeMessage message = mailSender.createMimeMessage();
// MimeMessageHelper对象,用来组装复杂邮件,其中构建方法中第二个参数为true,代表支持替代文本、内联元素和附件
MimeMessageHelper helper = new MimeMessageHelper(message, true);
// 发件人,不能省略
helper.setFrom(from);
// 收件人,可以是多个,不能省略
helper.setTo(to);
// 邮件标题,可以省略,省略之后展示的是:<无标题>
helper.setSubject("HTML邮件");
// cid:是占位符,huawei代表helper.addInline(XXX)方法中的第一个参数名称
String text = " ";
// 邮件正文,不可省略,可以发送html文本,需要第二个参数为true
helper.setText(text,true);
// 注意:下面的占位符值一定放在helper.setText()后面,否则文件无法放入邮件中
// 文件资源
FileSystemResource resource = new FileSystemResource(new File("C:\\Users\\mingming\\Pictures\\Camera Roll\\huawei.png"));
// 添加占位符参数,其中第一个参数是占位符,第二个参数是文件资源
helper.addInline("huawei", resource);
// 发送
mailSender.send(message);
}
}
";
// 邮件正文,不可省略,可以发送html文本,需要第二个参数为true
helper.setText(text,true);
// 注意:下面的占位符值一定放在helper.setText()后面,否则文件无法放入邮件中
// 文件资源
FileSystemResource resource = new FileSystemResource(new File("C:\\Users\\mingming\\Pictures\\Camera Roll\\huawei.png"));
// 添加占位符参数,其中第一个参数是占位符,第二个参数是文件资源
helper.addInline("huawei", resource);
// 发送
mailSender.send(message);
}
}
结果:
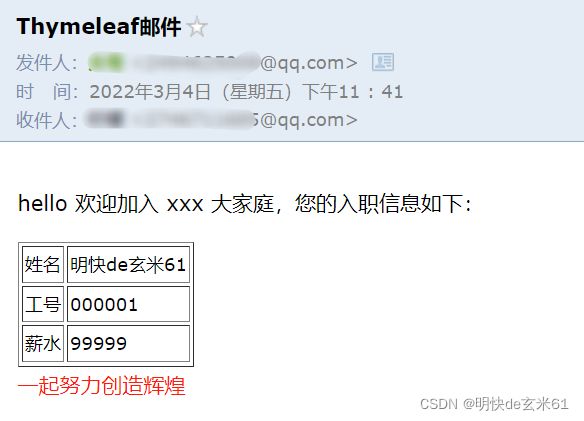
4、Thymeleaf模板
java代码:
@SpringBootTest
class EmailDemoApplicationTests {

    @Autowired
    private JavaMailSender mailSender;

	@Autowired
    TemplateEngine templateEngine;

    // 发件人邮箱账号
    private String from = "[email protected]";

    // 收件人邮箱账号
    private String[] to = {"[email protected]"};

    @Test
    void testThymeleafSend() throws Exception {// 复杂邮件对象
        MimeMessage message = mailSender.createMimeMessage();
        // MimeMessageHelper对象,用来组装复杂邮件,其中构建方法中第二个参数为true,代表支持替代文本、内联元素和附件
        MimeMessageHelper helper = new MimeMessageHelper(message, true);
        // 发件人,不能省略
        helper.setFrom(from);
        // 收件人,可以是多个,不能省略
        helper.setTo(to);
        // 邮件标题,可以省略,省略之后展示的是:<无标题>
        helper.setSubject("Thymeleaf邮件");
        // 引入Template的Context
        Context context = new Context();
        // 设置模板中的变量
        context.setVariable("username", "明快de玄米61");
        context.setVariable("num","000001");
        context.setVariable("salary", "99999");
        // 获取thymeleaf模板的html文本,其中第一个参数为模板名称,指向resources中的templates目录中的html文档,第二个参数是Context对象
        String html = templateEngine.process("test.html", context);
        // 邮件正文,不可省略,可以发送html文本,需要第二个参数为true
        helper.setText(html,true);

        // 发送
        mailSender.send(message);
    }
}
html代码:
<!DOCTYPE html>
<html lang="en" xmlns:th="http://www.thymeleaf.org">
<head>
    <meta charset="UTF-8">
    <title>Title</title>
</head>
<body>
<p>hello 欢迎加入 xxx 大家庭,您的入职信息如下:</p>
<table border="1">
    <tr>
        <td>姓名</td>
        <td th:text="${username}"></td>
    </tr>
    <tr>
        <td>工号</td>
        <td th:text="${num}"></td>
    </tr>
    <tr>
        <td>薪水</td>
        <td th:text="${salary}"></td>
    </tr>
</table>
<div style="color: #ff1a0e">一起努力创造辉煌</div>
</body>
</html>
位置如下:

结果:
四、参考链接
Spring Boot中使用JavaMailSender发送邮件
springboot发送邮件的几种方式