Vite + Vue3.0 项目基础结构
此文章为学习笔记
原文章链接:备战2021:Vite2项目最佳实践
目录:
+ 定义别名
+ 路由
+ 数据请求封装
+ Mock 插件应用
+ 状态管理
+ 样式管理
+ 导入 UI 库
Vite + Vue3.0
定义别名
定义前:页面中引入组件的路径是相对路径或绝对路径。
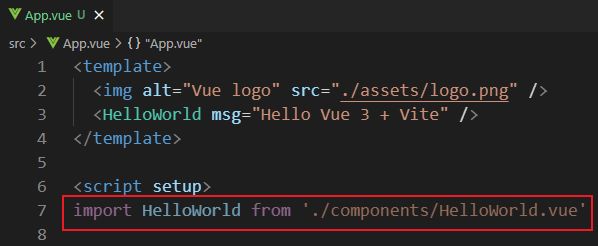
定义方法:

此时
comps就指向了路径/src/components。
在页面中使用:

注意:修改
vite.config.js配置文件需要重启项目。
路由
安装路由
$ npm install vue-router@next -S -D
配置路由
/src/router/index.js
import { createRouter, createWebHashHistory } from 'vue-router';

const router = createRouter({
  history: createWebHashHistory(),
  routes: [
    // @ 是 /src 的别名
    { path: '/', component: () => import('@/views/Home.vue') },
    { path: '/user', component: () => import('@/views/User.vue') }
  ]
})

export default router
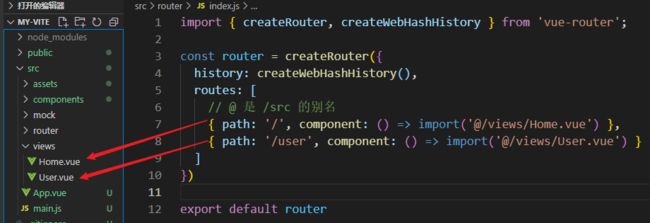
配置 main.js
import router from "@/router"
createApp(App).use(router).mount('#app')

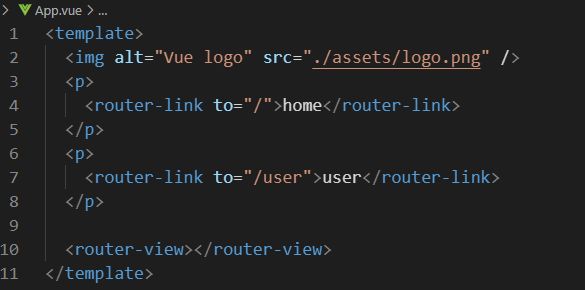
使用
App.vue
效果

数据请求封装
统一封装数据请求服务,有利于解决以下问题:
- 统一配置请求
- 请求、响应统一处理
安装 axios
$ npm install axios -S -D
配置生产环境文件
在根目录下添加配置文件 .env.development
VITE_APP_BASE_API= '请求的 baseURL'

注意:修改该文件后需要重启项目。
请求封装
utils/request.js
import axios from 'axios'

// 创建 axios 实例
const service = axios.create({
  // 在请求地址前面加上 baseURL
  baseURL: import.meta.env.VITE_APP_BASE_API,
  // 请求超时时间
  timeout: 5000
})

// 请求拦截
service.interceptors.request.use(
  (config) => {
    // 在请求前做某些事情
    return config
  },
  (error) => {
    // 处理请求错误
    return Promise.reject(error)
  }
)

// 响应拦截器
service.interceptors.response.use(
  (response) => {
    // 响应成功
    return response
  },
  (error) => {
    // 处理响应错误
    return Promise.reject(error)
  }
)

export default service
封装第一个接口
api/user.js
import service from '@/utils/request.js'

export const getUsers = (params) => {
  return service({
    url: '/getUsers',
    method: 'get',
    params
  })
}
效果
App.vue
<script setup>
import { getUsers } from '@/api/user.js'

getUsers()
  .then(() => {
    console.log('请求成功')
  })
  .catch(() => {
    console.log('请求失败')
  })
</script>

接口不存在,报错是正常的。
目录结构变化

Mock 插件应用
安装插件
$ npm install mockjs -D
$ npm install vite-plugin-mock cross-env -D
配置 package.json
"scripts": {
  "dev": "cross-env NODE_ENV=development vite",
}
配置 vite-config.js
import { viteMockServe } from 'vite-plugin-mock'

export default defineConfig({
  // supportTs: 是否用了ts,可以根据自己选择 true or false
  plugins: [ viteMockServe({ supportTs: trues }) ]
})
封装 user.ts 文件
/mock/user.ts( 与node_modules 目录同级 )
// user.ts
import { MockMethod } from 'vite-plugin-mock'

export default [
  {
    url: '/api/getUsers',
    method: 'get',
    response: () => {
      return {
        code: 0,
        message: 'ok',
        data: [
          { name: 'zlz', age: 17 },
          { name: 'sjw', age: 18 }
        ]
      }
    }
  }
] as MockMethod[]
使用
App.vue


在数据请求封装步骤中请求失败的接口已经可以拿到
user.ts文件模拟的数据了。
状态管理
安装 Vuex
$ npm install vuex@next -S -D
配置 Vuex
/src/store/index.js
import { createStore } from 'vuex'

const store = createStore({
  state: {
    count: 10
  }
})

export default store
配置 main.js
import store from '@/store'

createApp(App).use(store).mount('#app')
使用
App.vue

效果

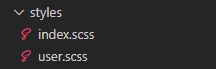
样式管理
安装 sass
$ npm install sass -S -D
配置样式
index.scss:全局样式
user.scss:单文件样式
// index.scss
* {
  background-color: beige;
}

// user.scss
.container {
  background-color: rgb(88, 228, 60);
}
使用
User.vue
<style scoped>
@import 'styles/user.scss';  // styles 是 /src/styles 的别名,记得在 vite.config.js 添加
</style>
效果

导入UI库
UI 库采用了 element3
安装
$ npm install -S -D
按需引入
// 引入完整样式
import 'element3/lib/theme-chalk/index.css'
// 按需引入组件
import { ElButton } from 'element3'

createApp(App)
  .use(ElButton)
  .mount('#app')

使用

效果

有错误的地方欢迎大家指出,