使用vite搭建vue3.0项目
vite和vue3已经出来有段时间了,最近一直忙着没时间搞一下,最近搞了一个还不错
安装vite下载模板
vite中文文档:https://cn.vitejs.dev/guide/
vue3中文文档:https://vue3js.cn/docs/zh/guide/introduction.html
通过在vscode中运行以下命令,可以使用 Vite 快速构建 Vue 项目
1、安装一下:npm init vite-app 你的项目名字
2、进入项目:cd
3、安装依赖:npm install
4、运行:npm run dev
2、安装vue全家桶
1、安装router:npm install vue-router@4,这是新版本的router,写法和之前的不一样,下面会说到
2、安装vuex:npm install vuex@next --save
3、安装vue-axios:npm install --save axios vue-axios
路由代码
路由这里路径最好配置一下别名,这样方便,最后挂载到main.js中
import { createRouter, createWebHashHistory } from 'vue-router'

const router = createRouter({
    history: createWebHashHistory(),
    routes: [
        {
            path: '/',
            redirect: '/index'
        },
        {
            path: '/index',
            name: 'index',
            component: () => import('../views/index.vue')
        },
        {
            path: '/my',
            name: 'my',
            component: () => import('../views/my.vue')
        }
    ]
})

export default router
vuex代码
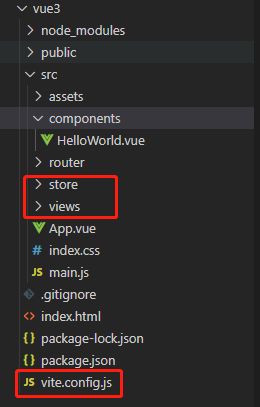
安装完成后引入vuex,写法也和之前的不一样了,我是分成了4个文件来写的,代码比较简单,最后记得挂载到main.js
index.js
import { createStore } from 'vuex'
import state from './state'
import actions from './actions'
import mutations from './mutations'

export default createStore({
  state,
  mutations,
  actions,
  modules: {}
})
state.js
export default {
  info: null
}
getters.js
export const getInfo = state => state.info
action.js
import { getCart } from '../service/cart'

export default {
  async updateCart(ctx) {
    const { data } = await getCart()
    ctx.commit('addCart', {
      count: data.length || 0
    })
  }
}
mutations.js
export default {
  addCart (state, payload) {
    state.info = payload.count
  }
}
main.js代码
import { createApp } from 'vue'
import App from './App.vue'
import './index.css'
import router from './router/index'

// import 'vant/lib/index.css'
import { ActionBar, Button } from 'vant'

const app = createApp(App)
app.use(router)

app.use(ActionBar)
    .use(Button)

app.mount('#app')
3、安装vant
vue3项目使用:npm i vant@next -S命令
然后我们需要按需引入组件,如果你是用脚手架创建的,用babel-plugin-import这个插件就ok
我的是babel7 的用户,在 babel.config.js 中配置
module.exports = {
  plugins: [
    [
      'import',
      {
        libraryName: 'vant',
        libraryDirectory: 'es',
        style: true,
      },
      'vant',
    ]
  ]
}
但是,我们用的是vite搭建的!!!!!!,所以上面的方法不行
vite创建的要用这个插件: vite-plugin-style-import
安装命令:npm i vite-plugin-style-import -D
GitHub地址:https://github.com/anncwb/vite-plugin-style-import
然后我们新建vite.config.js进行配置
import vue from '@vitejs/plugin-vue'
import styleImport from 'vite-plugin-style-import'

export default {
    plugins: [
        styleImport({
            libs: [
                {
                    libraryName: 'vant',
                    esModule: true,
                    resolveStyle: (name) => {
                        return `vant/es/${name}/style`;
                    },
                },
            ]
        })
    ]
}
其他UI框架配置
plugins: [
      styleImport({
        libs: [
          {
            libraryName: 'ant-design-vue',
            esModule: true,
            resolveStyle: (name) => {
              return `ant-design-vue/es/${name}/style/index`;
            },
          },
          {
            libraryName: 'antd',
            esModule: true,
            resolveStyle: (name) => {
              return `antd/es/${name}/style/index`;
            },
          },
          {
            libraryName: 'element-plus',
            resolveStyle: (name) => {
              return `element-plus/lib/theme-chalk/${name}.css`;
            },
            resolveComponent: (name) => {
              return `element-plus/lib/${name}`;
            },
          },
        ],
      }),
    ],
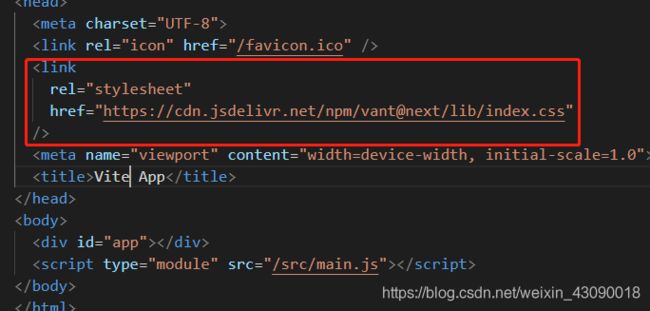
搞了半天没弄出来,最后在index.html直接用cdn引入了,有知道原因的欢迎在下面留言

别名配置:
const path = require('path')
import vue from '@vitejs/plugin-vue'

export default {
  plugins: [vue()],
  alias: {
    '@': path.resolve(__dirname, './src')
  }
}

