javaWeb项目部署到阿里云服务Linux系统
项目部署到阿里云Linux系统
前言:
如果没有购买到云服务器的话也可以在虚拟机中进行部署,环境搭配等等都是一样的操作
我的阿里云服务器配置:
系统:CentOS:7.9 64位
CPU&内存:2核(vCPU) 2 GiB
本地电脑连接软件以及上传文件软件:Xshall7&Xftp7或者FinalShell3.9.2.2(推荐)
本次部署是从零开发,所以前面会先如果安装部署所需要的运行环境
1、在虚拟机中创建一个指定安装软件的目录
# 创建CustomSoftware目录
[root@Zcl2001 ~]# mkdir /usr/local/CustomSoftware
# 进入CustomSoftware目录
[root@Zcl2001 ~]# cd /usr/local/CustomSoftware
# 查看目录文件
[root@Zcl2001 CustomSoftware]# ll
总用量 0
[root@Zcl2001 CustomSoftware]#
2、安装项目部署的java1.8环境
我们的项目是java开发的,所以虚拟机中也必须要有jdk该运行环境开可以正常的运行,同时后面还需要安装zookeeper都是要依赖与java的,安装的版本为1.8(网上搜索下载)
2.1、上传文件
2.2、解压文件
1、运行前置目录查看是否有安装的jdk
[root@Zcl2001 CustomSoftware]# java
-bash: java: 未找到命令
[root@Zcl2001 CustomSoftware]# javac
-bash: javac: 未找到命令
[root@Zcl2001 CustomSoftware]#
2、运行命令进行解压并删除原来文件
# 解压文件
[root@Zcl2001 CustomSoftware]# tar -zxvf jdk1.8-linux-x64.tar.gz
# 修改解压后的文件夹名称
[root@Zcl2001 CustomSoftware]# mv jdk1.8.0_333/ jdk1.8
[root@Zcl2001 CustomSoftware]# ll
总用量 144544
drwxr-xr-x 8 10143 10143      4096 4月  26 14:03 jdk1.8
# 删除原来文件
[root@Zcl2001 CustomSoftware]# rm -f jdk1.8-linux-x64.tar.gz
2.3、配置JDK环境变量
Linux的环境变量配置文件在
/etc/profile中,通过编辑进入里面进行添加修改即可
进入环境变量文件
进入文件后只能查看不能编辑,需要按住键盘上的Ins键切换编辑状态
# 进入文件
[root@Zcl2001 CustomSoftware]# vim /etc/profile
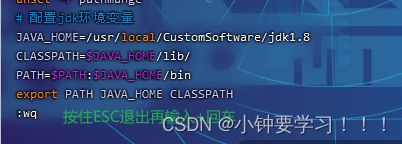
配置jdk环境变量
# 配置jdk环境变量
JAVA_HOME=/usr/local/CustomSoftware/jdk1.8
CLASSPATH=$JAVA_HOME/lib/
PATH=$PATH:$JAVA_HOME/bin
export PATH JAVA_HOME CLASSPATH
退出编辑编辑
使配置环境生效
[root@Zcl2001 CustomSoftware]# source /etc/profile
测试java环境是否成功
# 测试java
[root@Zcl2001 CustomSoftware]# java
# 测试javac编译环境
[root@Zcl2001 CustomSoftware]# javac
# 查看java版本
[root@Zcl2001 CustomSoftware]# java -version
3、RPM安装MySQL8.0.29数据库
mysql是项目的数据核心,没有数据库项目也就运行不了,下面将继续最新版本的数据库安装以及开放远程连接
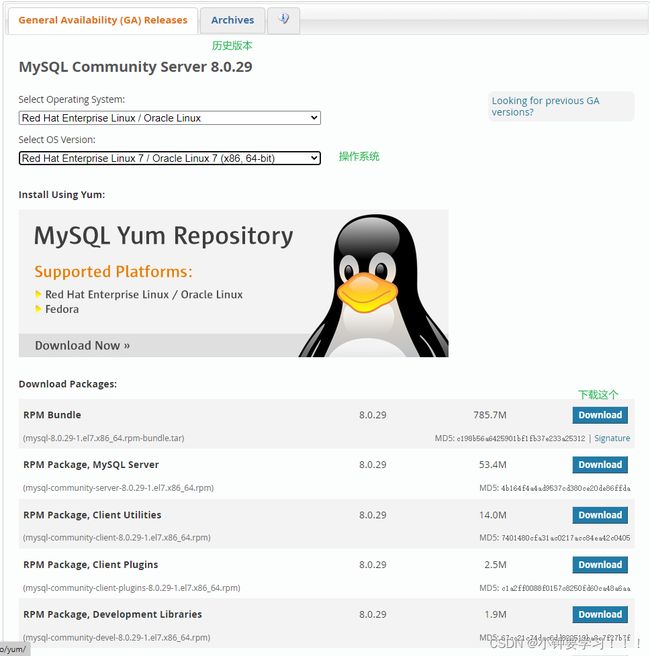
3.1、官网下载地址
MySQL :: Download MySQL Community Server
3.2、上传到Linux系统目录
1、解压文件
# 创建文件
[root@Zcl2001 CustomSoftware]# mkdir mysql8.0.29
# 解压到指定的文件
[root@Zcl2001 CustomSoftware]# tar -xvf mysql-8.0.29-1.el7.x86_64.rpm-bundle.tar -C ./mysql8.0.29
2、查看解压后的文件
# 进入文件
[root@Zcl2001 CustomSoftware]# cd mysql8.0.29/
[root@Zcl2001 mysql8.0.29]# ll
总用量 1609164
-rw-r--r-- 1 root root  823879680 7月  17 10:02 mysql-8.0.29-1.el7.x86_64.rpm-bundle.tar
-rw-r--r-- 1 7155 31415  14668996 3月  24 19:43 mysql-community-client-8.0.29-1.el7.x86_64.rpm
-rw-r--r-- 1 7155 31415   2574424 3月  24 19:43 mysql-community-client-plugins-8.0.29-1.el7.x86_64.rpm
-rw-r--r-- 1 7155 31415    648680 3月  24 19:43 mysql-community-common-8.0.29-1.el7.x86_64.rpm
-rw-r--r-- 1 7155 31415 445936940 3月  24 19:44 mysql-community-debuginfo-8.0.29-1.el7.x86_64.rpm
-rw-r--r-- 1 7155 31415   1949700 3月  24 19:44 mysql-community-devel-8.0.29-1.el7.x86_64.rpm
-rw-r--r-- 1 7155 31415   4214948 3月  24 19:44 mysql-community-embedded-compat-8.0.29-1.el7.x86_64.rpm
-rw-r--r-- 1 7155 31415   2216040 3月  24 19:45 mysql-community-icu-data-files-8.0.29-1.el7.x86_64.rpm
-rw-r--r-- 1 7155 31415   1575404 3月  24 19:45 mysql-community-libs-8.0.29-1.el7.x86_64.rpm
-rw-r--r-- 1 7155 31415    683148 3月  24 19:45 mysql-community-libs-compat-8.0.29-1.el7.x86_64.rpm
-rw-r--r-- 1 7155 31415  55984868 3月  24 19:45 mysql-community-server-8.0.29-1.el7.x86_64.rpm
-rw-r--r-- 1 7155 31415  22960584 3月  24 19:46 mysql-community-server-debug-8.0.29-1.el7.x86_64.rpm
-rw-r--r-- 1 7155 31415 270450256 3月  24 19:47 mysql-community-test-8.0.29-1.el7.x86_64.rpm
3.3、执行安装操作
1、进行安装install
[root@Zcl2001 mysql8.0.29]# yum -y install perl
2、删除mariadb
如果不删除会与mysql冲突
# 使用管道查询是否有
[root@Zcl2001 mysql8.0.29]# rpm -qa | grep mariadb
mariadb-libs-5.5.68-1.el7.x86_64
# 删除mariadb
[root@Zcl2001 mysql8.0.29]# rpm -e mariadb-libs-5.5.68-1.el7.x86_64 --nodeps
[root@Zcl2001 mysql8.0.29]# rpm -qa | grep mariadb
3、执行安装rpm安装包(有先后依赖顺序)
[root@Zcl2001 mysql8.0.29]# rpm -hiv mysql-community-common-8.0.29-1.el7.x86_64.rpm
[root@Zcl2001 mysql8.0.29]# rpm -hiv mysql-community-client-plugins-8.0.29-1.el7.x86_64.rpm
[root@Zcl2001 mysql8.0.29]# rpm -hiv mysql-community-libs-8.0.29-1.el7.x86_64.rpm
[root@Zcl2001 mysql8.0.29]# rpm -hiv mysql-community-client-8.0.29-1.el7.x86_64.rpm
[root@Zcl2001 mysql8.0.29]# rpm -hiv mysql-community-icu-data-files-8.0.29-1.el7.x86_64.rpm
[root@Zcl2001 mysql8.0.29]# rpm -hiv mysql-community-server-8.0.29-1.el7.x86_64.rpm
如果在安装
mysql-community-server-8.0.29-1.el7.x86_64.rpm出现如下错误只需运行yum install libaio代码即可[root@Zcl2001 mysql8.0.29]# rpm -hiv mysql-community-server-8.0.29-1.el7.x86_64.rpm 警告:mysql-community-server-8.0.29-1.el7.x86_64.rpm: 头V4 RSA/SHA256 Signature, 密钥 ID 3a79bd29: NOKEY 错误:依赖检测失败: libaio.so.1()(64bit) 被 mysql-community-server-8.0.29-1.el7.x86_64 需要 libaio.so.1(LIBAIO_0.1)(64bit) 被 mysql-community-server-8.0.29-1.el7.x86_64 需要 libaio.so.1(LIBAIO_0.4)(64bit) 被 mysql-community-server-8.0.29-1.el7.x86_64 需要 # 下载依赖解决 [root@Zcl2001 mysql8.0.29]# yum install libaio
3.4、运行MySQL
running状态代表启动成功
# 启动mysql
[root@Zcl2001 mysql8.0.29]# systemctl start mysqld
# 查看mysql启动状态
[root@Zcl2001 mysql8.0.29]# systemctl status mysqld
● mysqld.service - MySQL Server
   Loaded: loaded (/usr/lib/systemd/system/mysqld.service; enabled; vendor preset: disabled)
   Active: active (running) since 日 2022-07-17 10:20:25 CST; 6s ago
     Docs: man:mysqld(8)
           http://dev.mysql.com/doc/refman/en/using-systemd.html
  Process: 29755 ExecStartPre=/usr/bin/mysqld_pre_systemd (code=exited, status=0/SUCCESS)
 Main PID: 29933 (mysqld)
   Status: "Server is operational"
   CGroup: /system.slice/mysqld.service
           └─29933 /usr/sbin/mysqld

7月 17 10:20:18 Zcl2001 systemd[1]: Starting MySQL Server...
7月 17 10:20:25 Zcl2001 systemd[1]: Started MySQL Server.
[root@Zcl2001 mysql8.0.29]#
1、查看日志文件中分配的临时数据库密码
[root@Zcl2001 mysql8.0.29]# cat /var/log/mysqld.log | grep password
2022-07-17T02:20:21.441362Z 6 [Note] [MY-010454] [Server] A temporary password is generated for root@localhost: yGi,BEH)d6ti
2、用临时密码登录MySQL数据库
[root@Zcl2001 mysql8.0.29]# mysql -uroot -p
# 输入密码(不可见)
Enter password:
Welcome to the MySQL monitor.  Commands end with ; or \g.
Your MySQL connection id is 8
Server version: 8.0.29

Copyright (c) 2000, 2022, Oracle and/or its affiliates.

Oracle is a registered trademark of Oracle Corporation and/or its
affiliates. Other names may be trademarks of their respective
owners.

Type 'help;' or '\h' for help. Type '\c' to clear the current input statement.

mysql>
3、修改MySQL密码
在新版本中是有密码强度验证插件的,不能是太简单以及太短的密码
mysql> ALTER USER 'root'@'localhost' IDENTIFIED WITH MYSQL_NATIVE_PASSWORD BY 'MySQL123!';
3.1、根据上面修改密码后查看初始化的密码策略
mysql> SHOW VARIABLES LIKE 'validate_password%';
+--------------------------------------+--------+
| Variable_name                        | Value  |
+--------------------------------------+--------+
| validate_password.check_user_name    | ON     |
| validate_password.dictionary_file    |        |
| validate_password.length             | 8      |
| validate_password.mixed_case_count   | 1      |
| validate_password.number_count       | 1      |
| validate_password.policy             | MEDIUM |
| validate_password.special_char_count | 1      |
+--------------------------------------+--------+
7 rows in set (0.01 sec)
3.2、修改默认的长度和策略
# 修改策略
mysql> set global validate_password.policy = 0;
Query OK, 0 rows affected (0.00 sec)
# 修改长度
mysql> set global validate_password.length = 4;
Query OK, 0 rows affected (0.00 sec)

mysql> SHOW VARIABLES LIKE 'validate_password%';
+--------------------------------------+-------+
| Variable_name                        | Value |
+--------------------------------------+-------+
| validate_password.check_user_name    | ON    |
| validate_password.dictionary_file    |       |
| validate_password.length             | 4     |
| validate_password.mixed_case_count   | 1     |
| validate_password.number_count       | 1     |
| validate_password.policy             | LOW   |
| validate_password.special_char_count | 1     |
+--------------------------------------+-------+
7 rows in set (0.01 sec)
validate_password_policy取值
0 or LOW     只验证长度
1 or MEDIUM  验证长度、数字、大小写、特殊字符
2 or STRONG  验证长度、数字、大小写、特殊字符、字典文件
3.3、再次执行修改密码重写登录
ALTER USER 'root'@'localhost' IDENTIFIED BY '1234';
3.5、设置MySQL远程连接
如果不进行设置的话我们在window系统通过软件是连接不上虚拟机上的mysql的,设置后我们可以使用
navicat16进行远程可是个的操作
use mysql;
update user set host = "%" where user='root';
flush privileges;
查看防火墙状态
如果防火墙是开着的就要开放指定的端口才能访问到
[root@Zcl2001 mysql8.0.29]# systemctl status firewalld
● firewalld.service - firewalld - dynamic firewall daemon
   Loaded: loaded (/usr/lib/systemd/system/firewalld.service; disabled; vendor preset: enabled)
   Active: inactive (dead)
     Docs: man:firewalld(1)
# 关闭防火墙
[root@Zcl2001 mysql8.0.29]# systemctl stop firewalld
3.6、设置MySQL随着系统的启动而启动
[root@Zcl2001 mysql8.0.29]# systemctl enable mysqld
3.6、使用navicat16进行远程可视化的操作
4、安装Maven依赖管理
官网下载地址:Maven – Download Apache Maven
4.1、上传至Linux系统
4.2、解压文件并配置阿里云加速镜像
1、解压文件
[root@Zcl2001 CustomSoftware]# tar -zxvf apache-maven-3.8.6-bin.tar.gz
# 删除文件
[root@Zcl2001 CustomSoftware]# rm -f apache-maven-3.8.6-bin.tar.gz
2、配置加速镜像
编辑修改 /opt/maven/apache-maven-3.6.3/conf/settings.xml⽂件,在
<mirror>
     <id>alimavenid>
     <name>aliyun mavenname>
     <url>http://maven.aliyun.com/nexus/content/groups/public/url>
     <mirrorOf>centralmirrorOf>
mirror>
4.3、环境变量配置
编辑修改 /etc/profile ⽂件,在⽂件尾部添加如下内容,配置 maven 的安装路径
exprot PATH=/usr/local/CustomSoftware/apache-maven-3.8.6/bin:$PATH
重置环境变量并查看版本号
[root@Zcl2001 apache-maven-3.8.6]# source /etc/profile
[root@Zcl2001 apache-maven-3.8.6]# mvn -v
Apache Maven 3.8.6 (84538c9988a25aec085021c365c560670ad80f63)
Maven home: /usr/local/CustomSoftware/apache-maven-3.8.6
Java version: 1.8.0_333, vendor: Oracle Corporation, runtime: /usr/local/CustomSoftware/jdk1.8/jre
Default locale: zh_CN, platform encoding: UTF-8
OS name: "linux", version: "3.10.0-1160.66.1.el7.x86_64", arch: "amd64", family: "unix"
5、安装zookeeper注册中心
官网下载地址:[Index of /zookeeper (apache.org)
5.1、上传文件到Linux系统
5.2、解压文件并创建data文件
[root@Zcl2001 CustomSoftware]# tar -zxvf apache-maven-3.8.6-bin.tar.gz
# 删除文件
[root@Zcl2001 CustomSoftware]# rm -f apache-maven-3.8.6-bin.tar.gz
# 进入文件
[root@Zcl2001 CustomSoftware]# cd apache-zookeeper-3.8.0-bin/
# 创建data文件夹
[root@Zcl2001 apache-zookeeper-3.8.0-bin]# mkdir data
等下该 data ⽬录地址要配到 ZooKeeper 的配置⽂件中
5.3、修改配置文件
进⼊到 zookeeper 的 conf ⽬录,复制 zoo_sample.cfg 得到 zoo.cfg :
必须命名为zoo.cfg否则无效
[root@Zcl2001 apache-zookeeper-3.8.0-bin]# cd conf/
[root@Zcl2001 conf]# ll
总用量 16
-rw-r--r-- 1 1000 ftp  535 2月  25 16:47 configuration.xsl
-rw-r--r-- 1 1000 ftp 4559 2月  25 16:47 logback.xml
-rw-r--r-- 1 1000 ftp 1183 2月  25 16:47 zoo_sample.cfg
[root@Zcl2001 conf]# cp zoo_sample.cfg zoo.cfg
[root@Zcl2001 conf]# ll
总用量 20
-rw-r--r-- 1 1000 ftp   535 2月  25 16:47 configuration.xsl
-rw-r--r-- 1 1000 ftp  4559 2月  25 16:47 logback.xml
-rw-r--r-- 1 root root 1183 7月  17 19:21 zook.cfg
-rw-r--r-- 1 1000 ftp  1183 2月  25 16:47 zoo_sample.cfg
[root@Zcl2001 conf]#
编辑zoo.cfg文件,将其中的 dataDir 修改为上⾯刚创建的 data ⽬录,其他选项可以按需配置
# 主要是这里<需要修改成zookeeper的数据文件目录>
dataDir=/usr/local/CustomSoftware/apache-zookeeper-3.8.0-bin/data
5.4、环境变量配置
编辑/etc/profile环境变量添加zookeeper
export PATH=//usr/local/CustomSoftware/apache-zookeeper-3.8.0-bin/bin:$PATH
重置环境变量
[root@Zcl2001 apache-zookeeper-3.8.0-bin]# source /etc/profile
5.6、启动zookeeper
[root@Zcl2001 bin]# ./zkServer.sh start
ZooKeeper JMX enabled by default
Using config: /usr/local/CustomSoftware/apache-zookeeper-3.8.0-bin/bin/../conf/zoo.cfg
Starting zookeeper ... STARTED
启动后可以通过如下命令来检查启动后的状态(默认端口为2181需要开放为指定端口):
[root@Zcl2001 bin]# ./zkServer.sh status
ZooKeeper JMX enabled by default
Using config: /usr/local/CustomSoftware/apache-zookeeper-3.8.0-bin/bin/../conf/zoo.cfg
Client port found: 2181. Client address: localhost. Client SSL: false.
Error contacting service. It is probably not running.
5.7、设置开机启动
⾸先进⼊ /etc/rc.d/init.d ⽬录,创建⼀个名为 zookeeper 的⽂件,并赋予执⾏权限
# 创建文件
[root@Zcl2001 init.d]# touch zookeeper
# 赋值文件
[root@Zcl2001 init.d]# chmod +x zookeeper
文件设置如下
根据各自的系统安装文件配置修改
使用vim编辑粘贴数据可能会丢失部分内容导致设置开启启动无效,认真检查即可
#!/bin/bash
#chkconfig:2345 10 90
#description:service zookeeper
export     JAVA_HOME=/usr/local/CustomSoftware/jdk1.8
export     ZOO_LOG_DIR=/data/zookeeper/logs
ZOOKEEPER_HOME=/usr/local/CustomSoftware/apache-zookeeper-3.8.0-bin/
case  "$1"   in
     start)  su  root  ${ZOOKEEPER_HOME}/bin/zkServer.sh  start;;
     start-foreground)  su  root ${ZOOKEEPER_HOME}/bin/zkServer.sh   start-foreground;;
     stop)  su  root  ${ZOOKEEPER_HOME}/bin/zkServer.sh  stop;;
     status)  su root  ${ZOOKEEPER_HOME}/bin/zkServer.sh    status;;
     restart)  su root   ${ZOOKEEPER_HOME}/bin/zkServer.sh   restart;;
     upgrade)su root  ${ZOOKEEPER_HOME}/bin/zkServer.sh  upgrade;;
     print-cmd)su root  ${ZOOKEEPER_HOME}/bin/zkServer.sh  print-cmd;;
     *)  echo "requirestart|start-foreground|stop|status|restart|print-cmd";;
esac
最后加⼊开机启动即可:
chkconfig --add zookeeper
添加完之后,我们使用chkconfig --list来查看开机自启的服务中是否已经有我们的zookeeper了,如下所示,可以看到在最后一行便是我们的zookeeper服务了。
[root@Zcl2001 init.d]# chkconfig --list

注:该输出结果只显示 SysV 服务,并不包含
原生 systemd 服务。SysV 配置数据
可能被原生 systemd 配置覆盖。

      要列出 systemd 服务,请执行 'systemctl list-unit-files'。
      查看在具体 target 启用的服务请执行
      'systemctl list-dependencies [target]'。

netconsole      0:关    1:关    2:关    3:关    4:关    5:关    6:关
network         0:关    1:关    2:开    3:开    4:开    5:开    6:关
zookeeper       0:关    1:关    2:开    3:开    4:开    5:开    6:关
6、安装Tomcat部署服务器
官网下载地址:Apache Tomcat® - Apache Tomcat 9 Software Downloads
前提条件需要安装有jdk环境
6.1、上传到Linux系统
6.2、解压文件
# 解压文件
[root@Zcl2001 CustomSoftware]# tar -xvf apache-tomcat-8.5.72.tar.gz
# 删除原文件
[root@Zcl2001 CustomSoftware]# rm -f apache-tomcat-8.5.72.tar.gz
6.3、配置tomcat的环境变量:
# 查看解压路径
[root@Zcl2001 apache-tomcat-8.5.72]# pwd
/usr/local/CustomSoftware/apache-tomcat-8.5.72
# 进入修改文件
[root@Zcl2001 apache-tomcat-8.5.72]#  vim /etc/profile
修改的环境变量【可能会与各位的配置方式不一样,配置进去就可以了】
# 配置tomcat环境变量
export TOMCAT=/usr/local/CustomSoftware/apache-tomcat-8.5.72
export PATH=$PATH:$TOMCAT/bin
重点:如果变量设置错误导致系统的部分命令无效中心下面语句完成修复
export PATH=/usr/local/sbin:/usr/local/bin:/sbin:/bin:/usr/sbin:/usr/bin:/root/bin
使用变量生效
source /etc/profile
6.4、启动和关闭tomcat
startup.sh:这个脚本文件用于启动tomcat。
shutdown.sh:这个脚本用于关闭tomcat。
由于我们把tomcat的bin目录加到PATH环境变量中去了,我们可以直接运行"startup.sh,shutdown.sh"来启动关闭tomcat。
1、启动tomcat
[root@Zcl2001 bin]# ./startup.sh
Using CATALINA_BASE:   /usr/local/CustomSoftware/apache-tomcat-8.5.72
Using CATALINA_HOME:   /usr/local/CustomSoftware/apache-tomcat-8.5.72
Using CATALINA_TMPDIR: /usr/local/CustomSoftware/apache-tomcat-8.5.72/temp
Using JRE_HOME:        /usr/local/CustomSoftware/jdk1.8
Using CLASSPATH:       /usr/local/CustomSoftware/apache-tomcat-8.5.72/bin/bootstrap.jar:/usr/local/CustomSoftware/apache-tomcat-8.5.72/bin/tomcat-juli.jar
Using CATALINA_OPTS:
Tomcat started.
2、查看运行状态
[root@Zcl2001 bin]# ps -ef | grep tomcat
root     23218     1  1 12:07 pts/0    00:00:07 /usr/local/CustomSoftware/jdk1.8/bin/java -Djava.util.logging.config.file=/usr/local/CustomSoftware/apache-tomcat-8.5.72/conf/logging.properties -Djava.util.logging.manager=org.apache.juli.ClassLoaderLogManager -Djdk.tls.ephemeralDHKeySize=2048 -Djava.protocol.handler.pkgs=org.apache.catalina.webresources -Dorg.apache.catalina.security.SecurityListener.UMASK=0027 -Dignore.endorsed.dirs= -classpath /usr/local/CustomSoftware/apache-tomcat-8.5.72/bin/bootstrap.jar:/usr/local/CustomSoftware/apache-tomcat-8.5.72/bin/tomcat-juli.jar -Dcatalina.base=/usr/local/CustomSoftware/apache-tomcat-8.5.72 -Dcatalina.home=/usr/local/CustomSoftware/apache-tomcat-8.5.72 -Djava.io.tmpdir=/usr/local/CustomSoftware/apache-tomcat-8.5.72/temp org.apache.catalina.startup.Bootstrap start
root     29410  1197  0 12:15 pts/0    00:00:00 grep --color=auto tomcat
也可以根据端口号8080查看运行情况
ss -nal | grep 8080
3、关闭tomcat
[root@Zcl2001 bin]# shutdown.sh
Using CATALINA_BASE:   /usr/local/CustomSoftware/apache-tomcat-8.5.72
Using CATALINA_HOME:   /usr/local/CustomSoftware/apache-tomcat-8.5.72
Using CATALINA_TMPDIR: /usr/local/CustomSoftware/apache-tomcat-8.5.72/temp
Using JRE_HOME:        /usr/local/CustomSoftware/jdk1.8
Using CLASSPATH:       /usr/local/CustomSoftware/apache-tomcat-8.5.72/bin/bootstrap.jar:/usr/local/CustomSoftware/apache-tomcat-8.5.72/bin/tomcat-juli.jar
Using CATALINA_OPTS:
注意:我们也可以通过kill -9 进程id 关闭 tomcat的进程来关闭tomcat。
4、浏览器访问tomcat(开放指定端口)
在虚拟机中关闭防火墙还问题不大,如果作为服务器关闭防火墙这种是不明智的选择,但是我们开启防火墙就会导致tomcat不能访问,这时候我们可以通过在防火墙上开辟特定的端口来解决这个问题:
# 开启防火墙
systemctl start firewalld
# 查看防火墙状态
systemctl status firewalld

# 查看已经打开的端口
firewall-cmd --zone=public --list-ports

# 查看8080端口有没有打开
firewall-cmd --query-port=8080/tcp

# 或者在防火墙上开启tomcat的特定端口8080
firewall-cmd --zone=public --add-port=8080/tcp --permanent

# 然后重启防火墙
systemctl restart firewalld
浏览器输入:服务IP地址:8080
7、将项目部署到云服务器
7.1、在navicat16中将DFJD数据库逆向到SQL语句
将SQL语句在Linux系统的MySQL中新建查询添加数据库信息
7.2、将项目一起执行Install进行项目打包操作
需要注意的是:先将项目原来连接本地的dubbo连接改为Linux的连接再继续打包,否则无法连接上注册中心,如果数据库的端口号与Linux系统不一样的也需要修改
7.3、将打包好的项目上传到tomcat文件的wapper文件中
上传的war包tomcat会自动帮我们解析,由于我们需要发布两个服务所以需要启动两个tomcat并且他们的端口号也是不同的,如下面操作
7.4、Linux部署多个Tomcat服务
7.4.1、复制多个tomcat文件并修改名称
带上原来的一个就有了三个,下面还需要对环境变量进行配置
[root@Zcl2001 CustomSoftware]# cp -a apache-tomcat-8.5.72/ apache-tomcat2-8.5.72/
[root@Zcl2001 CustomSoftware]# cp -a apache-tomcat-8.5.72/ apache-tomcat3-8.5.72/
7.4.2、配置多个tomcat环境变量
在原来的继承上复制修改名称即可
# 配置tomcat环境变量
export TOMCAT=/usr/local/CustomSoftware/apache-tomcat-8.5.72
export TOMCAT2=/usr/local/CustomSoftware/apache-tomcat2-8.5.72
export TOMCAT3=/usr/local/CustomSoftware/apache-tomcat3-8.5.72
不要忘记重置变量生效
7.4.3、修改其他tomcat(除了第一个tomcat)根目录bin下的catalina.sh文件
具体操作是切换到tomcat2的bin目录下,vim catalina.sh,找到下面的注释代码
# OS specific support. $var _must_ be set to either true or false.
并在上述注释下面添加以下代码,目的是为了tomcat2启动的时候能通过该文件的里的$CATALINA_2_BASE 和 $TOMCAT2找到/etc/profile配置文件里我们前一步配好的具体路径,完成tomcat2的启动过程。
# myself : add
export CATALINA_BASE=$TOMCAT2
export CATALINA_HOME=$TOMCAT2
如果有多个tomcat,修改方法是一样的。
7.4.4、修改各自的端口号
除了第一个tomcat使用的默认配置好的端口号(如果有需要也可以修改),后面添加的tomcat都要通过其根目录下的conf目录下的server.xml文件来修改端口号防止端口冲突。
-
http访问端口(默认为8080端口):
-
监听tomcat关闭的端口(默认为8005):
-
负责接收其他http服务器的请求端口(默认为8009):
7.4.5、启动服务器访问
![[外链图片转存失败,源站可能有防盗链机制,建议将图片保存下来直接上传(img-Vfy2inEh-1658101230957)(images/3/1、上传文件.png)]](http://img.e-com-net.com/image/info8/c7aae0c47eb24082a3dd51bc9dcc80e3.jpg)


