SpringBoot项目下@Async注解的使用
SpringBoot项目下@Async注解的使用
-
- 简介
-
- 应用场景
- 使用方式
-
- SpringBoot启用@Async注解
-
- 1. 启动类添加@EnableAsync注解
- 2. 添加线程池
- 3. 创建接口调用的2个任务
- 4. 创建Controller接口调用
- 5. 测试结果
简介
应用场景
一个接口需要执行多个任务时,如task1、task2、task3三个任务,先执行完task1需要耗时1秒,再执行task2需要耗时2秒,最后执行task3需要耗时3秒,那么正常情况下这个接口总共需耗时6秒;
这个总耗时就有些长了很影响系统体验,此时就可以使用@Async进行一个异步调用,此时主线程就不需要等待task1执行完之后,再去调用task2,task3同理;主线程会同时去调用task1、task2、task3任务,3个任务会同时执行,那么此时该接口的总耗时就是耗时最长的task3任务的3秒;
使用方式
SpringBoot启用@Async注解
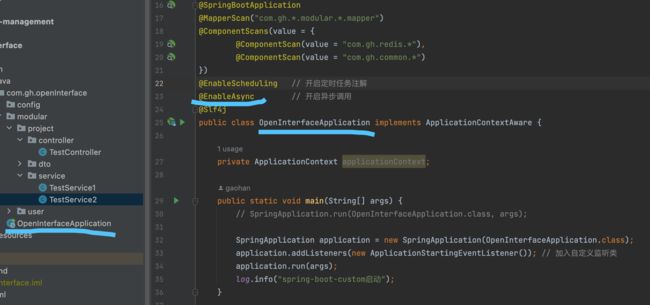
1. 启动类添加@EnableAsync注解
2. 添加线程池
package com.gh.openInterface.config;

import lombok.extern.slf4j.Slf4j;
import org.springframework.beans.factory.annotation.Value;
import org.springframework.context.annotation.Bean;
import org.springframework.context.annotation.Configuration;
import org.springframework.scheduling.concurrent.ThreadPoolTaskExecutor;

import java.util.concurrent.ThreadPoolExecutor;

@Configuration
@Slf4j
public class ThreadPoolConfig {

    @Value("${asyncThreadPool.corePoolSize}")
    private int corePoolSize;

    @Value("${asyncThreadPool.maxPoolSize}")
    private int maxPoolSize;

    @Value("${asyncThreadPool.queueCapacity}")
    private int queueCapacity;

    @Value("${asyncThreadPool.keepAliveSeconds}")
    private int keepAliveSeconds;

    @Value("${asyncThreadPool.awaitTerminationSeconds}")
    private int awaitTerminationSeconds;

    @Value("${asyncThreadPool.threadNamePrefix}")
    private String threadNamePrefix;

    @Bean(name = "threadPoolTaskExecutor")
    public ThreadPoolTaskExecutor threadPoolTaskExecutor() {
        log.info("---------- 线程池开始加载 ----------");
        ThreadPoolTaskExecutor threadPoolTaskExecutor = new ThreadPoolTaskExecutor();
        // 核心线程池大小
        threadPoolTaskExecutor.setCorePoolSize(corePoolSize);
        // 最大线程数
        threadPoolTaskExecutor.setMaxPoolSize(maxPoolSize);
        // 队列容量
        threadPoolTaskExecutor.setQueueCapacity(keepAliveSeconds);
        // 活跃时间
        threadPoolTaskExecutor.setKeepAliveSeconds(queueCapacity);
        // 主线程等待子线程执行时间
        threadPoolTaskExecutor.setAwaitTerminationSeconds(awaitTerminationSeconds);
        // 线程名字前缀
        threadPoolTaskExecutor.setThreadNamePrefix(threadNamePrefix);
        // RejectedExecutionHandler:当pool已经达到max-size的时候,如何处理新任务
        // CallerRunsPolicy:不在新线程中执行任务,而是由调用者所在的线程来执行
        threadPoolTaskExecutor.setRejectedExecutionHandler(new ThreadPoolExecutor.CallerRunsPolicy());
        // 初始化
        threadPoolTaskExecutor.initialize();
        log.info("---------- 线程池加载完成 ----------");
        threadPoolTaskExecutor.initialize();
        return threadPoolTaskExecutor;
    }
}
application.properties里的线程池配置
asyncThreadPool:
    corePoolSize: 10
    maxPoolSize: 10
    queueCapacity: 10
    keepAliveSeconds: 6
    awaitTerminationSeconds: 10
    threadNamePrefix: bc_thread
3. 创建接口调用的2个任务
注意点:
1、使@Async标注的方法必须是public的
2、需要同时执行的几个任务,也就是标注了@Async几个方法,不能在同一个类里
任务1:
任务1执行耗时2秒,返回值为7;(此处用线程睡眠模拟业务逻辑耗时)
方法上加@Async注解,@Async注解后加的threadPoolTaskExecutor值,是自定义线程池的名称;
方法存在返回值,所以需要用到Future,返回值具体类型是Integer还是String等可以自己定义;
获取方法返回值的方式下面会将,此处先创建执行任务;
package com.gh.openInterface.modular.project.service;

import org.springframework.scheduling.annotation.Async;
import org.springframework.scheduling.annotation.AsyncResult;
import org.springframework.stereotype.Service;

import java.util.concurrent.Future;

/**
 * @author : gaohan
 * @date : 2022/7/14 23:41
 */
@Service
public class TestService1 {
    @Async("threadPoolTaskExecutor")
    public Future<Integer> method1() throws InterruptedException {
        Thread.sleep(2000);
        return new AsyncResult<>(7);
    }
}
任务2:
任务2执行耗时4秒,返回值为4;实现方式同任务1;
package com.gh.openInterface.modular.project.service;

import org.springframework.scheduling.annotation.Async;
import org.springframework.scheduling.annotation.AsyncResult;
import org.springframework.stereotype.Service;

import java.util.concurrent.Future;

/**
 * @author : gaohan
 * @date : 2022/7/14 23:41
 */
@Service
public class TestService2 {
    @Async("threadPoolTaskExecutor")
    public Future method2() throws InterruptedException {
        Thread.sleep(4000);
        return new AsyncResult<>(4);
    }
}
4. 创建Controller接口调用
使用如下方法获取任务的返回值
Future<Integer> method1 = service1.method1();
method1.get()
如果方法不需要返回值,则在service里直接给方法设置void返回类型即可,无需添加Future;
下方代码中使用while循环来实现等待所有任务执行完毕,获取到所有任务的返回值;
package com.gh.openInterface.modular.project.controller;

import com.alibaba.fastjson.JSON;
import com.alibaba.fastjson.JSONObject;
import com.gh.openInterface.modular.project.service.TestService1;
import com.gh.openInterface.modular.project.service.TestService2;
import lombok.extern.slf4j.Slf4j;
import org.springframework.beans.factory.annotation.Autowired;
import org.springframework.web.bind.annotation.PostMapping;
import org.springframework.web.bind.annotation.RequestMapping;
import org.springframework.web.bind.annotation.RestController;

import java.util.ArrayList;
import java.util.List;
import java.util.UUID;
import java.util.concurrent.ExecutionException;
import java.util.concurrent.Future;

@Slf4j
@RestController
@RequestMapping(value = "/api")
public class TestController {

    @Autowired
    private TestService1 service1;

    @Autowired
    private TestService2 service2;

    @RequestMapping(value = "/sync")
    public String sync() throws InterruptedException, ExecutionException {
        Long start = System.currentTimeMillis();

        Future<Integer> method1 = service1.method1();
        Future<Integer> method2 = service2.method2();

        // 标记是否执行成功
        boolean run = Boolean.FALSE;
        while (true) {
          	// 任务是否执行完成
            if (method1.isDone() && method2.isDone()) {
                run = Boolean.TRUE;
                break;
            } else if (method1.isCancelled() || method2.isCancelled()) {
          			// 任务是否在正常完成之前被取消
                break;
            }
        }

        Long end = System.currentTimeMillis();
        if (run) {
            log.info("运行成功,耗时:{},结果为:{}", (end - start), (method1.get() + method2.get()));
        }

        return "ok";
    }
}
5. 测试结果
共耗时4s;

