SpringBoot (底层注解分析、依赖管理、自动配置原理)
SpringBoot (底层注解分析、依赖管理、自动配置原理)
文章目录
- SpringBoot (底层注解分析、依赖管理、自动配置原理)
-
- 1. Spring与SpringBoot
-
- 1.1 Spring生态
- 1.2 SpringBoot的出现
- 1.3 SpringBoot的优点
- 1.4 总结
- 2. 微服务与分布式
-
- 2.1 微服务
- 2.2 分布式
-
- 2.2.1 分布式与集群的区别
- 3. 第一个SpringBoot程序
-
- 3.1 版本要求
- 3.2 创建Maven工程
- 3.3 引入相关依赖
- 3.4 创建主启动类
- 3.5 编写业务
- 3.6 测试使用
- 3.7 简化的配置文件
- 3.8 简化部署
- 4. SpringBoot依赖管理与自动配置
-
- 4.1 依赖管理
- 4.2 自动配置
- 5. 底层注解分析
-
- 5.1 @Configuration
- 5.2 @Import 导入组件
- 5.3 @Conditional 条件装配
- 5.4 @ImportResource 导入配置文件
- 5.5 @ConfigurationProperties 配置绑定
- 6. 自动配置原理分析
-
- 6.1 自动包规则原理
- 6.2 按需开启自动配置项
- 6.3 总结
1. Spring与SpringBoot
1.1 Spring生态
Spring的生态十分庞大,覆盖了:
- web开发
- 数据访问
- 安全控制
- 分布式
- 消息服务
- 移动开发
- 批处理
- …

SpringBoot官方文档
Spring 一直在飞速的发展,到了今天拥有非常强大的生态。同时随着技术的发展,Java EE使用 Spring 逐渐变得笨重起来,有大量的XML文件需要配置,并且整合第三方框架配置繁琐,最终导致开发效率变低。
Spring5进行了重大升级,提供了响应式编程。并且内部源码设计基于Java8的一些新特性,如:接口默认实现。重新设计源码架构。
1.2 SpringBoot的出现
Spring Boot makes it easy to create stand-alone, production-grade Spring based Applications that you can “just run”.
能快速创建出生产级别的Spring应用。
— 来自官方文档的描述。
SpringBoot中boot翻译过来的意思就是引导、开始,也就是说从SpringBoot开始引出Spring生态圈中其他的技术。
1.3 SpringBoot的优点
-
Create stand-alone Spring applications
-
- 创建独立Spring应用
-
Embed Tomcat, Jetty or Undertow directly (no need to deploy WAR files)
-
- 内嵌web服务器
-
Provide opinionated ‘starter’ dependencies to simplify your build configuration
-
- 自动starter(启动器)依赖,简化构建配置
-
Automatically configure Spring and 3rd party libraries whenever possible
-
- 自动配置Spring以及第三方功能
-
Provide production-ready features such as metrics, health checks, and externalized configuration
-
- 提供生产级别的监控、健康检查及外部化配置
-
Absolutely no code generation and no requirement for XML configuration
-
- 无代码生成、无需编写XML
1.4 总结
- SpringBoot是整合Spring技术栈的一站式框架
- SpringBoot是简化Spring技术栈的快速开发脚手架
2. 微服务与分布式
2.1 微服务
微服务架构风格是一种使用一套小服务来开发单个应用的方式途径,每个服务运行在自己的进程中,并使用轻量级机制通信,通常是 HTTP API,这些服务基于业务能力构建,并能够通过 自动化部署机制 来独立部署,这些服务使用不同的编程语言实现,以及不同数据存储技术,并保持最低限度的集中式管理。
James Lewis and Martin Fowler (2014) 提出微服务完整概念。
- 微服务是一种架构风格
- 一个应用拆分为一组小型服务
- 每个服务运行在自己的进程内,也就是可独立部署和升级
- 服务之间使用轻量级HTTP交互
- 服务围绕业务功能拆分
- 可以由全自动部署机制独立部署
- 去中心化,服务自治。服务可以使用不同的语言、不同的存储技术
2.2 分布式
分布式是多个节点组成的系统,并且节点之间不是相互独立的,而是互通的。分布式系统对于用户的角度来看是使用的一个服务器,实际上是由众多服务器组成的分布式系统。
分布式需要解决的问题:
- 远程调用
- 服务发现
- 负载均衡
- 服务容错
- 配置管理
- 服务监控
- 链路追踪
- 日志管理
- 任务调度
- …
2.2.1 分布式与集群的区别
集群
集群是指在几个服务器上部署 相同的应用程序 来分担客户端的请求。也就是同一个系统部署到了多个不同的服务器,完成相同的任务。
集群的主要作用是用来分担请求压力。
分布式
分布式是指 多个系统协同合作 完成一个特定任务的系统。把一个大业务拆分成多个子业务,每个子业务都是一套独立的系统,子业务之间相互协作最终完成整体的大业务。
简单来说就是把一个大问题拆分成多个小问题,每个小问题由相关的解决方式来解决(微服务),并且去中心化的解决问题,也就是没有所谓的中心,不会把任务都交给一类节点来集中处理。
3. 第一个SpringBoot程序
3.1 版本要求
- Java8
- Maven3.3+
- idea2019
3.2 创建Maven工程

3.3 引入相关依赖
首先需要添加spring-boot-starter-parent 这个父工程(这里以2.3.4为例)。
然后引入web相关starter。
<parent>
    <groupId>org.springframework.bootgroupId>
    <artifactId>spring-boot-starter-parentartifactId>
    <version>2.3.4.RELEASEversion>
parent>

<dependencies>
    <dependency>
        <groupId>org.springframework.bootgroupId>
        <artifactId>spring-boot-starter-webartifactId>
    dependency>
dependencies>
3.4 创建主启动类
package com.jc;

import org.springframework.boot.SpringApplication;
import org.springframework.boot.autoconfigure.SpringBootApplication;

/**
 * @SpringBootApplication:表示这是一个SpringBoot应用
 */
@SpringBootApplication
public class HelloApplication {
    public static void main(String[] args) {
        SpringApplication.run(HelloApplication.class, args);
    }
}
3.5 编写业务
package com.jc.controller;

import org.springframework.web.bind.annotation.RequestMapping;
import org.springframework.web.bind.annotation.RestController;

@RestController
public class HelloController {

    @RequestMapping("/hello")
    public String hello() {
        return "Hello, World!";
    }
}
3.6 测试使用
我们不设置服务器端口号SpringBoot就默认使用8080端口,使用浏览器访问8080端口:

3.7 简化的配置文件
在resources目录下创建application.properties或者yaml文件:

在配置文件中我们可以自定义一些配置,如:
server.port=8888
访问服务的端口号就变成了8888。
3.8 简化部署
使用打包工具将SpringBoot应用打成jar包,直接运行jar包即可。
 <build>
	<plugins>
        <plugin>
            <groupId>org.springframework.bootgroupId>
            <artifactId>spring-boot-maven-pluginartifactId>
        plugin>
	plugins>
build>
![]()
运行命令:
java -jar xxx.jar
4. SpringBoot依赖管理与自动配置
4.1 依赖管理
每个springboot应用的pom.xml文件中会继承一个父工程:
继承的父工程
<parent>
    <groupId>org.springframework.boot</groupId>
    <artifactId>spring-boot-starter-parent</artifactId>
    <version>2.3.4.RELEASE</version>
</parent>

上面的工程又继承了下面这个工程,在这个工程中SpringBoot为我们设置了依赖的版本号
<parent>
  <groupId>org.springframework.boot</groupId>
  <artifactId>spring-boot-dependencies</artifactId>
  <version>2.3.4.RELEASE</version>
</parent>
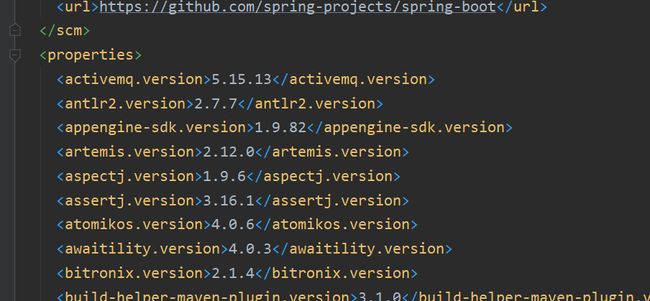
所以我们一般无需关注版本号,只需要引入相关starter即可,SpringBoot会自动版本仲裁。
如果有特殊的需求,也可以修改默认的版本号:
例如:修改mysql驱动版本
只需要在我们的工程的pom.xml文件中写入properties标签,在其中设置想要的版本。
<properties>
    <mysql.version>5.1.43mysql.version>
properties>
4.2 自动配置
SpringApplication.run() 方法是有返回值的,返回的就是SpringIOC工厂,通过获取到的工厂对象中的相关方法可以获取自动加载的bean的名字。
@SpringBootApplication
public class HelloApplication {
    public static void main(String[] args) {
        ConfigurableApplicationContext context = SpringApplication.run(HelloApplication.class, args);
        String[] names = context.getBeanDefinitionNames();
        for (String name : names) {
            System.out.println(name);
        }
    }
}

同样的,点开继承的父工程也可以看到SpringBoot自动配置好了许多的组件。
-
自动配好Tomcat
- 引入Tomcat依赖。
- 配置Tomcat
-
自动配好SpringMVC
- 引入SpringMVC全套组件
- 自动配好SpringMVC常用组件(功能)
-
自动配好Web常见功能,如:字符编码问题
- SpringBoot帮我们配置好了所有web开发的常见场景
-
默认的包结构
-
主程序所在包及其下面的所有子包里面的组件都会被默认扫描进来
-
无需以前的包扫描配置
-
想要改变扫描路径,
@SpringBootApplication(scanBasePackages="com.xxx") -
或者
@ComponentScan注解指定扫描路径
-
@SpringBootApplication 等同于 @SpringBootConfiguration @EnableAutoConfiguration @ComponentScan("com.xxx.yyy") -
-
各种配置拥有默认值
- 默认配置最终都是映射到某个类上,如:
MultipartProperties - 配置文件的值最终会绑定每个类上,这个类会在容器中创建对象
- 默认配置最终都是映射到某个类上,如:
-
按需加载所有自动配置项
- 非常多的starter
- 引入了哪些场景这个场景的自动配置才会开启
- SpringBoot所有的自动配置功能都在
spring-boot-autoconfigure包里面
5. 底层注解分析
其他更多Spring基础注解可以查看这篇文章:Spring基于注解编程详解
5.1 @Configuration
@Configuration是Spring在3.x提供的新的注解,用于替换XML配置文件。在SpringBoot中结合SpringBoot的特性做了进一步的增强。
从@Configuration的源码上来看,被其标记的类会成为Spring的组件。
@Target(ElementType.TYPE)
@Retention(RetentionPolicy.RUNTIME)
@Documented
@Component
public @interface Configuration {

	@AliasFor(annotation = Component.class)
	String value() default "";

	boolean proxyBeanMethods() default true;
}
- 基本使用
假设我们有一个User类,想要想IOC工厂中添加User类的对象,我们可以这样做:
package com.jc.config;

import com.jc.bean.User;
import org.springframework.context.annotation.Bean;
import org.springframework.context.annotation.Configuration;

/**
 * @Configuration表示被标记的类也是一个组件
 * 通过@Bean向Spring工厂中添加组件
 */
@Configuration
public class MyConfig {
    @Bean
    public User user01() {
        return new User(1, "tom", "123456");
    }
}
- Full模式与Lite模式
@Configuration 注解中有一个属性proxyBeanMethods,这个属性的默认值是true。
proxyBeanMethods如果设置为true,那么实际创建的配置类对象是Spring通过CGLIB的方式创建的代理类对象,当获取配置类中配置的组件时,执行的实际上是代理方法,从而控制配置的组件是单例的。

将proxyBeanMethods设置为false时,返回的就不是代理类对象:
com.jc.config.MyConfig@5aa6202e
那么proxyBeanMethods设置为true或false有什么作用呢?
可以用来解决组件之间依赖的问题。
- 配置类组件之间无依赖关系用
Lite模式加速容器启动过程,减少判断,返回的对象不是单例的,proxyBeanMethods值为true - 配置类组件之间有依赖关系,方法会被调用得到之前单实例组件,用
Full模式,返回的对象是单例的,proxyBeanMethods值为false
5.2 @Import 导入组件
@Import注解需要写到一个被声明为组件的类上。如:@Configuration、@Component、@Controller
@Import的作用也是向Spring工厂中添加组件。
源码:
@Target(ElementType.TYPE)
@Retention(RetentionPolicy.RUNTIME)
@Documented
public @interface Import {

	/**
	 * {@link Configuration @Configuration}, {@link ImportSelector},
	 * {@link ImportBeanDefinitionRegistrar}, or regular component classes to import.
	 */
	Class<?>[] value();

}
使用方式:
@Import({User.class, DBHelper.class})
@Configuration
public class MyConfig {
}
注意:添加的组件的id名称是组件的全类名。
5.3 @Conditional 条件装配
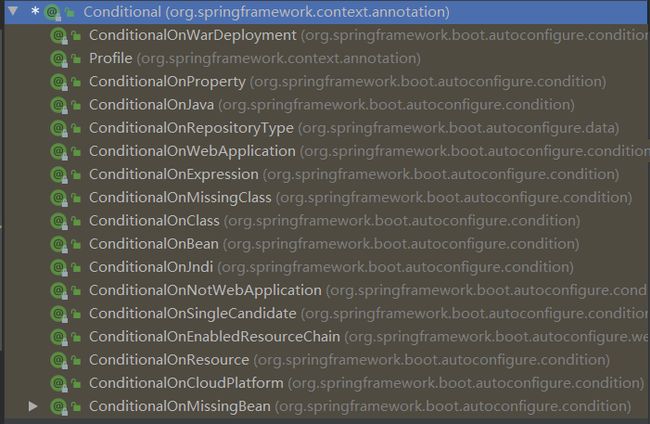
@Conditional有很多个实现:
满足Conditional指定的条件,则进行组件注入。
使用举例:
@Configuration
public class MyConfig {

    @Bean("tom1")
    public Cat cat() {
        return new Cat("Tom");
    }

    @ConditionalOnBean(name="tom") // 表示存在name叫做tom的才进行组件注入
    @Bean
    public User user01() {
        User user = new User();
        user.setCat(tom());
        return user;
    }
}
注意:
- 标记在配置类上的时候,只有符合条件,所有的组件才能被装填。
- 标记在方法上的时候,只有符合条件,这个方法返回的组件才能被装填。
5.4 @ImportResource 导入配置文件
用于引入配置文件。
使用举例:
将下面这个xml中的组件引入:
beans.xml
<beans xmlns="http://www.springframework.org/schema/beans"
       xmlns:xsi="http://www.w3.org/2001/XMLSchema-instance"
       xmlns:context="http://www.springframework.org/schema/context"
       xsi:schemaLocation="http://www.springframework.org/schema/beans http://www.springframework.org/schema/beans/spring-beans.xsd http://www.springframework.org/schema/context https://www.springframework.org/schema/context/spring-context.xsd">

    <bean id="haha" class="com.atguigu.boot.bean.User">
        <property name="name" value="zhangsan">property>
        <property name="age" value="18">property>
    bean>

    <bean id="hehe" class="com.atguigu.boot.bean.Pet">
        <property name="name" value="tomcat">property>
    bean>
beans>
使用@ImportResource注解:
@ImportResource("classpath:beans.xml")
5.5 @ConfigurationProperties 配置绑定
使用Java读取到properties文件中的内容,并且把它封装到JavaBean中,以供随时使用。
一般被@ConfigurationProperties注解标记的类都对应一个properties配置文件,并且这个类需要作为组件添加到容器中去。
@ConfigurationProperties注解中的prefix属性必须要指定值,这个属性代表了配置文件中的前缀。
例如:
car.brand=BYD
car.price=10000
使用方式一:@Component + @ConfigurationProperties
@Component
@ConfigurationProperties(prefix = "car")
public class CarProperties {
    private String brand;
    private Integer price;

    public String getBrand() {
        return brand;
    }

    public void setBrand(String brand) {
        this.brand = brand;
    }

    public Integer getPrice() {
        return price;
    }

    public void setPrice(Integer price) {
        this.price = price;
    }
}
使用方式二:@EnableConfigurationProperties + @ConfigurationProperties
在配置类上标记@EnableConfigurationProperties(CarProperties.class),并指定要添加的类的类对象。
通过@EnableConfigurationProperties注解的设置后,会将配置的类作为组件引入。
@Configuration
@EnableConfigurationProperties(CarProperties.class)
public class MyConfig {
}
@ConfigurationProperties(prefix = "car")
public class CarProperties {
    private String brand;
    private Integer price;
}
6. 自动配置原理分析
6.1 自动包规则原理
@SpringBootApplication标记在引导加载自动配置类上,也就是主程序类。
从下面的源码可以看出,@SpringBootApplication 实际上是一个复合注解,是由一下注解组成:
@SpringBootConfiguration@EnableAutoConfiguration@ComponentScan
@Target(ElementType.TYPE)
@Retention(RetentionPolicy.RUNTIME)
@Documented
@Inherited
@SpringBootConfiguration
@EnableAutoConfiguration
@ComponentScan(excludeFilters = { @Filter(type = FilterType.CUSTOM, classes = TypeExcludeFilter.class),
		@Filter(type = FilterType.CUSTOM, classes = AutoConfigurationExcludeFilter.class) })
public @interface SpringBootApplication {
@SpringBootConfiguration:
从源码来看本质是一个@Configuration注解。
@Target(ElementType.TYPE)
@Retention(RetentionPolicy.RUNTIME)
@Documented
@Configuration
public @interface SpringBootConfiguration {
@ComponentScan
用于配置包扫描
@EnableAutoConfiguration
先来看这个注解的源码,主要是继承了@AutoConfigurationPackage注解的功能,并且通过@Import注解导入组件。
@Target(ElementType.TYPE)
@Retention(RetentionPolicy.RUNTIME)
@Documented
@Inherited
@AutoConfigurationPackage
@Import(AutoConfigurationImportSelector.class) // 导入组件
public @interface EnableAutoConfiguration {
所以需要重点来看@AutoConfigurationPackage这个注解,这个注解是自动包扫描原理的核心注解。
查看源码,@AutoConfigurationPackage注解通过@Import(AutoConfigurationPackages.Registrar.class)
引入了一个内部类:AutoConfigurationPackages.Registrar
@Target(ElementType.TYPE)
@Retention(RetentionPolicy.RUNTIME)
@Documented
@Inherited
@Import(AutoConfigurationPackages.Registrar.class) // 导入组件
public @interface AutoConfigurationPackage {
内部类Registrar
static class Registrar implements ImportBeanDefinitionRegistrar, DeterminableImports {

   @Override
   public void registerBeanDefinitions(AnnotationMetadata metadata, BeanDefinitionRegistry registry) {
       // 需要断点调试的方法
      register(registry, new PackageImports(metadata).getPackageNames().toArray(new String[0]));
   }

   @Override
   public Set<Object> determineImports(AnnotationMetadata metadata) {
      return Collections.singleton(new PackageImports(metadata));
   }
}
在执行register方法处打上断点进行调试分析:

这也就解释清楚了为什么SpringBoot会自动扫描与主启动类下的包,是因为实际@SpringBootApplication通过层层继承,引入了Registrar,在这个内部类中执行相关操作将包名称设置到了包扫描中。
接下来主要分析@EnableAutoConfiguration注解源码中的@Import(AutoConfigurationImportSelector.class)里面的 AutoConfigurationImportSelector 有什么内容,做了那些事情。
点开源码后,是方法的逐层调用:
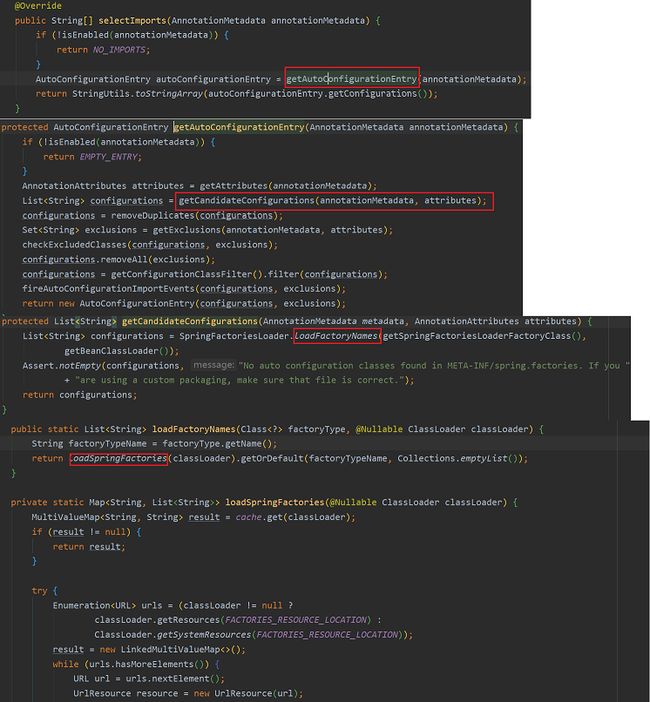
实际上最核心的是loadSpringFactories()方法,从这个方法的流程中可以看到如下内容:
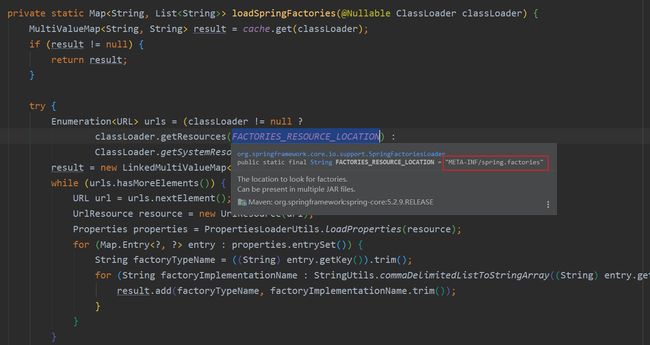
也就是从每个依赖下从META-INF/spring.factories位置来加载一个文件。默认扫描我们当前系统里面所有META-INF/spring.factories位置的文件,spring-boot-autoconfigure-2.3.4.RELEASE.jar包里面也有META-INF/spring.factories。
在getAutoConfigurationEntry()方法处打上断点进行调试,可以发现SpringBoot自动为我们引入的127个相关的组件:
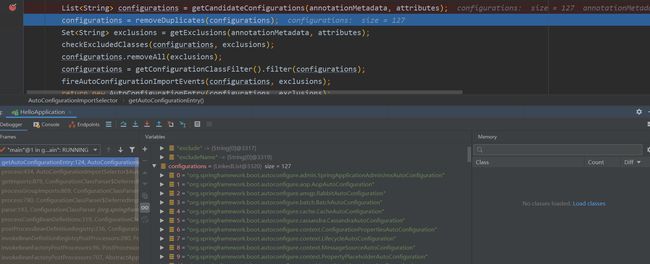
那么这127个组件从何而来呢?
实际上是在配置文件中写死的,从spring-boot-autoconfigure-2.3.4.RELEASE.jar里面的spring.factories可以看到相关的配置:

6.2 按需开启自动配置项
需要注意:不是所有组件都进行了装配,而是按需装配。
这时候@Conditional相关注解就显得尤为重要,在SpringBoot程序启动时会加载配置文件中配置的所有组件内容,而是实际加载根据@Conditional注解设置的规则按需装配。
6.3 总结
-
SpringBoot先加载所有的自动配置类
xxxxxAutoConfiguration -
每个自动配置类按照条件进行生效,默认都会绑定配置文件指定的值。xxxxProperties里面拿。xxxProperties和配置文件进行了绑定
-
生效的配置类就会给容器中装配很多组件
-
只要容器中有这些组件,相当于这些功能就有了
-
定制化配置
-
- 用户直接自己
@Bean替换底层的组件
- 用户去看这个组件是获取的配置文件什么值就去修改
- 用户直接自己