人工智能环境准备
国内镜像网站
阿里云 http://mirrors.aliyun.com/pypi/simple/
中国科技大学 https://pypi.mirrors.ustc.edu.cn/simple/
豆瓣(douban) http://pypi.douban.com/simple/
清华大学 https://pypi.tuna.tsinghua.edu.cn/simple/
中国科学技术大学 http://pypi.mirrors.ustc.edu.cn/simple/
参考链接
https://blog.csdn.net/Creama_/article/details/105024840
anaconda基本使用
https://blog.csdn.net/weixin_43837968/article/details/114776842
https://www.cnblogs.com/zhangxingcomeon/p/13801554.html
1.在conda环境中新建虚拟环境
conda create -n env_name python=X.X (2.7、3.6等)
2.查看conda环境
conda env list 或 conda info -e
3.切换环境
source/conda activate your_env_name(虚拟环境名称)
4.查看环境中的包
conda list
5.通过conda装包
conda install -n your_env_name [package]
  (或者进入环境直接conda install [package] 即可,eg: conda install tensorflow)
6.输入pip -V 查看指定正确虚拟环境后,通过pip安装
pip install [package]
  eg :pip install tensorflow
7.查看pip安装的包
pip list
8.conda删除包
conda remove --name your_env_name  [package_name]
  同理进入环境后直接 conda remove [package]即可  ,eg : conda remove numpy
pip删除包
pip/pip3 uninstall 包名
9.关闭虚拟环境
source/conda deactivate
10.删除虚拟环境
conda remove -n your_env_name(虚拟环境名称) --all
11.更改环境python版本
conda install python=x.x
配置环境
当出现解决ERROR: Cannot determine archive format o
--trusted-host pypi.tuna.tsinghua.edu.cn 模块名 ```
1.安装tensorflow
https://blog.csdn.net/qq_37374643/article/details/90597365
pip install --upgrade tensorflow # CPU版本 pip install --upgrade
tensorflow-gpu # GPU版本
特定版本:
pip install tensorflow==2.8.0 -i https://pypi.tuna.tsinghua.edu.cn/simple/
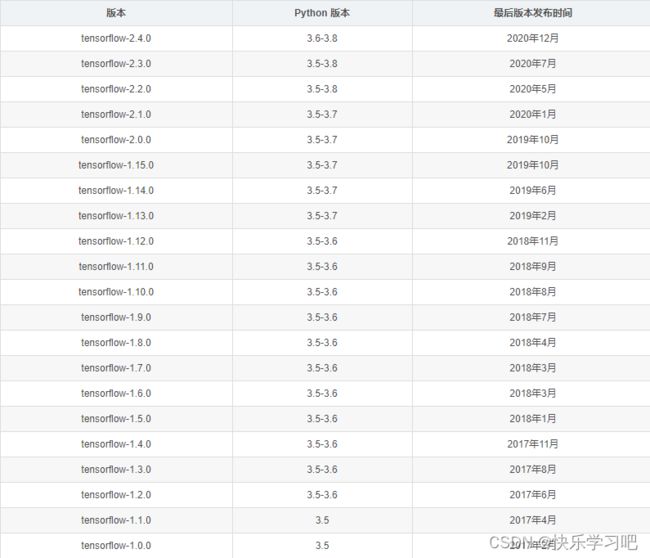
tensorflow版本

https://blog.csdn.net/baishuiniyaonulia/article/details/118977952
2.安装onnx
pip install onnx -i https://pypi.tuna.tsinghua.edu.cn/simple/
3.安装onnx_tf
pip install onnx_tf -i https://pypi.tuna.tsinghua.edu.cn/simple/
4.安装pytorch
https://blog.csdn.net/AIHUBEI/article/details/104259525
通过官网命令行安装
pip install torch==1.10.1+cpu torchvision==0.11.2+cpu torchaudio==0.10.1 -f https://download.pytorch.org/whl/torch_stable.html -i https://pypi.tuna.tsinghua.edu.cn/simple/
pip install
5.安装onnxruntime
pip install onnxruntime -i https://pypi.tuna.tsinghua.edu.cn/simple/
6.安装tf-nightly 2.10.0.dev20220426
pip install tf-nightly
https://pypi.org/project/tf-nightly/
7.安装tensorflow_addons
https://github.com/tensorflow/addons
pip install tensorflow_addons==0.9.1
8.安装openCV
pip install opencv-python
9.安装sklearn
pip install scikit-learn
pip虚拟环境
激活虚拟环境后通过
pip -V
来查看pip使用的是哪里的。
模型转换
pytorch to tflite
https://zhuanlan.zhihu.com/p/363317178
onnx to pb
https://blog.csdn.net/xywy2008/article/details/115400323
https://github.com/onnx/onnx-tensorflow/tree/rel-1.10.0