JetPack--Navigation实现页面跳转
Navigation组件可以让页面之间的切换变得更加容易实现。
Navigation大致包括四个部分:
-
NavHost
NavHost相当于一个容器,用来存放哪些页面可以进来,哪些页面可以出去。
-
Fragment
Fragment推出的最初目的是为了适应大屏幕,将大屏幕分割成小部分,每个小部分就是一个Fragment。
-
NavController
NavController用来控制导航的逻辑,按下按键要切换到哪个页面,具体要切换到哪个页面由导航路线决定。
-
NavGraph
NavGraph展示了页面之间的逻辑关系,也就是页面之间切换的关系,页面之间由箭头组成,每个箭头是一个Action,由NavController来驱动这些Action,进而实现页面的切换。
代码实践
第一步:首先创建两个Fragment。
fragment_home.xml
<LinearLayout xmlns:android="http://schemas.android.com/apk/res/android"
    xmlns:tools="http://schemas.android.com/tools"
    android:layout_width="match_parent"
    android:layout_height="match_parent"
    tools:context=".fragment.HomeFragment"
    android:orientation="vertical"
    android:gravity="center"
    >

    <TextView
        android:layout_width="100dp"
        android:layout_height="50dp"
        android:text="主页"
        android:gravity="center"
        />

    <Button
        android:id="@+id/btn1"
        android:layout_width="wrap_content"
        android:layout_height="wrap_content"
        android:text="跳转"
        />

LinearLayout>
fragment_detail.xml
<LinearLayout xmlns:android="http://schemas.android.com/apk/res/android"
    xmlns:tools="http://schemas.android.com/tools"
    android:layout_width="match_parent"
    android:layout_height="match_parent"
    tools:context=".fragment.HomeFragment"
    android:orientation="vertical"
    android:gravity="center"
    >

    <TextView
        android:layout_width="100dp"
        android:layout_height="50dp"
        android:text="详情页"
        android:gravity="center"
        />

    <Button
        android:id="@+id/btn1"
        android:layout_width="wrap_content"
        android:layout_height="wrap_content"
        android:text="跳转"
        />

LinearLayout>
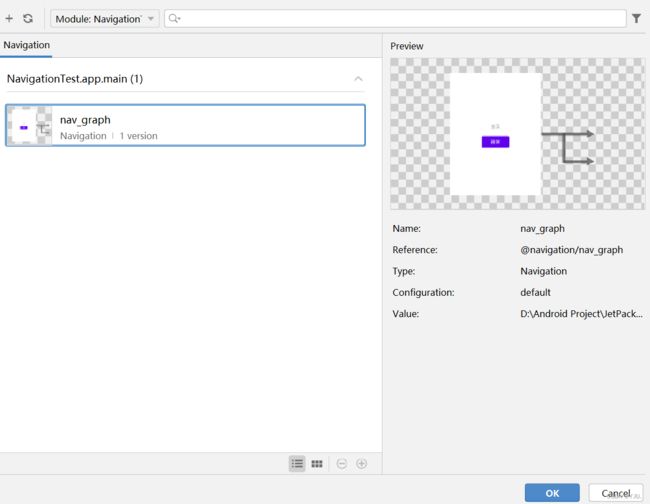
第二步:在res文件下创建Navigation资源文件,用于设计路线图(NavGraph)。
可以使用AS提供的可视化进行设计:
点击绿色加号将需要进行切换的页面加进来。
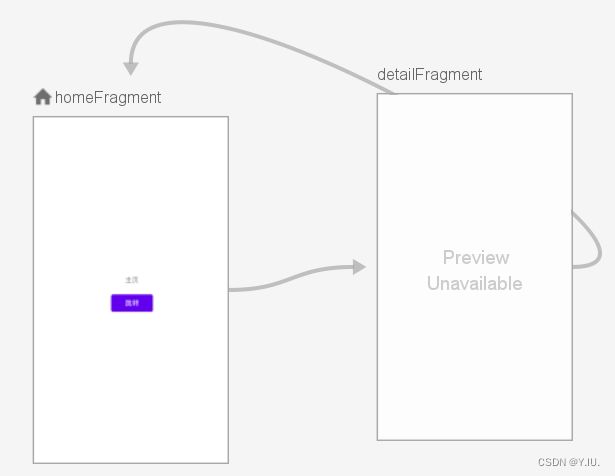
每个页面通过箭头连接,表示从一个页面可以跳转到箭头指向的页面,每一个箭头是一个Action,每个Action都有一个唯一的id。
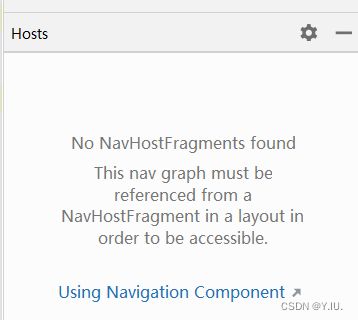
写完之后呢,我们会发现Hosts框会有如下提示,中文意思是:“导航图必须在布局中从NavHostFragment中引用才能访问”,这个NavHostFragment需要在Activity的xml文件中创建,具体看第三步。
这是代码部分
<navigation xmlns:android="http://schemas.android.com/apk/res/android"
    xmlns:app="http://schemas.android.com/apk/res-auto"
    xmlns:tools="http://schemas.android.com/tools"
    android:id="@+id/nav_graph"
    app:startDestination="@id/homeFragment">


    <fragment
        android:id="@+id/homeFragment"
        android:name="com.example.navigationtest.fragment.HomeFragment"
        android:label="fragment_home"
        tools:layout="@layout/fragment_home" >
        <action
            android:id="@+id/action_homeFragment_to_detailFragment"
            app:destination="@id/detailFragment" />
    fragment>

    <fragment
        android:id="@+id/detailFragment"
        android:name="com.example.navigationtest.fragment.DetailFragment"
        android:label="DetailFragment" >
        <action
            android:id="@+id/action_detailFragment_to_homeFragment2"
            app:destination="@id/homeFragment" />
    fragment>
navigation>
第三步:创建NavHostFragment
在activity_main.xml中选择NavHostFragment拖动到右边的布局当中去。
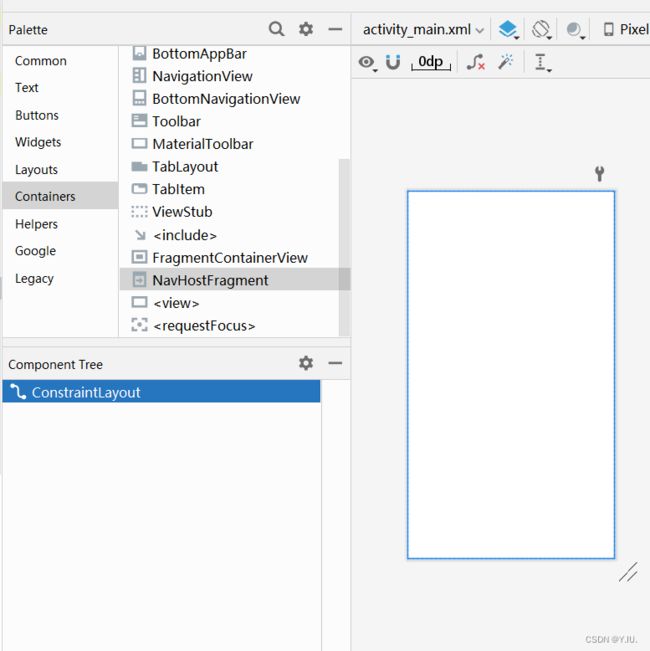
之后会有如下提示,选择需要访问的导航图,点击“OK” 即可。
回到导航图文件中我们可以看到NavHostFragment已经连接好了。

代码如下:
<androidx.constraintlayout.widget.ConstraintLayout xmlns:android="http://schemas.android.com/apk/res/android"
    xmlns:app="http://schemas.android.com/apk/res-auto"
    xmlns:tools="http://schemas.android.com/tools"
    android:layout_width="match_parent"
    android:layout_height="match_parent"
    tools:context=".MainActivity">

    <androidx.fragment.app.FragmentContainerView
        android:id="@+id/fragmentContainerView2"
        android:name="androidx.navigation.fragment.NavHostFragment"
        android:layout_width="409dp"
        android:layout_height="729dp"
        app:defaultNavHost="true"
        app:layout_constraintEnd_toEndOf="parent"
        app:layout_constraintStart_toStartOf="parent"
        app:navGraph="@navigation/nav_graph"
        tools:layout_editor_absoluteY="1dp"
        tools:ignore="MissingConstraints" />

androidx.constraintlayout.widget.ConstraintLayout>
第四步:使用NavControler来控制导航的逻辑。
首先,页面的跳转肯定是由于用户点击了某个控件或按键触发的,所以在处理点击事件时实现页面跳转。核心代码如下:
NavController controller = Navigation.findNavController(v); // 获取控制器
controller.navigate(R.id.action_homeFragment_to_detailFragment); // 调用navigation方法实现页面跳转,该方法需要传递一个Action的id,表示要执行这个跳转行为。
HomeFragment
public class HomeFragment extends Fragment {

    public HomeFragment() {
        // Required empty public constructor
    }

    @Override
    public View onCreateView(LayoutInflater inflater, ViewGroup container,
                             Bundle savedInstanceState) {
        // Inflate the layout for this fragment
        return inflater.inflate(R.layout.fragment_home, container, false);
    }

    @Override
    public void onViewCreated(@NonNull View view, @Nullable Bundle savedInstanceState) {
        Button button = (Button) view.findViewById(R.id.btn1);
        button.setOnClickListener(new View.OnClickListener() {
            @Override
            public void onClick(View v) {
                NavController controller = Navigation.findNavController(v);
                controller.navigate(R.id.action_homeFragment_to_detailFragment);
            }
        });
    }
}
使用NavController控制导航逻辑的第二种写法,这种写法更为简洁。
button.setOnClickListener(Navigation.createNavigateOnClickListener(R.id.action_detailFragment_to_homeFragment2));
DetailFragment
public class DetailFragment extends Fragment {

    public DetailFragment() {
        // Required empty public constructor
    }

    @Override
    public View onCreateView(LayoutInflater inflater, ViewGroup container,
                             Bundle savedInstanceState) {
        // Inflate the layout for this fragment
        return inflater.inflate(R.layout.fragment_detail, container, false);
    }

    @Override
    public void onViewCreated(@NonNull View view, @Nullable Bundle savedInstanceState) {
        Button button = (Button) view.findViewById(R.id.btn1);
        button.setOnClickListener(Navigation.createNavigateOnClickListener(R.id.action_detailFragment_to_homeFragment2));
    }
}
至此,基本的跳转功能已经实现,但是想要实现点击左上角的回退按钮实现回退功能又该如何实现呢?当然,Navigation也为我们提供了该功能,具体如下:
public class MainActivity extends AppCompatActivity {

    @Override
    protected void onCreate(Bundle savedInstanceState) {
        super.onCreate(savedInstanceState);
        setContentView(R.layout.activity_main);

        NavHostFragment fragment = (NavHostFragment)getSupportFragmentManager().findFragmentById(R.id.fragmentContainerView);
        NavController controller = fragment.getNavController();
        NavigationUI.setupActionBarWithNavController(this,controller);

    }

    @Override
    public boolean onSupportNavigateUp() {
        NavController controller = Navigation.findNavController(this,R.id.fragmentContainerView);
        return controller.navigateUp();
    }
}
