XML建模>︿<and自定义异常(~ ̄▽ ̄)~
目录
XML建模的步骤
1.环境搭建
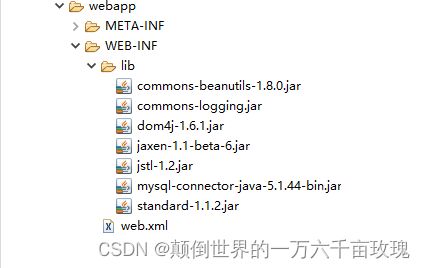
2.导入相关的jar包
3.建立相关的包和配置文件
4.根据配置文件建立相关的模型类
5、自定义异常
6.模型类代码编写
7、工厂类编写
XML建模的步骤
1.环境搭建
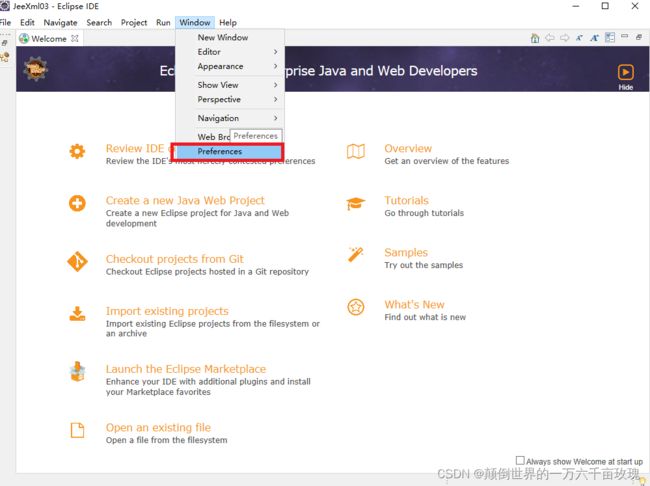
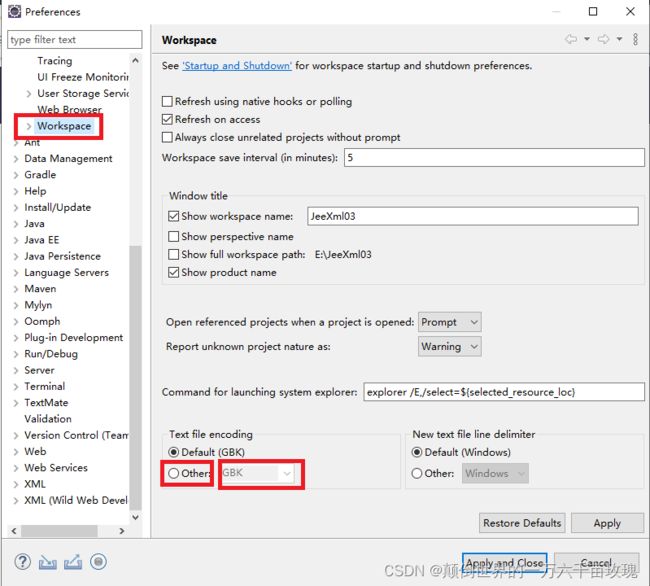
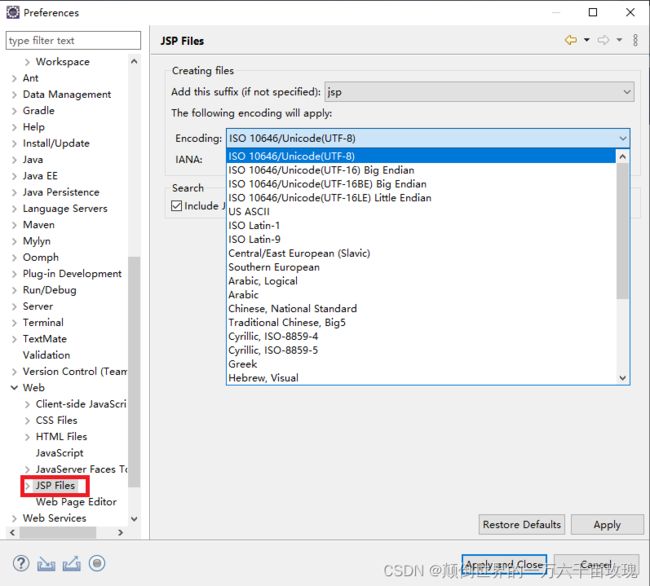
为了举例我新开了一个工作区间,所以需要修改编码
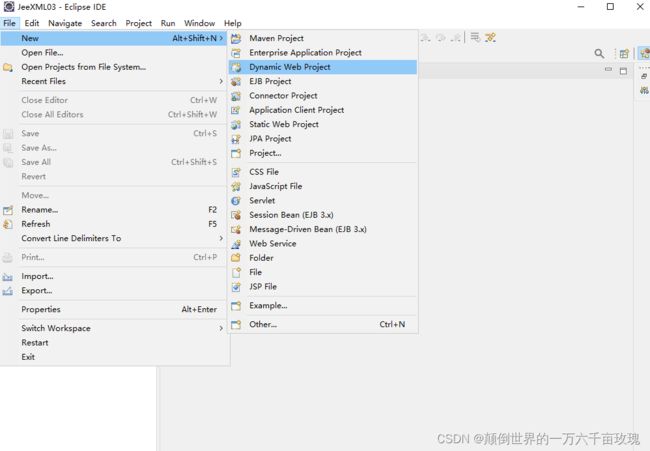
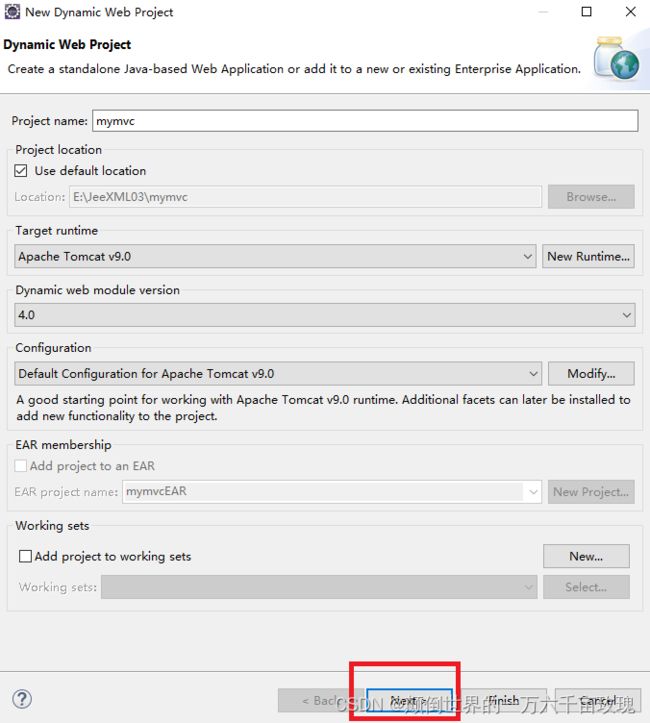
3.新建一个项目
4.配置tomcat,具体的配置方法请看JavaWeb.WEB环境的搭建
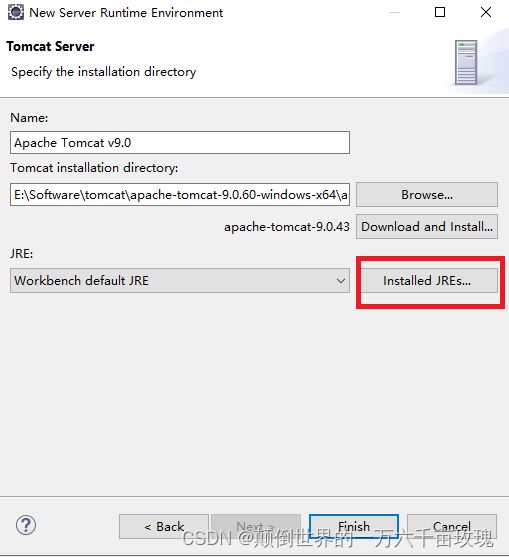
选好tomcat后,先别Finish,需要点击红框里的按钮
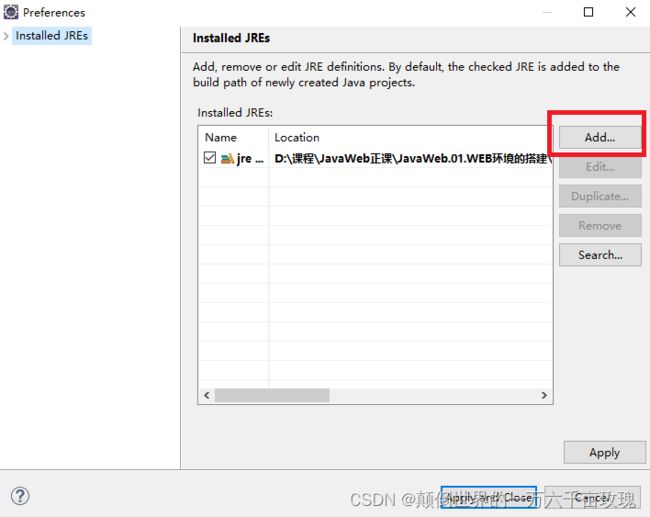
5.进入下一个界面,点击Add
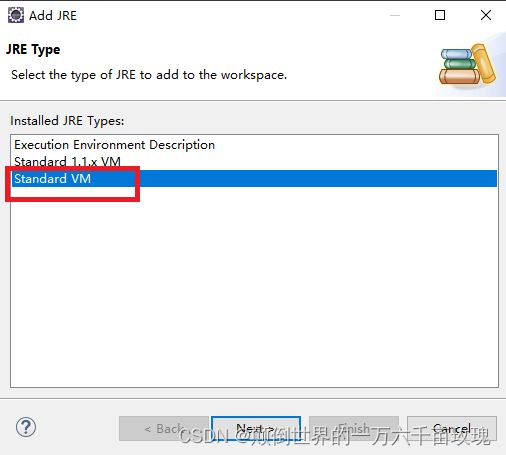
6.然后又接着进入下一个界面,选择Standard VM
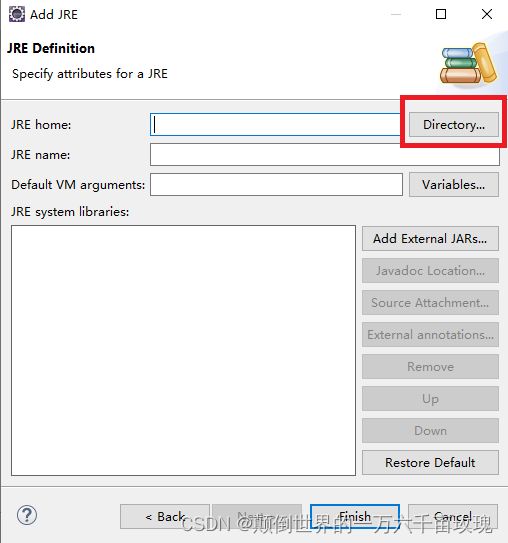
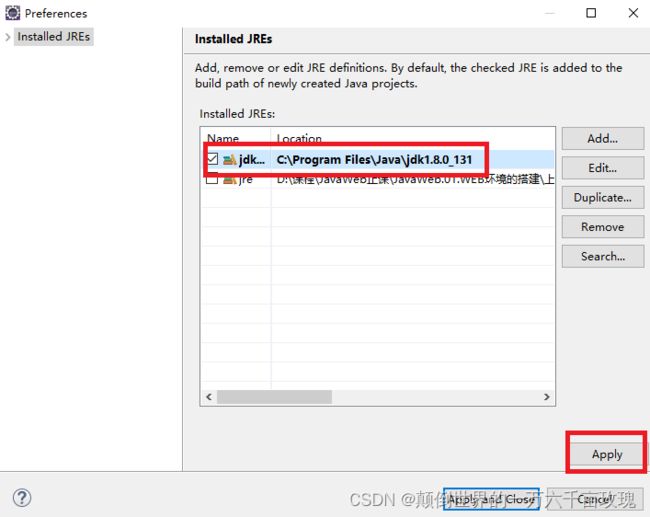
7.选择jdk版本,C:\Program Files\Java\jdk1.8.0_131(一般是默认地址,我这里的版本是jdk1.8.0_131)
选好后点击finish,返回上一个界面
8.选好jdk版本后,这个界面上就会显示出来,勾选好后点击Apply然后点击Apply and Close
返回上一个界面
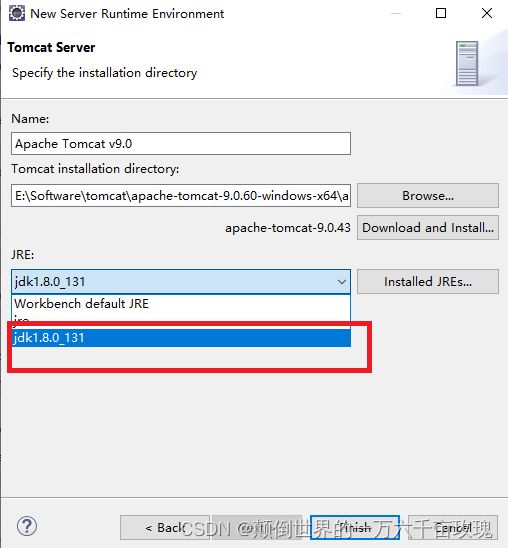
9.选择你配置好的jdk,然后点击Finish
10.点击两次next
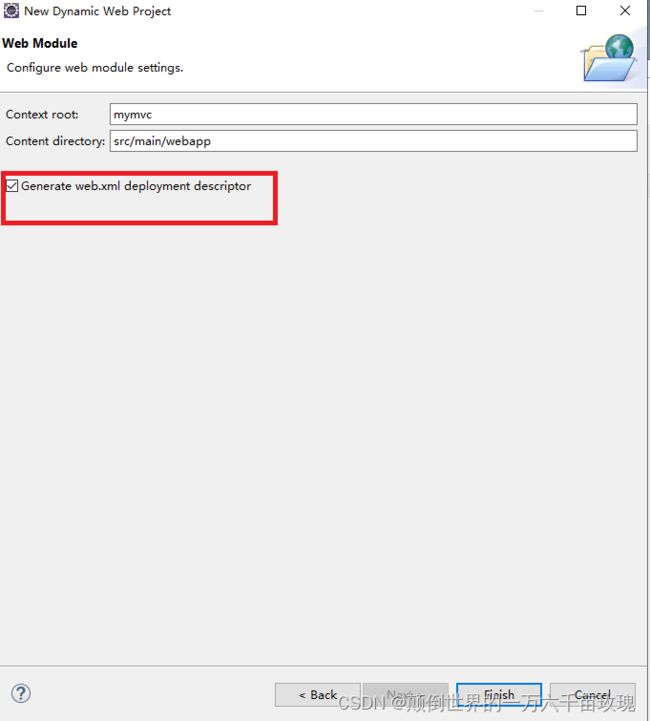
11.勾选完成后就配置好了
2.导入相关的jar包
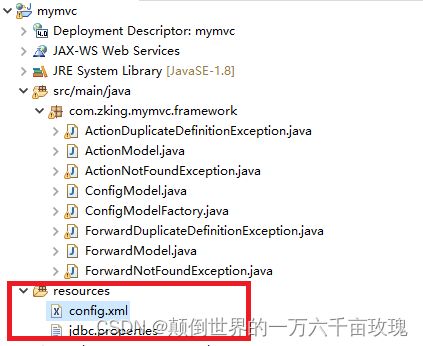
3.建立相关的包和配置文件
建包就不需要我多说了,但是我要着重讲的是建一个源码包
图片中的就是我建的源码包和配置文件。
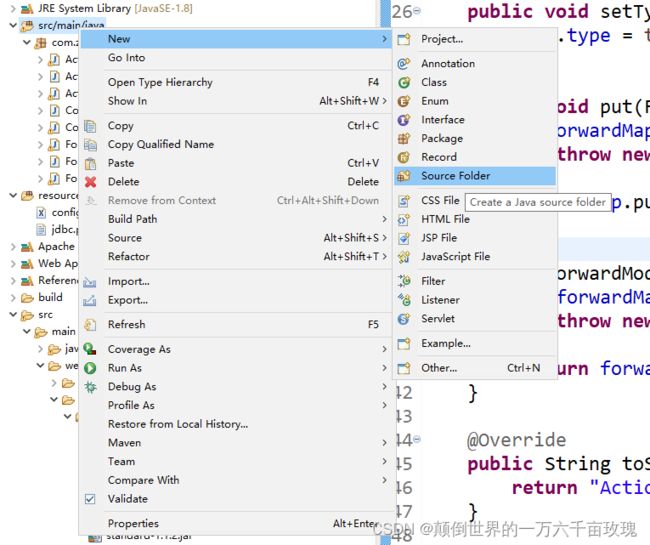
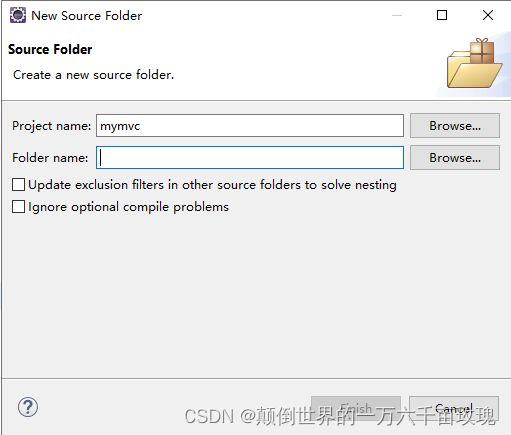
新建源码包的方法,按图片上的过程来( •̀ ω •́ )✧
第一个name是你的项目名
第二个是你的源码包名,命名规则:小写
我的配置文件(config.xml)代码( •̀ ω •́ )
]>
4.根据配置文件建立相关的模型类
类名规范:首字母大写的驼峰命名法
模型类命名:
- ConfigModel:Config节点模型
- ActionModel:Action节点模型
- ForwardModel:Farword节点模型
5、自定义异常
1.ActionDuplicateDefinitionException:Action元素中存在重复定义异常
package com.zking.mymvc.framework;

public class ActionDuplicateDefinitionException extends RuntimeException{

	public ActionDuplicateDefinitionException() {
		super();
	}

	public ActionDuplicateDefinitionException(String msg) {
		super(msg);
	}

	public ActionDuplicateDefinitionException(String msg,Throwable c) {
		super(msg , c);
	}

}
2.ActionNotFoundException:未找到
package com.zking.mymvc.framework;


public class ActionNotFoundException extends RuntimeException {


	public ActionNotFoundException() {
		super();
	}

	public ActionNotFoundException(String msg) {
		super(msg);
	}

	public ActionNotFoundException(String msg,Throwable c) {
		super(msg , c);
	}

}
3.ForwardDuplicateDefinitionException:Forward元素中存在重复定义异常
package com.zking.mymvc.framework;

public class ForwardDuplicateDefinitionException extends RuntimeException{

	public ForwardDuplicateDefinitionException() {
		super();
	}

	public ForwardDuplicateDefinitionException(String msg) {
		super(msg);
	}

	public ForwardDuplicateDefinitionException(String msg,Throwable c) {
		super(msg , c);
	}

}
4.ForwardNotFoundException:未找到
package com.zking.mymvc.framework;


public class ForwardNotFoundException extends RuntimeException {


	public ForwardNotFoundException() {
		super();
	}

	public ForwardNotFoundException(String msg) {
		super(msg);
	}

	public ForwardNotFoundException(String msg,Throwable c) {
		super(msg , c);
	}

}
6.模型类代码编写
根节点ConfigModel类
package com.zking.mymvc.framework;

import java.util.HashMap;
import java.util.Map;

public class ConfigModel {

	private Map actionMap= new HashMap<>();

	public void put(ActionModel action) {
		if(actionMap.containsKey((action.getPath()))) {
			throw new ActionDuplicateDefinitionException("Action"+ action.getPath()+" Duplicate Definition(重复定义)");
		}
		actionMap.put(action.getPath(), action);
	}

	public ActionModel find(String path) {
		if(!actionMap.containsKey(path)){
			throw new ActionNotFoundException("Action path ="+ path +" not found(没有找到)");
		}
		return actionMap.get(path);
	}

}
ActionModel类
package com.zking.mymvc.framework;

import java.util.HashMap;
import java.util.Map;

public class ActionModel {

	private String path;

	private String type;

	private Map forwardMap = new HashMap<>();

	public String getPath() {
		return path;
	}

	public void setPath(String path) {
		this.path = path;
	}

	public String getType() {
		return type;
	}

	public void setType(String type) {
		this.type = type;
	}

	public void put(ForwardModel forward) {
		if(forwardMap.containsKey(forward.getName())) {
			throw new ForwardDuplicateDefinitionException("forward name ="+forward.getName()+" Duplicate Definition(重复定义)");
		}
		forwardMap.put(forward.getName(), forward);
	}

	public ForwardModel find(String name) {
		if(!forwardMap.containsKey(name)) {
			throw new ForwardNotFoundException("forward name ="+ name +" not found(没有找到)");
		}
         return forwardMap.get(name);
	}

	@Override
	public String toString() {
		return "ActionModel [path=" + path + ", type=" + type + ", forwardMap=" + forwardMap + "]";
	}

}
ForwardModel类
package com.zking.mymvc.framework;

public class ForwardModel {

	private String name;

	private String path;

	private boolean redirect;

	public String getName() {
		return name;
	}

	public void setName(String name) {
		this.name = name;
	}

	public String getPath() {
		return path;
	}

	public void setPath(String path) {
		this.path = path;
	}

	public boolean isRedirect() {
		return redirect;
	}

	public void setRedirect(boolean redirect) {
		this.redirect = redirect;
	}

	public void setRedirect(String redirect) {
		this.redirect = Boolean.valueOf(redirect);
	}

	@Override
	public String toString() {
		return "ForwardModel [name=" + name + ", path=" + path + ", redirect=" + redirect + "]";
	}

}
7、工厂类编写
编写工厂类ConfigModelFactory的目的是在这个类中使用单例模式,并且只对XML文件中的内容读取一次,读取后放入上一步编写好了的模型对象中
package com.zking.mymvc.framework;

import java.io.InputStream;
import java.util.List;

import javax.sql.rowset.spi.XmlReader;

import org.dom4j.Document;
import org.dom4j.Element;
import org.dom4j.io.SAXReader;

@SuppressWarnings("unchecked")
public final class ConfigModelFactory {

	private ConfigModelFactory() {

	}

	private static ConfigModel config = new ConfigModel();

	//读取config.xml中的数据。填充到模型中
	static {
		try {
			InputStream in =  XmlReader.class.getResourceAsStream("/config.xml");
		    SAXReader reader = new SAXReader();
			Document doc = reader.read(in);

			Element rootElement = doc.getRootElement();
			List actions = rootElement.selectNodes("action");

			for(Element e: actions) {
				String path = e.attributeValue("path");
				String type= e.attributeValue("type");

                //放入模型
				ActionModel action = new ActionModel();

				action.setPath(path);
				action.setType(type);

                //通过action元素获得actions下面的节点forward
				List forwards = e.selectNodes("forward");
				for(Element f : forwards) {
					String name = f.attributeValue("name");
					String fPath = f.attributeValue("path");
					String redirect = f.attributeValue("redirect");

                    //放入模型
					ForwardModel forward = new ForwardModel();
					forward.setName(name);
					forward.setPath(path);
					forward.setRedirect(redirect);

                    //将forward放入action
					action.put(forward);

				}
                //循环完成后将action放入根节点
				config.put(action);
			}
		} catch (Exception e) {
			e.printStackTrace();
		}

	}

	public static ConfigModel getConfig() {
		return config;
	}

	public static void main(String[] args) {
		ConfigModel config = ConfigModelFactory.getConfig();
		ActionModel action = config.find("/studentAction");
		System.out.println(action);
		ForwardModel forward = action.find("students");
		System.out.println(forward);
	}

}
好了这篇文章就到这里结束了,拜拜!
