Docker ❉ DockerFile详解
一 基础概念
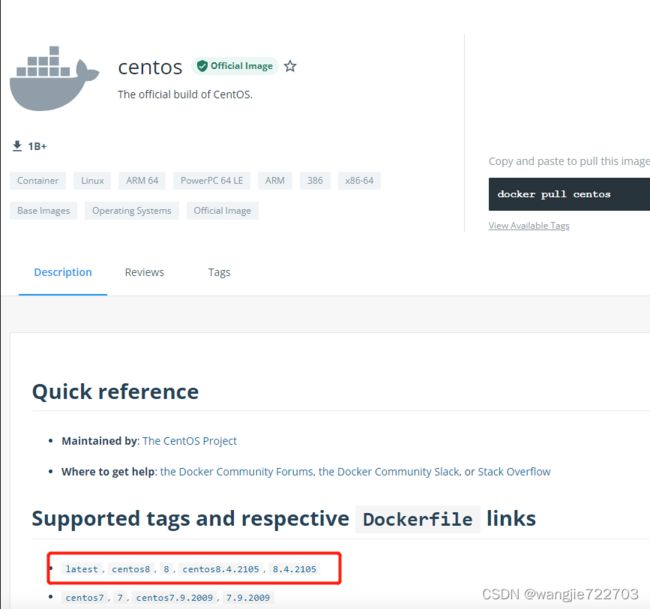
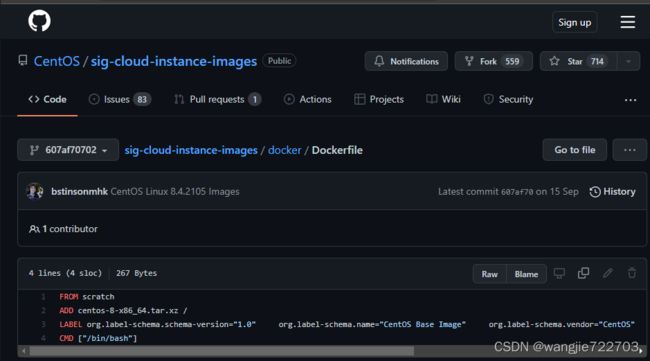
DockerFile是用来构建Docker镜像的构建文件,是由一系列命令和参数构成的脚本;我们在https://hub.docker.com/爬取的镜像其实本身也是由DockerFile文件构建,如下所示;
代码如下:
FROM scratch
ADD centos-8-x86_64.tar.xz /
LABEL org.label-schema.schema-version="1.0"     org.label-schema.name="CentOS Base Image"     org.label-schema.vendor="CentOS"     org.label-schema.license="GPLv2"     org.label-schema.build-date="20210915"
CMD ["/bin/bash"]
有一点要注意
有的docker是启动的时候不需要加/bin/bash,有的需要加,是因为有的镜像的DockerFile最后有一行 CMD ["/bin/bash"],有这个命令不用加/bin/bash后缀,有这个后缀的,执行的时候加的话,相当于执行了两遍CMD ["/bin/bash"]
二 构建过程
DockerFile构建镜像的过程如下:
- 编写DockerFile文件
- docker build
- docker run
1 语法介绍
- 每一个保留字指令都是大写,且后面都跟随至少一个参数
- 从上到下顺序执行
- # 表示注释
- 每条指令都会创建一个新的镜像层,并对镜像进行提交
2 docker解析dockerfile过程
- docker从基础镜像运行一个容器
- 执行一条指令并对容器进行修改
- 执行类似docker commit的操作提交一个新的镜像层
- docker再基于刚提交的镜像运行一个新容器
- 执行dockerfile中的下一条指令直到所有指令都执行完毕
3 总结
从软件应用的角度来看,dockerfile,docker镜像和docker容器分别代表软件的三个不同阶段
- dockerfile是软件的原材料,面向开发
- docker镜像是软件的交付品,成为交付标准
- docker容器则可以认为是软件的运行态,涉及运维和部署
三 DockerFile体系结构
- FROM:基础镜像,指定当前镜像是基于哪个镜像的;
- MAINTAINER:指定镜像维护者的姓名和邮箱地址;
- RUN:指定容器构建时需要运行的命令;
- EXPOSE:指定当前容器对外暴露的端口信息;
- WORKDIR:指定在创建容器后终端默认登录的工作目录;
- ENV:指定构建镜像过程中的环境变量;
- ADD:将宿主机目录下文件复制进镜像且ADD命令会自动处理URL和解压tar类型压缩包;
- COPY:类似于ADD,复制文件和目录到镜像中,但是不做处理;
- – CPOY src dest
- – COPY [“src”,“dest”]
- VOLUME:容器数据卷,用于数据保持和持久化;
- CMD:指定容器启动时要运行的命令,Docker中可以存在多个CMD命令,但是只有最后一个生效,CMD会被Docker run之后的参数替换;
- ENTRYPOINT:指定容器启动时要运行的命令,ENTRYPOINT和CMD一样,但是不会被Docker run的参数替换,进行追加执行;
- ONBUILD:当构建一个被继承的DockerFile时运行指令,父镜像在被子镜像继承后父镜像的onbuild被触发;
小总结:注意命令特性
四 案例
1 构建自定义系统
首先使用默认centos镜像创建一个容器作为对比容器,名称设置为test_a,在该容器内执行vim与ifconfig命令无法执行,因为精简版的centos没有此功能;
DockerHub中99%的镜像都是通过在base镜像中安装和配置需要的关键构建出来的
构建DockerFile;
[root@Docker ~]# vim /myDocker/DockerFile_test01
FROM centos
MAINTAINER zxc<[email protected]>
ENV mypath /tmp						/环境变量设置为/tmp;
WORKDIR $mypath						/修改容器默认登录目录;

RUN yum install -y vim					/安装vim功能;
RUN yum install -y net-tools				/安装网络功能;

EXPOSE 80							/暴露80端口;
CMD /bin/bash
使用DockerFile构建镜像;
[root@Docker ~]# docker build -f /myDocker/DockerFile_test01 -t mycentos:1.3 .
Sending build context to Docker daemon  12.19MB
Step 1/8 : FROM centos
 ---> 300e315adb2f
Step 2/8 : MAINTAINER zxc<[email protected]>
 ---> Running in 9334196fed84
Removing intermediate container 9334196fed84
 ---> 3faa116ae7ee
Step 3/8 : ENV mypath /tmp
 ---> Running in 63dbd47292ce
Removing intermediate container 63dbd47292ce
 ---> def729e0a375
Step 4/8 : WORKDIR $mypath
 ---> Running in 5e2756007a93
Removing intermediate container 5e2756007a93
 ---> 422d53f849bd
Step 5/8 : RUN yum install -y vim
Complete!
Removing intermediate container 0448e9cb3db8
 ---> d761096df2eb
Step 6/8 : RUN yum install -y net-tools
Complete!
Removing intermediate container 948beabdd09e
 ---> 4d7ccf0941d4
Step 7/8 : EXPOSE 80
 ---> Running in f5870f895b8f
Removing intermediate container f5870f895b8f
 ---> 78d5fca3e1dd
Step 8/8 : CMD /bin/bash
 ---> Running in a991211763cc
Removing intermediate container a991211763cc
 ---> 37fa47ba5db8
Successfully built 37fa47ba5db8
Successfully tagged mycentos:1.3

[root@Docker ~]# docker images mycentos
REPOSITORY   TAG       IMAGE ID       CREATED         SIZE
centos             latest    300e315adb2f   3 months ago    209MB
mycentos     1.3       37fa47ba5db8   2 minutes ago   291MB
使用新镜像创建容器,名称为test_b,并验证容器默认登录目录、vim与ifconfig是否可以执行、端口80是否打开;
[root@Docker ~]# docker run -it --name test_b mycentos:1.3
[root@3663701a12aa tmp]# pwd
/tmp
[root@3663701a12aa tmp]# vim /tmp/test.txt
[root@3663701a12aa tmp]# ifconfig
eth0: flags=4163  mtu 1500
        inet 172.17.0.3  netmask 255.255.0.0  broadcast 172.17.255.255
        ether 02:42:ac:11:00:03  txqueuelen 0  (Ethernet)
        RX packets 16  bytes 2092 (2.0 KiB)
        RX errors 0  dropped 0  overruns 0  frame 0
        TX packets 0  bytes 0 (0.0 B)
        TX errors 0  dropped 0 overruns 0  carrier 0  collisions 0

lo: flags=73  mtu 65536
        inet 127.0.0.1  netmask 255.0.0.0
        loop  txqueuelen 1000  (Local Loopback)
        RX packets 0  bytes 0 (0.0 B)
        RX errors 0  dropped 0  overruns 0  frame 0
        TX packets 0  bytes 0 (0.0 B)
        TX errors 0  dropped 0 overruns 0  carrier 0  collisions 0

[root@3663701a12aa tmp]# [root@Docker ~]#
[root@Docker ~]# docker ps
CONTAINER ID   IMAGE          COMMAND                  CREATED          STATUS          PORTS     NAMES
3663701a12aa   mycentos:1.3   "/bin/sh -c /bin/bash"   24 seconds ago   Up 22 seconds   80/tcp    test_b
efb048390050   centos         "/bin/bash"              8 minutes ago    Up 8 minutes              test_a
2 区分CMD与ENTRYPOINT示例
[root@Docker ~]# vim /myDocker/DockerFile_test02
FROM centos
RUN yum install -y curl
CMD curl -k https://www.baidu.com

[root@Docker ~]# docker build -f /myDocker/DockerFile_test02 -t mycentos02:1.3 .
Sending build context to Docker daemon  12.19MB
Step 1/3 : FROM centos
 ---> 300e315adb2f
Step 2/3 : RUN yum install -y curl
Complete!
Removing intermediate container 9d958771849f
 ---> 2c4160ab22b9
Step 3/3 : CMD curl -s http://ip.cn
 ---> Running in 6419f0667627
Removing intermediate container 6419f0667627
 ---> ed0db2759ed1
Successfully built ed0db2759ed1
Successfully tagged mycentos02:1.3

[root@Docker ~]# docker images mycentos02
REPOSITORY   TAG       IMAGE ID       CREATED              SIZE
mycentos02   1.3       ed0db2759ed1   About a minute ago   243MB

[root@Docker ~]# docker run -it --name test_c mycentos02:1.3
~
百度一下,你就知道
~

[root@Docker ~]# curl -k https://www.baidu.com -i
HTTP/1.1 200 OK
Accept-Ranges: bytes
Cache-Control: private, no-cache, no-store, proxy-revalidate, no-transform
Connection: keep-alive
Content-Length: 2443
Content-Type: text/html
Date: Thu, 11 Mar 2021 07:26:27 GMT
Etag: "588603eb-98b"
Last-Modified: Mon, 23 Jan 2017 13:23:55 GMT
Pragma: no-cache
Server: bfe/1.0.8.18
Set-Cookie: BDORZ=27315; max-age=86400; domain=.baidu.com; path=/

[root@Docker ~]# docker run -it --name test_c mycentos02:1.3 -i

[root@Docker ~]# docker run -it --name test_c mycentos02:1.3 -i
docker: Error response from daemon: Conflict. The container name "/test_c" is already in use by container "fdcf5c5e28df2f7d1dfde3c92903d808fc2b568966162d5594db1c7d1c6bf62a". You have to remove (or rename) that container to be able to reuse that name.
See 'docker run --help'.
# 此处产生报错原因:Docker中可以存在多个CMD命令,但是只有最后一个生效,CMD会被Docker run之后的参数替换,此处加入参数 -i,实际上是执行了代码命令 CMD -i,因此输出报错
[root@Docker ~]# vim /myDocker/DockerFile_test02
FROM centos
RUN yum install -y curl
ENTRYPOINT curl -k https://www.baidu.com
[root@Docker ~]# docker build -f /myDocker/DockerFile_test03 -t mycentos03:1.3 .
[root@Docker ~]# docker run -it --name test_d mycentos03:1.3
~
百度一下,你就知道
~

[root@Docker ~]# docker run -it --name test_d mycentos02:1.3 -i
HTTP/1.1 200 OK
Accept-Ranges: bytes
Cache-Control: private, no-cache, no-store, proxy-revalidate, no-transform
Connection: keep-alive
Content-Length: 2443
Content-Type: text/html
Date: Fri, 12 Mar 2021 07:50:23 GMT
Etag: "588603eb-98b"
Last-Modified: Mon, 23 Jan 2017 13:23:55 GMT
Pragma: no-cache
Server: bfe/1.0.8.18
Set-Cookie: BDORZ=27315; max-age=86400; domain=.baidu.com; path=/
~
百度一下,你就知道
~
- 相同点:都是指定一个容器启动时要执行的命令
- 不同点:
- CMD:会被docker run紧跟的命令替换E
- NTRYPOINT:docker run后面的命令会被当做参数传递给ENTRYPOINT,形成新的命令组合
注意使用追加指令千万不要用CMD,会替换,追加的话用ENTRYPOINT
小总结
1,架构,过程,解析
2,要会分析工程实践的方式,以及过程,然后体现在实际安装中

