vue组件通信案例练习(包含:父子组件通信及平行组件通信)
文章目录
- 一、案例概述
- 二、代码
-
- 准备工作:
- 案例1.1:父组件向子组件传值(或者叫:子组件使用父组件属性),采用v-bind方式实现
- 案例1.2:子组件向父组件传值(或者叫:子组件调用父组件方法),修改父组件属性,采用$emit和v-on(或者叫@自定义事件)方式实现
- 案例1.3:父组件调用子组件方法,修改子组件属性值,采用$refs方式实现
- 案例1.4:父组件直接修改子组件属性值,采用$refs方式实现
- 案例2.1:平行组件之间通信:Student2组件内打印展示Student1组件传递过来的属性,采用v-bind方式实现
- 案例2.2:平行组件之间通信:Student2组件内调用Student1组件方法修改Student1组件属性,采用\$refs和v-on(或者叫@自定义事件)方式实现
- 案例2.3:平行组件之间通信:Student2组件内打印展示Student1组件传递过来的属性,采用“全局事件总线”实现
- 案例2.4:平行组件之间通信:Student2组件内打印展示Student1组件传递过来的属性,采用“消息订阅与发布”实现
- 案例2.5:平行组件之间通信:Student1组件和Student2组件共同读取vuex共享数据,并实现修改vuex数据,采用“vuex方式”实现
- 案例3.1:嵌套父子组建通信,实现父组件一次性给所有子孙组件传值,采用“provide/inject”方式
- 案例4.1:获取父 / 子组件实例,采用“$parent / $children与 ref”方式
- 三、html项目页面实现平行组件通信案例
- 四、使用方式总结
- 本人其他相关文章链接
一、案例概述
说明点1:我使用vue-cli也就是脚手架创建的vue项目,即模拟真实项目创建School.vue组件文件,通过组建引入方式练习,而不是在html页面中引入vue.js练习。
说明点2:vue我目前只学习到组件,所以通信方式较单一,如果想多方式实现请查看下面别人的文章 vue组件间通信六种方式(完整版)
说明点3:该案例练习包含两大分类
第一类:父子组件之间通信
- 案例1.1:父组件向子组件传值(或者叫:子组件使用父组件属性),采用v-bind方式实现
- 案例1.2:子组件向父组件传值(或者叫:子组件调用父组件方法),修改父组件属性,采用$emit和v-on(或者叫@自定义事件)方式实现
- 案例1.3:父组件调用子组件方法,修改子组件属性值,采用$refs方式实现
- 案例1.4:父组件直接修改子组件属性值,采用$refs方式实现
第二类:平行组件间之间通信
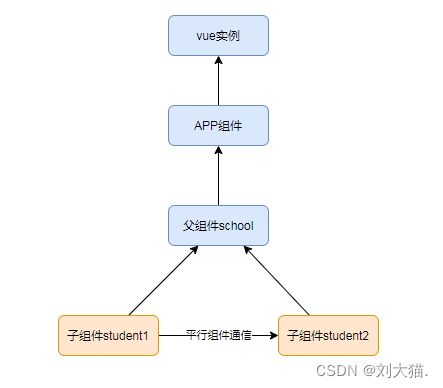
注意点1:默认情况两个子组件之间是无法直接通信的,所以需要构建父组件,通过把父组件当做一个传递桥梁进而实现平行组件间之间通信。(即“子组件student1”把数据传递给“父组件school”,然后“父组件school”再把数据传递给“子组件student2”使用)
- 案例2.1:平行组件之间通信:Student2组件内打印展示Student1组件传递过来的属性,采用v-bind方式实现
- 案例2.2:平行组件之间通信:Student2组件内调用Student1组件方法修改Student1组件属性,采用$refs和v-on(或者叫@自定义事件)方式实现
- 案例2.3:平行组件之间通信:Student2组件内打印展示Student1组件传递过来的属性,采用“全局事件总线”实现
- 案例2.4:平行组件之间通信:Student2组件内打印展示Student1组件传递过来的属性,采用“消息订阅与发布”实现
- 案例2.5:平行组件之间通信:,Student1组件和Student2组件共同读取vuex共享数据,并实现修改vuex数据,采用“vuex方式”实现

第三类:provide/inject,嵌套父子组建通信
- 案例3.1:嵌套父子组建通信,实现父组件一次性给所有子孙组件传值,采用“provide/inject”方式
第四类:$parent / $children与 ref,获取父 / 子组件实例
- 案例4.1:获取父 / 子组件实例,采用“$parent / $children与 ref”方式
二、代码
准备工作:
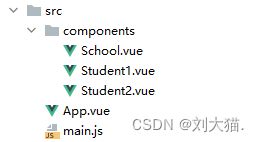
模拟真实项目目录准备如下:图1红框部分为模拟项目使用的必须文件,图2整体流程图如下,
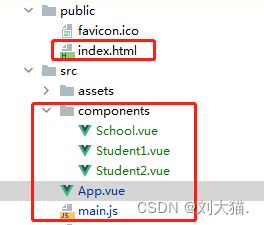
index.html 创建首页
DOCTYPE html>
<html lang="en">
  <head>
    <meta charset="utf-8">
    <meta http-equiv="X-UA-Compatible" content="IE=edge">
    <meta name="viewport" content="width=device-width,initial-scale=1.0">
    <link rel="icon" href="<%= BASE_URL %>favicon.ico">
    <title><%= htmlWebpackPlugin.options.title %>title>
  head>
  <body>
    <noscript>
      <strong>We're sorry but <%= htmlWebpackPlugin.options.title %> doesn't work properly without JavaScript enabled. Please enable it to continue.strong>
    noscript>
    <div id="app">div>
  body>
html>
App.vue 创建App组件,它是所有组件的根部爸爸
<template>
	  <div>
	    <img alt="Vue logo" src="./assets/logo.png"><hr>
	    <School>School>
	  div>
template>

<script>
import School from './components/School'

export default {
	  name: 'App',
	  components: {
	    School
	  }
}
script>

<style>
#app {
	  font-family: Avenir, Helvetica, Arial, sans-serif;
	  -webkit-font-smoothing: antialiased;
	  -moz-osx-font-smoothing: grayscale;
	  text-align: center;
	  color: #2c3e50;
	  margin-top: 60px;
}
style>
main.js 程序主入口,用来绑定id=App的div标签
import Vue from 'vue'
import App from './App.vue'

Vue.config.productionTip = false

new Vue({
	  render: h => h(App),
	  template:`<App>App>`
}).$mount('#app')
案例1.1:父组件向子组件传值(或者叫:子组件使用父组件属性),采用v-bind方式实现
采用v-bind方式实现
注意点1:
语法:父组件配置v:bind传值,子组件配置props:{}接收
大白话讲:父组件通过使用子组件标签,在内部配置v:bind指令传属性,也就是:number=“count” :ids="arr"等等,而子组件通过配置props:{}来接收父组件传递过来的属性
父组件School.vue
<template>
  <div>
    <student1 :number="count" :ids="arr" :person="p" >student1>
  div>
template>

<script>
import Student1 from './Student1'

export default {
  name: "School",
  components: {Student1},
  data() {
    return {
      count: 5,
      arr: [1, 2, 3],
      p: {username: "zhangsan", age: 23}
    }
  }
}
script>

<style scoped>style>
子组件Student1.vue
<template>
  <div>
    <h1>案例1.1:父组件向子组件传值(或者叫:子组件使用父组件属性):h1>
    <p>这是学生1子组件p>
    <p>学生1子组件的属性size:{{size}}p>
    <p>父组件传递过来的属性值:{{number}}--{{ids}}--{{person}}p>
  div>
template>

<script>
export default {
  name: "Student1",
  data() {
    return {
      size:110
    }
  },
  //给组件添加属性 -》 是组件用来接收父组件数据对象的
  props: {
    //父传子属性:普通属性number
    number: null,
    //父传子属性:数组属性ids
    ids: [],
    //父传子属性:对象属性person
    person: {}
  }
}
script>

<style scoped>style>
页面展示效果
案例1.2:子组件向父组件传值(或者叫:子组件调用父组件方法),修改父组件属性,采用$emit和v-on(或者叫@自定义事件)方式实现
采用$emit和v-on(或者叫@自定义事件)方式实现
注意点1:
语法:子组件配置 $emit传值, 父组件配置 v-on 接收。
大白话讲:父组件使用子组件标签时配置v-on指令接收子组件传递过来的属性,也就是@receivePCount="add(arguments)",而子组件配置this.$emit()来触发调用函数并传参给父组件
注意点2:
问题:子组件调用父组件方法时传参,父组件如何接收到参数值?
1)如果只传递一个参数,比如:this.$emit('update-count', "你是谁?");
那么子组件标签形参可不带参数或者形参使用$event
比如<child v-on:update-count="changeCount">child>
或者<child v-on:update-count="changeCount($event)">child>
那么父组件(vue实例)方法中通过value即可接收参数比如:  changeCount:function(value)

2)如果传递多个参数,比如: this.$emit('update-count', "ldz",29);,
那么子组件标签形参请使用arguments
<child v-on:update-count="changeCount(arguments)">child>
那么父组件(vue实例)通过value[index]即可接收参数,比如:
changeCount:function(value){
console.log("@" + value[0]);
console.log("@" + value[1]);
父组件School.vue
<template>
  <div>
    <p>父组件属性count:{{count}}--msg:{{msg}}p>
    <student1  @receivePCount="add(arguments)" >student1>
  div>
template>

<script>
import Student1 from './Student1'

export default {
  name: "School",
  components: {Student1},
  data() {
    return {
      count: 5,
      msg:""
    }
  },
  methods: {
    //子组件向父组件通信
    add(args){
      this.count += args[0];
      this.msg += args[1];
    }
  }
}
script>

<style scoped>style>
子组件Student1.vue
<template>
  <div>
    <h1>案例1.2:子组件向父组件传值(或者叫:子组件调用父组件方法),修改父组件属性count,msg值h1>
    <button @click="childTransmitParentProperty()">子组件内调用父组件方法修改count,msg值button>
  div>
template>

<script>

export default {
  name: "Student1",
  data() {
    return {}
  },
  methods: {
    //案例1.2:父组件传递子组件方法(或者叫:子组件调用父组件方法修改父组件属性值)
    childTransmitParentProperty() {
      this.$emit("receivePCount", 70, "你是个der")
    }
  }
}
script>

<style scoped>style>
案例1.3:父组件调用子组件方法,修改子组件属性值,采用$refs方式实现
采用$refs方式实现
注意点1:
语法:父组件使用子组件标签时配置ref=“student1”,父组件方法中this.$refs.student1= 子组件的vue实例
大白话讲:在父组件中想调用子组件的属性或者方法,需要获取子组件的vue实例,通过ref标签即可获取
父组件School.vue
<template>
  <div>
    <student1 ref="student1">student1>
    <h2>案例1.3:父组件调用子组件方法,修改子组件属性值h2>
    <button @click="pRemSize()">父组件调用子组件方法减少size值button><hr>
  div>
template>

<script>
import Student1 from './Student1'

export default {
  name: "School",
  components: {Student1},
  data() {
    return {}
  },
  methods: {
    //案例1.3:父组件直接使用子组件方法,修改子组件属性值
    pRemSize() {
      this.$refs.student1.remSize()
    }
  }
}
script>

<style scoped>style>
子组件Student1.vue
<template>
  <div>
    <p>这是学生1子组件p>
    <p>学生1子组件的属性size:{{size}}p>
  div>
template>

<script>
export default {
  name: "Student1",
  data() {
    return {
      size:110
    }
  },
  methods: {
    remSize() {
      this.size--;
    }
  }
}
script>

<style scoped>style>
案例1.4:父组件直接修改子组件属性值,采用$refs方式实现
采用$refs方式实现
注意点1:
语法:父组件使用子组件标签时配置ref=“student1”,父组件方法中this.$refs.student1= 子组件的vue实例
大白话讲:在父组件中想调用子组件的属性或者方法,需要获取子组件的vue实例,通过ref标签即可获取
父组件School.vue
<template>
  <div>
    <student1 ref="student1">student1>
    <h2>案例1.4:父组件直接修改子组件属性值h2>
    <button @click="parentModifyChildProperty()">父组件直接修改子组件属性size值button><hr>
  div>
template>

<script>
import Student1 from './Student1'

export default {
  name: "School",
  components: {Student1},
  data() {
    return {}
  },
  methods: {
    //案例1.4:父组件直接修改子组件属性值
    parentModifyChildProperty() {
      this.$refs.student1.size = -1;
    }
  }
}
script>

<style scoped>style>
子组件Student1.vue
<template>
  <div>
    <p>这是学生1子组件p>
    <p>学生1子组件的属性size:{{size}}p>
  div>
template>

<script>
export default {
  name: "Student1",
  data() {
    return {
      size:110
    }
  }
}
script>

<style scoped>style>
案例2.1:平行组件之间通信:Student2组件内打印展示Student1组件传递过来的属性,采用v-bind方式实现
采用v-bind方式实现
注意点1:默认情况两个子组件之间是无法直接通信的,所以需要构建父组件,通过把父组件当做一个传递桥梁进而实现平行组件间之间通信。(即“子组件student1”把数据传递给“父组件school”,然后“父组件school”再把数据传递给“子组件student2”使用)
父组件School.vue
<template>
  <div>
    <student1 ref="student1" @receivePCount="add(arguments)" >student1>
    <student2 ref="student2" :stu1TransformCount="count" :stu1TransformMsg="msg">student2>
  div>
template>

<script>
import Student1 from './Student1'
import Student2 from './Student2'

export default {
  name: "School",
  components: {Student2, Student1},
  data() {
    return {
      count: 5,
      msg:""
    }
  },
  methods: {
    //子组件向父组件通信
    add(args){
      this.count += args[0];
      this.msg += args[1];
    }
  }
}
script>

<style scoped>style>
子组件Student1.vue
<template>
  <div>
    <h2>案例2.1:平行组件之间通信:Student2组件内打印展示Student1组件传递过来的属性h2>
    <button @click="childTransmitParentProperty()">平行组件Student1发送数据给Student2button><hr>
  div>
template>

<script>
export default {
  name: "Student1",
  data() {
    return {}
  },
  methods: {
    //案例1.2:父组件传递子组件方法(或者叫:子组件调用父组件方法修改父组件属性值)
    childTransmitParentProperty() {
      this.$emit("receivePCount", 70, "你是个der")
    }
  }
}
script>

<style scoped>style>
子组件Student2.vue
<template>
  <div>
    <p>这是子组件学生2p>
    <p>平行组件通信:接收的学生组件1发过来的数据:{{stu1TransformCount}}--{{stu1TransformMsg}}p>
  div>
template>

<script>
export default {
  name: "Student2",
  data() {
    return {}
  },
  props:{
    stu1TransformCount:null,
    stu1TransformMsg:null
  }
}
script>

<style scoped>style>
案例2.2:平行组件之间通信:Student2组件内调用Student1组件方法修改Student1组件属性,采用$refs和v-on(或者叫@自定义事件)方式实现
采用$refs和v-on(或者叫@自定义事件)方式实现
注意点1:默认情况两个子组件之间是无法直接通信的,所以需要构建父组件,通过把父组件当做一个传递桥梁进而实现平行组件间之间通信。(即“子组件student1”把数据传递给“父组件school”,然后“父组件school”再把数据传递给“子组件student2”使用)
父组件School.vue
<template>
  <div>
    <student1 ref="student1">student1>
    <student2 ref="student2"  @receiveStu1Method="invokeStu1Method">student2>
  div>
template>

<script>
import Student1 from './Student1'
import Student2 from './Student2'

export default {
  name: "School",
  components: {Student2, Student1},
  data() {
    return {}
  },
  methods: {
    invokeStu1Method() {
      this.$refs.student1.remSize()
    }
  },
}
script>

<style scoped>style>
子组件Student1.vue
<template>
  <div>
    <p>这是学生1子组件p>
    <p>学生1子组件的属性size:{{size}}p>
  div>
template>

<script>
export default {
  name: "Student1",
  data() {
    return {
      size:110
    }
  },
  methods: {
    remSize() {
      this.size--;
    }
  }
}
script>

<style scoped>style>
子组件Student2.vue
<template>
  <div>
    <h2>案例2.2:平行组件之间通信:Student2组件内调用Student1组件方法修改Student1组件属性h2>
    <button @click="invokeStu1Method()">平行组件Student2调用Student1方法,修改size值button><hr>
  div>
template>

<script>
export default {
  name: "Student2",
  data() {
    return {}
  },
  props:{
    receiveStu1Method:function () {}
  },
  methods:{
    invokeStu1Method() {
      this.$emit("receiveStu1Method")
    }
  }
}
script>

<style scoped>style>
案例2.3:平行组件之间通信:Student2组件内打印展示Student1组件传递过来的属性,采用“全局事件总线”实现
采用“全局事件总线”实现
说明:使用“全局事件总线”只需要2个平行组件通信就行,跟v-bind方式区别在于,v-bind方式需要使用父组件当一个传递者,而“全局事件总线”不需要传递者这么个角色。
注意点1:
问题:“全局事件总线”需要哪些特点?
答案:
1)被所有组件(vc、vm)能够看得见
2)能够调用$on、$emit、$off
注意点2:
问题:Vue原型对象上面的所有属性和方法是给谁用的?
答案:是给所有的vm和vc使用的
注意点3:
问题:为什么定义“全局事件总线”要放在main.js文件中?
答案:因为哪里引入Vue,哪里才会去定义“全局事件总线”
注意点4:
问题:为什么定义“全局事件总线”要放在beforeCreate的钩子函数中?
答案:原因1,beforeCreate钩子函数里this指代new出来的vm,原因2,在beforeCreate钩子函数里模板还没解析,数据监测和数据代理也还没完成呢。也就是说借助这个beforeCreate钩子函数你把想做的事儿做好了,原型上该放的放好了,随后模板开始解析,等组件执行的时候你该放的都放好了,后续才做都不会产生影响。
注意点5:
问题:如何避免在使用“全局事件总线”时自定义函数名重名使用问题?比如组件1使用自定义函数名叫demo,那组件2不全文搜索也使用了自定义函数名也叫demo,这就混了
答案:真实项目中src目录下创建一个config文件夹,里面创建个constants常量文件,里面用来定义要使用的自定义函数名,方便别人查看并避免重名问题。
注意点6:
问题:为什么要在组件销毁之前,把“全局事件总线”中定义的自定义事件函数解绑?那“知识点3.13自定义事件”中咋没说解绑的事儿呢?
答案:“知识点3.13自定义事件”中组件销毁了== vc销毁了,vc销毁了自定义事件也就销毁了,而“全局事件总线”中定义的自定义函数是一直存在的,哪怕使用组件销毁了,但是Vue实力定义的“全局事件总线”中还是会存在自定义事件,所以需要在组件销毁之前进行解绑。
注意点7:销毁“全局事件总线”中定义的自定义事件请放在beforeDestroy()钩子中
注意点8:子组件中使用“全局事件总线”时this.$bus.$on()中回调配置要使用箭头函数,不要使用普通函数,箭头函数中this才指代vc,而普通函数中this指代vue实例,因为最终要在school组件上接收平行组件发过来的消息,所以要使用vc,而不是要使用vue实例,因为vue实例不是我们最终要的。
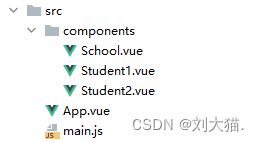
项目结构
完整代码
main.js
//引入Vue
import Vue from 'vue'
//引入App
import App from './App.vue'
//关闭Vue的生产提示
Vue.config.productionTip = false

//创建vm
new Vue({
	el:'#app',
	render: h => h(App),
	beforeCreate() {
		Vue.prototype.$bus = this
	},
})
App.vue
<template>
	<div id="app">
		<div>
			<School></School>
		</div>
	</div>
</template>

<script>
  import School from "./components/School";

	export default {
		name:'App',
		components:{School},
		data() {
			return {

			}
		},
		methods: {

    }
	}
</script>
School.vue
<template>
  <div>
    <student1></student1>
    <student2></student2>
  </div>
</template>

<script>
import Student1 from './Student1'
import Student2 from './Student2'

export default {
  name: "School",
  components: {Student2, Student1},
  data() {
    return {}
  },
  methods: {

  },
}
</script>

<style scoped></style>
Student1.vue
<template>
  <div class="student">
    <h2>学生1姓名:{{name}}</h2>
    <h2>学生1性别:{{sex}}</h2>
    <button @click="sendToStudent2">把学生名给School组件</button>
  </div>
</template>

<script>
export default {
  name:'Student',
  data() {
    return {
      name:'张三',
      sex:'男',
    }
  },
  methods: {
    sendToStudent2(){
      this.$bus.$emit('hello',this.name, this.sex)
    }
  },
}
</script>

<style lang="less" scoped>
.student{
  background-color: pink;
  padding: 5px;
  margin-top: 30px;
}
</style>
Student2.vue
<template>
  <div class="school">
    <h2>学生2名称:{{name}}</h2>
    <h2>学生2地址:{{address}}</h2>
  </div>
</template>

<script>
export default {
  name:'School',
  data() {
    return {
      name:'李四',
      address:'女',
    }
  },
  mounted() {
    this.$bus.$on('hello',(arguements)=>{
      console.log('我是Student2组件,收到了数据:',arguements[0], arguements[1])
    })
  },
  beforeDestroy() {
    this.$bus.$off('hello')
  },
}
</script>

<style scoped>
.school{
  background-color: skyblue;
  padding: 5px;
}
</style>
结果展示
案例2.4:平行组件之间通信:Student2组件内打印展示Student1组件传递过来的属性,采用“消息订阅与发布”实现
使用步骤:
采用“消息订阅与发布”实现
注意点0:这块知识点如果不太懂,可以查看我自己总结的博客:vue2知识点:消息订阅与发布
注意点1:由于“消息订阅与发布”可依赖的第三方太多了,这里使用pubsub-js
注意点2:使用语法
消息订阅语法
import pubsub from 'pubsub-js'

mounted() {
this.pubId = pubsub.subscribe('hello',(msgName,data)=>{
	// console.log('有人发布了hello消息,hello消息的回调执行了',msgName,data)
})
},
beforeDestroy() {
	// this.$bus.$off('hello')
	pubsub.unsubscribe(this.pubId)
}
消息发布语法
import pubsub from 'pubsub-js'

pubsub.publish('hello',666)
注意点3:取消订阅方式和“全局事件总线”不同,取消订阅指定订阅返回的id,且每次返回的id都不同,而“全局事件总线”指定的是“自定义事件名称”
注意点4:订阅回调配置一定要使用箭头函数或者外部定义方法,在订阅中引用也行,千万不要使用普通函数,因为普通函数中this不指代vc,而是undefine,这一点跟“全局事件总线”中的注意点8很像,但还是略有不同
注意点5:消息订阅会接收到2个参数,第1个参数为消息名称,第2个参数才是传递过来的值,如写法1,但是实际msgName参数1他跟用不到它,所以可使用下划线“_”占个位,如写法2
写法1:
this.pubId = pubsub.subscribe('hello',(msgName,data)=>{
	// console.log('有人发布了hello消息,hello消息的回调执行了',msgName,data)
})
写法2:
this.pubId = pubsub.subscribe('hello',(_,data)=>{
	// console.log('有人发布了hello消息,hello消息的回调执行了',_,data)
})
注意点6:箭头函数中的名称(msgName,data)=>{}可以随便写,但是避免使用使用关键字名字
注意点7:如果想传递多个参数,需使用{}
发送方
sendToStudent2(){
  pubsub.publish('hello',{name:this.name, sex:this.sex})
}
接收方
mounted() {
    this.pubId = pubsub.subscribe('hello',(msgName, object)=>{
      console.log('有student1平行组件发布了hello消息,hello消息的回调执行了:',object.name, object.sex)
    })
  }
项目结构
完整代码
main.js
//引入Vue
import Vue from 'vue'
//引入App
import App from './App.vue'
//关闭Vue的生产提示
Vue.config.productionTip = false

//创建vm
new Vue({
	el:'#app',
	render: h => h(App)
})
App.vue
<template>
	<div id="app">
		<div>
			<School></School>
		</div>
	</div>
</template>

<script>
  import School from "./components/School";

	export default {
		name:'App',
		components:{School},
		data() {
			return {

			}
		},
		methods: {

    }
	}
</script>
School.vue
<template>
  <div>
    <student1></student1>
    <student2></student2>
  </div>
</template>

<script>
import Student1 from './Student1'
import Student2 from './Student2'

export default {
  name: "School",
  components: {Student2, Student1},
  data() {
    return {}
  },
  methods: {

  },
}
</script>

<style scoped></style>
Student1.vue
<template>
  <div class="student">
    <h2>学生1姓名:{{name}}</h2>
    <h2>学生1性别:{{sex}}</h2>
    <button @click="sendToStudent2">把学生名给School组件</button>
  </div>
</template>

<script>
import pubsub from 'pubsub-js';

export default {

  name:'Student',
  data() {
    return {
      name:'张三',
      sex:'男',
    }
  },
  methods: {
    sendToStudent2(){
      pubsub.publish('hello',{name:this.name, sex:this.sex})
    }
  },
}
</script>

<style lang="less" scoped>
.student{
  background-color: pink;
  padding: 5px;
  margin-top: 30px;
}
</style>
Student2.vue
<template>
  <div class="school">
    <h2>学生2名称:{{name}}</h2>
    <h2>学生2地址:{{address}}</h2>
  </div>
</template>

<script>
import pubsub from 'pubsub-js';

export default {
  name:'School',
  data() {
    return {
      name:'李四',
      address:'女',
    }
  },
  mounted() {
    this.pubId = pubsub.subscribe('hello',(msgName, object)=>{
      console.log('有student1平行组件发布了hello消息,hello消息的回调执行了:',object.name, object.sex)
    })
  },
  beforeDestroy() {
    pubsub.unsubscribe(this.pubId)
  },
}
</script>

<style scoped>
.school{
  background-color: skyblue;
  padding: 5px;
}
</style>
结果展示
案例2.5:平行组件之间通信:Student1组件和Student2组件共同读取vuex共享数据,并实现修改vuex数据,采用“vuex方式”实现
使用步骤:


注意点0:如果vuex相关知识点不太了解,可以查看我自己总结的博客进行了解学习。
vue2知识点:理解vuex、安装vuex、搭建vuex环境
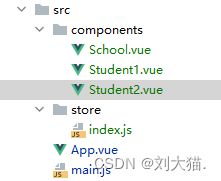
项目目录
main.js
//引入Vue
import Vue from 'vue'
//引入App
import App from './App.vue'
//关闭Vue的生产提示
Vue.config.productionTip = false
//引入store
import store from './store'

//创建vm
new Vue({
    el:'#app',
    render: h => h(App),
    store
})
App.vue
index.js
//该文件用于创建Vuex中最为核心的store
import Vue from 'vue'
//引入Vuex
import Vuex from 'vuex'
//应用Vuex插件
Vue.use(Vuex)

//准备actions——用于响应组件中的动作
const actions = {
    //响应式组件中加的动作
    jia(context, value) {
        context.commit('JIA', value);
    }
}
//准备mutations——用于操作数据(state)
const mutations = {
    //执行加
    JIA(state, value) {
        state.sum += value;
    }
}
//准备state——用于存储数据
const state = {
    sum:0
}

//创建并暴露store
export default new Vuex.Store({
    actions,
    mutations,
    state,
})
School.vue
Student1.vue
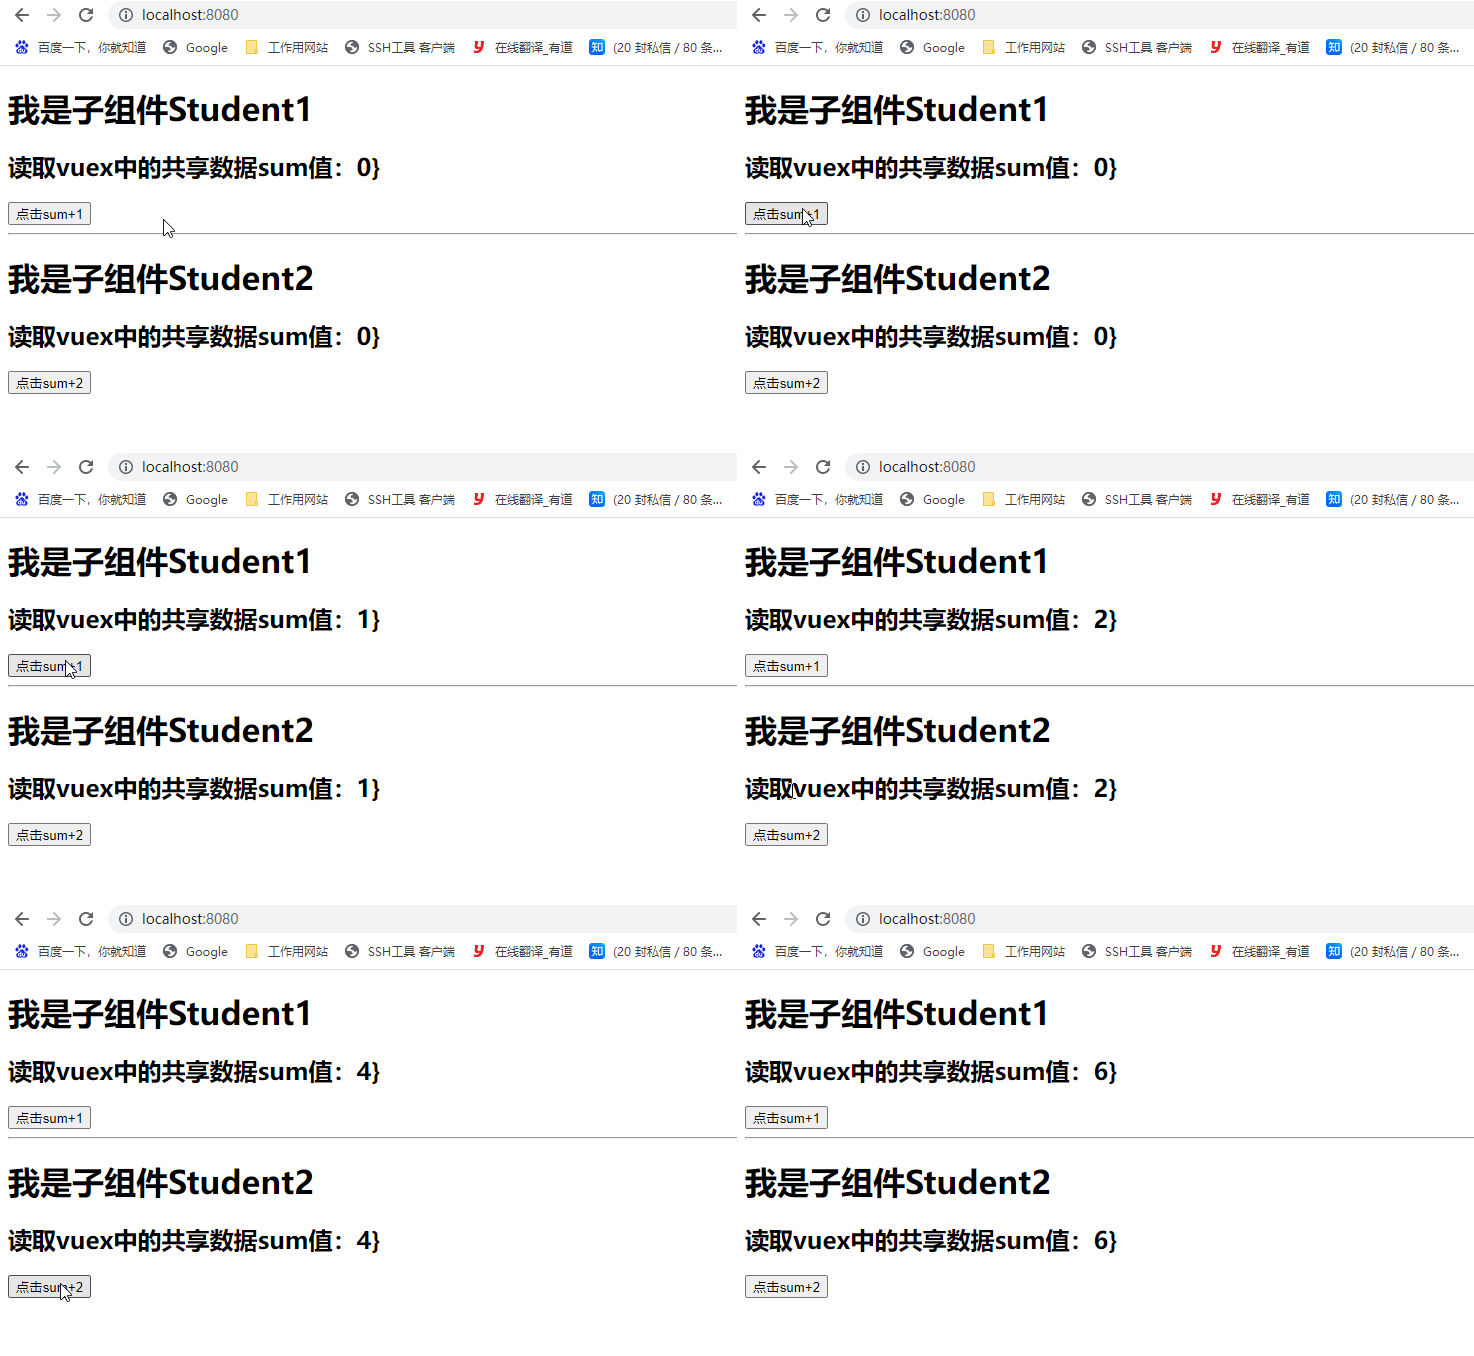
我是子组件Student1
读取vuex中的共享数据sum值:{{$store.state.sum}}}
Student2.vue
我是子组件Student2
读取vuex中的共享数据sum值:{{$store.state.sum}}}
结果展示
案例3.1:嵌套父子组建通信,实现父组件一次性给所有子孙组件传值,采用“provide/inject”方式
Vue2.2.0新增API,这对选项需要一起使用,以允许一个祖先组件向其所有子孙后代注入一个依赖,不论组件层次有多深,并在起上下游关系成立的时间里始终生效。一言而蔽之:祖先组件中通过provider来提供变量,然后在子孙组件中通过inject来注入变量。
provide / inject API 主要解决了跨级组件间的通信问题,不过它的使用场景,主要是子组件获取上级组件的状态,跨级组件间建立了一种主动提供与依赖注入的关系。:
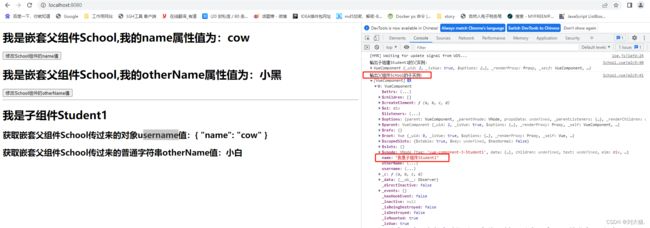
注意点1:provide 和 inject 绑定并不是可响应的。这是刻意为之的。然而,如果你传入了一个可监听的对象,那么其对象的属性还是可响应的。仔细看最终案例结果展示username属性传递的是对象,所以是响应式的;而otherNme传递的是普通字符串,是非响应的,因为子组件值未更新。
使用场景:祖先组建一次性给所有子孙组件传递属性。
优点是:节省代码,不需要每个子组件使用v-bind之类的挨个绑定
项目目录,其中School是父组件,Student1是子组建
项目代码
main.js
//引入Vue
import Vue from 'vue'
//引入App
import App from './App.vue'
//关闭Vue的生产提示
Vue.config.productionTip = false

//创建vm
new Vue({
    el:'#app',
    render: h => h(App),
})
App.vue
School.vue
我是嵌套父组件School,我的name属性值为:{{obj.name}}
我是嵌套父组件School,我的otherName属性值为:{{otherName}}
Student1.vue
我是子组件Student1
获取嵌套父组件School传过来的对象username值:{{username}}
获取嵌套父组件School传过来的普通字符串otherName值:{{otherName}}
结果展示
案例4.1:获取父 / 子组件实例,采用“$parent / $children与 ref”方式
- ref:如果在普通的 DOM 元素上使用,引用指向的就是 DOM 元素;如果用在子组件上,引用就指向组件实例
- $parent / $children:访问父 / 子实例
注意点1:这两种都是直接得到组件实例,使用后可以直接调用组件的方法或访问数据。
改动地方,School.vue组件中使用子组件Student1 标签中,定义ref属性,同时打印 p a r e n t 和 parent和 parent和children
三、html项目页面实现平行组件通信案例
上面的代码是针对vue-cli创建的vue项目实现组件通信的方案,然而在刚学习vue时都是创建html页面引入vue.js去练习vue技术的,接下来介绍的方案就是针对html页面中组件通信的。
语法:$emit和$on,同一页面中通过创建Event实例去传递使用数据
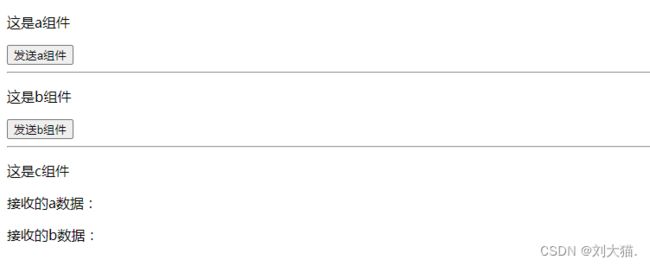
问题要求:有
、 、 3个子组件,他们三个处于平行关系,用来接收或者组件发过来的消息
子组件中调用Event.$emit(‘asend’, this.ipt)调用
子组件中接收Event.$on(‘bsend’, function (msg) { _this.strb = msg;})
DOCTYPE html>
<html lang="en">
<head>
    <meta charset="UTF-8">
    <title>Vue练习title>

    <script type="text/javascript" src="../../static/vue/vue.js" >script>
head>
<body>

    <div id="app">
        <v-a>v-a><hr>
        <v-b>v-b><hr>
        <v-c>v-c>
    div>

    <template id="a">
        <div>
            <p>这是a组件p>
            <button @click="a()">发送a组件button>
        div>
    template>
    <template id="b">
        <div>
            <p>这是b组件p>
            <button @click="b()">发送b组件button>
        div>
    template>
    <template id="c">
        <div>
            <p>这是c组件p>
            <p>接收的a数据:{{stra}}p>
            <p>接收的b数据:{{strb}}p>
        div>
    template>


    <script type="text/javascript">
        var Event = new Vue();

        new Vue({
            el: '#app',
            data: {},
            methods: {},
            components: {
                "v-a": {
                    template: "#a",
                    data() {
                        return {
                            ipt:"我是a组件发过来数据"
                        }
                    },
                    methods: {
                        a() {
                            Event.$emit('asend', this.ipt)
                        }
                    }
                },
                "v-b": {
                    template: '#b',
                    data() {
                        return{
                            ipt:"我是b组件发过来数据"
                        }
                    },
                    methods: {
                        b() {
                            Event.$emit('bsend', this.ipt)
                        }
                    }
                },
                "v-c": {
                    template: '#c',
                    data() {
                        return {
                            stra:"",
                            strb:""
                        }
                    },
                    mounted() {
                        var _this = this;
                        //接收a数据
                        Event.$on('asend', function (msg) {
                            _this.stra = msg;
                        })
                        //接收b数据
                        Event.$on('bsend', function (msg) {
                            _this.strb = msg;
                        })
                    }
                }
            }
        })
    script>
body>
html>
四、使用方式总结
常见使用场景可以分为三类:
父子通信:
- 父向子传递数据是通过 props,子向父是通过$emit和$on或者v-on
- 多级父子组件嵌套想获取父/子的vc实例,请使用$parent / $children
- ref 也可以访问组件实例
- 父组件一次性给所有子孙组件传递属性,请使用provide / inject
- $attrs/$listeners不常用,可忽略或者了解即可
平行组件通信:
- 全局事件总线,请使用Bus(推荐使用),优点vue开发完全友好支持,适用于很小项目或者练习
- 消息订阅发布,属于使用第三方(不太推荐使用)
- vuex,共享数据(推荐使用),同样是vue开发完全友好支持,vuex和全局事件总线区别是:大项目请使用vuex,因为共享数据多,小范围共享数据请使用全局事件总线Bus
跨级通信:
- Bus
- Vuex
- provide / inject API
- $attrs/$listeners
本人其他相关文章链接
1.《基础篇第1章:vue2简介》包含Vue2知识点、个人总结的使用注意点及碰到的问题总结
2.《基础篇第2章:vue2基础》包含Vue2知识点、个人总结的使用注意点及碰到的问题总结
3.《进阶篇第3章:vue进阶-组件》包含组件、自定义事件、插槽、路由等等扩展知识点
4.《基础篇第4章》:使用vue脚手架创建项目
5.vue2知识点:数据代理
6.vue2知识点:事件处理
7.vue2知识点:列表渲染(包含:v-for、key、取值范围、列表过滤、列表排序、vue监视对象或数组的数据改变原理、总结vue数据监测)
8.vue2知识点:计算属性与监听属性
9.vue2知识点:生命周期(包含:生命周期介绍、生命周期钩子、整体流程图详解)
10.vue2知识点:非单文件组件和单文件组件
11.vue2知识点:组件is属性
12.vue2知识点:组件模板定义
13.vue2知识点:组件的props属性、非props属性、props属性校验
14.vue2知识点:组件自定义事件
15.vue2知识点:组件插槽分发
16.vue2知识点:动态组件
17.vue2知识点:混入
18.vue2知识点:浏览器本地缓存
19.vue2知识点:全局事件总线(GlobalEventBus)
20.vue2知识点:消息订阅与发布
21.vue2知识点:nextTick语法
22.vue2知识点:Vue封装的过度与动画
23.vue2知识点:路由
24.vue2知识点:vm调用待$命令介绍
25.vue组件通信案例练习(包含:父子组件通信及平行组件通信)
26.vue表单案例练习:vue表单创建一行数据及删除数据的实现与理解
27.vue2基础组件通信案例练习:待办事项Todo-list案例练习
28.vue2基础组件通信案例练习:把案例Todo-list改写成本地缓存
29.vue2基础组件通信案例练习:把案例Todo-list改成使用自定义事件
30.vue2基础组件通信案例练习:把案例Todo-list改成使用全局事件总线
31.vue2基础组件通信案例练习:把案例Todo-list改成使用消息订阅与发布
32.vue2基础组件通信案例练习:把案例Todo-list新增编辑按钮
33.vue2基础组件通信案例练习:把案例Todo-list改成使用动画与过度
34.学习vue2遇到过的问题及个人总结
