机器学习之分类模型评估指标及sklearn代码实现
文章目录
- 前言
- Accuracy(准确率)、Recall(召回率)、Precision(精确率)、 F1评分(F1-Score)
-
- Accuracy(准确率)
- Recall(召回率)
- Precision(精确率)
- F1评分(F1-Score)
- TPR、FPR、ROC、AUC、AP
-
- TPR、FPR
- ROC
- AUC
- AP
- 参考:
前言
由于模型评估指标对于模型来说还是非常重要的,并且各种各样,因为最开始认为对分类模型评估只有个非常简单的思路:预测对的/总数,后来才发现,这个指标有的时候是没啥用的…比如说正负样本失调的时候。因此,还是需要好好整理一下分类模型的评价指标,先整理一些,以后遇到了再补。
Accuracy(准确率)、Recall(召回率)、Precision(精确率)、 F1评分(F1-Score)
以二分类模型为例,假设我们需要评价一个乳腺癌病情诊断分类器,其中标签1代表阳性,表明患有乳腺癌,标签0代表阴性,表明没有乳腺癌。那么TP、FP、FN、TN如下表所示:
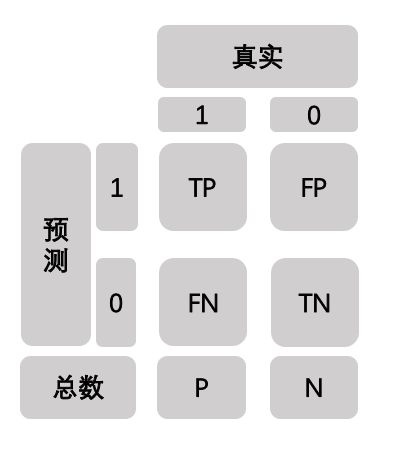
其中真实代表数据的真实值,预测代表模型的预测值,P、N分别代表真实的阳性数和阴性数。
假设我们有那么一组数据:
y_true = [1, 1, 0, 1, 0, 0]
y_pred = [1, 1, 1, 1, 0, 1]
y_true为真实标签,y_pred为模型的预测标签,那么带入表格可得:
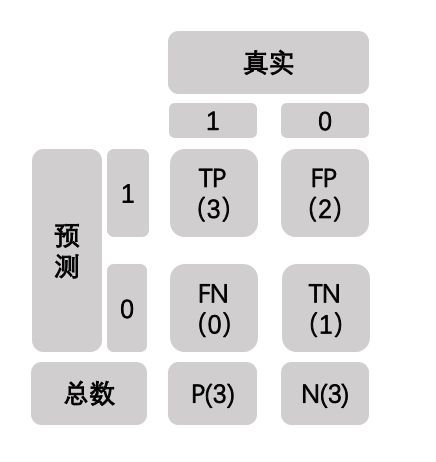
TP表示原本为阳性,经模型预测后也为阳性的个数
FN表示原本为阳性,经模型预测后不为阳性的个数
FP、TN亦是如此。
我们可以通过sklearn检验一下结果是否正确:
from sklearn.metrics import confusion_matrix
y_true = [1, 1, 0, 1, 0, 0]
y_pred = [1, 1, 1, 1, 0, 1]
TN, FP, FN, TP = confusion_matrix(y_true, y_pred).ravel()
print(TN, FP, FN, TP)
输出:

结果正确
然后我们就可以根据公式计算 Accuracy(准确率)、Recall(召回率)、Precision(精确率)
Accuracy(准确率)
Recall(召回率)
![]()
用阳性来举例
简单来说就是用于评判模型能不能很好的找出阳性样本,即 阳性样本中被模型识别出阳性的数量/实际的阳性样本数量,这里阳性的recall = 3 / 3 = 100%
说明模型recall非常好,因为乳腺癌是宁可错杀也不可放过的,因此需要有较高的召回率才行的,对阳性样本需要有较高的识别度。
Precision(精确率)
![]()
用阳性来举例
精确率又称为查准率,可以简单理解为该模型认为你是阳性,而其中实际确实为阳性的概率,这里阳性的Precision = 3 / 5
F1评分(F1-Score)
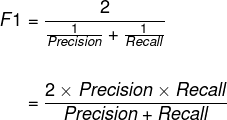
F1就是precision和recall的一种综合考虑标准,因为有的模型需要recall高才能够进行实际运用,有的需要precision高,有的则需要二者的折中。
以阳性为例,这里f1 = 2 * 0.6 * 1 / 0.6 + 1 = 0.75
至此已经差不多可以理解了,我们可以用sklearn来验证一下结果:
from sklearn.metrics import classification_report
y_true = [1, 1, 0, 1, 0, 0]
y_pred = [1, 1, 1, 1, 0, 1]
print(classification_report(y_true, y_pred))
输出:
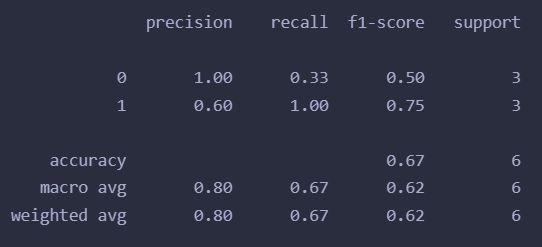
可见阳性(标签1)的样本的precision、recall、f1-score以及计算的acc都是正确的,符合预期。
TPR、FPR、ROC、AUC、AP
假设数据如下:
y_true = np.array([0, 0, 1, 1])
y_scores = np.array([0.1, 0.4, 0.35, 0.8])
y_true为对应标签,y_scores为对于标签的预测值,那么我们可以确定一个阈值与y_scores进比较,大于阈值的为阳性,小于阈值的为阴性。
TPR、FPR
假设阈值为0.5
那么y_pred = [0, 0, 0, 1]
TPR为查出率,即 检测为阳性实际是阳性 / 所有的阳性 = 1 / 2 = 0.5
FRP为误检率,即 检测为阳性实际非阳性 / 所有非阳性 = 0 / 2 = 0
那么我们可以获得一个(FPR,TPR)的坐标点,就可以画图了
当然如果我们换一个阈值,例如换成0.39,就能获得另一个(FPR,TPR)的坐标点
sklearn有计算阈值和对应TPR、FRP的函数
import numpy as np
from sklearn.metrics import roc_auc_score,roc_curve
y_true = np.array([0, 0, 1, 1])
y_scores = np.array([0.1, 0.4, 0.35, 0.8])
# 阳性为1
FPR, TPR, thresholds = roc_curve(y_true, y_scores, pos_label=1)
print(FPR)
print(TPR)
print(thresholds)
# true
# 0 0 1 1

# 1.8
# 0 0 0 0

# 0.8
# 0 0 0 1

# 0.4
# 0 1 0 1

# 0.35
# 0 1 1 1

# 0.1
# 1 1 1 1
# 这5个阈值已经囊括了所有情况了
ROC
当取了所有阈值使得所有(FPR,TPR)都计算出后,将每个点都画在图上,然后连接出的线就是ROC了。
import numpy as np
from sklearn.metrics import roc_auc_score,roc_curve
y_true = np.array([0, 0, 1, 1])
y_scores = np.array([0.1, 0.4, 0.35, 0.8])
# 阳性为1
FPR, TPR, thresholds = roc_curve(y_true, y_scores, pos_label=1)
print(FPR)
print(TPR)
print(thresholds)
import matplotlib.pyplot as plt
plt.scatter(FPR, TPR)
plt.plot(FPR, TPR)
plt.show()
运行结果:
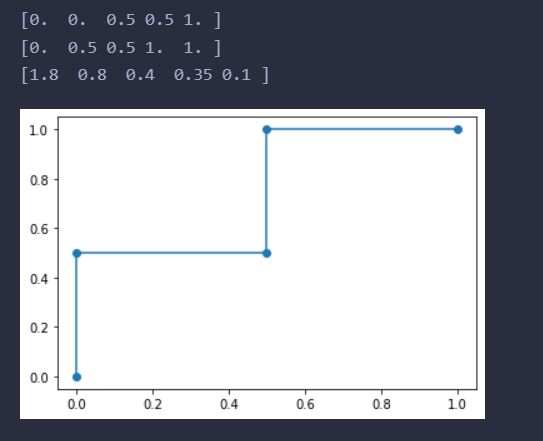
这就是这组数据的ROC曲线了
可见(0,1)这个点应该是最好的阈值划分了。
AUC
ROC曲线的形状不太好量化比较,于是就有了AUC。就是ROC曲线与x轴围成的面积
此时AUC=1 * 0.5 + 0.5 * 0.5 = 0.75
可以用可爱的sklearn验证一下:
import numpy as np
from sklearn.metrics import roc_auc_score,roc_curve
y_true = np.array([0, 0, 1, 1])
y_scores = np.array([0.1, 0.4, 0.35, 0.8])
# 阳性为1
FPR, TPR, thresholds = roc_curve(y_true, y_scores, pos_label=1)
AUC = roc_auc_score(y_true, y_scores)
print(AUC)
AP
AP和AUC差不多,只不过点是用(recall,precision)来描
import numpy as np
from sklearn.metrics import precision_recall_curve
y_true = np.array([0, 0, 1, 1])
y_scores = np.array([0.1, 0.4, 0.35, 0.8])
# 阳性为1
precision, recall, thresholds=precision_recall_curve(y_true,y_scores,pos_label=1)
print(precision)
print(recall)
print(thresholds)
import matplotlib.pyplot as plt
plt.scatter(recall, precision)
plt.plot(recall, precision)
plt.ylim(0, 1.2)
plt.xlim(0, 1.2)
plt.show()
运行结果如下:
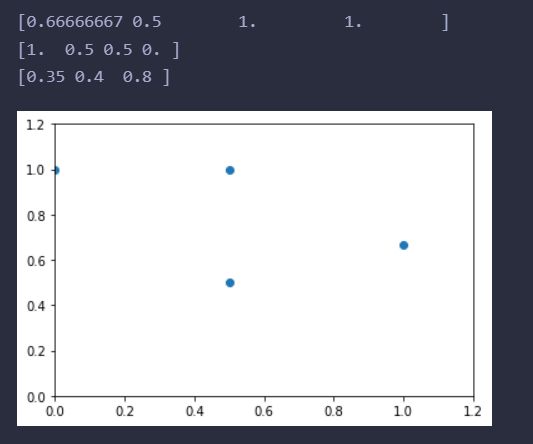
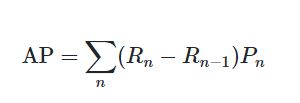
但是并不能点直接相连求面积,因为其计算公式如下:
那么图的曲线应该是这样画的:
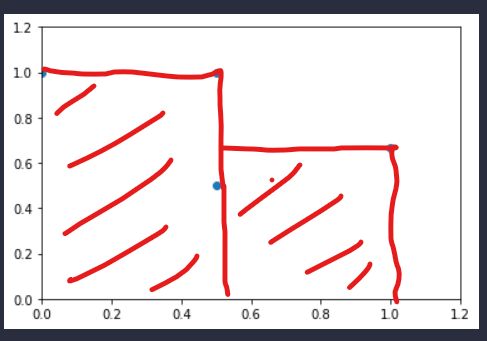
AP = 0.5 * 1 + 0.5 * 0.6666666 = 0.8333333
我们同样可以验证一下:
from sklearn.metrics import average_precision_score
import numpy as np
y_true = np.array([0, 0, 1, 1])
y_scores = np.array([0.1, 0.4, 0.35, 0.8])
AP = average_precision_score(y_true, y_scores)
print(AP)
参考:
机器学习 - 模型评估(TPR、FPR、K1、ROC、AUC、KS、GAIN、LIFT、GINI、KSI)
