前言
AIDL(Android Interface Definition Language)是一种 IDL 语言,用于生成可以在 Android 设备上两个进程之间进行进程间通信(IPC)的代码。 通过 AIDL,可以在一个进程中获取另一个进程的数据和调用其暴露出来的方法,从而满足进程间通信的需求。通常,暴露方法给其他应用进行调用的应用称为服务端,调用其他应用的方法的应用称为客户端,客户端通过绑定服务端的 Service 来进行交互。
官方文档中对 AIDL 有这样一段介绍:
Using AIDL is necessary only if you allow clients from different applications to access your service for IPC and want to handle multithreading in your service. If you do not need to perform concurrent IPC across different applications, you should create your interface by implementing a Binder or, if you want to perform IPC, but do not need to handle multithreading, implement your interface using a Messenger. Regardless, be sure that you understand Bound Services before implementing an AIDL.
第一句很重要,“只有当你允许来自不同的客户端访问你的服务并且需要处理多线程问题时你才必须使用AIDL”,其他情况下你都可以选择其他方法,如使用 Messenger,也能跨进程通信。可见 AIDL 是处理多线程、多客户端并发访问的,而 Messenger 是单线程处理。 下面介绍 AIDL 的使用方法。
1 创建 AIDL 文件
AIDL 文件可以分为两类。一类用来声明实现了 Parcelable 接口的数据类型,以供其他 AIDL 文件使用那些非默认支持的数据类型。还有一类是用来定义接口方法,声明要暴露哪些接口给客户端调用。在 AIDL 文件中需要明确标明引用到的数据类型所在的包名,即使两个文件处在同个包名下。
默认情况下,AIDL 支持下列数据类型:
- 八种基本数据类型:byte、char、short、int、long、float、double、boolean
- String,CharSequence
- List类型。List承载的数据必须是AIDL支持的类型,或者是其它声明的AIDL对象
- Map类型。Map承载的数据必须是AIDL支持的类型,或者是其它声明的AIDL对象
客户端和服务端都需要创建,我们先在服务端中创建,然后复制到客户端即可。在 Android Studio 中右键点击新建一个 AIDL 文件,
如图所示:
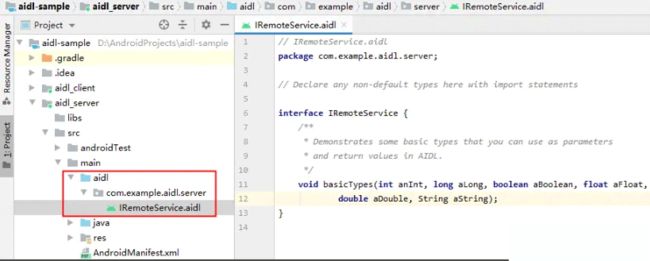
创建完成后,系统就会默认创建一个 aidl 文件夹,文件夹下的目录结构即是工程的包名,AIDL 文件就在其中。
如图所示:
文件中会有一个默认方法,可以删除掉,也可以新增其他方法。
2 实现接口
创建或修改过 AIDL 文件后需要 build 下工程,Android SDK 工具会生成以 .aidl 文件命名的 .java 接口文件(例如,IRemoteService.aidl 生成的文件名是 IRemoteService.java),在进程间通信中真正起作用的就是该文件。生成的接口包含一个名为 Stub 的子类(例如,IRemoteService.Stub),该子类是其父接口的抽象实现,并且会声明 AIDL 文件中的所有方法。 如要实现 AIDL 生成的接口,请实例化生成的 Binder 子类(例如,IRemoteService.Stub),并实现继承自 AIDL 文件的方法。
以下是使用匿名内部类实现 IRemoteService 接口的示例:
private final IRemoteService.Stub binder = new IRemoteService.Stub() {
    public int getPid(){
        return Process.myPid();
    }
    public void basicTypes(int anInt, long aLong, boolean aBoolean,
        float aFloat, double aDouble, String aString) {
        // Does nothing
    }
};
现在,binder 是 Stub 类的一个实例(一个 Binder),其定义了服务端的 RPC 接口。
3 服务端公开接口
在为服务端实现接口后,需要向客户端公开该接口,以便客户端进行绑定。创建 Service 并实现 onBind(),从而返回生成的 Stub 的类实例。
以下是服务端的示例代码:
public class RemoteService extends Service {
    private final String TAG = "RemoteService";
    @Override
    public void onCreate() {
        super.onCreate();
    }
    @Override
    public IBinder onBind(Intent intent) {
        // Return the interface
        Log.d(TAG, "onBind");
        return binder;
    }
    private final IRemoteService.Stub binder = new IRemoteService.Stub() {
        public int getPid() {
            return Process.myPid();
        }
        public void basicTypes(int anInt, long aLong, boolean aBoolean,
                               float aFloat, double aDouble, String aString) {
            Log.d(TAG, "basicTypes anInt:" + anInt + ";aLong:" + aLong + ";aBoolean:" + aBoolean + ";aFloat:" + aFloat + ";aDouble:" + aDouble + ";aString:" + aString);
        }
    };
}
我们还需要在 Manefest 文件中注册我们创建的这个 Service,否则客户端无法绑定服务。
4 客户端调用 IPC 方法
当客户端(如 Activity)调用 bindService() 以连接此服务时,客户端的 onServiceConnected() 回调会接收服务端的 onBind() 方法所返回的 binder 实例。
客户端还必须拥有接口类的访问权限,因此如果客户端和服务端在不同应用内,则客户端应用的 src/ 目录内必须包含 .aidl 文件(该文件会生成 android.os.Binder 接口,进而为客户端提供 AIDL 方法的访问权限)的副本。所以我们需要把服务端的 aidl 文件夹整个复制到客户端的 java 文件夹同个层级下,不需要改动任何代码。
当客户端在 onServiceConnected() 回调中收到 IBinder 时,它必须调用 IRemoteService.Stub.asInterface(service),以将返回的参数转换成 IRemoteService 类型。例如:
IRemoteService iRemoteService;
private ServiceConnection mConnection = new ServiceConnection() {
    // Called when the connection with the service is established
    public void onServiceConnected(ComponentName className, IBinder service) {
        // Following the example above for an AIDL interface,
        // this gets an instance of the IRemoteInterface, which we can use to call on the service
        iRemoteService = IRemoteService.Stub.asInterface(service);
    }

    // Called when the connection with the service disconnects unexpectedly
    public void onServiceDisconnected(ComponentName className) {
        Log.e(TAG, "Service has unexpectedly disconnected");
        iRemoteService = null;
    }
};
获得了 iRemoteService 对象,我们就可以调用 AIDL 中定义的方法了。如要断开连接,可以调用unbindService() 方法。
以下是客户端的示例代码:
public class MainActivity extends AppCompatActivity {
    private final String TAG = "ClientActivity";
    private IRemoteService iRemoteService;
    private Button mBindServiceButton;
    @Override
    protected void onCreate(Bundle savedInstanceState) {
        super.onCreate(savedInstanceState);
        setContentView(R.layout.activity_main);

        mBindServiceButton = findViewById(R.id.btn_bind_service);
        mBindServiceButton.setOnClickListener(new View.OnClickListener() {
            @Override
            public void onClick(View v) {
                String text = mBindServiceButton.getText().toString();
                if ("Bind Service".equals(text)) {
                    Intent intent = new Intent();
                    intent.setAction("com.example.aidl");
                    intent.setPackage("com.example.aidl.server");
                    bindService(intent, mConnection, Context.BIND_AUTO_CREATE);
                } else {
                    unbindService(mConnection);
                    mBindServiceButton.setText("Bind Service");
                }
            }
        });
    }
    ServiceConnection mConnection = new ServiceConnection() {
        @Override
        public void onServiceDisconnected(ComponentName name) {
            Log.d(TAG, "onServiceDisconnected");
            iRemoteService = null;
        }
        @Override
        public void onServiceConnected(ComponentName name, IBinder service) {
            Log.d(TAG, "onServiceConnected");
            iRemoteService = IRemoteService.Stub.asInterface(service);
            try {
                int pid = iRemoteService.getPid();
                int currentPid = Process.myPid();
                Log.d(TAG, "currentPID: " + currentPid + ", remotePID: " + pid);
                iRemoteService.basicTypes(12, 123, true, 123.4f, 123.45,
                        "服务端你好,我是客户端");
            } catch (RemoteException e) {
                e.printStackTrace();
            }
            mBindServiceButton.setText("Unbind Service");
        }
    };
}
5 通过 IPC 传递对象
除了上面默认支持的数据类型,AIDL 还可以传递对象,但是该类必须实现 Parcelable 接口。而该类是两个应用间都需要使用到的,所以也需要在 AIDL 文件中声明该类,为了避免出现类名重复导致无法创建 AIDL 文件的错误,这里需要先创建 AIDL 文件,之后再创建类。 先在服务端新建一个 AIDL 文件,比如 Rect.aidl,
示例如下:
// Rect.aidl
package com.example.aidl.server;

// Declare Rect so AIDL can find it and knows that it implements
// the parcelable protocol.
parcelable Rect;
然后就可以创建 Rect 类了,并使之实现 Parcelable 接口。示例代码如下:
public class Rect implements Parcelable {
    private int left;
    private int top;
    private int right;
    private int bottom;
    public Rect(int left, int top, int right, int bottom) {
        this.left = left;
        this.top = top;
        this.right = right;
        this.bottom = bottom;
    }
    public static final Parcelable.Creator CREATOR = new Parcelable.Creator() {
        public Rect createFromParcel(Parcel in) {
            return new Rect(in);
        }

        public Rect[] newArray(int size) {
            return new Rect[size];
        }
    };
    private Rect(Parcel in) {
        readFromParcel(in);
    }
    @Override
    public void writeToParcel(Parcel out, int flags) {
        out.writeInt(left);
        out.writeInt(top);
        out.writeInt(right);
        out.writeInt(bottom);
    }
    public void readFromParcel(Parcel in) {
        left = in.readInt();
        top = in.readInt();
        right = in.readInt();
        bottom = in.readInt();
    }
    @Override
    public int describeContents() {
        return 0;
    }
    @NonNull
    @Override
    public String toString() {
        return "Rect[left:" + left + ",top:" + top + ",right:" + right + ",bottom:" + bottom + "]";
    }
}
这样我们就可以在之前创建的 IRemoteService.aidl 中新增一个方法来传递 Rect 对象了,示例代码如下:
// IRemoteService.aidl
package com.example.aidl.server;
import com.example.aidl.server.Rect;
// Declare any non-default types here with import statements
interface IRemoteService {
    /**
     * Demonstrates some basic types that you can use as parameters
     * and return values in AIDL.
     */
    void basicTypes(int anInt, long aLong, boolean aBoolean, float aFloat,
            double aDouble, String aString);

    int getPid();
    void addRectInOut(inout Rect rect);
}
注意这里需要明确导包:
import com.example.aidl.server.Rect;
然后将新增的 Rect.aidl 文件和 Rect.java 文件还有修改的 IRemoteService.aidl 文件同步到客户端相同路径下,
如图所示:
build 下工程,就可以在客户端调用到该 addRectInOut 方法了。
示例代码如下:
    ServiceConnection mConnection = new ServiceConnection() {
        @Override
        public void onServiceDisconnected(ComponentName name) {
        }
        @Override
        public void onServiceConnected(ComponentName name, IBinder service) {
            iRemoteService = IRemoteService.Stub.asInterface(service);
            try {
                iRemoteService.addRectInOut(new Rect(1, 2, 3, 4));
            } catch (RemoteException e) {
                e.printStackTrace();
            }
        }
    };
到此这篇关于Android 创建AIDL文件使用教程的文章就介绍到这了,更多相关Android AIDL 内容请搜索脚本之家以前的文章或继续浏览下面的相关文章希望大家以后多多支持脚本之家!


