基于Unity官方素材开发的3D二人沙漠坦克大战
1.1前言
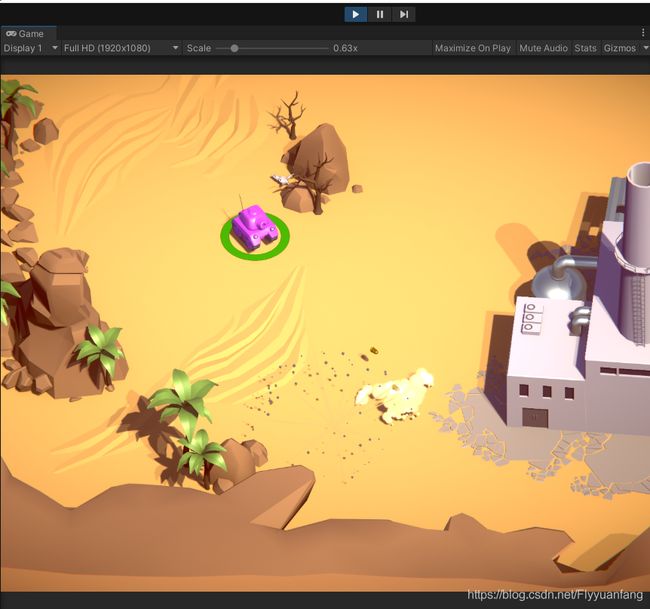
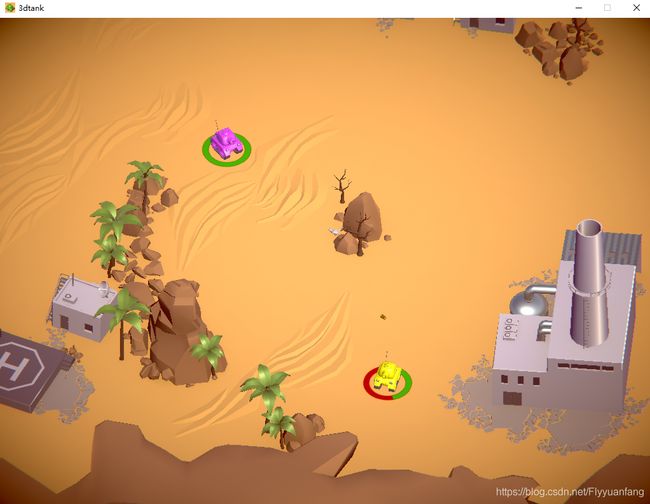
本篇文章是对学习的知识内容进行总结和记录下,前段时间跟着公开课程(没收广告费,就不说是哪个了)学习制作了第一个3D游戏—《3D坦克大战》,是一款二人对战的游戏,左边玩家用WASD控制方向移动,空格键发射炮弹,右边的玩家用方向键上下左右控制方向,Enter回车键发射炮弹。素材用的是UnityStore的官方的免费素材,基本的炮弹,坦克和地图不需要自己去建模了,套进去用就行了。
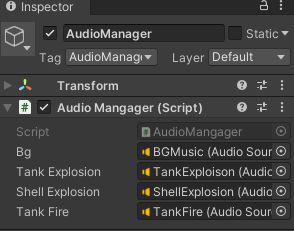
**特别注意一下,这里我只放了脚本代码,具体的几个小点,包括Rigidbody组件和刚体组件的添加,Audio组件的添加,大小的调整介于时间问题就不放了,代码部分最初变量的声明可以到客户端中进行更改,大家可以看看代码来进行学习啥的**
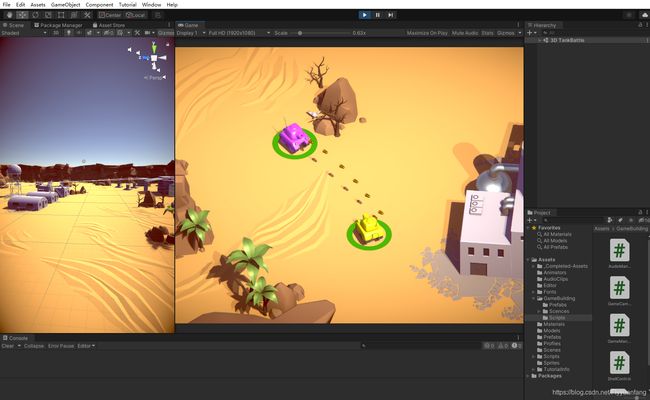
先放一张最后的完成图
下面进入正题代码部分
2.1TankControl
第一部分是坦克控制的脚本,完成了坦克的初始化和几个功能,Input获取键盘输入然后控制坦克的移动,这里倒退有bug所以多加了个一个判断让他倒退为反方向。包括开火的命令,这里进行了小优化,子弹射出的速度有初始速度和蓄力速度,最终的速度等于初速度+蓄力时间*蓄力速度,还有个最大值,大于最大值炮弹将自动发射。最后的炮弹的销毁和特效的销毁,这里注意下,特效销毁的时候要把它拿出来放到父类,不然会和坦克一起被销毁导致看不到特效或者声音,最后面导入SceneManagement模块来实现重开游戏,最后把脚本挂载到预制件上就可以了。
using System.Collections;
using System.Collections.Generic;
using UnityEngine;
using UnityEngine.SceneManagement;
using UnityEngine.UI;

public enum TankType
{
    Tank_One = 1,
    Tank_Two = 2,
    Tank_Enemy = 3,
}
public class TankControl : MonoBehaviour
{
    public TankType TankType = TankType.Tank_One;
    public string inputHorizontalStr;
    public string inputVerticalStr;
    public string inputFireStr;

    public Rigidbody _rigidbody;
    public float h_Value;
    public float v_Value;
    public float speed = 40;
    public float rotateSpeed = 60;

    //Fire
    public GameObject shell;
    public Transform shellPos;
    public float MinSpeed = 10;
    public float MaxSpeed = 30;
    public float currentSpeed = 10;
    public float speedChange = 10;
    public bool IsFire = false;

    //PH
    public float PH = 20;
    public Slider phSlider; //血条的那个滑块,同时这是一个UI要导入UI的包

    //tank爆炸
    public ParticleSystem tankExplosion; //ParticleSystem 粒子特效

    //public AudioSource tankFire;//先舍弃

    // Start is called before the first frame update
    void Start()
    {
        TankInitilization();
    }

    void TankInitilization() //坦克的初始化
    {

        //将Tank1和Tank2区分开来,用Tank2你按wasd是没有效果的,必须要按方向键的上下左右
        _rigidbody = this.gameObject.GetComponent();
        inputHorizontalStr = inputHorizontalStr + (int)TankType;
        inputVerticalStr = inputVerticalStr + (int)TankType;
        inputFireStr = inputFireStr + (int)TankType;

        //血量初始化一下
        phSlider.maxValue = PH;
        phSlider.value = PH;
    }


    // Update is called once per frame
    void Update()
    {
        //input 控制器
        h_Value = Input.GetAxis(inputHorizontalStr);
        v_Value = Input.GetAxis(inputVerticalStr);
        if (v_Value != 0)
        {
            _rigidbody.MovePosition(this.transform.position + v_Value*this.transform.forward * speed * Time.deltaTime);//Time.delataTime上一帧执行的时间,可理解为间隔时间
        }
        if(h_Value != 0)
        {
            if (v_Value < 0)   //倒退有bug,让他方向为反的时候左右方向为反
            {
                h_Value =  - h_Value;
            }
            this.gameObject.transform.Rotate(Vector3.up* h_Value * rotateSpeed * Time.deltaTime);//旋转方向
        }
        //按下的瞬间
        if (Input.GetButtonDown(inputFireStr))
        {
            IsFire = true;
            currentSpeed = MinSpeed;
        }
        //按下的状态
        if (Input.GetButton(inputFireStr)&& IsFire)
        {
            currentSpeed += speedChange * Time.deltaTime; //当前时间=改变的速度与蓄力的时间的乘积
            if (currentSpeed >=MaxSpeed)
            {
                currentSpeed = MaxSpeed;
                OpenFire(currentSpeed);
                currentSpeed = MinSpeed;
                IsFire = false;
            }
        }
        if (Input.GetButtonUp(inputFireStr)&&IsFire) //这里是不蓄力的
        {
            //Fire
            OpenFire(currentSpeed);
            currentSpeed = MinSpeed;
            IsFire = false;
        }

    }
    private void FixedUpdate()
    {

    }
    void OpenFire(float shellSpeed) //开火的方法,等着被调用
    {
        //step1:先克隆一个炮弹
        //step2:给炮弹一个速度
        if (shell!=null)
        {
            //AudioMangager._audioManagerInstance.tankExplosionAudioPlay();//调用AudioManager中的方法,不能重复多次,暂时舍弃
/*            if (tankFire!=null)
            {
                tankFire.Play();
            }*///同上先舍弃

            GameObject shellObj = Instantiate(shell, shellPos.position, shellPos.transform.rotation); //克隆后面的炮弹
            Rigidbody shellRegidbody = shellObj.GetComponent(); //把Rigidbody下赋值给shellRegidbody
            if (shellRegidbody != null)
            {
                shellRegidbody.velocity = shellPos.forward * shellSpeed;
            }

        }


    }

    public void ShellDamage(float damgae)  //炮弹的销毁
    {
        if (PH > 0)
        {
            PH -= damgae;
            phSlider.value = PH;
        }
        if (PH < 0)
        {
            //Die
            if (tankExplosion != null)
            {
                AudioMangager._audioManagerInstance.tankExplosionAudioPlay();//调用AudioManager中的方法

                tankExplosion.transform.parent = null;
                tankExplosion.Play();

                Destroy(tankExplosion.gameObject, tankExplosion.main.duration);
            }
            //Destroy(this.transform.gameObject);
            this.gameObject.SetActive(false);
            Invoke("RelodTankBattleScence",2);
        }
    }
    void RelodTankBattleScence()
    {
        SceneManager.LoadScene("3D TankBattle");//坦克损毁重开
    }
}
脚本挂载到坦克预制件上
2.2ShellControl
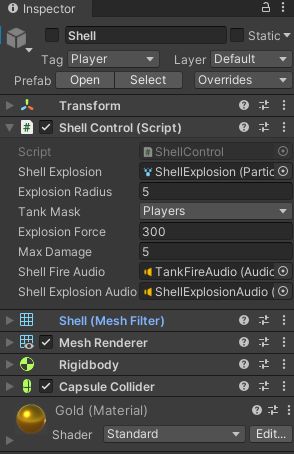
挂载在子弹预制件上,主要去实现碰撞和伤害,击中对方的坦克进行范围和伤害的判断然后掉血,这里要注意一下,坦克的两个Rigidbody如果是使用两个的话,可以删除一个,否则因为爆炸有范围伤害,扣血会双倍,特效的话和上面类同,这里就不展开叙述了
using System.Collections;
using System.Collections.Generic;
using UnityEngine;

public class ShellControl : MonoBehaviour
{
    public ParticleSystem shellExplosion;

    public float explosionRadius = 2;//爆炸半径
    public LayerMask tankMask;
    public float explosionForce = 5;//爆炸力

    //Damage 损害
    public float MaxDamage = 5;

    public AudioSource shellFireAudio;
    public AudioSource shellExplosionAudio;

    // Start is called before the first frame update
    void Start()
    {
        if (shellFireAudio != null)
        {
            if (!shellFireAudio.isPlaying)
            {
                shellFireAudio.Play();
            }
        }
    }

    // Update is called once per frame
    void Update()
    {

    }

    private void OnCollisionEnter(Collision collision)
    {
        Collider[] tankColliders = Physics.OverlapSphere(this.transform.position,explosionRadius,tankMask); //爆炸特效的地点和范围
        for(int i =0; i(); //判断爆炸范围内是否有tank,有的话,获取他的collier
            if (tankRigidbody!=null)
            {
                tankRigidbody.AddExplosionForce(explosionForce,this.transform.position,explosionRadius);    //传入爆炸力和爆炸中心点,爆炸半径
                float distance = (this.transform.position - tankRigidbody.position).magnitude;  //获取范围大小
                float currentDamage = distance / explosionRadius * MaxDamage; //当前伤害量的计算方法

                var tankControl = tankColliders[i].gameObject.GetComponent(); //把tankControl赋值给一个变量
                //稳妥起见,再判断一下
                if (tankControl!=null)
                {
                    tankControl.ShellDamage(currentDamage); //这里击中坦克就可以掉血了
                }
            }
        }


        // AudioMangager._audioManagerInstance.shellExplosionAudioPlay();//调用AudioManager中的方法,无法重复,舍弃
        if (shellExplosionAudio != null)
        {
            shellExplosionAudio.gameObject.transform.parent = null;
            if (!shellExplosionAudio.isPlaying)
            {
                shellExplosionAudio.Play();
                Destroy(shellExplosionAudio.gameObject, 1);
            }
        }
        //炮弹爆炸特效

        if (shellExplosion!=null) //发送爆炸
        {
            shellExplosion.transform.parent = null; //把爆炸父体给消除,把爆炸特效放在外面(上一级目录),防止跟随炮弹被销毁
            shellExplosion.Play();//爆炸特效
            Destroy(shellExplosion.gameObject,shellExplosion.main.duration); //销毁爆炸特效以及物体本身
        }
        Destroy(this.gameObject);
    }
}
完成了两个主体预制件脚本的挂载,下面终于进入了整体游戏控制管理脚本的编写
3.1GameMange
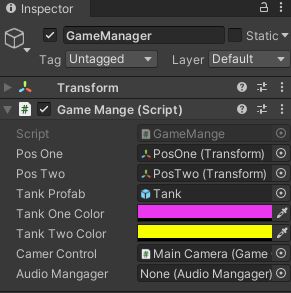
背景音乐的播放,这里暂时不提,后面有专门的脚本;由于是双人游戏,GameMange脚本完成了一个很重要的任务,克隆两个新的坦克,我们可以在场景里新创建两个空的组件,在你预期想产生新坦克的位置,在对预制件进行使用Instantiate克隆的时候,克隆位置那里可以选择这两个组件他所在的位置,克隆两次,就会有两个和预制件设置一模一样的坦克产生,记得将它们的控制改为Horizontal1和Horizontal2,否则你按WASD两个克隆体都会同时移动。还可以通过定义Color变量来调整两个坦克的颜色等。
using System.Collections;
using System.Collections.Generic;
using UnityEngine;

public class GameMange : MonoBehaviour
{
    //两个位置生成坦克;初始化坦克设置
    public Transform PosOne;
    public Transform PosTwo;
    public GameObject tankProfab;
    public Color TankOneColor;
    public Color TankTwoColor;

    public GameCameraControl camerControl;
    public AudioMangager audioMangager;

    // Start is called before the first frame update
    void Start()
    {
        audioMangager = GameObject.FindWithTag("AudioManager").GetComponent(); //通过脚本找到游戏对象
        if (audioMangager != null)
        {
            audioMangager.bgAudioPlay();
        }

        TankSpawn();
        if (camerControl!= null)
        {
            camerControl.tanks = GameObject.FindGameObjectsWithTag("Player");
        }
    }

    // Update is called once per frame
    void Update()
    {

    }

    void TankSpawn() //产生新的坦克,用原来的坦克克隆
    {
        GameObject tankOne = Instantiate(tankProfab, PosOne.position,PosOne.transform.rotation);//克隆一号
        var tankOneControl = tankOne.GetComponent(); //坦克的控制
        if (tankOneControl != null)
        {
            tankOneControl.TankType = TankType.Tank_One;
            MeshRenderer[] tankOnerenderers = tankOne.GetComponentsInChildren();
            for (int i = 0; i < tankOnerenderers.Length; i++)
            {
                tankOnerenderers[i].material.color = TankOneColor;
            }

        /*    foreach (var renderer in renderers)
            {
                renderer.material.color = tankOneColor;
            }*/
        }

        GameObject tankTwo = Instantiate(tankProfab, PosTwo.position, PosTwo.transform.rotation);//克隆二号
        var tankTwoControl = tankTwo.GetComponent();
        if (tankTwoControl != null)
        {
            tankTwoControl.TankType = TankType.Tank_Two;
            MeshRenderer[] tankTworenderers = tankTwo.GetComponentsInChildren();
            for(int i=0;i < tankTworenderers.Length; i++)
            {
                tankTworenderers[i].material.color = TankTwoColor;
            }
        }
    }
}
3.2GameCameraControl
这里个人觉得是最难理解的一个脚本,负责照相机视角的移动,基本原理就是相机的位置始终保持在两个坦克的中心点,通过计算坦克与相机目标中心位置的X,Z的差值,来判断计算机的Size为多少。(小知识,x,z的值一般只有整个游戏画面分辨率的一半)。
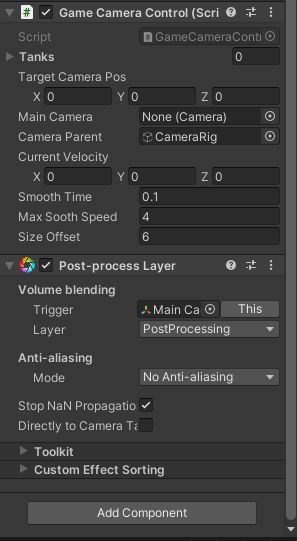
如果你想强行玩2D的话,也有个小技巧,把相机Rotation也就是旋转角度调为90°,这样相机就会以垂直90°俯视整个地图,就变成了2D游戏了,但是我们这里当时是先计算好了90°时中心点的值,后来想让相机以45°角去看地图以达到3D视角的目的,但是一开始视角会产生偏移(视角不一样),后来我们采取将相机组件放入另一个空的组件中并重新命名,在游戏开始后调整组件的视角与位置以到达我们想要的效果,记录下改变后的(当时空组件改变了的)位置参数,然后在Main Camera中改参数,其实主要是Position中Z轴的函数,然后脚本通过计算加上一点点时延,就可以达到根据两个坦克的移动平滑移动相机视角的目的。不多说了,上代码。
using System.Collections;
using System.Collections.Generic;
using UnityEngine;

public class GameCameraControl : MonoBehaviour
{
    public GameObject[] tanks;
    public Vector3 targetCameraPos = Vector3.zero; //相机移动的目标位置,也就是所有坦克的中心点
    public Camera mainCamera;
    public GameObject cameraParent;

    public Vector3 currentVelocity = Vector3.zero;
    public float smoothTime = 1;
    public float maxSoothSpeed = 2;

    public float sizeOffset = 4;

    //public Vector3 cameraOffsetPos = Vector3.zero;//每次去重置它的位置

    // Start is called before the first frame update
    void Start()
    {
        mainCamera = Camera.main;
    }

    // Update is called once per frame
    void Update()
    {
        ResetCameraPos();
        ResetCameraSize();
    }

    void ResetCameraPos()
    {
        //Step1 计算相机移动目标位置
        //Step2 平滑移动相机

        Vector3 sumPos = Vector3.zero;
        foreach (var tank in tanks)
        {
            sumPos += tank.transform.position;//所有坦克位置加起来
        }
        if (tanks.Length > 0)
        {
            targetCameraPos = sumPos / tanks.Length;//中心点

            targetCameraPos.y = cameraParent.transform.position.y;//避免y坐标有偏差

            // targetCameraPos += cameraOffsetPos; //每次让他的位置偏移量加上一个数,如果你想垂直视角游玩,请注释本行
            cameraParent.transform.position = Vector3.SmoothDamp(cameraParent.transform.position, targetCameraPos, ref currentVelocity, smoothTime, maxSoothSpeed);//当前位置到目标位置,平滑移动
        }

    }
    void ResetCameraSize()
    {
        //通过计算坦克与相机目标中心位置的X,Z的差值,来判断计算机的Size为多少
        float size = 0;
        foreach (var tank in tanks)
        {
            Vector3 offsetPos = tank.transform.position - targetCameraPos; //这里是坦克位置与相机目标中心位置的差值
            float z_Value = Mathf.Abs(offsetPos.z); //取绝对值保证为正数

            size = Mathf.Max(size, z_Value); //z方向,取两个之间最大的值

            float x_Value = Mathf.Abs(offsetPos.x);
            //mainCamera.aspect  宽度除以高度,用这个来求长宽比,最后和分辨率联系
            size = Mathf.Max(size, x_Value / mainCamera.aspect);

        }
        size += sizeOffset;

        mainCamera.orthographicSize = size; //正交摄像机的大小
    }
}
3.3AudioMangager
最后是声音控件的部分了,这里没什么要重点讲的,我甚至当时连注释都没怎么标(雾)不是懒,很简单的代码,一般都能看懂,不细说了。主要包括一个背景音乐和三个音效的添加,需要注意的是,这里的代码主要是在特定位置和时间进行触发,除了循环的BGM,一般写好了会在比如说坦克爆炸后调用,子弹发射后调用,子弹爆炸后调用等,唯一注意下就是别跟着别的函数跟组件一起被销毁就行,要不然到时候看不到现象。
using System.Collections;
using System.Collections.Generic;
using UnityEngine;

public class AudioMangager : MonoBehaviour
{
    public AudioSource bg;
    public AudioSource tankExplosion;
    public AudioSource shellExplosion;
    public AudioSource tankFire;

    public static AudioMangager _audioManagerInstance;

    private void Awake()//唤醒并进行实例化。简省后面的声明,减少代码重复性
    {
        _audioManagerInstance = this;
    }
    // Start is called before the first frame update
    void Start()
    {

    }

    // Update is called once per frame
    void Update()
    {

    }
    public void bgAudioPlay()
    {
        if (bg != null)
        {
            if (!bg.isPlaying)
            {
                bg.loop = true;
                bg.Play();
            }
        }
    }
    public void tankExplosionAudioPlay()
    {
        if (tankExplosion != null)
        {
            if (!tankExplosion.isPlaying)
            {
                tankExplosion.Play();
            }
        }
    }
    public void shellExplosionAudioPlay()
    {
        if (shellExplosion != null)
        {
            if (!shellExplosion.isPlaying)
            {
                shellExplosion.Play();
            }
        }
    }
    public void tankFireAudioPlay()
    {
        if (tankFire != null)
        {
            if (!tankFire.isPlaying)
            {
                tankFire.Play();
            }
        }
    }
}
四、总结
个人的第一个3D游戏,目前还在学习中,也肯定会有很多不足很多值得改进的地方,包括UI的设计,开始结束界面也可以添加,暂不支持联网功能等等,这些知识在学了,在学了,我会努力在下一个2.0或者3.0版本进行更新和加入的,希望各位有别的新的想法或者建议,或者错误啥的可以跟我探讨,也请各位大佬斧正,欢迎私信交流探讨,有时间一定会回复的。
最后再来两张实物图
