Spring Boot整合Redis实现缓存(实战详细)
目录
-
-
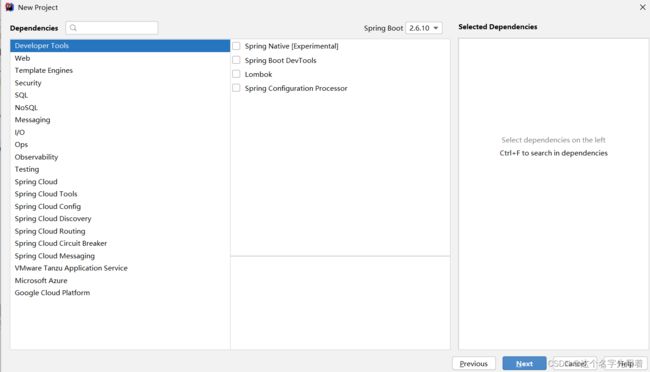
- 第一步:创建springboot项目
- 第二步:引入依赖:spring-boot-starter-data-redis
- 第三步:修改启动类:
- 第四步:准备数据表和实体类:
- 第五步:配置文件
- 常用redis缓存:相关注解介绍
-
- 1 @Cacheable
- 2 @CachePut
- 3 @CacheEvict
- 第六步:接口文件:缓存注解使用的地方
-
第一步:创建springboot项目

第二步:引入依赖:spring-boot-starter-data-redis
            mysql
            mysql-connector-java
            8.0.22


            com.baomidou
            mybatis-plus-boot-starter
            3.4.2


            org.springframework.boot
            spring-boot-starter-data-redis
            2.6.6


            org.projectlombok
            lombok
            1.18.22


            org.springframework.boot
            spring-boot-starter


            io.springfox
            springfox-swagger2
            2.9.2


            io.springfox
            springfox-swagger-ui
            2.9.2


            org.springframework.boot
            spring-boot-starter-web
            2.6.9


            org.springframework.boot
            spring-boot-starter-test
            test
第三步:修改启动类:
package com.fan.rediscach;

import org.mybatis.spring.annotation.MapperScan;
import org.springframework.boot.SpringApplication;
import org.springframework.boot.autoconfigure.SpringBootApplication;

@SpringBootApplication
@MapperScan("com.fan.rediscach.mapper") //mapper扫描
public class RediscachApplication {

    public static void main(String[] args) {
        SpringApplication.run(RediscachApplication.class, args);
    }

}
第四步:准备数据表和实体类:
准备数据库和对用的实体类:
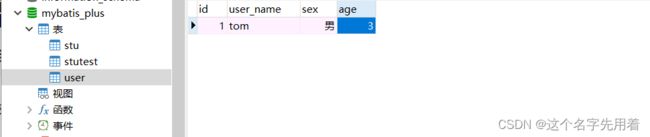
实体类com.fan.rediscach.entity.User:
@TableName和@TableField属于mybatis-plus的注解,很好用
package com.fan.rediscach.entity;

import com.baomidou.mybatisplus.annotation.TableField;
import com.baomidou.mybatisplus.annotation.TableName;
import lombok.AllArgsConstructor;
import lombok.Data;
import lombok.NoArgsConstructor;

import java.io.Serializable;

@Data
@AllArgsConstructor
@NoArgsConstructor
@TableName(value = "user")
public class User implements Serializable {

    private Long id;//一定使用包装类,实体类
    @TableField(value = "user_name")
    private String name;

    private String sex;
    private int age;

}
第五步:配置文件
# mysql数据库连接
spring.datasource.driver-class-name=com.mysql.cj.jdbc.Driver
spring.datasource.url=jdbc:mysql://127.0.0.1:3306/mybatis_plus?useUnicode=true&characterEncoding=utf-8&allowMultiQueries=true&useSSL=false&serverTimezone=UTC
spring.datasource.username=root
spring.datasource.password=***

spring.mvc.pathmatch.matching-strategy=ant_path_matcher

#redis配置
spring.cache.type=redis
pring.redis.database=0
pring.redis.port=6379
spring.redis.host=192.168.211.210 //自己redis地址
spring.redis.password=
spring.redis.timeout=1800000
配置类config包下:
Swagger2Config配置类:Swagger2测试接口比较方便
package com.fan.rediscach.config;

import com.google.common.base.Predicates;
import org.springframework.context.annotation.Bean;
import org.springframework.context.annotation.Configuration;
import springfox.documentation.builders.ApiInfoBuilder;
import springfox.documentation.builders.PathSelectors;
import springfox.documentation.service.ApiInfo;
import springfox.documentation.service.Contact;
import springfox.documentation.spi.DocumentationType;
import springfox.documentation.spring.web.plugins.Docket;
import springfox.documentation.swagger2.annotations.EnableSwagger2;

/**
 * Swagger2配置信息
 */
@Configuration
@EnableSwagger2
public class Swagger2Config {

    @Bean
    public Docket webApiConfig(){

        return new Docket(DocumentationType.SWAGGER_2)
                .groupName("webApi")
                .apiInfo(webApiInfo())
                .select()
                //只显示api路径下的页面
                .paths(Predicates.and(PathSelectors.regex("/api/.*")))
                .build();

    }

    @Bean
    public Docket adminApiConfig(){

        return new Docket(DocumentationType.SWAGGER_2)
                .groupName("adminApi")
                .apiInfo(adminApiInfo())
                .select()
                //这里要修改成自己的controller类上的requestmapping路径
                .paths(Predicates.and(PathSelectors.regex("/.*")))
                .build();

    }

    private ApiInfo webApiInfo(){

        return new ApiInfoBuilder()
                .title("网站-API文档")
                .description("本文档描述了网站微服务接口定义")
                .version("1.1")
                .contact(new Contact("fan", "http://atguigu.com", "[email protected]"))
                .build();
    }

    private ApiInfo adminApiInfo(){

        return new ApiInfoBuilder()
                .title("后台管理系统-API文档")
                .description("本文档描述了后台管理系统微服务接口定义")
                .version("1.1")
                .contact(new Contact("fan", "http://atguigu.com", "[email protected]"))
                .build();
    }


}
RedisConfig配置类:
package com.fan.rediscach.config;
import org.springframework.cache.CacheManager;
import org.springframework.cache.annotation.EnableCaching;
import org.springframework.context.annotation.Bean;
import org.springframework.context.annotation.Configuration;
import org.springframework.data.redis.cache.RedisCacheConfiguration;
import org.springframework.data.redis.cache.RedisCacheManager;
import org.springframework.data.redis.connection.RedisConnectionFactory;
import org.springframework.data.redis.serializer.*;
import java.time.Duration;
/**
* Redis 配置类
*/
@Configuration
@EnableCaching //开启缓存配置
public class RedisConfig {
/**
* 配置缓存管理器
* @param factory Redis 线程安全连接工厂
* @return 缓存管理器
*/
@Bean
public CacheManager cacheManager(RedisConnectionFactory factory) {
// 生成两套默认配置,通过 Config 对象即可对缓存进行自定义配置
RedisCacheConfiguration cacheConfig1 = RedisCacheConfiguration.defaultCacheConfig()
// 设置过期时间 10 分钟
.entryTtl(Duration.ofMinutes(10))
// 设置缓存前缀
.prefixKeysWith("cache:user:")
// 禁止缓存 null 值
.disableCachingNullValues()
// 设置 key 序列化
.serializeKeysWith(keyPair())
// 设置 value 序列化
.serializeValuesWith(valuePair());
RedisCacheConfiguration cacheConfig2 = RedisCacheConfiguration.defaultCacheConfig()
// 设置过期时间 30 秒
.entryTtl(Duration.ofSeconds(30))
.prefixKeysWith("cache:admin:")
.disableCachingNullValues()
.serializeKeysWith(keyPair())
.serializeValuesWith(valuePair());
// 返回 Redis 缓存管理器
return RedisCacheManager.builder(factory)
.withCacheConfiguration("user", cacheConfig1)
.withCacheConfiguration("admin", cacheConfig2)
.build();
}
/**
* 配置键序列化
* @return StringRedisSerializer
*/
private RedisSerializationContext.SerializationPair keyPair() {
return RedisSerializationContext.SerializationPair.fromSerializer(new StringRedisSerializer());
}
/**
* 配置值序列化,使用 GenericJackson2JsonRedisSerializer 替换默认序列化
* @return GenericJackson2JsonRedisSerializer
*/
private RedisSerializationContext.SerializationPair 这里我们使用mybatis-plus来使用:
常用redis缓存:相关注解介绍
1 @Cacheable
如果缓存中不存在目标值,则将调用目标方法并将返回的值存入缓存;如果存在,则直接返回缓存中的值,不会执行方法体。即使方法体内进行了数据库的更新操作,也不会执行。
该注解常用参数如下:
-
cacheNames/value :存储方法调用结果的缓存的名称
-
key :缓存数据使用的key,可以用它来指定,key="#param"可以指定参数值,也可以是其他属性
-
keyGenerator :key的生成器,用来自定义key的生成,与key为二选一,不能兼存
-
condition:用于使方法缓存有条件,默认为"" ,表示方法结果始终被缓存。conditon="#id>1000"表示id>1000的数据才进行缓存
-
unless:用于否决方法缓存,此表达式在方法被调用后计算,因此可以引用方法返回值(result),默认为"" ,这意味着缓存永远不会被否决。unless = "#result==null"表示除非该方法返回值为null,否则将方法返回值进行缓存
-
sync :是否使用异步模式,默认为false不使用异步
2 @CachePut
如果缓存中先前存在目标值,则更新缓存中的值为该方法的返回值;如果不存在,则将方法的返回值存入缓存。
该注解常用参数同@Cacheable,不过@CachePut没有sync 这个参数
3 @CacheEvict
如果缓存中存在存在目标值,则将其从缓存中删除
该注解常用参数如下:
- cacheNames/value、key、keyGenerator、condition同@Cacheable
- allEntries:如果指定allEntries为true,Spring Cache将忽略指定的key清除缓存中的所有元素,默认情况下为false。
- beforeInvocation:删除缓存操作默认是在对应方法成功执行之后触发的,方法如果因为抛出异常而未能成功返回时也不会触发删除操作。如果指定beforeInvocation为true ,则无论方法结果如何,无论方法是否抛出异常都会导致删除缓存。
第六步:接口文件:缓存注解使用的地方
mapper接口:
package com.fan.rediscach.mapper;

import com.baomidou.mybatisplus.core.mapper.BaseMapper;
import com.fan.rediscach.entity.User;


public interface UserMapper extends BaseMapper {
}
service接口:
package com.fan.rediscach.service;

import com.baomidou.mybatisplus.extension.service.IService;
import com.fan.rediscach.entity.User;

public interface UserService extends IService {
    //定义一个接口方法
    User findById(long id);
}
service实现类:
其它层正常编写即可,与之前并无差别,此处不再展示;
package com.fan.rediscach.service.impl;

import com.baomidou.mybatisplus.extension.service.impl.ServiceImpl;
import com.fan.rediscach.entity.User;
import com.fan.rediscach.mapper.UserMapper;
import com.fan.rediscach.service.UserService;
import org.springframework.cache.annotation.Cacheable;
import org.springframework.stereotype.Service;

@Service
public class UserServiceImpl extends ServiceImpl
        implements UserService {
    //测试缓存
    @Override
    @Cacheable(cacheNames = "user111" ,key = " 'id' ")//或者这样写key = "#id"
    public User findById(Long id) {
        User user = baseMapper.selectById(id);
        return user;
    }
}
controller:
package com.fan.rediscach.controller;

import com.fan.rediscach.entity.User;
import com.fan.rediscach.service.UserService;
import io.swagger.annotations.Api;
import io.swagger.annotations.ApiOperation;
import org.springframework.web.bind.annotation.GetMapping;
import org.springframework.web.bind.annotation.PathVariable;
import org.springframework.web.bind.annotation.RestController;

import javax.annotation.Resource;

@Api("contrller") //swagger标签
@RestController
public class UserController {
    @Resource
    private UserService userService;

    @ApiOperation(value = "findById接口")//swagger标签
    @GetMapping("findById/{id}")//注意接口
    public User findById(@PathVariable Long id){
        User byId = userService.getById(id);
        return byId;
    }

    //测试redis缓存
    @ApiOperation(value = "findById接口")//swagger标签
    @GetMapping("findById2/{id}")//注意接口
    public User findById2(@PathVariable Long id){
        User user = userService.findById(id);
        return user;
    }
}
swagger测试:
http://localhost:8080/swagger-ui.html
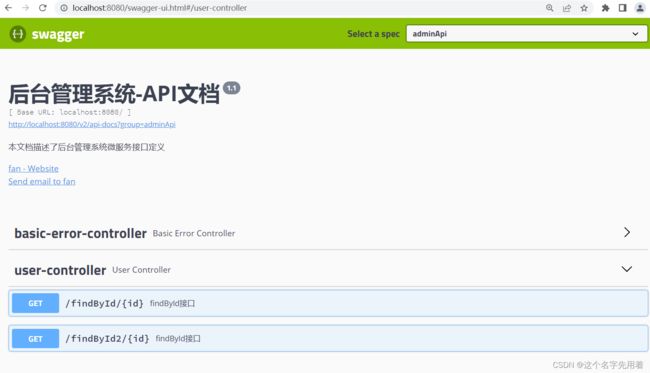
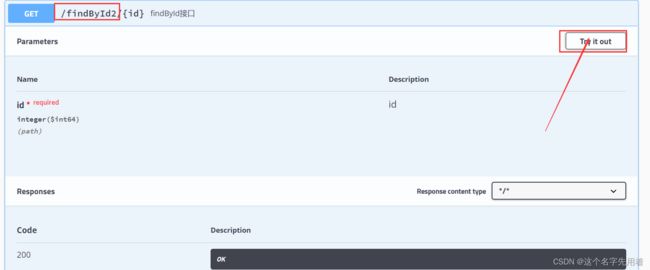
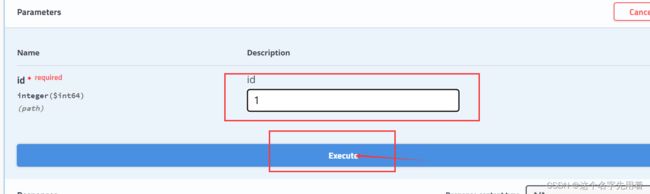
测试通过:
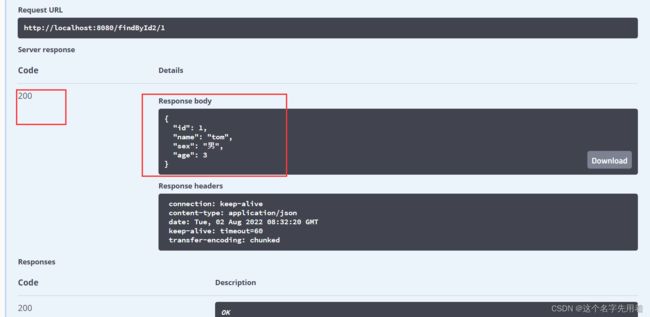
缓存都是写在实现类中的:更多的缓存方法如下:
package com.fan.rediscach.service.impl;

import com.baomidou.mybatisplus.extension.service.impl.ServiceImpl;
import com.fan.rediscach.entity.User;
import com.fan.rediscach.mapper.UserMapper;
import com.fan.rediscach.service.UserService;
import org.springframework.cache.annotation.CacheEvict;
import org.springframework.cache.annotation.CachePut;
import org.springframework.cache.annotation.Cacheable;
import org.springframework.stereotype.Service;

import javax.annotation.Resource;

@Service
public class UserServiceImpl extends ServiceImpl
        implements UserService {

    @Resource
    private UserMapper userMapper;

    //测试缓存
   /* @Override
    @Cacheable(cacheNames = "user111" ,key = " 'id' ")//或者这样写key = "#id"
    public User findById(long id) {
        User user = baseMapper.selectById(id);
        return user;
    }*/

    // 当调用这个方法的时候,会从一个名叫user的缓存中查询
    @Cacheable(cacheNames = "user", key = "#id")
    @Override
    public User findById(Long id) {
        // 如果不存在则查询数据库,并把查询的结果放入缓存中
        return userMapper.selectById(id);
    }

    // 先执行方法体中的代码,成功执行之后删除缓存
    @CacheEvict(cacheNames = "user", key = "#id")
    public boolean delete(Long id) {
        // 删除数据库中具有的数据
        return userMapper.deleteById(id) == 1;
    }

    // 如果缓存中先前存在,则更新缓存;如果不存在,则将方法的返回值存入缓存
    @CachePut(cacheNames = "user", key = "#user.id")
    public User update(User user) {
        userMapper.updateById(user);
        return user;
    }

    @CachePut(cacheNames = "user", key = "#user.id")
    public User insert(User user) {
        userMapper.insert(user);
        return user;
    }


}