读书笔记:深度学习入门-基于python的理论与实现(俗称鱼书)
文章目录
- 前言
- 三、神经网络
-
- 3.2 激活函数
-
- 3.2.1 阶跃函数
- 3.2.2 sigmoid函数
- 3.2.3 ReLU函数
- 3.3 多维数组
-
- 3.3.1 多维数组的维度和形状
- 3.3.2 多维数组的点乘
- 3.4 三层神经网络的实现
-
- 3.4.1 一步一步进行
- 3.4.2 合起来实现
- 3.5 输出层的设计
-
- 3.5.1 Softmax函数
- 3.5.2 Softmax函数的特征:输出值求和为1,符合概率分布问题
- 四、神经网络的学习
-
- 4.2 损失函数
-
- 4.2.1 均方误差MSE
- 4.2.2 交叉熵误差CEE
- 4.2.3 mini-batch上的交叉熵的实现
- 4.3 数值微分
-
- 4.3.1 导数
- 4.3.2 偏导数
- 4.4 梯度
-
- 4.4.1 梯度法
- 4.4.2 神经网络的梯度
- 4.5 学习算法的实现
- 五、误差反向传播法
-
- 5.4 简单层的实现
- 5.5 激活函数层的实现
-
- 5.5.1 Relu层
- 5.5.2 Sigmoid
- 5.6 Affine/Softmax层的实现
-
- 5.6.1 Affine层数
- 5.6.2 Softmax-with-Loss层
- 六、与学习相关的技巧
-
- 6.1 参数的更新
-
- 6.1.1 SGD
- 6.1.2 Momentum
- 6.1.3 AdaGrad
- 6.1.4 Adam
- 6.1.5 使用哪种优化器呢
- 6.2 权重的初始值
-
- 6.2.1 可以将权重初始值设为0吗?
- 6.2.2 隐藏层的激活值的分布-对于对称的激活函数(sigmoid和tanh)
-
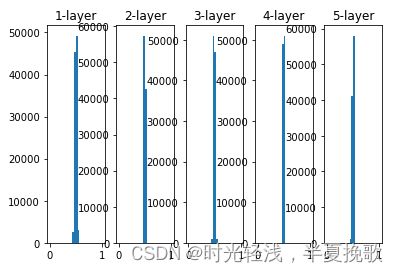
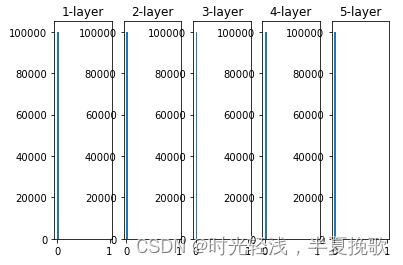
- 6.2.2.1 将初始权重设置为标准差为1的高斯分布
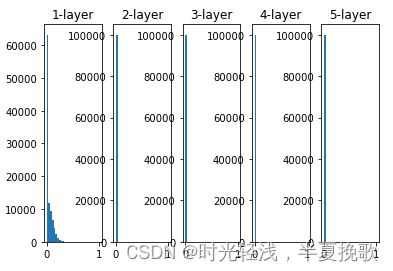
- 6.2.2.2 将初始权重设置为标准差为0.01的高斯分布
- 6.2.2.3 将初始权重设置为标准差为1/根号n(n为前一层的节点数)的高斯分布(Xavier)
- 6.2.3 对于不对称的激活函数ReLu
-
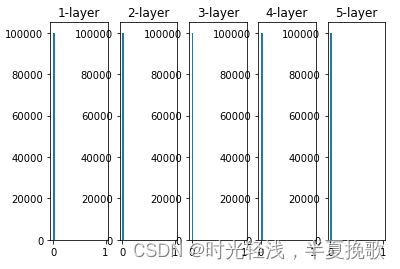
- 6.2.3.1 将初始权重设置为标准差为0.01的高斯分布
- 6.2.3.2 将初始权重设置为标准差为1/根号n(n为前一层的节点数)的高斯分布(Xavier)
- 6.2.3.3 将初始权重设置为标准差为根号2/n(n为前一层的节点数)的高斯分布(He)
- 6.3 Batch Normalization
- 6.4 正则化
-
- 6.4.1 过拟合
- 6.4.2 权值衰减
- 6.4.3 Dropout
- 6.5 超参数的验证
-
- 6.5.1 验证数据
- 6.5.2 超参数的最优化
- 6.5.3 超参数优化的实现
- 七、卷积神经网络
-
- 7.1 卷积层
- 7.2 池化层
- 7.3 CNN的实现
- 八、深度学习
-
- 8.1 加深网络
- 8.2 深度学习的小历史
- 8.3 深度学习的高速化
- 8.4 深度学习的应用案例
- 8.5 深度学习的未来
- 总结
前言
终于从头到尾把鱼书看完啦,真的是非常入门,非常查漏补缺,对新手很友好,对有一定基础的人也非常不错。看完不复习等于没看,所以今天开始复盘,顺便写这篇读书笔记。希望分享给没看过这本书或者看过这本书的同僚们参考,欢迎大家指教。我将从第三章神经网络开始复习,前两章内容书里已经非常基础and清楚了。(会持续更新滴)
三、神经网络
3.2 激活函数
这一小节学习的概念是神经网络学习中非常重要的激活函数,它们都是一些非线性函数,至于为何是非线性函数,因为非线性函数组合才能实现复杂网络的构建。以下将实现三个激活函数,它们分别是阶跃函数、sigmoid函数和relu函数
3.2.1 阶跃函数
def step_function(x):
#     if x > 0:
#         y = 1
#     else:
#         y = 0
    y = x > 0
    y = y.astype(np.int)
    return y
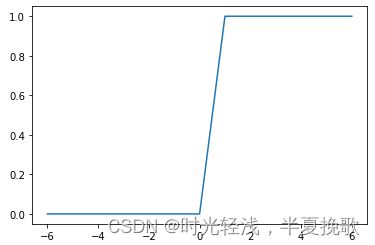
这就是阶跃函数的代码实现,可以了解到阶跃函数就是当自变量大于零的时候等于1,小于零的时候等于0的函数,注释上面的改写成下面的原因是,为了numpy数组更方便进行后续操作。
x = np.array([1.5,-2,5.0])
step_function(x)
输出为array([1, 0, 1])
x1 = np.arange(-6,7,1)
y1 = step_function(x1)
plt.plot(x1,y1)
plt.show()
3.2.2 sigmoid函数
def sigmoid(x):
    y = 1/(1+np.exp(-x))
    return y
sigmoid函数是1/(+exp(-x))的形式,当输入是numpy数组的时候,用上面的代码就可实现了。
sigmoid(x):
输出为array([0.81757448, 0.11920292, 0.99330715])
x1 = np.arange(-6,7,1)
y2 = sigmoid(x1)
plt.plot(x1,y2)
plt.show()
3.2.3 ReLU函数
def ReLU(x):
    y = np.maximum(0,x)
    return y
ReLU函数相当于在自变量小于0的时候为0,大于零的时候和自变量相等,也就是在自变量和0中取最大值,如上代码即可实现。
ReLU(x)
输出为array([1.5, 0. , 5. ])
x1 = np.arange(-6,7,1)
y3 = ReLU(x1)
plt.plot(x1,y3)
plt.show()
输出图像为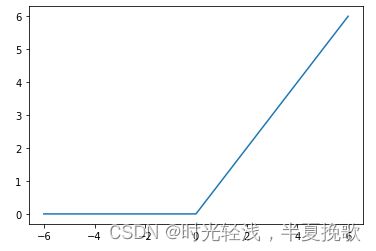
以上小节激活函数,为什么激活函数不能是线性函数呢?如果使用线性函数,加深神经网络的层数就没有意义了。
3.3 多维数组
numpy多维数组的相关运算对于神经网络的实现是基本操作。
3.3.1 多维数组的维度和形状
a = np.array([[2,4,5],[2,3,9]])
a.ndim #维度 将会输出2
a.shape #形状 将会输出(2,3)

b = np.array([[2,2,1],[2,2,4],[5,4,4]])
b.ndim #维度 将会输出2
b.shape #形状 将会输出(3,3)
3.3.2 多维数组的点乘
np.dot(a,b) #维度要符合矩阵乘法,左列等于右行;不然就要符合广播机制
输出为array([[37, 32, 38],
[55, 46, 50]])
3.4 三层神经网络的实现
3.4.1 一步一步进行
第一层,大概逻辑是输入×权重加偏置,然后激活函数
X = np.array([1.0,0.5])
W1 = np.array([[0.1,0.3,0.5],[0.2,0.4,0.6]])
B1 = np.array([0.1,0.2,0.3])

print(X.shape)
print(W1.shape)
print(B1.shape)
输出为(2,)
(2, 3)
(3,)
A1 = np.dot(X,W1) + B1
print(A1)
输出为[0.3 0.7 1.1]
Z1 = sigmoid(A1)
print(Z1)
输出为[0.57444252 0.66818777 0.75026011]
第二层,和第一层的逻辑
W2 = np.array([[0.1,0.4],[0.2,0.5],[0.3,0.6]])
B2 = np.array([0.1,0.2])
A2 = np.dot(A1,W2) + B2

print(A2)
输出为[0.6 1.33]
Z2 = sigmoid(A2)
print(Z2)
输出为[0.64565631 0.79084063]
第三层,前面逻辑一样,激活函数那里用的恒等函数,回归用恒等,分类下一节介绍
W3 = np.array([[0.1,0.3],[0.2,0.4]])
B3 = np.array([0.1,0.2])
A3 = np.dot(A2,W3) + B3

print(A3)
输出为[0.426 0.912]
def identity_function(x):
    y = x
    return y

Z3=identity_function(A3)
print(Z3)
输出为[0.426 0.912]
回归问题的输出层的激活函数为恒等函数,下一节详细介绍
3.4.2 合起来实现
先构建一个初始化参数的函数,如下:
def init_network():
    network = {}
    network['W1'] = np.array([[0.1,0.3,0.5],[0.2,0.4,0.6]])
    network['W2'] = np.array([[0.1,0.4],[0.2,0.5],[0.3,0.6]])
    network['W3'] = np.array([[0.1,0.3],[0.2,0.4]])
    network['B1'] = np.array([0.1,0.2,0.3])
    network['B2'] = np.array([0.1,0.2])
    network['B3'] = np.array([0.1,0.2])
    return network
然后构建一个前进函数,如下:
def forward(network,x):
    W1,W2,W3 = network['W1'],network['W2'],network['W3']
    B1,B2,B3 = network['B1'],network['B2'],network['B3']
    A1 = np.dot(x,W1) + B1
    Z1 = sigmoid(A1)
    A2 = np.dot(Z1,W2) + B2
    Z2 = sigmoid(A2)
    A3 = np.dot(Z2,W3) + B3
    Z3 = identity_function(A3)
    return Z3
接着传入输入,观察参数通过网络的情况
network=init_network()
x=np.array([1.0,0.5])
y=forward(network,x)
print(y)
输出为[0.31682708 0.69627909]
3.5 输出层的设计
3.5.1 Softmax函数
激活函数的使用,回归问题用恒等函数,分类问题用softmax函数
def softmax(x):
    exp_x = np.exp(x)
    sum_exp_x = np.sum(exp_x)
    y = exp_x / sum_exp_x
    return y
softmax函数的函数形式相当于是自然指数除以自然之数求和
x = np.array([0.3,2.9,4.0])
y = softmax(x)
print(y)
输出为[0.01821127 0.24519181 0.73659691]
x = np.array([1010,1000,990])
y = softmax(x)
print(y)
输出为[nan nan nan]
为了解决数组中的大数的输入无法处理的问题,将softmax函数优化为下面这样,在传入自然指数的时候减去数组中的最大值,得到的函数定义代码如下:
def softmax(x):
    c = np.max(x)
    exp_x = np.exp(x-c)
    sum_exp_x = np.sum(exp_x)
    y = exp_x / sum_exp_x
    return y
x = np.array([1010,1000,990])
y = softmax(x)
print(y)
输出为[9.99954600e-01 4.53978686e-05 2.06106005e-09],至此解决了softmax函数的大数输入问题
3.5.2 Softmax函数的特征:输出值求和为1,符合概率分布问题
sum_y = np.sum(y)
print(sum_y)
输出为1.0,因此对于分类问题的输出都是需要进行这样的softmax操作,规范输出的求和符合1.0
四、神经网络的学习
4.2 损失函数
这一小节中的y为输出的预测值,t为标签
4.2.1 均方误差MSE
均方误差的公式相当于相减的平方求和然后×0.5,如下:
def mean_standard_erro(y,t):
    return 0.5*np.sum((y-t)**2)

t=[0,0,1,0,0,0,0,0,0,0]
y=[0.1,0.05,0.6,0.0,0.05,0.1,0.0,0.1,0.0,0.0]
mean_standard_erro(np.array(y),np.array(t))
输出为0.09750000000000003
y=[0.1,0.05,0.1,0.0,0.05,0.1,0.0,0.6,0.0,0.0]
mean_standard_erro(np.array(y),np.array(t))
输出为0.5975
一般回归问题使用的损失函数是方均误差这种形式的
4.2.2 交叉熵误差CEE
交叉熵误差相当于计算一个和另一个的lg相乘的相反数,其中lg里需要加上一个小数,避免定义域出现0的问题,这是一种保护机制,交叉熵误差的值是由正确解标签所对应的输出结果决定的,代码如下:
def cross_entropy_error(y,t):
    delta=1e-7
    return -np.sum(t*np.log(y+delta))

t=[0,0,1,0,0,0,0,0,0,0]
y=[0.1,0.05,0.6,0.0,0.05,0.1,0.0,0.1,0.0,0.0]
cross_entropy_error(np.array(y),np.array(t))
输出为0.510825457099338
y=[0.1,0.05,0.1,0.0,0.05,0.1,0.0,0.6,0.0,0.0]
cross_entropy_error(np.array(y),np.array(t))
输出为2.302584092994546
一般分类问题使用的损失函数是交叉熵误差这种形式的
4.2.3 mini-batch上的交叉熵的实现
mini-batch用的是部分计算计算近似整体的一个思路,类似于电视台求收视率,mini-batch上的交叉熵求解的代码如下:
def cross_entropy_error(y,t):
    if y.ndim==1:
        t=t.reshape(1,t.size)
        y=y.reshape(1,y.size)
    batch_size=y.shape[0]
    return -np.sum(np.log(y[np.arange(batch_size),t]+1e-7))/batch_size
np.arange(batch_size)会生成一个从0到batch_size-1的numpy数组,y[np.arange(batch_size),t]能抽出各个数据的正确解标签对应的神经网络输出
关于为何设定损失函数,不直接把精度作为标准,原因是以精度为标准的话会使得绝大多数地方的导数为0,连续、平滑才能使导数不为0,才能继续更新神经网络参数,这也是激活函数不能选择阶跃函数这样不连续光滑的函数,而是选择了sigmoid这样的函数的原因
4.3 数值微分
4.3.1 导数
导数的 求解代码就像之前高中数学里学的一样,通过一个小区间里的变化来定义的,也就是说实现函数的输入需要是一个函数和一个自变量的值,因此实现代码如下:
def numberical_diff(f,x):
    h=1e-4
    return (f(x+h)-f(x-h))/(2*h)
比如定义一个函数的形式如下:
def function_1(x):
    return 0.01*x**2+0.1*x
对这个函数画图,用下面的代码:
import numpy as np
import matplotlib.pyplot as plt

x=np.arange(0.0,20.0,0.1)
y=function_1(x)
plt.xlabel("x")
plt.ylabel("y")
plt.plot(x,y)
plt.show()
输出为:
对这个函数在某个位置求导,可以直接向上面的求导的函数传入变量:
numberical_diff(function_1,5)
输出为0.1999999999990898
numberical_diff(function_1,10)
输出为0.2999999999986347
4.3.2 偏导数
偏导数的定义是针对于一个函数含有的变量不止一个的时候,那么在求导数的时候先对一个变量求导数,这个时候其它变量的处理就当作常数,然后对整个函数的每个变量依次处理就好了
比如这里定义一个对自变量平方求和的函数
def function_2(x):
    return np.sum(x**2)
对一个变量求导,另一个带入常数进去进行运算就好了
def function_tmp1(x0):
    return x0*x0+4.0**2.0
numberical_diff(function_tmp1,3.0)
输出为6.00000000000378
def function_tmp2(x1):
    return 3.0**2+x1*x1
numberical_diff(function_tmp2,4.0)
输出为7.999999999999119
4.4 梯度
梯度的定义是对含变量求偏导数形成的向量
def numberical_gradient(f,x):
    h=1e-4
    grad=np.zeros_like(x)
    for idx in range(x.size):
        tmp_val=x[idx]
        x[idx]=tmp_val+h
        fxh1=f(x)

        x[idx]=tmp_val-h
        fxh2=f(x)

        grad[idx]=(fxh1-fxh2)/(2*h)
        x[idx]=tmp_val

    return grad
numberical_gradient(function_2,np.array([3.0,4.0]))
输出为array([6., 8.])
numberical_gradient(function_2,np.array([0.0,2.0]))
输出为array([0., 4.])
numberical_gradient(function_2,np.array([3.0,0.0]))
输出为array([6., 0.])
梯度指示的方向是各点处的函数值减小最多的方向
4.4.1 梯度法
梯度法是用来优化参数的
梯度为0的地方不一定是最小值处,可能为极小值或鞍点
梯度法相当于以一定的速度(学习率)和步数,向损失最小点(极小点/鞍点)靠近
def gradient_descent(f,init_x,lr=0.01,step_num=100):
    x=init_x

    for i in range(step_num):
        grad=numberical_gradient(f,x)
        x-=lr*grad
    return x
定义一个函数:
def function_2(x):
    return x[0]**2+x[1]**2
传入输入,用梯度法优化参数:
init_x=np.array([-3.0,4.0])
gradient_descent(function_2,init_x=init_x,lr=0.1,step_num=100)
输出为array([-6.11110793e-10, 8.14814391e-10])
梯度法中,学习率是很有必要调节的参数,学习率过大过小都会存在一些问题,如下:
#学习率过大
init_x=np.array([-3.0,4.0])
gradient_descent(function_2,init_x=init_x,lr=10.0,step_num=100)
输出为array([-2.58983747e+13, -1.29524862e+12])
#学习率过小
init_x=np.array([-3.0,4.0])
gradient_descent(function_2,init_x=init_x,lr=1e-10,step_num=100)
输出为array([-2.99999994, 3.99999992])
4.4.2 神经网络的梯度
首先定义一个只有一个中间层的简单的网络,实现代码如下:
class simpleNet:
    def __init__(self):
        self.W=np.random.randn(2,3)

    def predict(self,x):
        return np.dot(x,self.W)

    def loss(self,x,t):
        z=self.predict(x)
        y=softmax(z)
        loss=cross_entropy_error(y,t)

        return loss
实例化这个类
net=simpleNet()
print(net.W)
输出为[[-0.15560113 0.01606903 -1.45965474]
[ 1.04496805 0.86740927 0.81660113]]
x=np.array([0.6,0.9])
p=net.predict(x)
print(p)
输出为[ 0.84711057 0.79030976 -0.14085183]
np.argmax(p)
输出最大值对应的索引,这里是0
t=np.array([0,0,1])
net.loss(x,t)
def f(W):
    return net.loss(x,t)
dW=numberical_gradient(f,net.W)
print(dW)
这里报错IndexError: index 2 is out of bounds for axis 0 with size 2
尚未解决
4.5 学习算法的实现
下面是一个有两个中间层的网络:
class TwoLayerNet:
    def __init__(self,input_size,hidden_size,output_size,weight_init_std=0.01):
        #初始化权重
        self.params={}
        self.params['W1']=weight_init_std*np.random.randn(input_size,hidden_size)
        self.params['b1']=np.zeros(hidden_size)
        self.params['W2']=weight_init_std*np.random.randn(hidden_size,output_size)
        self.params['b2']=np.zeros(output_size)

    def predict(self,x):
        W1,W2=self.params['W1'],self.params['W2']
        b1,b2=self.params['b1'],self.params['b2']

        a1=np.dot(x,W1)+b1
        z1=sigmoid(a1)
        a2=np.dot(z1,W2)+b2
        y=softmax(a2)

        return y

    #x为输入数据,t为监督数据
    def loss(self,x,t):
        y=self.predict(x)
        return cross_entropy_error(y,t)

    def accuracy(self,x,t):
        y=self.predict(x)
        y=np.argmax(y,axis=1)
        t=np.argmax(t,axis=1)

        accuracy=np.sum(y==t)/float(x.shape[0])
        return accuracy
    #x为输入数据,t为监督数据
    def numberical_gradient(self,x,t):
        loss_W=lambda W: self.loss(x,t)

        grads={}
        grads['W1']=numberical_gradient(loss_W,self.params['W1'])
        grads['b1']=numberical_gradient(loss_W,self.params['b1'])
        grads['W2']=numberical_gradient(loss_W,self.params['W2'])
        grads['b2']=numberical_gradient(loss_W,self.params['b2'])
        return grads
首先对这个两层的网络的类进行实例化
net=TwoLayerNet(input_size=784,hidden_size=100,output_size=10)
net.params['W1'].shape
输出为(784, 100)
net.params['b1'].shape
输出为(100,)
net.params['W2'].shape
输出为(100, 10)
net.params['b2'].shape
输出为(10,)
x=np.random.rand(100,784)
y=net.predict(x)
x=np.random.rand(100,784)
t=np.random.rand(100,10)
grads=net.numberical_gradient(x,t)
这里仍然报错index 784 is out of bounds for axis 0 with size 784
五、误差反向传播法
这一章首先定义了计算图和反向传播,
计算图计算图可以集中精力于局部计算,将复杂的计算分割成简单的局部计算,和流水线作业一样,将局部计算的结果传递给下一个节点,至于使用计算图的原因,是通过反向传播高效计算导数
链式法则则是同求偏导数一样,对各个变量一个一个进行导数运算
反向传播是计算图从右往左传播,对于加法和正向传播相等,对于乘法则与正向传播成反比例,
5.4 简单层的实现
首先,构建一个乘法层:
class MulLayer:
    def __init__(self):
        self.x=None
        self.y=None

    def forward(self,x,y):
        self.x=x
        self.y=y
        out=x*y

        return out

    def backward(self,dout):
        dx=dout*self.y
        dy=dout*self.x

        return dx,dy
输入自变量,正向传播:
apple=100
apple_num=2
tax=1.1

#layer
mul_apple_layer=MulLayer()
mul_tax_layer=MulLayer()

#forward
apple_price=mul_apple_layer.forward(apple,apple_num)
price=mul_tax_layer.forward(apple_price,tax)

print(price)
输出为220.00000000000003
反向传播:
#backward
dprice=1
dapple_price, dtax=mul_tax_layer.backward(dprice)
dapple,dapple_num=mul_apple_layer.backward(dapple_price)

print(dapple,dapple_num,dtax)
输出为2.2 110.00000000000001 200
加法层的实现:
class AddLayer:
    def __init__(self):
        pass
    def forward(self,x,y):
        out=x+y
        return out
    def backward(self,dout):
        dx=dout*1
        dy=dout*1
        return dx,dy
apple=100
apple_num=2
orange=150
orange_num=3
tax=1.1

#layer
mul_apple_layer=MulLayer()
mul_orange_layer=MulLayer()
add_apple_orange_layer=AddLayer()
mul_tax_layer=MulLayer()

#forward
apple_price=mul_apple_layer.forward(apple,apple_num)
orange_price=mul_orange_layer.forward(orange,orange_num)
all_price=add_apple_orange_layer.forward(apple_price,orange_price)
price=mul_tax_layer.forward(all_price,tax)

#backward
dprice=1
dall_price,dtax=mul_tax_layer.backward(dprice)
dapple_price,dorange_price=add_apple_orange_layer.backward(dall_price)
dorange,dorange_num=mul_orange_layer.backward(dorange_price)
dapple,dapple_num=mul_apple_layer.backward(apple_price)

print(price)
print(dapple_num,dapple,dorange,dorange_num,dtax)
输出为715.0000000000001
20000 400 3.3000000000000003 165.0 650
5.5 激活函数层的实现
5.5.1 Relu层
激活函数也都是可以画出计算图的,通过计算图的求导可以得到,比如Relu函数:
class Relu:
    def __inin__(self):
        self.mask=None

    def forward(self,x):
        self.mask=(x<=0)
        out=x.copy()
        out[self.mask]=0

        return out

    def backward(self,dout):
        dout[self.mask]=0
        dx=dout

        return dx
实例化这个类,看一下输出:
x=np.array([[1.0,-0.5],[-2.0,3.0]])
print(x)
mask=(x<=0)
print(mask)
输出为[[ 1. -0.5]
[-2. 3. ]]
[[False True]
[ True False]]
5.5.2 Sigmoid
对于Sigmoid函数:
class Sigmoid:
    def __init__(self):
        self.out=None

    def forward(self,x):
        out=1/(1+np.exp(-x))
        self.out=out

        return out
    def backward(self,dout):
        dx=dout*(1.0-self.out)*self.out

        return dx
5.6 Affine/Softmax层的实现
5.6.1 Affine层数
X=np.random.rand(2)
W=np.random.rand(2,3)
B=np.random.rand(3)

print(X.shape)
print(W.shape)
print(B.shape)

Y=np.dot(X,W)+B
print(Y)
输出为(2,)
(2, 3)
(3,)
[0.41279864 1.43681214 0.85228714]
X_dot_W=np.array([[0,0,0],[10,10,10]])
B=np.array([1,2,3])

print(X_dot_W)

output=X_dot_W+B

print(output)
输出为[[ 0 0 0]
[10 10 10]]
[[ 1 2 3]
[11 12 13]]
dY=np.array([[1,2,3],[4,5,6]])
print(dY)

dB=np.sum(dY,axis=0)
print(dB)
输出为[[1 2 3]
[4 5 6]]
[5 7 9]
对于线性层:
class Affine:
    def __init__ (self,W,b):
        self.W=W
        self.b=b
        self.x=None
        self.dW=None
        self.db=None

    def forward(self,x):
        self.x=x
        out=np.dot(x,self.W)+self.b

        return out

    def backward(self,dout):
        dx=np.dot(dout,self.W.T)
        self.dW=np.dot(self.x.T,dout)
        self.db=np.sum(dout,axis=0)

        return dx
5.6.2 Softmax-with-Loss层
对于Softmax-with-Loss层:
class SoftmaxWithLoss:
    def __init__(self):
        self.loss=None
        self.y=None
        self.t=None

    def forward(self,x,t):
        self.t=t
        self.y=softmax(x)
        self.loss=cross_entropy_error(self.y,self.t)

        return self.loss

    def backward(self,dout=1):
        batch_size=self.t.shape[0]
        dx=(self.y-self.t)/batch_size

        return dx
六、与学习相关的技巧
6.1 参数的更新
6.1.1 SGD
class SGD:
    def __init__(self,lr=0.01):
        self.lr=lr
    def update(self,params,grads):
        for key in params.keys():
            params[key]-=self.lr*grads[key]
缺点是对于非均匀函数的搜索效率低
6.1.2 Momentum
class Momentum:
    def __init__(self,lr=0.01,momentum=0.9):
        self.lr=lr
        self.momentum=momentum
        self.v=None

    def update(self,params,grads):
        if self.v is None:
            self.v={}
            for key, val in params.items():
                self.v[key]=np.zeros_like(val)

            for key in params.keys():
                self.v[key]=self.momentum*self.v[key]-self.lr*grads[key]
                params[key]+=self.v[key]
相当于给了一个初速度
6.1.3 AdaGrad
class AdaGrad:
    def __init__(self,lr=0.01):
        self.lr=lr
        self.h=None

    def update(self,params,grads):
        if self.h is None:
            self.h={}
            for key, val in params.items():
                self.h[key]=np.zeros_like(val)

            for key in params.keys():
                self.h[key]+=grads[key]*grads[key]
                params[key]-=self.lr*grads[key]/(np.sqrt(self.h[key])+1e-7)
根据元素调节学习率进行参数优化
6.1.4 Adam
将Momentum和AdaGrad相融合的方法
6.1.5 使用哪种优化器呢
哪种优化器最好需要根据问题而定。目前用的比较多的是Adam和SGD。
6.2 权重的初始值
6.2.1 可以将权重初始值设为0吗?
不能,误差反向传播过程中,若将权重初始值设为0,所有的权重值都会进行相同的更新,使得权重均一化
6.2.2 隐藏层的激活值的分布-对于对称的激活函数(sigmoid和tanh)
6.2.2.1 将初始权重设置为标准差为1的高斯分布
import numpy as np
import matplotlib.pyplot as plt
def sigmoid(x):
    return 1/(1+np.exp(-x))
x=np.random.randn(1000,100)
node_num=100
hidden_layer_size=5
activations={}
for i in range(hidden_layer_size):
    if i!=0:
        x=activations[i-1]

    w=np.random.randn(node_num,node_num)*1

    z=np.dot(x,w)
    a=sigmoid(z)
    activations[i]=a
for i,a in activations.items():
    plt.subplot(1,len(activations),i+1)
    plt.title(str(i+1)+"-layer")
    plt.hist(a.flatten(),30,range=(0,1))
plt.show()
6.2.2.2 将初始权重设置为标准差为0.01的高斯分布
for i in range(hidden_layer_size):
    if i!=0:
        x=activations[i-1]

    w=np.random.randn(node_num,node_num)*0.01

    z=np.dot(x,w)
    a=sigmoid(z)
    activations[i]=a
for i,a in activations.items():
    plt.subplot(1,len(activations),i+1)
    plt.title(str(i+1)+"-layer")
    plt.hist(a.flatten(),30,range=(0,1))
plt.show()
6.2.2.3 将初始权重设置为标准差为1/根号n(n为前一层的节点数)的高斯分布(Xavier)
for i in range(hidden_layer_size):
    if i!=0:
        x=activations[i-1]
    node_num=100
    w=np.random.randn(node_num,node_num)/np.sqrt(node_num)

    z=np.dot(x,w)
    a=sigmoid(z)
    activations[i]=a
for i,a in activations.items():
    plt.subplot(1,len(activations),i+1)
    plt.title(str(i+1)+"-layer")
    plt.hist(a.flatten(),30,range=(0,1))
plt.show()
6.2.3 对于不对称的激活函数ReLu
对于不对成的ReLu来说,标准差为He(根号2/n)好于Xavier好于0.01
权重初始值的设置非常重要,直接决定之后的网络能否进行正常学习
6.2.3.1 将初始权重设置为标准差为0.01的高斯分布
def ReLU(x):
    y = np.maximum(0,x)
    return y
x=np.random.randn(1000,100)
node_num=100
hidden_layer_size=5
activations={}
for i in range(hidden_layer_size):
    if i!=0:
        x=activations[i-1]

    w=np.random.randn(node_num,node_num)*0.01

    z=np.dot(x,w)
    a=ReLU(z)
    activations[i]=a
for i,a in activations.items():
    plt.subplot(1,len(activations),i+1)
    plt.title(str(i+1)+"-layer")
    plt.hist(a.flatten(),30,range=(0,1))
plt.show()
6.2.3.2 将初始权重设置为标准差为1/根号n(n为前一层的节点数)的高斯分布(Xavier)
for i in range(hidden_layer_size):
    if i!=0:
        x=activations[i-1]

    node_num=100
    w=np.random.randn(node_num,node_num)/np.sqrt(node_num)

    z=np.dot(x,w)
    a=ReLU(z)
    activations[i]=a
for i,a in activations.items():
    plt.subplot(1,len(activations),i+1)
    plt.title(str(i+1)+"-layer")
    plt.hist(a.flatten(),30,range=(0,1))
plt.show()
6.2.3.3 将初始权重设置为标准差为根号2/n(n为前一层的节点数)的高斯分布(He)
for i in range(hidden_layer_size):
    if i!=0:
        x=activations[i-1]

    node_num=100
    w=np.random.randn(node_num,node_num)/np.sqrt(node_num/2)

    z=np.dot(x,w)
    a=ReLU(z)
    activations[i]=a
for i,a in activations.items():
    plt.subplot(1,len(activations),i+1)
    plt.title(str(i+1)+"-layer")
    plt.hist(a.flatten(),30,range=(0,1))
plt.show()
6.3 Batch Normalization
使得学习对初始权重不敏感
6.4 正则化
为了避免过拟合
6.4.1 过拟合
测试的精度和训练的相差很大,原因可能是数据量不够,或模型过于复杂
6.4.2 权值衰减
能在一定程度上,减少过拟合
6.4.3 Dropout
对于表现能力强的网络,能减少过拟合
class Dropout:
    def __init__(self,dropout_ratio=0.5):
        self.dropout_ratio=dropout_ratio
        self.mask=None

    def forward(self,x,train_flg=True):
        if train_flg:
            self.mask=np.random.rand(*x.shape)>self.dropout_ratio
            return x*self.mask
        else:
            return x*(1.0-self.dropout_ratio)

    def backward(self,dout):
        return dout*self.mask
6.5 超参数的验证
6.5.1 验证数据
划分验证集的意义,就是调整超参数
6.5.2 超参数的最优化
除了凭借经验,还可以通过贝叶斯最优化来进行超参数优化
6.5.3 超参数优化的实现
七、卷积神经网络
7.1 卷积层
维度:卷积层的输出=(输入+2*填充-滤波器大小)/步幅+1
def im2col(input_data, filter_h, filter_w, stride=1, pad=0):
    """

    Parameters
    ----------
    input_data : (データ数, チャンネル, 高さ, 幅)の4次元配列からなる入力データ
    filter_h : フィルターの高さ
    filter_w : フィルターの幅
    stride : ストライド
    pad : パディング

    Returns
    -------
    col : 2次元配列
    """
    N, C, H, W = input_data.shape
    out_h = (H + 2*pad - filter_h)//stride + 1
    out_w = (W + 2*pad - filter_w)//stride + 1

    img = np.pad(input_data, [(0,0), (0,0), (pad, pad), (pad, pad)], 'constant')
    col = np.zeros((N, C, filter_h, filter_w, out_h, out_w))

    for y in range(filter_h):
        y_max = y + stride*out_h
        for x in range(filter_w):
            x_max = x + stride*out_w
            col[:, :, y, x, :, :] = img[:, :, y:y_max:stride, x:x_max:stride]

    col = col.transpose(0, 4, 5, 1, 2, 3).reshape(N*out_h*out_w, -1)
    return col


def col2im(col, input_shape, filter_h, filter_w, stride=1, pad=0):
    """

    Parameters
    ----------
    col :
    input_shape : 入力データの形状(例:(10, 1, 28, 28))
    filter_h :
    filter_w
    stride
    pad

    Returns
    -------

    """
    N, C, H, W = input_shape
    out_h = (H + 2*pad - filter_h)//stride + 1
    out_w = (W + 2*pad - filter_w)//stride + 1
    col = col.reshape(N, out_h, out_w, C, filter_h, filter_w).transpose(0, 3, 4, 5, 1, 2)

    img = np.zeros((N, C, H + 2*pad + stride - 1, W + 2*pad + stride - 1))
    for y in range(filter_h):
        y_max = y + stride*out_h
        for x in range(filter_w):
            x_max = x + stride*out_w
            img[:, :, y:y_max:stride, x:x_max:stride] += col[:, :, y, x, :, :]

    return img[:, :, pad:H + pad, pad:W + pad]
x1=np.random.rand(1,3,7,7)
col1=im2col(x1,5,5,stride=1,pad=0)
print(col1.shape)
输出(9, 75)
x2=np.random.rand(10,3,7,7)
col2=im2col(x2,5,5,stride=1,pad=0)
print(col2.shape)
输出(90, 75)
class Convolution:
    def __init__(self,W,b,stride=1,pad=0):
        self.W=W
        self.b=b
        self.stride=stride
        self.pad=pad

    def forward(self,x):
        FN,C,FH,FM=self.W.shaoe
        N,C,H,W=x.shape
        out_h=int(1+(H+2*sel.pad-FH)/self.stride)
        out_w=int(1+(W+2*sel.pad-FW)/self.stride)

        col=im2col(x,FH,FW,self.stride,self.pad)
        col_w=self.W.reshape(FN,-1).T
        out=np.dot(col,col.W)+self.b

        out=out.reshape(N,out_h,out_w,-1).transpose(0,3,1,2)

        return out
7.2 池化层
池化层的特征:1没有要学习的参数 2通道数不发生变化 3对微小的位置变化具有鲁棒性(健壮)
class Pooling:
    def __init__(self,pool_h,pool_w,stride=1,pad=0):
        self.pool_h=pool_h
        self.pool_w=pool_w
        self.stride=stride
        self.pad=pad

    def forward(self,x):
        N,C,H,W=x.shape
        out_h=int(1+(H-self.pool_h)/self.stride)
        out_w=int(1+(W-self.pool_w)/self.stride)

        col=im2col(x,self.pool_h,self.pool_w,self.stride,self.pad)
        col=col.reshape(-1,self.pool_h*self.pool_w)

        out=np.max(col,axis=1)
        out=out.reshape(N,out_h,out_w,C).transpose(0,3,1,2)

        return out
7.3 CNN的实现
class SimpleConvNet:
    def __init__(self,input_dim=(1,28,28),conv_param={'fileter_num':30,'filter_size':5,'pad':0,'stride':1},hidden_size=100,output_size=10,weight_init_std=0.01):
        filter_num=conv_param['filter_num']
        filter_size=conv_param['filter_size']
        filter_pad=conv_param['filter_pad']
        filter_stride=conv_param['filter_stride']
        input_size=input_dim[1]
        conv_output_size=(input_size-filter_size+2*filter_pad)/filter_stride+1
        pool_output_size=int(filter_num*(conv_output_size/2)*(conv_output_size/2))

        self.params={}
        self.params['W1']=weight_init_std*np.random.randn(filter_num,input_dim[0],filter_size,filter_size)
        self.params['b1']=np.zeros(filter_num)
        self.params['W2']=weight_init_std*np.random.randn(pool_output_size,hidden_size)
        self.params['b2']=np.zeros(hidden_size)
        self.params['W3']=weight_init_std*np.random.randn(hidden_size,output_size)
        self.params['b3']=np.zeros(output_size)

        self.layers=OrderedDict()
        self.layers['Conv1']=Convolution(self.params['W1'],self.params['b1'],conv_param['filter_stride'],conv_param['filter_pad'])
        self.layers['Relu1']=Relu()
        self.layers['Pool1']=Pooling(pool_h=2,pool_w=2,stride=2)
        self.layers['Affine1']=Affine(self.params['W2'],self.params['b2'])
        self.layers['Relu2']=Relu()
        self.layers['Affine2']=Affine(self.params['W3'],self.params['b3'])
        self.last_layer=SoftmaxWithLoss()

        def predict(self,x):
            for layer in self.layers.values():
                x=layer.forward(x)
            return x
        def loss(self,x,t):
            y=self.predict(x)
            return self.lastLayer.forward(y,t)
        def gradient(self,x,t):
            self.loss(x,t)

            dout=1
            dout=self.lastLayer.backward(dout)

            grads={}
            grads['W1']=self.layers['Conv1'].dW
            grads['b1']=self.layers['Conv1'].db
            grads['W2']=self.layers['Affine1'].dW
            grads['b2']=self.layers['Affine1'].db
            grads['W3']=self.layers['Affine2'].dW
            grads['b3']=self.layers['Affine2'].db

            return grads
八、深度学习
8.1 加深网络
8.2 深度学习的小历史
8.3 深度学习的高速化
8.4 深度学习的应用案例
8.5 深度学习的未来
总结
第三章到第七章将会以书上的基础内容总结为主,第八章争取找一些新东西(那些没有代码示例,但似乎很有趣的概念和算法)加进读书笔记里。
希望这一次的读书笔记不要半途而废,每天总结一小部分,积少成多,希望早日完结撒花~
