mmsegmentation使用教程 使用 OpenMMLab 的 MM segmention 下Swin-T 预训练模型 语义分割 推理的记录
前言:
给大家说一下怎么使用mmsegmention时,毕竟自己用mmsegmention走过很多弯路,然后结合其他人的文章和mmsegmention自己的doc来写下这个教程
第一部分:
我的电脑配置
处理器 11th Gen Intel(R) Core(TM) i7-11700 @ 2.50GHz 2.50 GHz
机带 RAM 16.0 GB (15.8 GB 可用)
显卡 GEFORCE RTX 3060
电脑在windows环境 WSL2下 配置的Ubuntu
nvidia-smi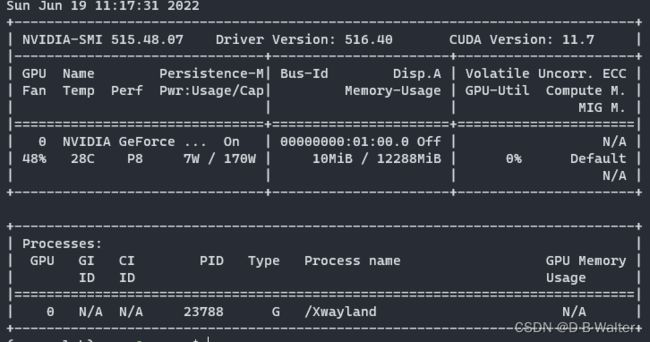
第二部分:安装配置mmsegmentation环境
下载anaconda,此处下载bfsu镜像源的anaconda文件 北京外国语大学开源软件镜像站
wget -c https://mirrors.bfsu.edu.cn/anaconda/archive/Anaconda3-2022.05-Linux-x86_64.sh
bash Anaconda3-2022.05-Linux-x86_64.sh
新建虚拟环境并激活
conda create -n open-mmlab python=3.9 -y
conda activate open-mmlab
1.安装PyTorch 参考PyTorch官网安装方式
在终端查询cuda版本nvidia-smi可知该系统CUDA Version: 11.3,则安装对应版本pytorch
conda install pytorch torchvision torchaudio cudatoolkit=11.3 -c pytorch2.安装mmcv-full,由系统cuda版本和安装的pytorch版本安装对应版本mmcv
pip install mmcv-full -f https://download.openmmlab.com/mmcv/dist/cu113/torch1.11.0/index.html
!!!
此处安装的cu113应该于你此时机器上的cuda版本一致
!!!
此处的Torch版本应于你当前安装的torch版本一致
此处的Torch版本应于你当前安装的torch版本一致
此处的Torch版本应于你当前安装的torch版本一致
!!!
3.安装MMSegmentation
Option A:
pip install mmsegmentationOption B:
git clone https://github.com/open-mmlab/mmsegmentation.git
cd mmsegmentation
pip install -e .  # or "python setup.py develop"
Best Practices
Step 0. Install MMCV using MIM.
pip install -U openmim
# 使用mim管理openmmlab package
mim install mmcv-full  #此处为测试 ,如果之前按照指示安装了mmcv-full,此处会打印已安装和版本号
使用openmim管理 openmmlab 的package
指令是mim
Verify the installation 测试验证安装
To verify whether MMSegmentation is installed correctly, we provide some sample codes to run an inference demo.
为了验证是否正确安装了 MMSegmentation,我们提供了一些示例代码来运行推理演示。
Step 1. We need to download config and checkpoint files.
首先下载config和checkpoint文件
checkpoint 是预训练pth文件 ,其实config文件在config目录下已经存在
mim download mmsegmentation --config pspnet_r50-d8_512x1024_40k_cityscapes --dest .使用mim下载mmsegmention的预训练模型
--dest . 指定下载位置当前目录 , 没有的话会下载到 .cache/mim 目录下
这个下载过程会持续几秒或者更长,取决于你当前的网络环境,当下载完成后,你会在当前目录下看到这两个文件pspnet_r50d8_512x1024_40k_cityscapes.py 和 pspnet_r50-d8_512x1024_40k_cityscapes_20200605_003338-2966598c.pth
The downloading will take several seconds or more, depending on your network environment. When it is done, you will find two files pspnet_r50d8_512x1024_40k_cityscapes.py and pspnet_r50-d8_512x1024_40k_cityscapes_20200605_003338-2966598c.pth in your current folder.
Step 2. Verify the inference demo. 验证推理的demo
Option (a). If you install mmsegmentation from source, just run the following command.
选项 (a)。 如果从源代码安装 mmsegmentation,只需运行以下命令。 意思是从Github下git来的代码,在mmsegmentation下,
python demo/image_demo.py demo/demo.png configs/pspnet/pspnet_r50-d8_512x1024_40k_cityscapes.py pspnet_r50-d8_512x1024_40k_cityscapes_20200605_003338-2966598c.pth --device cuda:0 --out-file result.jpg上面的代码按照如下格式书写,config文件 和 checkpoint文件 必须按照格式顺序书写!!!,否则报错
python demo的py文件 configs文件 checkpoint文件 --device GPU选项 --out-file 导出文件选项
Option (b). If you install mmsegmentation with pip, open you python interpreter and copy&paste the following codes.
选项 (b)。 如果您使用 pip 安装 mmsegmentation,请打开 python 解释器并复制并粘贴以下代码。
from mmseg.apis import inference_segmentor, init_segmentor
import mmcv

config_file = 'pspnet_r50-d8_512x1024_40k_cityscapes.py'
checkpoint_file = 'pspnet_r50-d8_512x1024_40k_cityscapes_20200605_003338-2966598c.pth'

# build the model from a config file and a checkpoint file
model = init_segmentor(config_file, checkpoint_file, device='cuda:0')

# test a single image and show the results
img = 'test.jpg'  # or img = mmcv.imread(img), which will only load it once
result = inference_segmentor(model, img)
# visualize the results in a new window
model.show_result(img, result, show=True)
# or save the visualization results to image files
# you can change the opacity of the painted segmentation map in (0, 1].
model.show_result(img, result, out_file='result.jpg', opacity=0.5)

# test a video and show the results
video = mmcv.VideoReader('video.mp4')
for frame in video:
   result = inference_segmentor(model, frame)
   model.show_result(frame, result, wait_time=1)
You can modify the code above to test a single image or a video, both of these options can verify that the installation was successful.
您可以修改上面的代码来测试单个图像或视频,这两个选项都可以验证安装是否成功。
//此处的py代码本人未做验证,仅从mmsegmention/doc/getstarted.md复制过来
上述工作完成后,准备推理ADE20K
数据集ADE20K
The training and validation set of ADE20K could be download from this link. We may also download test set from here.
可以从此链接下载 ADE20K 的训练和验证集。 我们也可以从这里链接下载测试集。
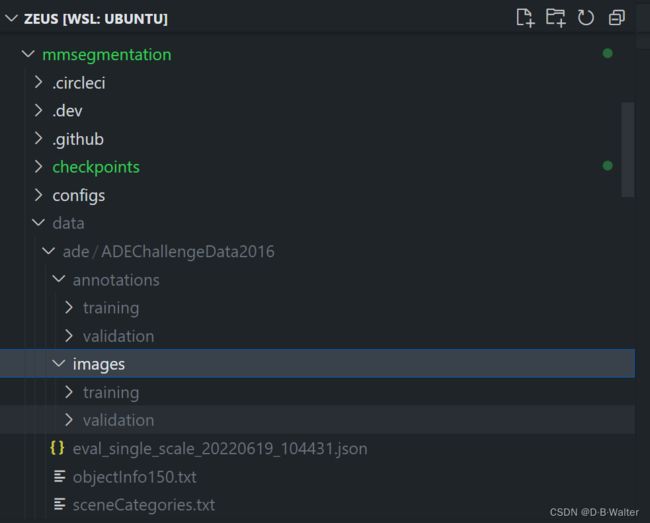
数据集的存放格式按照如下方式存储,在mmsegmentation下新建/data/ade,并将ADE20K存放在下面
mmsegmentation
├── mmseg
├── tools
├── configs
├── data
│   ├── cityscapes
│   │   ├── leftImg8bit
│   │   │   ├── train
│   │   │   ├── val
│   │   ├── gtFine
│   │   │   ├── train
│   │   │   ├── val
│   ├── VOCdevkit
│   │   ├── VOC2012
│   │   │   ├── JPEGImages
│   │   │   ├── SegmentationClass
│   │   │   ├── ImageSets
│   │   │   │   ├── Segmentation
│   │   ├── VOC2010
│   │   │   ├── JPEGImages
│   │   │   ├── SegmentationClassContext
│   │   │   ├── ImageSets
│   │   │   │   ├── SegmentationContext
│   │   │   │   │   ├── train.txt
│   │   │   │   │   ├── val.txt
│   │   │   ├── trainval_merged.json
│   │   ├── VOCaug
│   │   │   ├── dataset
│   │   │   │   ├── cls
│   ├── ade
│   │   ├── ADEChallengeData2016
│   │   │   ├── annotations
│   │   │   │   ├── training
│   │   │   │   ├── validation
│   │   │   ├── images
│   │   │   │   ├── training
│   │   │   │   ├── validation
│   ├── coco_stuff10k
│   │   ├── images
│   │   │   ├── train2014
│   │   │   ├── test2014
│   │   ├── annotations
│   │   │   ├── train2014
│   │   │   ├── test2014
│   │   ├── imagesLists
│   │   │   ├── train.txt
│   │   │   ├── test.txt
│   │   │   ├── all.txt
│   ├── coco_stuff164k
│   │   ├── images
│   │   │   ├── train2017
│   │   │   ├── val2017
│   │   ├── annotations
│   │   │   ├── train2017
│   │   │   ├── val2017
│   ├── CHASE_DB1
│   │   ├── images
│   │   │   ├── training
│   │   │   ├── validation
│   │   ├── annotations
│   │   │   ├── training
│   │   │   ├── validation
│   ├── DRIVE
│   │   ├── images
│   │   │   ├── training
│   │   │   ├── validation
│   │   ├── annotations
│   │   │   ├── training
│   │   │   ├── validation
│   ├── HRF
│   │   ├── images
│   │   │   ├── training
│   │   │   ├── validation
│   │   ├── annotations
│   │   │   ├── training
│   │   │   ├── validation
│   ├── STARE
│   │   ├── images
│   │   │   ├── training
│   │   │   ├── validation
│   │   ├── annotations
│   │   │   ├── training
│   │   │   ├── validation
|   ├── dark_zurich
|   │   ├── gps
|   │   │   ├── val
|   │   │   └── val_ref
|   │   ├── gt
|   │   │   └── val
|   │   ├── LICENSE.txt
|   │   ├── lists_file_names
|   │   │   ├── val_filenames.txt
|   │   │   └── val_ref_filenames.txt
|   │   ├── README.md
|   │   └── rgb_anon
|   │   |   ├── val
|   │   |   └── val_ref
|   ├── NighttimeDrivingTest
|   |   ├── gtCoarse_daytime_trainvaltest
|   |   │   └── test
|   |   │       └── night
|   |   └── leftImg8bit
|   |   |   └── test
|   |   |       └── night
│   ├── loveDA
│   │   ├── img_dir
│   │   │   ├── train
│   │   │   ├── val
│   │   │   ├── test
│   │   ├── ann_dir
│   │   │   ├── train
│   │   │   ├── val
│   ├── potsdam
│   │   ├── img_dir
│   │   │   ├── train
│   │   │   ├── val
│   │   ├── ann_dir
│   │   │   ├── train
│   │   │   ├── val
│   ├── vaihingen
│   │   ├── img_dir
│   │   │   ├── train
│   │   │   ├── val
│   │   ├── ann_dir
│   │   │   ├── train
│   │   │   ├── val
│   ├── iSAID
│   │   ├── img_dir
│   │   │   ├── train
│   │   │   ├── val
│   │   │   ├── test
│   │   ├── ann_dir
│   │   │   ├── train
│   │   │   ├── val
Test a dataset
- single GPU
- CPU
- single node multiple GPU
- multiple node
You can use the following commands to test a dataset.
# single-gpu testing
python tools/test.py ${CONFIG_FILE} ${CHECKPOINT_FILE} [--out ${RESULT_FILE}] [--eval ${EVAL_METRICS}] [--show]

# CPU: If GPU unavailable, directly running single-gpu testing command above
# CPU: If GPU available, disable GPUs and run single-gpu testing script
export CUDA_VISIBLE_DEVICES=-1
python tools/test.py ${CONFIG_FILE} ${CHECKPOINT_FILE} [--out ${RESULT_FILE}] [--eval ${EVAL_METRICS}] [--show]

# multi-gpu testing
./tools/dist_test.sh ${CONFIG_FILE} ${CHECKPOINT_FILE} ${GPU_NUM} [--out ${RESULT_FILE}] [--eval ${EVAL_METRICS}]
Optional arguments:
RESULT_FILE: Filename of the output results in pickle format. If not specified, the results will not be saved to a file. (After mmseg v0.17, the output results become pre-evaluation results or format result paths)EVAL_METRICS: Items to be evaluated on the results. Allowed values depend on the dataset, e.g.,mIoUis available for all dataset. Cityscapes could be evaluated bycityscapesas well as standardmIoUmetrics.--show: If specified, segmentation results will be plotted on the images and shown in a new window. It is only applicable to single GPU testing and used for debugging and visualization. Please make sure that GUI is available in your environment, otherwise you may encounter the error likecannot connect to X server.--show-dir: If specified, segmentation results will be plotted on the images and saved to the specified directory. It is only applicable to single GPU testing and used for debugging and visualization. You do NOT need a GUI available in your environment for using this option.--eval-options: Optional parameters fordataset.format_resultsanddataset.evaluateduring evaluation. Whenefficient_test=True, it will save intermediate results to local files to save CPU memory. Make sure that you have enough local storage space (more than 20GB). (efficient_testargument does not have effect after mmseg v0.17, we use a progressive mode to evaluation and format results which can largely save memory cost and evaluation time.)
有疑问请参考Github mmsegmentation/doc/en/inference.md
第三部分:使用Swin-T推理ADE20k
此处写上Swin-T 的推理实例
Step 0 :准备好ADE20K数据集
Step 1:
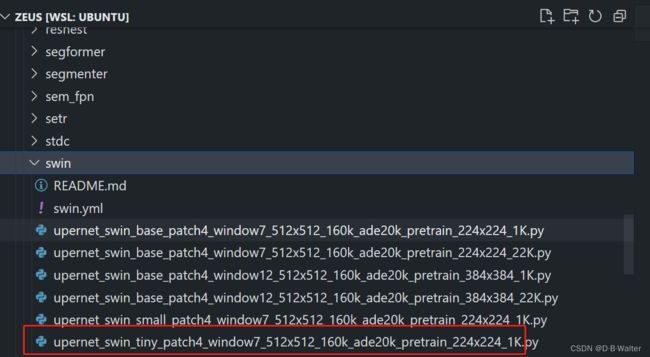
mim download mmsegmentation --config upernet_swin_tiny_patch4_window7_512x512_160k_ade20k_pretrain_224x224_1K --dest .在mmsegmentation/cofigs/swin/下载复制需要下载的pth文件, 在checkponits文件使用mim下载预训练模型到该目录下
Step 2 : 开始推理 Swin-T
python tools/test.py configs/swin/upernet_swin_tiny_patch4_window7_512x512_160k_ade20k_pretrain_224x224_1K.py checkpoints/upernet_swin_tiny_patch4_window7_512x512_160k_ade20k_pretrain_224x224_1K_20210531_112542-e380ad3e.pth --eval mIoU --show-dir results
- --eval mIoU
--show-dir: 如果指定,分割结果将绘制在图像上并保存到指定目录。 仅适用于单GPU测试,用于调试和可视化。 您不需要环境中可用的 GUI 即可使用此选项。 If specified, segmentation results will be plotted on the images and saved to the specified directory. It is only applicable to single GPU testing and used for debugging and visualization. You do NOT need a GUI available in your environment for using this option.
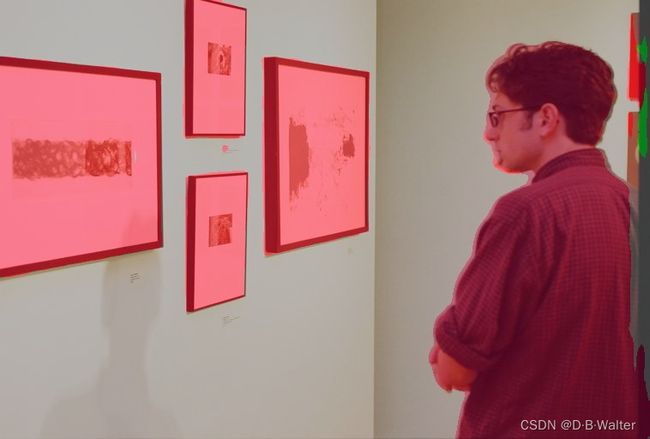
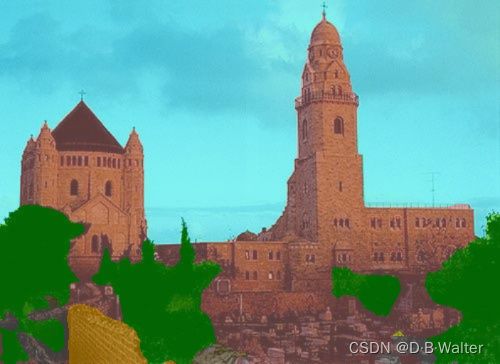
推理结果
部分具体的例子