Kubernetes 容器安全 最小特权原则POLP AppArmor限制容器对资源访问
最小特权原则(POLP)
最小特权原则 (Principle of least privilege,POLP) :是一种信息安全概念,即为用户提供执行其工作职责所需的最小权限等级或许可。
最小特权原则 (POLP) 重要性
在团队中实施最小特权原则 (POLP)
• 在所有服务器、业务系统中,审核整个环境以查找特权帐户(例如SSH账号、管理后台账号、跳板机账号);
AppArmor限制容器对资源访问
AppArmor(Application Armor) 是一个 Linux 内核安全模块,可用于限制主机操作系统上运行的进程的功能。每个进程都可以拥有自己的安全配置文件。安全配置文件用来允许或禁止特定功能,例如网络访问、文件读/写/执行权限等。
Apparmor两种工作模式
• Enforcement(强制模式) :在这种模式下,配置文件里列出的限制条件都会得到执行,并且对于违反这些限制条件的程序会进行日志记录。
AppArmor限制容器对资源访问
root@k8s-master:~# kubectl describe node | grep AppAr
  Ready                True    Sat, 03 Jul 2021 12:31:43 +0800   Sat, 05 Jun 2021 23:41:25 +0800   KubeletReady                 kubelet is posting ready status. AppArmor enabled


root@k8s-master:~# cat /sys/module/apparmor/parameters/enabled
Y
AppArmor 目前处于测试阶段,因此在注解中指定AppArmor策略配置文件。
如果想要pod使用 apparmor,限制对容器的哪些资源操作,就需要去声明一下让容器使用apparmor,否则默认情况下是不具有这种能力的。
An introduction to AppArmor Profiles
An apparmor profile defines what resources (like network, system capabilities, or files) on the system can be accessed by the target confined application.
Here’s an example of a simple AppArmor profile:
profile k8s-apparmor-example-deny-write flags=(attach_disconnected) {
  file,
  # Deny all file writes.
  deny /** w,
}
In this example, the profile grants the application all kinds of access, except write to the entire file system. It contains two rules:
file: Allows all kinds of access to the entire file system.deny /** w: Denies any file write under the root/directory. The expression/**translates to any file under the root directory, as well as those under its subdirectories.
Setting up a Kubernetes cluster so containers can use apparmor profiles is done with the following steps:
- Install and enable AppArmor on all of the cluster nodes.
- Copy the apparmor profile you want to use to every node, and parse it into either enforce mode or complain mode.
- Annotate the container workload with the AppArmor profile name.
Here is how you would use a profile in a Pod:
apiVersion: v1
kind: Pod
metadata:
  name: hello-apparmor
  annotations:
    # Tell Kubernetes to apply the AppArmor profile "k8s-apparmor-example-deny-write".
    container.apparmor.security.beta.kubernetes.io/hello: localhost/k8s-apparmor-example-deny-write
spec:
  containers:
  - name: hello
    image: busybox
    command: [ "sh", "-c", "echo 'Hello AppArmor!' && sleep 1h" ]
In the pod yaml above, the container named hello is using the AppArmor profile named k8s-apparmor-example-deny-write. If the AppArmor profile does not exist, the pod will fail to be created.
Each profile can be run in either enforce mode, which blocks access to disallowed resources, or complain mode, which only reports violations. After building an AppArmor profile, it is good practice to apply it with the complain mode first and let the workload run for a while. By analyzing the AppArmor log, you can detect and fix any false positive activities. Once you are confident enough, you can turn the profile to enforce mode.
If the previous profile runs in enforce mode, it will block any file write activities:
$ kubectl exec hello-apparmor touch /tmp/test
touch: /tmp/test: Permission denied
error: error executing remote command: command terminated with non-zero exit code: Error executing in Docker Container:
This was a simplified example. Now, think of the challenges of implementing AppArmor in production.
First, you will have to build robust profiles for each of your containers to prevent attacks without blocking daily tasks.
Then, you will have to manage several profiles across all the nodes in your cluster.
案例:容器文件系统访问限制
容器当中跑着我们的应用程序,想要对文件系统最小权限的访问,默认情况下对容器环境下的文件系统有任何的访问权限。如果黑客进入到你的容器当中,可能想方设法的去提取权限。提权到宿主机上面去。最小权限的目的是为了即使黑客进入到容器他的权限也是非常有限的。可能是很多文件都不能访问,很多的工具都不能使用。
步骤:
#include
profile k8s-deny-write flags=(attach_disconnected) {
  include
  file,
  deny /bin/** w,
  deny /data/www/** w,
}


#include    导入依赖,是linux的内核模块,遵循c语言的语法,格式固定
profile k8s-deny-write flags=(attach_disconnected)  策略名字为k8s-deny-write,这个是需要自己写
include    c语言导入的依赖,格式固定


注意,如果策略里面什么都不写就是拒绝一切行为,你在策略里面添加的东西相对于白名单,就是放行
测试,默认策略,里面什么都不写
root@k8s-master:~# cd /etc/apparmor.d/
root@k8s-master:/etc/apparmor.d# cat k8s-deny-write
#include
profile k8s-deny-write flags=(attach_disconnected) {
  #include
  #file,
  #deny /bin/** w,
  #deny /data/www/** w,
}


#让这个文件生效一下
root@k8s-master:/etc/apparmor.d# apparmor_parser -r k8s-deny-write

#显示加载成功
root@k8s-master:/etc/apparmor.d# apparmor_status | grep k8s
   k8s-deny-write
container.apparmor.security.beta.kubernetes.io/hello hello是指定了容器的名称
apiVersion: v1
kind: Pod
metadata:
name: hello-apparmor
annotations:
container.apparmor.security.beta.kubernetes.io/hello: localhost/k8s-deny-write
spec:
containers:
- name: hello
image: busybox
command: [ "sh", "-c", "echo 'Hello AppArmor!' && sleep 1h" ]
使用默认的策略创建后的pod,进入里面会发现使用touch会提示没有权限,在使用默认策略的时候都是拒绝的行为,这个就相对于白名单,往里面加什么就是要放行什么root@k8s-master:/etc/apparmor.d# cat k8s-deny-write
#include
profile k8s-deny-write flags=(attach_disconnected) {
#include
file, #允许所有文件读写,创建和查看文件都有
deny /bin/** w, #控制某个目录进行读写,这边一般都放可执行的程序
}
这里都是先放行所有的文件,然后针对具体的目录去限制
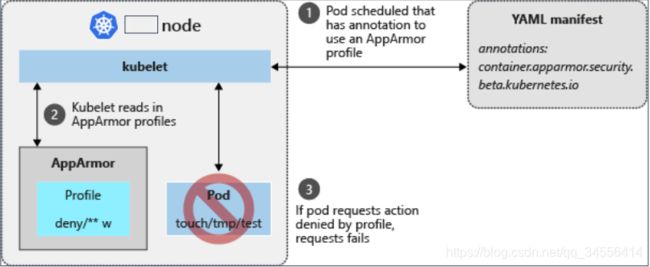
修改之后不需要重启容器,只需要使用-r生效一下即可 工作流程
当去写pod的yaml的时候,要去注解里面去指定你要使用的AppArmor的容器名称和策略名称,pod会被调度到某个节点上面,这个节点就会去读取AppArmor的配置文件,然后对pod当中容器应用上。

