- 通过TensorFlow实现简单深度学习模型(2)
yyc_audio
人工智能深度学习python机器学习
前文我们已经实现了对每批数据的训练,下面继续实现一轮完整的训练。完整的训练循环一轮训练就是对训练数据的每个批量都重复上述训练步骤,而完整的训练循环就是重复多轮训练。deffit(model,images,labels,epochs,batch_size=128):forepoch_counterinrange(epochs):print(f"Epoch{epoch_counter}")batch_
- Python连接SQL SEVER数据库全流程
m0_74824865
面试学习路线阿里巴巴数据库pythonsql
背景介绍在数据分析领域,经常需要从数据库中获取数据进行分析和处理。而SQLServer是一种常用的关系型数据库管理系统,因此学习如何使用Python连接SQLServer数据库并获取数据是非常有用的。以下是Python使用pymssql连接SQLServer数据库的全流程:安装pymssql库本地账号设置脚本连接数据导入函数实现一、安装pymssqlpymssql是Python连接SQLServe
- 网络安全工具 AWVS 与 Nmap:原理、使用及代码示例
阿贾克斯的黎明
网络安全安全web安全网络
目录网络安全工具AWVS与Nmap:原理、使用及代码示例AWVS:Web漏洞扫描的利器1.工具概述2.工作原理3.使用方法4.代码示例(Python调用AWVSAPI进行扫描)Nmap:网络探测与端口扫描的神器1.工具概述2.工作原理3.使用方法4.代码示例(Python调用Nmap进行扫描)总结在网络安全领域,AWVS(AcunetixWebVulnerabilityScanner)和Nmap是
- 深入剖析 Weblogic、ThinkPHP、Jboss、Struct2 历史漏洞
阿贾克斯的黎明
网络安全web安全
目录深入剖析Weblogic、ThinkPHP、Jboss、Struct2历史漏洞一、Weblogic漏洞(一)漏洞原理(二)漏洞利用代码(Python示例)(三)防范措施二、ThinkPHP漏洞(一)漏洞原理(二)漏洞利用代码(示例,假设存在漏洞的代码片段)(三)防范措施三、Jboss漏洞(一)漏洞原理(二)漏洞利用代码(Java示例,用于构造恶意序列化数据)(三)防范措施四、Struct2漏洞
- 【Python专栏】Python的发展历程
雾岛心情
Python入门到精通python开发语言
Python的创始人为吉多·范罗苏姆(GuidovanRossum),人称龟叔1989年,为了打发圣诞节假期,Guido开始写Python语言的编译器。Python这个名字,来自Guido所挚爱的电视剧MontyPython’sFlyingCircus。他希望这个新的叫做Python的语言,能符合他的理想:创造一种C和shell之间,功能全面,易学易用,可拓展的语言。Python的具体发展历史和版
- Stable diffusion 3.5本地运行环境配置记录
寸先生的牛马庄园
扩散模型stablediffusion
1.环境配置创建虚环境condacreate-nsd3.5python=3.10Pytorch(>2.0)condainstallpytorch==2.2.2torchvision==0.17.2torchaudio==2.2.2pytorch-cuda=12.1-cpytorch-cnvidiaJupyter能使用Anaconda虚环境condainstallipykernelpython-mi
- 阿里巴巴DIN模型原理与Python实现
eso1983
python开发语言算法推荐算法
阿里巴巴的DeepInterestNetwork(DIN)是一种用于点击率预测(CTR)的深度学习模型,特别针对电商场景中用户兴趣多样化和动态变化的特性设计。其核心思想是通过注意力机制动态捕捉用户历史行为中与当前候选商品相关的兴趣。1.DIN模型原理1.核心问题传统推荐模型(如Embedding+MLP)将用户历史行为视为固定长度的向量,忽略了用户兴趣的多样性。例如,用户历史行为中可能包含多个互不
- pytorch基础-比较矩阵是否相等
yuweififi
pytorch人工智能
1、使用NumPy库NumPy是Python中用于科学计算的常用库,它提供了array_equal和allclose函数来判断矩阵是否相等。array_equal用于精确比较,allclose用于考虑一定误差范围的近似比较,适合浮点数矩阵。importnumpyasnp#创建示例矩阵matrix_a=np.array([[1,2,3],[4,5,6]])matrix_b=np.array([[1,
- 一学就会:A*算法详细介绍(Python)
不去幼儿园
人工智能(AI)#启发式算法算法python人工智能机器学习开发语言
本篇文章是博主人工智能学习以及算法研究时,用于个人学习、研究或者欣赏使用,并基于博主对相关等领域的一些理解而记录的学习摘录和笔记,若有不当和侵权之处,指出后将会立即改正,还望谅解。文章分类在启发式算法专栏:【人工智能】-【启发式算法】(6)---《一学就会:A*算法详细介绍(Python)》一学就会:A*算法详细介绍(Python)目录A*算法介绍A*算法的核心概念A*算法的特点A*算法示例:迷宫
- 电竞赛事数据分析:LNG vs BLG的胜利背后
烧瓶里的西瓜皮
python自动驾驶人工智能数据可视化机器学习
电竞赛事数据分析:LNGvsBLG的胜利背后摘要在S14瑞士轮次日,LNG以1:0战胜BLG,取得了开赛二连胜。本文将通过Python进行数据处理与分析,结合机器学习算法预测比赛结果,并使用数据可视化工具展示关键指标。通过对这场比赛的数据深入挖掘,揭示LNG获胜的关键因素。引言电子竞技(Esports)已经成为全球范围内的一项重要娱乐活动,而《英雄联盟》(LeagueofLegends,LoL)作
- 如何使用Python编程实现捕获笔记本电脑麦克风的音频并通过蓝牙耳机实时传输
winfredzhang
python音视频实时传输蓝牙耳机
在现代的工作和生活环境中,音频传输的需求日益增加。无论是远程会议、在线教育,还是家庭娱乐,音频的实时传输都扮演着至关重要的角色。今天,我将向大家介绍一个简单而实用的应用程序,它能够捕获笔记本电脑麦克风的音频,并通过蓝牙耳机实时传输。这款应用程序特别适用于需要在会议室等场景中远程听取声音的情况。接下来,我将详细讲解这个应用程序的实现过程,并提供完整的代码和使用指南。引言想象一下这样的场景:你需要离开
- 网络安全加密python代码
黑客Ash
web安全安全
点击文末小卡片,免费获取网络安全全套资料,资料在手,涨薪更快网络信息安全中遇到的各种攻击是防不胜防的,采取适当的防护措施就能有效地保护网络信息的安全,包括防火墙、入侵检测系统、漏洞扫描技术以及加密技术等多种防护措施。而信息安全的本质就是要保护信息本身和信息系统在存储、传输中的完整性和保密性,保障不被攻击和篡改,上述的主动攻击、被动攻击和病毒袭击都会造成信息的破坏和泄密,我们以信息安全中的基础理论出
- python 商城 性能,python商城项目总结
Yvetzy
python商城性能
importhashlib#实例化md5对象md5=hashlib.md5()#md5.update()方法的参数必须是字节型数据md5.update(bytes(request.POST['password'],encoding="UTF-8"))#以16进制格式存储md5.hexdigest()'''这里有个坑必须注意:md5.update()方法会将每次加密的字符进行拼接,所以每次加密前都要
- 用Python写一个商城系统
潮水岩
如果要用Python写一个商城系统,可以先定义需要实现的功能,再按照功能模块分别进行开发。下面是一个简单的开发流程:数据模型设计:需要定义商品、订单、用户等数据模型,并且将它们存储在数据库中。用户模块:用户可以注册、登录、查看个人信息、修改密码等。商品模块:商家可以发布商品、管理商品信息、查看商品列表等;用户可以查看商品详情、加入购物车等。订单模块:用户可以下单、查看订单详情、取消订单、评价订单等
- python pandas 读取数据库_Python+Pandas 获取数据库并加入DataFrame的实例
weixin_39955149
pythonpandas读取数据库
Python+Pandas获取数据库并加入DataFrame的实例实例如下所示:importpandasaspdimportsysimportimpimp.reload(sys)fromsqlalchemyimportcreate_engineimportcx_Oracledb=cx_Oracle.connect('userid','password','10.10.1.10:1521/dbins
- python导出结果_Python连接Oracle数据查询导出结果
weixin_39712821
python导出结果
python连接oracle,需用用到模块cx_oracle,可以直接pip安装,如网络不好,可下载离线后本地安装本人由于工作需要,期望便捷查询所得结果,且固定输出某个格式具体代码如下:#!coding:utf-8importcx_Oracleconn=cx_Oracle.connect('username/password@IP/连接名')cur=conn.cursor()cur.execute
- Python—kafka操作
蓝魔Y
Python编程kafka
文档结构1、概念简介2、环境搭建3、操作实践1、概念简介2、环境搭建接口手册:https://kafka-python.readthedocs.io/en/master/Python操作kafka的模块为:kafka-python模块安装pipinstallkafka-python3、操作实践=============================================over====
- python使用kafka原理详解_Python操作Kafka原理及使用详解
形象顧問Aking
Python操作Kafka原理及使用详解一、什么是KafkaKafka是一个分布式流处理系统,流处理系统使它可以像消息队列一样publish或者subscribe消息,分布式提供了容错性,并发处理消息的机制二、Kafka的基本概念kafka运行在集群上,集群包含一个或多个服务器。kafka把消息存在topic中,每一条消息包含键值(key),值(value)和时间戳(timestamp)。kafk
- python把oracle的查询结果导出为insert语句
优游的鱼
oraclepython数据库开发语言
可以使用cx_Oracle库在Python中连接Oracle数据库并执行查询。然后,可以使用pandas库将查询结果读取为DataFrame,并使用to_sql()方法将其导出为insert语句。示例代码如下:importcx_Oracleimportpandasaspd#ConnecttoOracledatabaseconn=cx_Oracle.connect('username/passwor
- python画出roc曲线 auc计算逻辑_Python画ROC曲线和AUC值计算
路过炊烟
python画出roc曲线auc计算逻辑
前言ROC(ReceiverOperatingCharacteristic)曲线和AUC常被用来评价一个二值分类器(binaryclassifier)的优劣。这篇文章将先简单的介绍ROC和AUC,而后用实例演示如何python作出ROC曲线图以及计算AUC。AUC介绍AUC(AreaUnderCurve)是机器学习二分类模型中非常常用的评估指标,相比于F1-Score对项目的不平衡有更大的容忍性,
- 【spug】使用
勤不了一点
CI/CDpythondjangoci/cd运维devops
目录简介下载与安装初始化配置启动与日志版本更新登录与使用工作台主机管理批量执行配置中心应用发布系统管理监控与告警使用问题简介手动部署|Spugwalle的升级版本轻量级无Agent主机管理主机批量执行主机在线终端文件在线上传下载应用发布部署在线任务计划配置中心监控报警如果有测试错误请指出。下载与安装测试环境:Python3.7.8CentOSLinuxrelease7.4.1708(Core)sp
- 记一次从mysql数据迁移到oralce (基于python和pandas)
qq_36532060
mysqloraclepandaspython
记一次从mysql数据迁移到oralce(基于python)前景提要具体实现创建数据库链接读取mysql数据写入orcale结语前景提要公司最近有个从mysql迁移数据到oracle的需求,于是进行了一下方案调研和分析,但作为一个之前从没接触过Oracle的人真的感到好难,但再难也难上,这篇文章主要是记录一下做这件事时遇到的坑以及分享一下最终的方案及代码。具体实现创建数据库链接其实我觉得这个算是最
- python调用kafka
smile__su
pythonpythonkafka
先启动hadoop,zookeeper,kafka启动命令hadoop启动命令sbin/start-all.shzookeeper启动命令./bin/zkServer.shstart每台机器都要启动kafka启动命令bin/kafka-server-start.shconfig/server.properties每台机器都要启动进行以下操作的前提是将hadoop,zookeeper,kafka安装
- python实现从oracle数据库查询数据生成excel透视表发送outlook
niceme!
python
#-*-coding:utf-8-*-#http://pypi.cq.pegatroncorp.com/simple--trusted-hostpypi.cq.pegatroncorp.comimportchardetimportdatetimeimporttimeimportxlwtimportwin32com.clientaswin32fromwin32com.clientimportcons
- pip 与当前python环境版本不匹配,python安装库成功,还是提示没有该库
灿灿的金
pythonpip开发语言
解决pip版本不一致在使用pip命令前加上python-m即可让pip版本和当前python版本一致因此,当使用pip安装依赖时,需要在命令前添加python-m来配合使用,比如安装一个pillow库,命令如下python-mpipinstallpillow你同时安装了python2和python3pipinstallPillow可能下载的是python3的库,而你代码跑的是python2可以通过
- 【Python-ML】SKlearn库性能指标ROC-AUC
fjssharpsword
Bigdatapython专栏
#-*-coding:utf-8-*-'''Createdon2018年1月19日@author:Jason.F@summary:ROC(receiveroperatorcharacteristic,基于模型真正率和假正率等性能指标评估分类模型'''importpandasaspdfromsklearn.preprocessingimportLabelEncoderfromsklearn.cros
- 使用Python导出Oracle数据库数据表目录
SeanData
Python数据分析pythonoracle数据目录导出
###Oracle数据库数据表目录导出###导入包importpandasaspdimportcx_Oracle###数据库信息username='xxx'password='yyy'ipaddr='100.28.60.132'port='1521'service_name='service_name'connect_string=ipaddr+":"+port+"/"+service_name#
- 《Python入门+Python爬虫》——6Day 数据库可视化——Flask框架应用
不摆烂的小劉
pythonpythonflask爬虫
Python学习版本:Python3.X观看:Python入门+Python爬虫+Python数据分析1.Flask入门1.1关于Flask1.1.1了解框架Flask作为Web框架,它的作用主要是为了开发Web应用程序。那么我们首先来了解下Web应用程序。Web应用程序(WorldWideWeb)诞生最初的目的,是为了利用互联网交流工作文档。一切从客户端发起请求开始。所有Flask程序都必须创建
- 【python 机器学习】sklearn ROC曲线与AUC指标
人才程序员
杂谈机器学习pythonsklearn人工智能深度学习神经网络目标检测
文章目录sklearnROC曲线与AUC指标1.什么是ROC曲线与AUC?通俗介绍:学术解释:2.在`sklearn`中绘制ROC曲线与计算AUC2.1导入库和数据2.2加载数据集2.3训练模型2.4预测概率2.5计算FPR、TPR和AUC2.6绘制ROC曲线3.解析ROC曲线和AUC值4.总结sklearnROC曲线与AUC指标在机器学习中,评估分类模型的性能不仅仅依赖于准确率,还需要使用一些更
- python操作kafka
您懂我意思吧
python开发kafka分布式python
一、参考阿里云的官方链接:使用PythonSDK接入Kafka收发消息_云消息队列Kafka版(Kafka)-阿里云帮助中心二、安装python环境三、添加python依赖库pipinstallconfluent-kafka==1.9.2四、新建一个setting.py文件配置信息kafka_setting={'sasl_plain_username':'XXX',#如果是默认接入点实例,请删除该
- mysql主从数据同步
林鹤霄
mysql主从数据同步
配置mysql5.5主从服务器(转)
教程开始:一、安装MySQL
说明:在两台MySQL服务器192.168.21.169和192.168.21.168上分别进行如下操作,安装MySQL 5.5.22
二、配置MySQL主服务器(192.168.21.169)mysql -uroot -p &nb
- oracle学习笔记
caoyong
oracle
1、ORACLE的安装
a>、ORACLE的版本
8i,9i : i是internet
10g,11g : grid (网格)
12c : cloud (云计算)
b>、10g不支持win7
&
- 数据库,SQL零基础入门
天子之骄
sql数据库入门基本术语
数据库,SQL零基础入门
做网站肯定离不开数据库,本人之前没怎么具体接触SQL,这几天起早贪黑得各种入门,恶补脑洞。一些具体的知识点,可以让小白不再迷茫的术语,拿来与大家分享。
数据库,永久数据的一个或多个大型结构化集合,通常与更新和查询数据的软件相关
- pom.xml
一炮送你回车库
pom.xml
1、一级元素dependencies是可以被子项目继承的
2、一级元素dependencyManagement是定义该项目群里jar包版本号的,通常和一级元素properties一起使用,既然有继承,也肯定有一级元素modules来定义子元素
3、父项目里的一级元素<modules>
<module>lcas-admin-war</module>
<
- sql查地区省市县
3213213333332132
sqlmysql
-- db_yhm_city
SELECT * FROM db_yhm_city WHERE class_parent_id = 1 -- 海南 class_id = 9 港、奥、台 class_id = 33、34、35
SELECT * FROM db_yhm_city WHERE class_parent_id =169
SELECT d1.cla
- 关于监听器那些让人头疼的事
宝剑锋梅花香
画图板监听器鼠标监听器
本人初学JAVA,对于界面开发我只能说有点蛋疼,用JAVA来做界面的话确实需要一定的耐心(不使用插件,就算使用插件的话也没好多少)既然Java提供了界面开发,老师又要求做,只能硬着头皮上啦。但是监听器还真是个难懂的地方,我是上了几次课才略微搞懂了些。
- JAVA的遍历MAP
darkranger
map
Java Map遍历方式的选择
1. 阐述
对于Java中Map的遍历方式,很多文章都推荐使用entrySet,认为其比keySet的效率高很多。理由是:entrySet方法一次拿到所有key和value的集合;而keySet拿到的只是key的集合,针对每个key,都要去Map中额外查找一次value,从而降低了总体效率。那么实际情况如何呢?
为了解遍历性能的真实差距,包括在遍历ke
- POJ 2312 Battle City 优先多列+bfs
aijuans
搜索
来源:http://poj.org/problem?id=2312
题意:题目背景就是小时候玩的坦克大战,求从起点到终点最少需要多少步。已知S和R是不能走得,E是空的,可以走,B是砖,只有打掉后才可以通过。
思路:很容易看出来这是一道广搜的题目,但是因为走E和走B所需要的时间不一样,因此不能用普通的队列存点。因为对于走B来说,要先打掉砖才能通过,所以我们可以理解为走B需要两步,而走E是指需要1
- Hibernate与Jpa的关系,终于弄懂
avords
javaHibernate数据库jpa
我知道Jpa是一种规范,而Hibernate是它的一种实现。除了Hibernate,还有EclipseLink(曾经的toplink),OpenJPA等可供选择,所以使用Jpa的一个好处是,可以更换实现而不必改动太多代码。
在play中定义Model时,使用的是jpa的annotations,比如javax.persistence.Entity, Table, Column, OneToMany
- 酸爽的console.log
bee1314
console
在前端的开发中,console.log那是开发必备啊,简直直观。通过写小函数,组合大功能。更容易测试。但是在打版本时,就要删除console.log,打完版本进入开发状态又要添加,真不够爽。重复劳动太多。所以可以做些简单地封装,方便开发和上线。
/**
* log.js hufeng
* The safe wrapper for `console.xxx` functions
*
- 哈佛教授:穷人和过于忙碌的人有一个共同思维特质
bijian1013
时间管理励志人生穷人过于忙碌
一个跨学科团队今年完成了一项对资源稀缺状况下人的思维方式的研究,结论是:穷人和过于忙碌的人有一个共同思维特质,即注意力被稀缺资源过分占据,引起认知和判断力的全面下降。这项研究是心理学、行为经济学和政策研究学者协作的典范。
这个研究源于穆来纳森对自己拖延症的憎恨。他7岁从印度移民美国,很快就如鱼得水,哈佛毕业
- other operate
征客丶
OSosx
一、Mac Finder 设置排序方式,预览栏 在显示-》查看显示选项中
二、有时预览显示时,卡死在那,有可能是一些临时文件夹被删除了,如:/private/tmp[有待验证]
--------------------------------------------------------------------
若有其他凝问或文中有错误,请及时向我指出,
我好及时改正,同时也让我们一
- 【Scala五】分析Spark源代码总结的Scala语法三
bit1129
scala
1. If语句作为表达式
val properties = if (jobIdToActiveJob.contains(jobId)) {
jobIdToActiveJob(stage.jobId).properties
} else {
// this stage will be assigned to "default" po
- ZooKeeper 入门
BlueSkator
中间件zk
ZooKeeper是一个高可用的分布式数据管理与系统协调框架。基于对Paxos算法的实现,使该框架保证了分布式环境中数据的强一致性,也正是基于这样的特性,使得ZooKeeper解决很多分布式问题。网上对ZK的应用场景也有不少介绍,本文将结合作者身边的项目例子,系统地对ZK的应用场景进行一个分门归类的介绍。
值得注意的是,ZK并非天生就是为这些应用场景设计的,都是后来众多开发者根据其框架的特性,利
- MySQL取得当前时间的函数是什么 格式化日期的函数是什么
BreakingBad
mysqlDate
取得当前时间用 now() 就行。
在数据库中格式化时间 用DATE_FORMA T(date, format) .
根据格式串format 格式化日期或日期和时间值date,返回结果串。
可用DATE_FORMAT( ) 来格式化DATE 或DATETIME 值,以便得到所希望的格式。根据format字符串格式化date值:
%S, %s 两位数字形式的秒( 00,01,
- 读《研磨设计模式》-代码笔记-组合模式
bylijinnan
java设计模式
声明: 本文只为方便我个人查阅和理解,详细的分析以及源代码请移步 原作者的博客http://chjavach.iteye.com/
import java.util.ArrayList;
import java.util.List;
abstract class Component {
public abstract void printStruct(Str
- 4_JAVA+Oracle面试题(有答案)
chenke
oracle
基础测试题
卷面上不能出现任何的涂写文字,所有的答案要求写在答题纸上,考卷不得带走。
选择题
1、 What will happen when you attempt to compile and run the following code? (3)
public class Static {
static {
int x = 5; // 在static内有效
}
st
- 新一代工作流系统设计目标
comsci
工作算法脚本
用户只需要给工作流系统制定若干个需求,流程系统根据需求,并结合事先输入的组织机构和权限结构,调用若干算法,在流程展示版面上面显示出系统自动生成的流程图,然后由用户根据实际情况对该流程图进行微调,直到满意为止,流程在运行过程中,系统和用户可以根据情况对流程进行实时的调整,包括拓扑结构的调整,权限的调整,内置脚本的调整。。。。。
在这个设计中,最难的地方是系统根据什么来生成流
- oracle 行链接与行迁移
daizj
oracle行迁移
表里的一行对于一个数据块太大的情况有二种(一行在一个数据块里放不下)
第一种情况:
INSERT的时候,INSERT时候行的大小就超一个块的大小。Oracle把这行的数据存储在一连串的数据块里(Oracle Stores the data for the row in a chain of data blocks),这种情况称为行链接(Row Chain),一般不可避免(除非使用更大的数据
- [JShop]开源电子商务系统jshop的系统缓存实现
dinguangx
jshop电子商务
前言
jeeshop中通过SystemManager管理了大量的缓存数据,来提升系统的性能,但这些缓存数据全部都是存放于内存中的,无法满足特定场景的数据更新(如集群环境)。JShop对jeeshop的缓存机制进行了扩展,提供CacheProvider来辅助SystemManager管理这些缓存数据,通过CacheProvider,可以把缓存存放在内存,ehcache,redis,memcache
- 初三全学年难记忆单词
dcj3sjt126com
englishword
several 儿子;若干
shelf 架子
knowledge 知识;学问
librarian 图书管理员
abroad 到国外,在国外
surf 冲浪
wave 浪;波浪
twice 两次;两倍
describe 描写;叙述
especially 特别;尤其
attract 吸引
prize 奖品;奖赏
competition 比赛;竞争
event 大事;事件
O
- sphinx实践
dcj3sjt126com
sphinx
安装参考地址:http://briansnelson.com/How_to_install_Sphinx_on_Centos_Server
yum install sphinx
如果失败的话使用下面的方式安装
wget http://sphinxsearch.com/files/sphinx-2.2.9-1.rhel6.x86_64.rpm
yum loca
- JPA之JPQL(三)
frank1234
ormjpaJPQL
1 什么是JPQL
JPQL是Java Persistence Query Language的简称,可以看成是JPA中的HQL, JPQL支持各种复杂查询。
2 检索单个对象
@Test
public void querySingleObject1() {
Query query = em.createQuery("sele
- Remove Duplicates from Sorted Array II
hcx2013
remove
Follow up for "Remove Duplicates":What if duplicates are allowed at most twice?
For example,Given sorted array nums = [1,1,1,2,2,3],
Your function should return length
- Spring4新特性——Groovy Bean定义DSL
jinnianshilongnian
spring 4
Spring4新特性——泛型限定式依赖注入
Spring4新特性——核心容器的其他改进
Spring4新特性——Web开发的增强
Spring4新特性——集成Bean Validation 1.1(JSR-349)到SpringMVC
Spring4新特性——Groovy Bean定义DSL
Spring4新特性——更好的Java泛型操作API
Spring4新
- CentOS安装Mysql5.5
liuxingguome
centos
CentOS下以RPM方式安装MySQL5.5
首先卸载系统自带Mysql:
yum remove mysql mysql-server mysql-libs compat-mysql51
rm -rf /var/lib/mysql
rm /etc/my.cnf
查看是否还有mysql软件:
rpm -qa|grep mysql
去http://dev.mysql.c
- 第14章 工具函数(下)
onestopweb
函数
index.html
<!DOCTYPE html PUBLIC "-//W3C//DTD XHTML 1.0 Transitional//EN" "http://www.w3.org/TR/xhtml1/DTD/xhtml1-transitional.dtd">
<html xmlns="http://www.w3.org/
- POJ 1050
SaraWon
二维数组子矩阵最大和
POJ ACM第1050题的详细描述,请参照
http://acm.pku.edu.cn/JudgeOnline/problem?id=1050
题目意思:
给定包含有正负整型的二维数组,找出所有子矩阵的和的最大值。
如二维数组
0 -2 -7 0
9 2 -6 2
-4 1 -4 1
-1 8 0 -2
中和最大的子矩阵是
9 2
-4 1
-1 8
且最大和是15
- [5]设计模式——单例模式
tsface
java单例设计模式虚拟机
单例模式:保证一个类仅有一个实例,并提供一个访问它的全局访问点
安全的单例模式:
/*
* @(#)Singleton.java 2014-8-1
*
* Copyright 2014 XXXX, Inc. All rights reserved.
*/
package com.fiberhome.singleton;
- Java8全新打造,英语学习supertool
yangshangchuan
javasuperword闭包java8函数式编程
superword是一个Java实现的英文单词分析软件,主要研究英语单词音近形似转化规律、前缀后缀规律、词之间的相似性规律等等。Clean code、Fluent style、Java8 feature: Lambdas, Streams and Functional-style Programming。
升学考试、工作求职、充电提高,都少不了英语的身影,英语对我们来说实在太重要

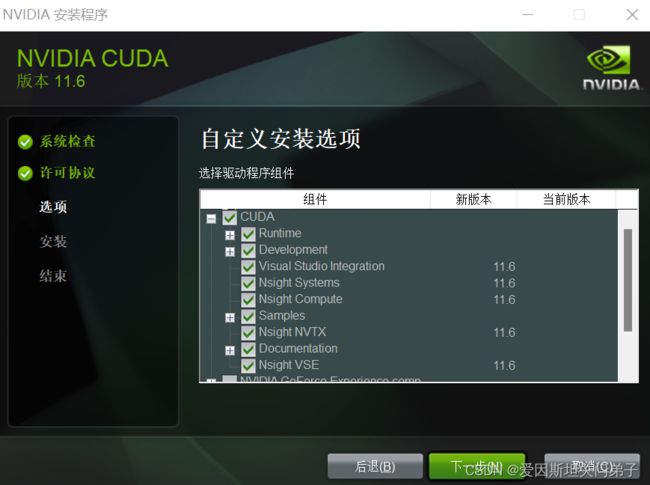
![]() https://developer.nvidia.cn/rdp/cudnn-archive将cudann解压缩后的三个子文件夹下的子文件复制到cuda安装路径的对应名称的文件夹下,并非替换文件夹。
https://developer.nvidia.cn/rdp/cudnn-archive将cudann解压缩后的三个子文件夹下的子文件复制到cuda安装路径的对应名称的文件夹下,并非替换文件夹。