Android入门 简易前后端分离 以登录功能为例
目录
- 一、前言
-
- 1.项目环境
- 二、Android前端制作
-
- 1.基本框架结构
- 2.UI交互界面设计
- 3.Activity功能实现
- 三、SpringBoot简易服务端制作
-
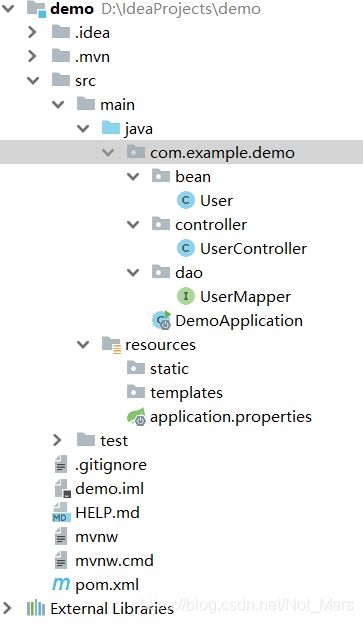
- 1.基本框架结构
- 2.数据库设计
- 3.application.properties
- 4.JavaBean
- 5.Mapper(Dao)
- 6.Controller
- 7.内网穿透
- 8.接口测试
- 四、API接口调用与JSON解析
-
- 1.权限申请
- 2.HttpUtils工具类
- 3.JSON解析
- 4.接口调用与功能实现
- 五、成品展示
- 六、总结
一、前言
Android开发新手入门,安全性会有所欠佳
欢迎各路大佬提供宝贵建议
1.项目环境
- JDK 1.8(JAVA环境)
- MySQL 5.5(数据库环境)
- Android Studio(安卓端开发)
- Navicat Premium 12(数据库可视化)
- IntelliJ IDEA 2017(服务端开发)
- 阿里云服务器(服务端搭建平台)
- 花生壳(内网穿透工具)
本文仅供学习,如需转载请标明出处,谢谢
二、Android前端制作
1.基本框架结构
Android端普遍分为两大模块:
- 交互界面布局设计(俗称 Layout.xml):通俗的说,它决定了你的APP长什么样
- 功能及事件响应编程(俗称 Activity.class):通俗的说,它决定了你的APP怎么使用
2.UI交互界面设计
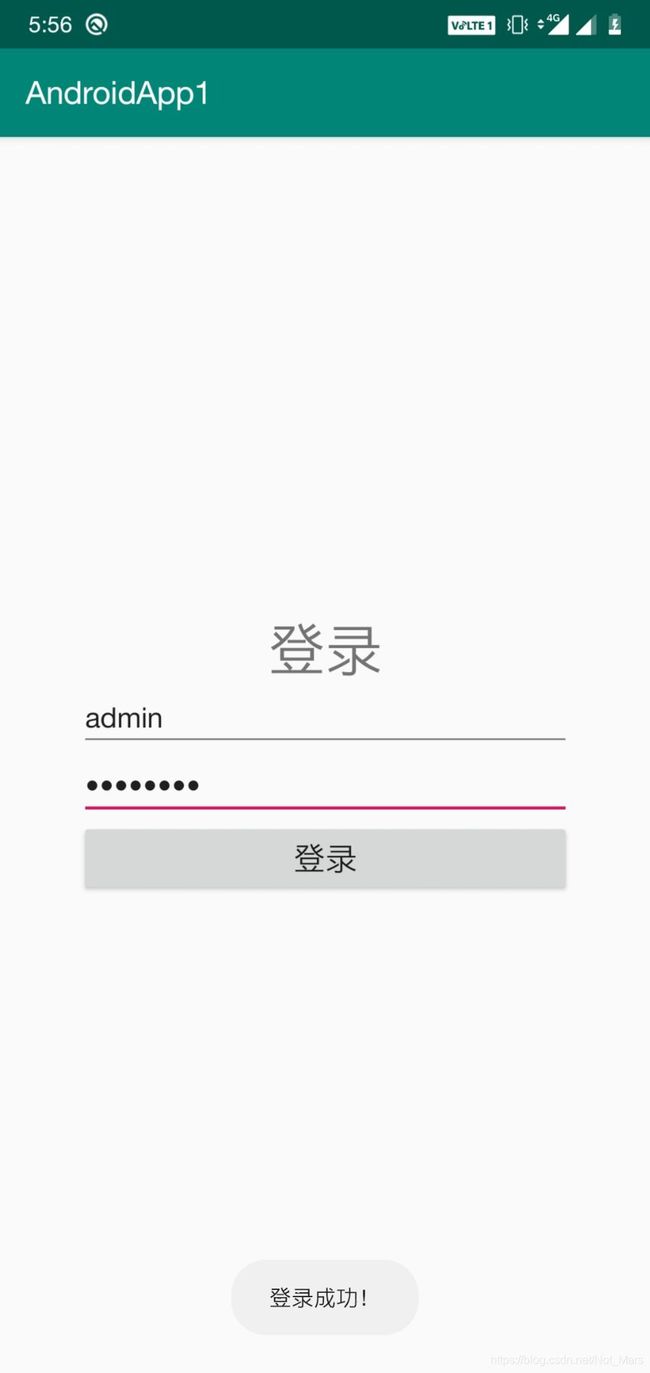
首先设计登录界面粗糙设计(用户名,密码,登录按钮)
奉上Layout文件
<androidx.constraintlayout.widget.ConstraintLayout xmlns:android="http://schemas.android.com/apk/res/android"
    xmlns:app="http://schemas.android.com/apk/res-auto"
    xmlns:tools="http://schemas.android.com/tools"
    android:layout_width="match_parent"
    android:layout_height="match_parent"
    tools:context=".MainActivity">

    <LinearLayout
        android:layout_width="match_parent"
        android:layout_height="match_parent"
        android:gravity="center"
        android:orientation="vertical"
        android:paddingLeft="50dp"
        android:paddingRight="50dp">

        <TextView
            android:id="@+id/tv_Title"
            android:layout_width="match_parent"
            android:layout_height="wrap_content"
            android:gravity="center"
            android:text="登录"
            android:textSize="36sp" />

        <EditText
            android:id="@+id/et_username"
            android:layout_width="match_parent"
            android:layout_height="wrap_content"
            android:ems="10"
            android:hint="用户名"
            android:inputType="text" />

        <EditText
            android:id="@+id/et_password"
            android:layout_width="match_parent"
            android:layout_height="wrap_content"
            android:ems="10"
            android:hint="密码"
            android:inputType="textPassword" />

        <Button
            android:id="@+id/btn_login"
            android:layout_width="match_parent"
            android:layout_height="wrap_content"
            android:text="登录"
            android:textSize="20sp" />
    LinearLayout>
androidx.constraintlayout.widget.ConstraintLayout>
3.Activity功能实现
import androidx.appcompat.app.AppCompatActivity;

import android.os.Bundle;
import android.view.View;
import android.widget.Button;
import android.widget.TextView;
import android.widget.Toast;

public class MainActivity extends AppCompatActivity {

    //控件
    private TextView et_username;
    private TextView et_password;
    private Button btn_login;

    //全局变量
    private boolean password_currect = false;

    @Override
    protected void onCreate(Bundle savedInstanceState) {
        super.onCreate(savedInstanceState);
        setContentView(R.layout.activity_main);
        initView(); //初始化控件
        initEvent(); //初始化事件
    }

    public void initView(){
        et_username = this.findViewById(R.id.et_username);
        et_password = this.findViewById(R.id.et_password);
        btn_login = this.findViewById(R.id.btn_login);
    }

    public void initEvent(){
        //给登录按钮添加点击事件监听器(登录事件)
        btn_login.setOnClickListener(new View.OnClickListener() {
            @Override
            public void onClick(View v) {
                //获取用户名和密码
                String username = et_username.getText().toString();
                String password = et_password.getText().toString();
                //调用API验证用户名密码是否正确

                //登录事件
                if(password_currect) {
                    Toast.makeText(MainActivity.this, "登录成功!", Toast.LENGTH_SHORT).show();
                } else {
                    Toast.makeText(MainActivity.this, "密码错误!", Toast.LENGTH_SHORT).show();
                }
            }
        });
    }
}
这里还没写后台,所以API调用暂时为空,如有需要可快进至第四大模块API接口调用与JSON解析
至此,Android端 前端 编写基本完成
三、SpringBoot简易服务端制作
1.基本框架结构
- 数据库:用于存放数据信息
- SpringBoot配置文件
application.properties:项目配置文件 - Bean:实体类,装载一个实体,可以实现代码的重复利用
- Mapper:Mapper层=Dao层,可以实现对数据库进行数据持久化操作
- Controller:控制器,对前端传来的参数进行相应的业务操作
2.数据库设计
CREATE TABLE users
(
username Varchar(50) PRIMARY KEY,
password Varchar(30)
)
username用于存放用户名
password用于存放用户密码
数据库如下:
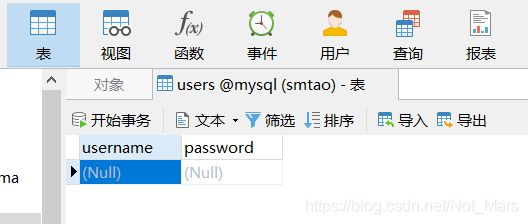
然后自己输入一条记录作为测试用
比如username:admin和password:password
可自行发挥
3.application.properties
spring.datasource.url=jdbc:mysql://localhost:3306/logdemo?serverTimezone=UTC&characterEncoding=utf8
spring.datasource.username=root
spring.datasource.password=root
spring.datasource.driver-class-name=com.mysql.cj.jdbc.Driver

spring.jpa.properties.hibernate.hbm2ddl.auto=update
spring.jpa.properties.hibernate.dialect=org.hibernate.dialect.MySQL5InnoDBDialect
spring.jpa.show-sql=true

server.port=10003
其中logdemo为数据库名
username后的root填自己数据库的用户名
password后的root填自己数据库的密码,没有密码则为空
server.port为服务运行的端口号,可自行发挥,但请勿与别的服务使用相同端口
4.JavaBean
JavaBean类是根据实体类建立的,比如我们拥有的user类体包含username和password两个String类型属性,于是我们得到了以下Bean类User,用于描述用户类:
public class User {

    private String username;
    private String password;

    public String getUsername() {
        return username;
    }

    public void setUsername(String username) {
        this.username = username;
    }

    public String getPassword() {
        return password;
    }

    public void setPassword(String password) {
        this.password = password;
    }
}
可使用 Alt+Insert 快速添加 Getter和Setter
Getter和Setter的目的是使得实体类的访问权限得到控制
5.Mapper(Dao)
import org.apache.ibatis.annotations.Mapper;
import org.apache.ibatis.annotation.Select;
import org.springframework.stereotype.Component;

@Mapper
@Component("userMapper")
public interface UserMapper {

    @Select("SELECT count(*) FROM users WHERE username=#{username} AND password=#{password}")
    int login(String username, String password);

}
6.Controller
import com.example.demo.dao.UserMapper;
import org.apache.annotations.Param;
import org.json.JSONObject;
import org.json.JSONException;
import org.springframework.beans.factory.annotation.Autowired;
import org.springframework.web.bind.annotation.RequestMapping;
import org.springframework.web.bind.annotation.ResponseBody;
import org.springframework.web.bind.annotation.RestController;

@RestController
@RequestMapping("/api") //一级接口
public class UserController {

    private JSONObject objectTrue = new JSONObject();
    private JSONObject objectFalse = new JSONObject();

    @Autowired
    UserMapper userMapper;

    public UserController() throws JSONException {
        objectTrue.put("result", true);
        objectFalse.put("result", false);
    }

    @ResponseBody
    @RequestMapping("/login") //二级接口
    public String login(String username, String password){
        if(userMapper.login(username, password) == 0){
            //不存在符合的用户
            return objectFalse.toString();
        } else {
            return objectTrue.toString();
        }
    }
}
访问方法为localhost:10003/api/login?username=admin&password=password
成功登录返回{"result", true}
失败返回{"result", false}
7.内网穿透
我用的是花生壳内网穿透免费版,作为学生的话很方便
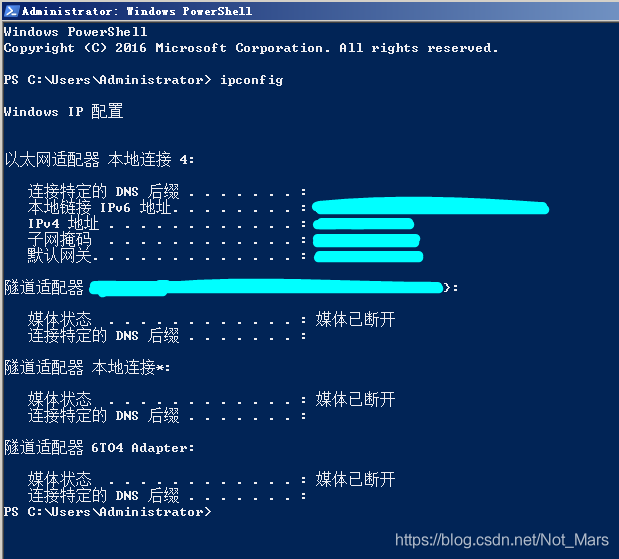
第一步获取服务器的IP:
- 打开cmd (服务器的PowerShell)
- 输入ipconfig
- 按回车
- 找到
IPv4地址,记下
第二步新建一个内网穿透的配置:
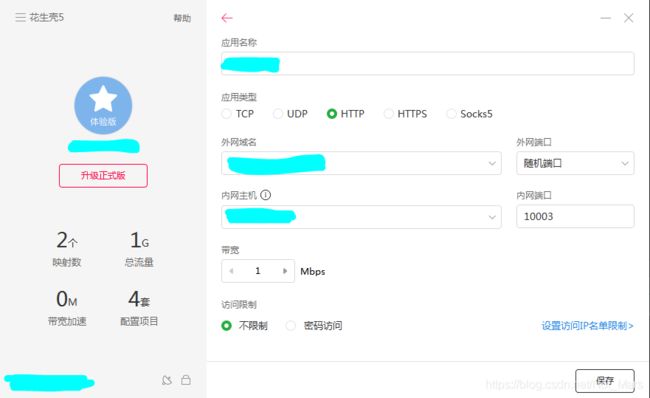
应用名称随便写,也可以不写(默认)
类型选择Http(Https协议更安全,但是需要付费,因为是写大作业所以暂时没必要,感兴趣也可以使用Https)
外网域名注册送2个,随便选择一个
外网端口选择随机端口
内网主机就是刚刚查询的IPv4地址
内网端口就是application.properties里设置的server.port端口号
最后点击保存,点击诊断
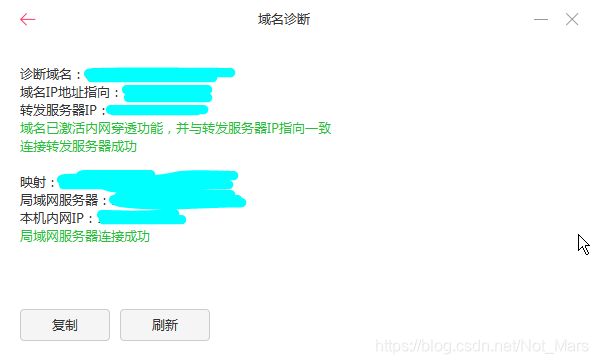
得到两个成功就说明可以啦!
8.接口测试
接下来到了最激动的接口测试环节
打开浏览器(自己电脑的浏览器)
输入API接口 http://你的域名:花生壳随机端口号/login?username=admin&password=password按回车
如果显示如下JSON数据则说明成功了

接下来是重头戏,也是难点之一
四、API接口调用与JSON解析
1.权限申请
因为涉及到网络连接,需要申请Internet权限
在AndroidManifest.xml文件中添加标签
<uses-permission android:name="android.permission.INTERNET" />
又因为Android默认不允许Http协议的访问(之前提到的不安全协议),因此要在AndroidManifest.xml中的
android:usesCleartextTraffic="true"
2.HttpUtils工具类
AndroidStudio中新建一个HttpUtils的Java工具类
上代码!!!
import java.io.ByteArrayOutputStream;
import java.io.IOException;
import java.io.InputStream;
import java.net.HttpURLConnection;
import java.net.MalformedURLException;
import java.net.URL;

public class HttpUtils {

    public HttpUtils(){

    }

    public static String getJsonContent(String url_path) {
        try{
            URL url = new URL(url_path);
            HttpURLConnection connection = (HttpURLConnection) url.openConnection();
            connection.setConnectTimeout(3000);
            connection.setRequestMethod("GET");
            connection.setDoInput(true);
            int code = connection.getResponseCode();
            if(code == 200){
                return changeInputStream(connection.getInputStream());
            }
        } catch (MalformedURLException e) {
            e.printStackTrace();
        } catch (IOException e) {
            e.printStackTrace();
        }
        return "";
    }

    private static String changeInputStream(InputStream inputStream) {
        String jsonString = "";
        ByteArrayOutputStream outputStream = new ByteArrayOutputStream();
        int len = 0;
        byte[] data = new byte[1024];
        try{
            while ((len = inputStream.read(data)) != -1) {
                outputStream.write(data, 0, len);
            }
            jsonString = new String(outputStream.toByteArray());
            return jsonString;
        } catch (IOException e) {
            e.printStackTrace();
        }
        return "";
    }
}
功能:利用HttpUtils中的getJsonContent(String url_path)方法,可以实现通过url地址获取返回的String字符串
例如:String result = HttpUtils.getJsonContent("http://你的域名:花生壳随机端口号/login?username=admin&password=password");会得到字符串result = "{'result', true}"
3.JSON解析
对获取到的result字符串进行JSON解析
目的:获取其中result标签下boolean属性值
try {
	JSONObject jsonObject = new JSONObject(result);
	if(jsonObject.getBoolean("result") == true) {
		//登录成功
	} else {
		//登录失败
	}
} catch (JSONException e) {
	e.printStackTrace();
}
接下来就是整合接口调用、JSON解析和Activity功能实现了
4.接口调用与功能实现
通过修改之前缺失的代码块,最终我们得到以下完整的Activity:
import androidx.appcompat.app.AppCompatActivity;

import android.os.Bundle;
import android.view.View;
import android.widget.Button;
import android.widget.TextView;
import android.widget.Toast;

import org.json.JSONException;
import org.json.JSONObject;

public class MainActivity extends AppCompatActivity {

    //控件
    private TextView et_username;
    private TextView et_password;
    private Button btn_login;

    //全局变量
    private boolean password_currect = false;

    @Override
    protected void onCreate(Bundle savedInstanceState) {
        super.onCreate(savedInstanceState);
        setContentView(R.layout.activity_main);
        initView(); //初始化控件
        initEvent(); //初始化事件
    }

    public void initView(){
        et_username = this.findViewById(R.id.et_username);
        et_password = this.findViewById(R.id.et_password);
        btn_login = this.findViewById(R.id.btn_login);
    }

    public void initEvent(){
        //给登录按钮添加点击事件(登录)
        btn_login.setOnClickListener(new View.OnClickListener() {
            @Override
            public void onClick(View v) {
                //获取用户名和密码
                String username = et_username.getText().toString();
                String password = et_password.getText().toString();
                //调用API验证用户名密码是否正确
                Thread thread = new Thread(new Runnable() {
                    @Override
                    public void run() {
                        String result = HttpUtils.getJsonContent("http://你的域名:花生壳随机端口号/api/login?username=admin&password=password");
                        try {
                            JSONObject jsonObject = new JSONObject(result);
                            if(jsonObject.getBoolean("result") == true) {
                                password_currect = true;
                            } else {
                                password_currect = false;
                            }
                        } catch (JSONException e) {
                            e.printStackTrace();
                        }
                    }
                });
                thread.start();
                try {
                    thread.join();
                } catch (InterruptedException e) {
                    e.printStackTrace();
                }
                //登录事件
                if(password_currect) {
                    Toast.makeText(MainActivity.this, "登录成功!", Toast.LENGTH_SHORT).show();
                } else {
                    Toast.makeText(MainActivity.this, "密码错误!", Toast.LENGTH_SHORT).show();
                }
            }
        });
    }
}
最后解释一下这里用到了Thread线程是因为Android项目中所有访问Internet有延迟的操作都会阻塞主线程,因此只能在子线程中进行,而Thread.join()方法是为了让线程运行完整结束后再进行验证判断,否则会导致线程尚未运行结束而APP已经开始判断是否登录成功,大概率的结果是先登录失败,而后子线程返回true。
五、成品展示
六、总结
一个简易的Android前后端分离小程序
希望能帮助到入坑Android的萌新,如有错误,欢迎指出~

