Vue+springboot前后端分离实现简单的注册登录
Vue+springboot前后端分离实现简单的注册登录
-
-
- 使用Spring Initializr搭建springboot后台
-
- 连接Mysql数据库
- Mysql数据库中建表与在Springboot中创建实体类
-
- 使用persisence生成实体类:
- 控制器的搭建
-
- 注册登录的实现
- Mybatis的配置
-
- pom.xml引入mybatis
- 配置文件#application.properties
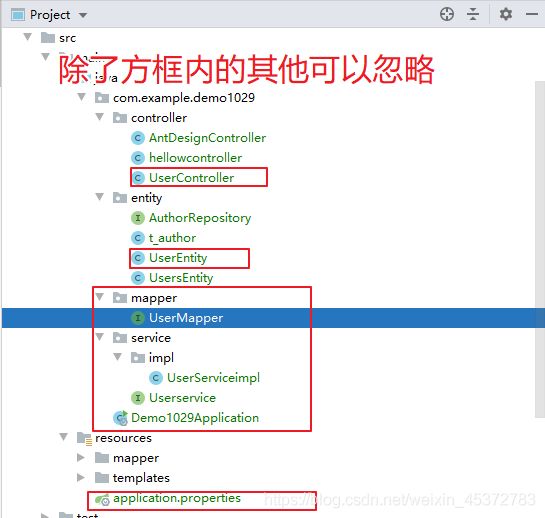
- 项目目录结构
- mybatis具体实现
- 测试接口
- antd vue前端搭建
-
- 搭建vue项目
- 前端页面的搭建
-
- 主页面
- 子组件
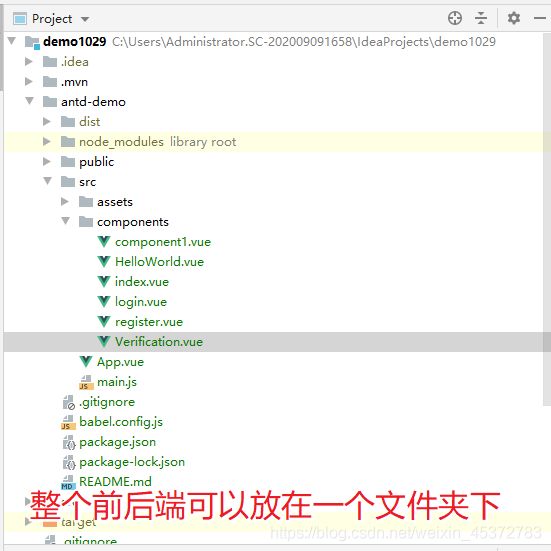
- Vue目录结构
- 测试整体效果
- 其他
-
- 数据库编码格式
- 注册优化
-
使用Spring Initializr搭建springboot后台
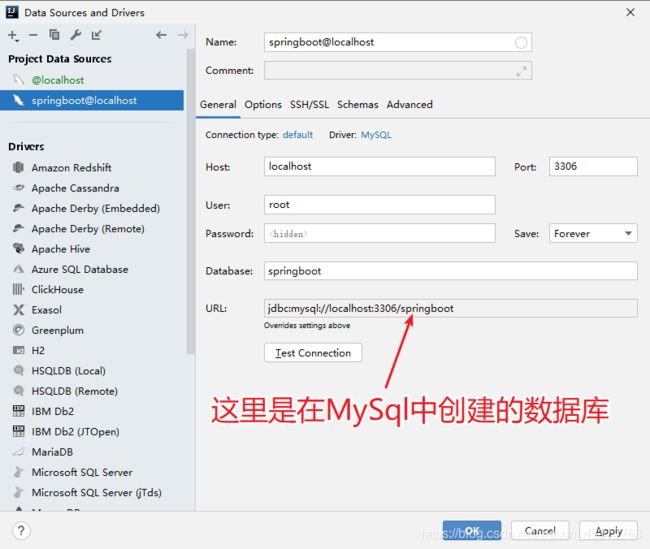
连接Mysql数据库
Mysql数据库中建表与在Springboot中创建实体类
在数据库中创建用户表,我用的navicat工具建表,建表方式不限

使用persisence生成实体类:
在intellij IDE中选择 View–>Tool windows–>persistence工具
后续操作如下图

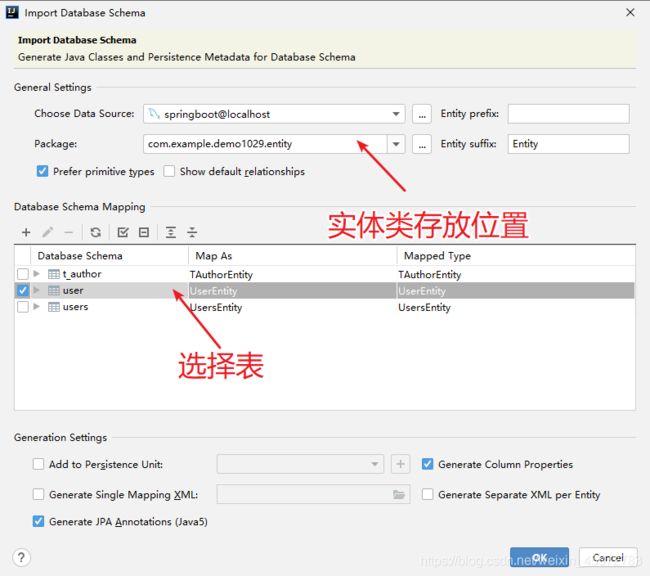
生成的实体类 UserEntity
package com.example.demo1029.entity;

import javax.persistence.*;

import java.sql.Timestamp;
import java.util.Date;

@Entity
@Table(name = "user", schema = "springboot", catalog = "")
public class UserEntity {
    private String userid;
    private String username;
    private String passsword;
    private String email;
    private Date createtime;
    private String phonenumber;

    @Id
    @Column(name = "userid", nullable = false, length = 255)
    public String getUserid() {
        return userid;
    }

    public void setUserid(String userid) {
        this.userid = userid;
    }

    @Basic
    @Column(name = "username", nullable = false, length = 255)
    public String getUsername() {
        return username;
    }

    public void setUsername(String username) {
        this.username = username;
    }

    @Basic
    @Column(name = "passsword", nullable = false, length = 255)
    public String getPasssword() {
        return passsword;
    }

    public void setPasssword(String passsword) {
        this.passsword = passsword;
    }

    @Basic
    @Column(name = "email", nullable = false, length = 255)
    public String getEmail() {
        return email;
    }

    public void setEmail(String email) {
        this.email = email;
    }

    @Basic
    @Column(name = "createtime", nullable = true)
    public Date getCreatetime() {
        return createtime;
    }

    public void setCreatetime(Timestamp createtime) {
        this.createtime = createtime;
    }

    public void setCreatetime(Date createtime) {
        this.createtime = createtime;
    }

    @Override
    public boolean equals(Object o) {
        if (this == o) return true;
        if (o == null || getClass() != o.getClass()) return false;

        UserEntity that = (UserEntity) o;

        if (userid != that.userid) return false;
        if (username != null ? !username.equals(that.username) : that.username != null) return false;
        if (passsword != null ? !passsword.equals(that.passsword) : that.passsword != null) return false;
        if (email != null ? !email.equals(that.email) : that.email != null) return false;
        if (createtime != null ? !createtime.equals(that.createtime) : that.createtime != null) return false;

        return true;
    }

    @Override
    public int hashCode() {
        int result = 5;
        result = 31 * result + (username != null ? username.hashCode() : 0);
        result = 31 * result + (passsword != null ? passsword.hashCode() : 0);
        result = 31 * result + (email != null ? email.hashCode() : 0);
        result = 31 * result + (createtime != null ? createtime.hashCode() : 0);
        return result;
    }

    @Basic
    @Column(name = "phonenumber", nullable = false, length = 20)
    public String getPhonenumber() {
        return phonenumber;
    }

    public void setPhonenumber(String phonenumber) {
        this.phonenumber = phonenumber;
    }
}
控制器的搭建
创建UserController类。
注册登录的实现
#UserController.java
package com.example.demo1029.controller;
import com.example.demo1029.entity.UserEntity;
import com.example.demo1029.service.Userservice;
import org.springframework.beans.factory.annotation.Autowired;
import org.springframework.stereotype.Controller;
import org.springframework.web.bind.annotation.*;
import org.springframework.ui.ModelMap;
import java.util.*;

@Controller//这里可以改写成@RestController,这样做的话下面子函数就不需要再写上@ResponseBody了。
//参考连接:https://blog.csdn.net/gg12365gg/article/details/51345601。
//因为我们做的是前后端分离,所以只需要返回数据而不是HTML页面。
@RequestMapping("/user")
public class UserController {

    @Autowired(required = false)
    private Userservice userService;
    @RequestMapping("/register")
    public String register(){
        System.out.println("注册");
        return "register";
    }
    @CrossOrigin
    @PostMapping("/register")
    @ResponseBody
    public String register2(@RequestParam("username") String username, @RequestParam("password") String password,@RequestParam("email") String email,
                            @RequestParam("phonenumber") String phonenumber){
        UserEntity checkemail = userService.findemail(email);//查询数据库有没有相同的邮箱
        UserEntity checkusername = userService.findusername(username);//查询数据库有没有相同用户名
        //System.out.println(checkemail);
        if(checkemail != null){
            return "email has existed";
        }
        else if(checkusername != null){
            return "name has existed";
        }
        else {
        //创建用户对象,并赋值保存
            UserEntity user = new UserEntity();
            Date now = new Date(); //获取时间
            String id = UUID.randomUUID().toString();//创建一个唯一标识id
            user.setCreatetime(now);
            user.setUserid(id);
            user.setUsername(username);
            user.setEmail(email);
            user.setPasssword(password);
            user.setPhonenumber(phonenumber);
            userService.register(user);
            return "index";
        }
    }
    @CrossOrigin
    @PostMapping("/login")
    @ResponseBody
    // 注意login函数接收数据的方式为@RequestBody,而register函数接收数据的方式为@RequestParam,这与前端axios发送数据的方式不同有关。稍后详解
    public String login2(@RequestBody Map map){
        UserEntity user = userService.login(map.get("username").toString(),map.get("password").toString());
        if(user != null){
            return "index";
        }
        else {
            return "login";
        }
    }
}
Mybatis的配置
pom.xml引入mybatis
	<dependency>
            <groupId>org.mybatis.spring.bootgroupId>
            <artifactId>mybatis-spring-boot-starterartifactId>
            <version>2.1.0version>
    dependency>
配置文件#application.properties
spring.thymeleaf.encoding=UTF-8
spring.thymeleaf.prefix=classpath:/templates/
spring.thymeleaf.suffix=.html

spring.datasource.url=jdbc:mysql://localhost:3306/springboot?serverTimezone=GMT%2B8&useUnicode=true&characterEncoding=utf-8

spring.datasource.username=root

spring.datasource.password=5157827509

spring.datasource.driver-class-name=com.mysql.jdbc.Driver
spring.jpa.hibernate.naming.physical-strategy=org.hibernate.boot.model.naming.PhysicalNamingStrategyStandardImpl

mybatis.type-aliases-package=com.example.demo1029.entity
mybatis.configuration.map-underscore-to-camel-case=true
项目目录结构
mybatis具体实现
mapper层UserMapper接口,也是sql具体实现方法的地方,用相应解释器加上sql语句配置相应查询。
#UserMapper.java
package com.example.demo1029.mapper;
import com.example.demo1029.entity.UserEntity;
import org.apache.ibatis.annotations.Insert;
import org.apache.ibatis.annotations.Mapper;
import org.apache.ibatis.annotations.Select;
@Mapper
public interface UserMapper {
    @Insert("insert into User(userid,username,passsword,email,createtime,phonenumber) values(#{userid},#{username},#{passsword},#{email},#{createtime},#{phonenumber})")
    int insertuser(UserEntity user);
    @Select("select userid,username from User where username=#{username} and passsword = #{password}")
    UserEntity login(String username,String password);
    @Select("select email from User where email = #{email}")
    UserEntity findemail(String email);
    @Select("select username from User where username = #{username}")
    UserEntity findusername(String username);
}
service层的定义方法接口.
(其实我觉得这一层有点多余,可以直接在impl层直接写上相应方法即可。这样做好像是比较符合业务逻辑还是用的抽象工厂模式?)
#Usersevice.java
package com.example.demo1029.service;

import com.example.demo1029.entity.UserEntity;


import java.util.List;

public interface Userservice {
    int register(UserEntity user);
    UserEntity login(String a,String b);
    UserEntity findemail(String email);
    UserEntity findusername(String username);
}
具体实现层(impl)
#UserServiceimpl.java
package com.example.demo1029.service.impl;

import com.example.demo1029.entity.UserEntity;
import com.example.demo1029.mapper.UserMapper;
import com.example.demo1029.service.Userservice;
import org.springframework.beans.factory.annotation.Autowired;
import org.springframework.stereotype.Service;

import java.util.List;

@Service("Userservice")
public class UserServiceimpl implements Userservice {
    @Autowired(required=false)
    private UserMapper userMapper;
//    @Override
//    public List findAll() {
//        return userMapper.findAll();
//    }
    @Override
    public int register(UserEntity user) {return userMapper.insertuser(user);}
    @Override
    public UserEntity login(String a,String b) {
        return userMapper.login(a,b);
    }
    @Override
    public UserEntity findemail(String email) {
        return userMapper.findemail(email);
    }
    @Override
    public UserEntity findusername(String username){
        return userMapper.findusername(username);
    }
}
至此Mybatis 配置就完成了。
测试接口
至此,后端基本配置完成,写了一个简单的登录页面做测试。
#register.html
<html lang="en">
<head>
    <meta charset="UTF-8">
    <title>注册title>
head>
<body>
    <form action="/user/register" method="post">
        <label for="register_name">用户名:label>
        <input type="text" name="username" id="register_name">
        <label for="register_password">密码:label>
        <input type="password" name="password" id="register_password">
        <label for="register_email">邮箱:label>
        <input type="email" name="email" id="register_email">
        <label for="register_phonenumber">电话:label>
        <input type="text" name="phonenumber" id="register_phonenumber">
        <button type="submit">注册button>
    form>
body>
html>
控制器内的注册get接口,这里没有用 @ResponseBody是因为要返回register.html模板。
@RequestMapping("/register")
    public String register(){
        System.out.println("注册");
        return "register";
    }

点击注册后页面返回字符串index,数据库中多了一条数据

要做登录验证的话浏览这篇文章的好兄弟可以试试自己写个简单的html测试一下。
antd vue前端搭建
以下关于有关命令的操作都可以在intellij IDE中的terminal窗口执行。
搭建vue项目
1、安装脚手架工具 vue-cli
npm install -g @vue/cli
2、创建一个项目
$ vue create antd-demo
3、使用组件
npm i --save ant-design-vue
4、完整引入
#main.js
import Vue from 'vue';
import Antd from 'ant-design-vue';
import App from './App';
import 'ant-design-vue/dist/antd.css';
Vue.config.productionTip = false;
Vue.use(Antd);
/* eslint-disable no-new */
new Vue({
el: '#app',
components: { App },
template: '前端页面的搭建
主页面
页面结构
<div>导航栏div>
<div>子组件div> //包括主页,注册,登录
具体实现
#app.vue
<template>
  <div id="app">

    <div>
      <a-menu v-model="current" mode="horizontal">
        <a-menu-item key="index"> <a-icon type="home" />首页a-menu-item>
        <a-menu-item key="login"> <a-icon type="login" />登录a-menu-item>
        <a-sub-menu>
        <span slot="title" class="submenu-title-wrapper"
        ><a-icon type="setting" />工作台span
        >
          <a-menu-item-group title="">
            <a-menu-item key="setting:1">
              数据集成
            a-menu-item>
            <a-menu-item key="setting:2">
              可视化分析
            a-menu-item>
            <a-menu-item key="setting:3">
              数据挖掘
            a-menu-item>
            <a-menu-item key="setting:4">
              多维分析
            a-menu-item>
          a-menu-item-group>
        a-sub-menu>
        <a-menu-item key="register">
          <a-icon type="plus-square" />注册
        a-menu-item>
      a-menu>
    div>

    <div id="main">

      <index v-if="current == 'index'">index>
      <login  v-on:lisentcurrent="lisentcurrent2" v-else-if="current == 'login'">login>
      <register v-on:lisentcurrent="lisentcurrent2" v-else-if="current == 'register'">register>
    div>
  div>
template>
<script>
  import index from './components/index';// 引入组件
  import login from './components/login';
  import register from  './components/register';
  export default {
    name: 'App',
    components: {
      index,
      login,
      register
    },
    data() {
      return {
        current: ['index'],
      };
    },
    methods:{
      lisentcurrent2:function (data) { //接收子组件穿的值
        this.current = data;
      }
    }
  }
script>

<style>
#app {
  font-family: Avenir, Helvetica, Arial, sans-serif;
  -webkit-font-smoothing: antialiased;
  -moz-osx-font-smoothing: grayscale;
  text-align: center;
  color: #2c3e50;
  margin-top: 60px;
}
style>
子组件
1、register.vue
<template>
    <a-form :form="form"  class="register1"  @submit="handleSubmit">
        <a-form-item v-bind="formItemLayout" label="邮箱"> // v-decorator为antd的表单验证方法
            <a-input
                    v-decorator="[
          'email',
          {
            rules: [
              {
                type: 'email',
                message: 'The input is not valid E-mail!',
              },
              {
                required: true,
                message: 'Please input your E-mail!',
              },
            ],
          },
        ]"
            />
        a-form-item>
        <a-form-item v-bind="formItemLayout" label="密码" has-feedback>
            <a-input
                    v-decorator="[
          'password',
          {
            rules: [
              {
                required: true,
                message: '请输入密码!',
              },
              {
                validator: validateToNextPassword,
              },
            ],
          },
        ]"
                    type="password"
            />
        a-form-item>
        <a-form-item v-bind="formItemLayout" label="确认密码" has-feedback>
            <a-input
                    v-decorator="[
          'confirm',
          {
            rules: [
              {
                required: true,
                message: '请确认您的密码!',
              },
              {
                validator: compareToFirstPassword,
              },
            ],
          },
        ]"
                    type="password"
                    @blur="handleConfirmBlur"
            />
        a-form-item>
        <a-form-item v-bind="formItemLayout">
      <span slot="label">
        昵称
        <a-tooltip title="网络世界真真假假假假真真">
          <a-icon type="question-circle-o" />
        a-tooltip>
      span>
            <a-input
                    v-decorator="[
          'username',
          {
            rules: [{ required: true, message: '请输入昵称!', whitespace: true }],
          },
        ]"
            />
        a-form-item>
        <a-form-item v-bind="formItemLayout" label="电话号码">
            <a-input
                    v-decorator="[
          'phonenumber',
          {
            rules: [{ required: true, message: '请输入你的电话号码!' }],
          },
        ]"
                    style="width: 100%"
            >
                <a-select
                        slot="addonBefore"
                        v-decorator="['prefix', { initialValue: '86' }]"
                        style="width: 70px"
                >
                    <a-select-option value="86">
                        +86
                    a-select-option>
                    <a-select-option value="87">
                        +87
                    a-select-option>
                a-select>
            a-input>
        a-form-item>

        <a-form-item
                v-bind="formItemLayout"
                label="Captcha"
                extra="We must make sure that your are a human."

        >
            <a-row :gutter="8">
                <a-col :span="6">
                    <a-input v-decorator="[
              'captcha',
              { rules: [{ required: true, message: '请输入验证码!' },{validator:validateCode,}] },
            ]"/>
                a-col>
                <a-col :span="12" @click="refreshCode">
                    <Verification :identifyCode="identifyCode">Verification>
                a-col>
            a-row>
        a-form-item>
        <a-form-item v-bind="tailFormItemLayout">
            <a-checkbox v-decorator="['agreement', { valuePropName: 'checked' }]">
                I have read the
                <a href="">
                    agreement
                a>
            a-checkbox>
        a-form-item>
        <a-form-item v-bind="tailFormItemLayout">
            <a-button type="primary" html-type="submit" >
                Register
            a-button>
        a-form-item>
    a-form>
template>

<script>
    import Verification from "./Verification";
    const axios = require('axios');
    axios.defaults.headers.post['Content-Type'] = 'application/x-www-form-urlencoded';
    export default {
        name: "register",
        components:{
            Verification
        },

        data() {
            return {
                isDebugLogin: false,
                confirmDirty: false,
                identifyCodes: '1234567890',
                identifyCode: '',
                code:'',
                autoCompleteResult: [],
                formItemLayout: {
                    labelCol: {
                        xs: { span: 24 },
                        sm: { span: 8 },
                    },
                    wrapperCol: {
                        xs: { span: 24 },
                        sm: { span: 16 },
                    },
                },
                tailFormItemLayout: {
                    wrapperCol: {
                        xs: {
                            span: 24,
                            offset: 0,
                        },
                        sm: {
                            span: 16,
                            offset: 8,
                        },
                    },
                },
            };
        },
        beforeCreate() {
            this.form = this.$form.createForm(this, { name: 'register' });
        },
        methods: {
            randomNum(min, max) {
                return Math.floor(Math.random() * (max - min) + min)
            },
            refreshCode() {
                this.identifyCode = ''
                this.makeCode(this.identifyCodes, 4)
            },
            makeCode(o, l) {
                for (let i = 0; i < l; i++) {
                    this.identifyCode += this.identifyCodes[
                        this.randomNum(0, this.identifyCodes.length)
                        ]
                }
            },
            handleSubmit(e) {
                e.preventDefault();
                var that = this;
                this.form.validateFieldsAndScroll((err, values) => {
                    if (!err) {
                        let param = new URLSearchParams();
                        param.append('username',values.username);
                        param.append('email',values.email);
                        param.append('phonenumber',values.phonenumber);
                        param.append('password',values.password)
                        axios.post('http://localhost:8080/user/register',param).then(function (response) {
                            console.log(response.data)
                            if(response.data == 'index'){
                                that.$emit("lisentcurrent",[response.data]);
                            }
                            else {
                                alert(response.data);
                            }
                        }).catch(function (error) {
                            console.log(error)
                        }).then(function () {

                        })
                        console.log('Received values of form: ', values);
                    }
                });
            },
            handleConfirmBlur(e) {
                const value = e.target.value;
                this.confirmDirty = this.confirmDirty || !!value;
            },
            compareToFirstPassword(rule, value, callback) {
                const form = this.form;
                if (value && value !== form.getFieldValue('password')) {
                    callback('Two passwords that you enter is inconsistent!');
                } else {
                    callback();
                }
            },
            validateCode(rule, value, callback) {
                const identifyCode = this.identifyCode
                if (identifyCode !== value) {
                    callback('请输入正确的验证码');
                } else {
                    callback();
                }
            },
            validateToNextPassword(rule, value, callback) {
                const form = this.form;
                if (value && this.confirmDirty) {
                    form.validateFields(['confirm'], { force: true });
                }
                callback();
            },

        },
        created() {
            this.refreshCode()
        }
    }
script>

<style>
.register1{
    margin: 0 auto;
    padding-right: 20%;
}
style>
2、login.vue
<template>
    <a-form-model layout="inline" >
        <a-form-model-item>
            <a-input v-model="username" placeholder="Username"  >
                <a-icon slot="prefix" type="user" style="color:rgba(0,0,0,.25)" />
            a-input>
        a-form-model-item>
        <a-form-model-item>
            <a-input v-model="password" type="password" placeholder="Password">
                <a-icon slot="prefix" type="lock" style="color:rgba(0,0,0,.25)" />
            a-input>
        a-form-model-item>
        <a-form-model-item>
            <a-button
                    @click="handlesubmit()"
                    type="primary"
                    html-type="submit"
                    :disabled="username === '' || password === ''"
            >
                Log in
            a-button>
        a-form-model-item>
    a-form-model>
template>
<script>
    const axios = require('axios');
    export default {
        name: "login",
        props:{

        },
        data(){
            return{
                username:'',
                password:'',
                response:['index']
            }
        },
        methods:{
            handlesubmit(){
                var that = this
                axios.post('http://localhost:8080/user/login',{//请求登录接口
                    username:this.username,
                    password:this.password
                }).then(function (response) {
                    // console.log(response.data);
                    that.response = response.data;
                    that.$emit("lisentcurrent",[that.response]);
                }).catch(function (error) {
                    console.log(error);
                });
                console.log("pass",that.response)

            }
        }
    }
script>

<style scoped>

style>
3、index.vue
<template>
    <div>
    <p style="margin-top: 50px;font-size: larger">欢迎来到智慧树乐园p>
    <a-carousel >
        <div><h3>动画梦工厂h3>div>
        <div><h3>智慧树乐园h3>div>
        <div><h3>动漫世界h3>div>
        <div><h3>大风车h3>div>
    a-carousel>
    div>
template>

<script>
    export default {
        name: "index"
    }
script>

<style scoped>
    .ant-carousel >>> .slick-slide {
        text-align: center;
        height: 160px;
        line-height: 160px;
        background: #364d79;
        overflow: hidden;
    }
    .ant-carousel >>> .slick-slide h3 {
        color: #fff;
    }
    .ant-carousel {
        margin:0 auto;
        width: 60%;
        display: block;
    }
style>
4、Verification.vue(验证码组件)
关于验证码的实现可以参考:https://blog.csdn.net/weixin_45372783/article/details/109636250
<template>
    <div class="s-canvas">
        <canvas id="s-canvas" :width="contentWidth" :height="contentHeight">canvas>
    div>
template>

<script>
    export default {
        name: "Verification",
        props: {
            identifyCode: {
                type: String,
                default: '1234'
            },
            fontSizeMin: {
                type: Number,
                default: 16
            },
            fontSizeMax: {
                type: Number,
                default: 40
            },
            backgroundColorMin: {
                type: Number,
                default: 180
            },
            backgroundColorMax: {
                type: Number,
                default: 240
            },
            colorMin: {
                type: Number,
                default: 50
            },
            colorMax: {
                type: Number,
                default: 160
            },
            lineColorMin: {
                type: Number,
                default: 40
            },
            lineColorMax: {
                type: Number,
                default: 180
            },
            dotColorMin: {
                type: Number,
                default: 0
            },
            dotColorMax: {
                type: Number,
                default: 255
            },
            contentWidth: {
                type: Number,
                default: 112
            },
            contentHeight: {
                type: Number,
                default: 38
            }
        },
        methods: {
            // 生成一个随机数
            randomNum(min, max) {
                return Math.floor(Math.random() * (max - min) + min)
            },
            // 生成一个随机的颜色
            randomColor(min, max) {
                let r = this.randomNum(min, max)
                let g = this.randomNum(min, max)
                let b = this.randomNum(min, max)
                return 'rgb(' + r + ',' + g + ',' + b + ')'
            },
            drawPic() {
                let canvas = document.getElementById('s-canvas')
                let ctx = canvas.getContext('2d')
                ctx.textBaseline = 'bottom'
                // 绘制背景
                ctx.fillStyle = this.randomColor(this.backgroundColorMin, this.backgroundColorMax)
                ctx.fillRect(0, 0, this.contentWidth, this.contentHeight)
                // 绘制文字
                for (let i = 0; i < this.identifyCode.length; i++) {
                    this.drawText(ctx, this.identifyCode[i], i)
                }
                this.drawLine(ctx)
                this.drawDot(ctx)
            },
            drawText(ctx, txt, i) {
                ctx.fillStyle = this.randomColor(this.colorMin, this.colorMax)
                ctx.font = this.randomNum(this.fontSizeMin, this.fontSizeMax) + 'px SimHei'
                let x = (i + 1) * (this.contentWidth / (this.identifyCode.length + 1))
                let y = this.randomNum(this.fontSizeMax, this.contentHeight - 5)
                var deg = this.randomNum(-45, 45)
                // 修改坐标原点和旋转角度
                ctx.translate(x, y)
                ctx.rotate(deg * Math.PI / 180)
                ctx.fillText(txt, 0, 0)
                // 恢复坐标原点和旋转角度
                ctx.rotate(-deg * Math.PI / 180)
                ctx.translate(-x, -y)
            },
            drawLine(ctx) {
                // 绘制干扰线
                for (let i = 0; i < 8; i++) {
                    ctx.strokeStyle = this.randomColor(this.lineColorMin, this.lineColorMax)
                    ctx.beginPath()
                    ctx.moveTo(this.randomNum(0, this.contentWidth), this.randomNum(0, this.contentHeight))
                    ctx.lineTo(this.randomNum(0, this.contentWidth), this.randomNum(0, this.contentHeight))
                    ctx.stroke()
                }
            },
            drawDot(ctx) {
                // 绘制干扰点
                for (let i = 0; i < 100; i++) {
                    ctx.fillStyle = this.randomColor(0, 255)
                    ctx.beginPath()
                    ctx.arc(this.randomNum(0, this.contentWidth), this.randomNum(0, this.contentHeight), 1, 0, 2 * Math.PI)
                    ctx.fill()
                }
            }
        },
        watch: {
            identifyCode() {
                this.drawPic()
            }
        },
        mounted() {
            this.drawPic()
        }
    }
script>

<style scoped>

style>
Vue目录结构
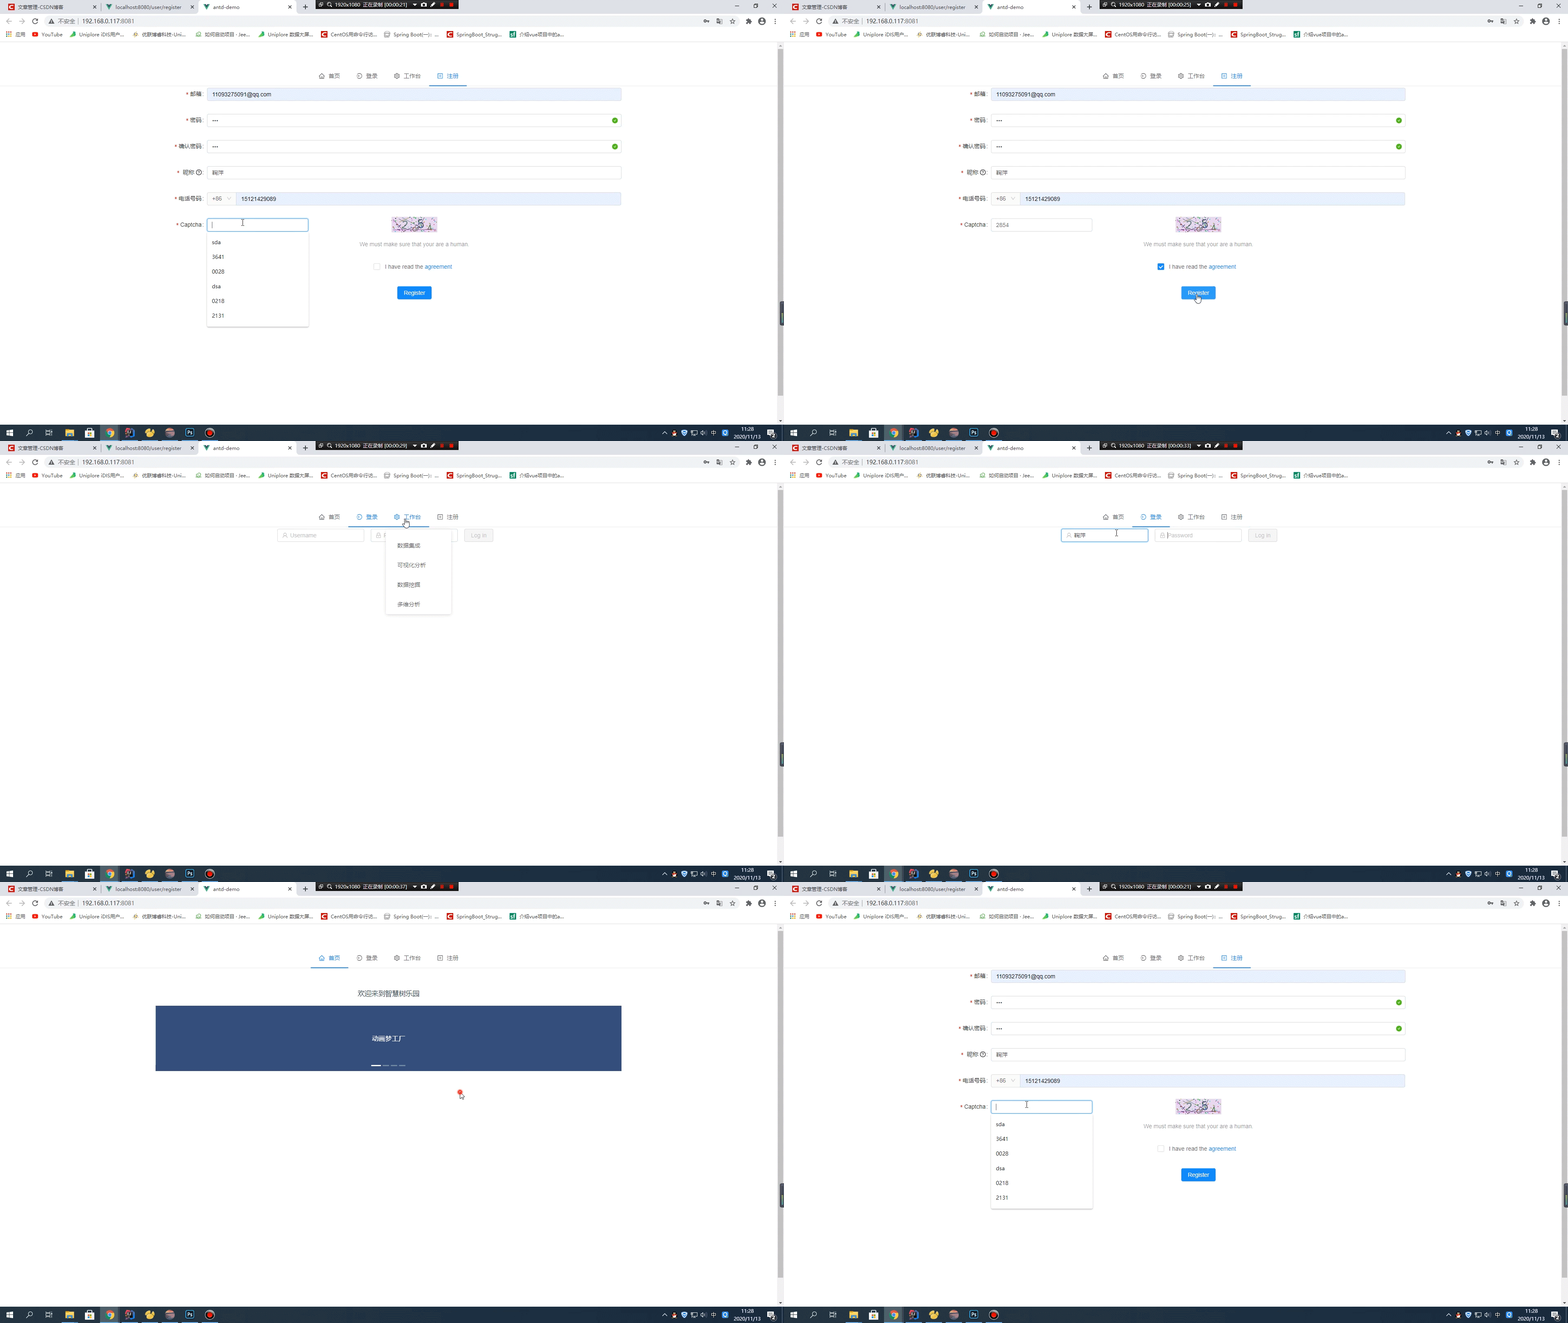
测试整体效果
1、启动服务(前端服务器启动是使用命令进入到antd-demo文件夹中运行 npm run serve)

2、效果
主页

注册页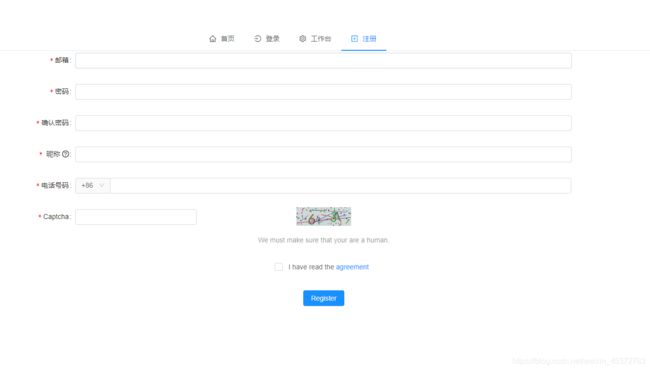
其他
数据库编码格式
数据库用到中文字段的编码模式应选择utf-8,不然在注册的用到中文时候会报错。
注册优化
使用try,catch插入,做到一次查询即可完成注册功能。
@CrossOrigin
    @PostMapping("/register")
    @ResponseBody
    public String register2(@RequestParam("username") String username, @RequestParam("password") String password,@RequestParam("email") String email,
                            @RequestParam("phonenumber") String phonenumber){
//        UserEntity checkemail = userService.findemail(email);
//        UserEntity checkusername = userService.findusername(username);
//        System.out.println(checkemail);
//        if(checkemail != null){
//            return "email has existed";
//        }
//        else if(checkusername != null){
//            return "name has existed";
//        }
//        else {
        try {
            UserEntity user = new UserEntity();
            Date now = new Date();
            String id = UUID.randomUUID().toString();
            user.setCreatetime(now);
            user.setUserid(id);
            user.setUsername(username);
            user.setEmail(email);
            user.setPasssword(password);
            user.setPhonenumber(phonenumber);
            System.out.println(userService.register(user));
//            UserEntity user1 = userService.login(username, password);
            return "index";
        }
        catch (Exception e){
            Throwable cause = e.getCause();
            if (cause instanceof java.sql.SQLIntegrityConstraintViolationException){
                if(cause.toString().indexOf("u_name") != -1){
                    return "用户名已存在";
                }
                else
                    {return "邮箱已存在";}
            }
            return "未知错误";
        }
//        }
    }

