用户管理和身份验证
在Trac中,添加、删除、配置用户账户以及身份验证的过程依赖于运行Trac的方式,也就是使用哪种方式、在哪种Web服务器上运行Trac。
下面介绍使用Tracd时如何管理用户帐号以及进行身份验证。
在以前的讲解中,我们建立了一个Angel项目的Trac环境,用以下的命令:
C:\Python24\Scripts>..\python tracd -p 8001 C:\SCM\Angel\Angel_Trac
来运行Trac环境。
虽然使用浏览器访问该项目时,页面上方也有一个“Login”连接,但是是无法使用的,点击了会报错,提示:
“Authentication information not available. Please refer to the installation documentation.”
这是因为我们没有为该项目设置用户、分配权限和密码。要使Login可用,我们需要做以下三个工作:
1. 创建用户并分配权限
过程如下图:
现在我们的Angel项目有了一个admin的用户,是Trac的管理员。
2. 给用户设定密码
Tracd支持Basic和Digest两种身份验证方式,默认使用Digest,在这里只介绍Digest方式,这是来源于Apache的用户管理和身份验证方式。
Digest方式需要提供一个特定格式的密码文件,可以使用Apache的htdigest命令来生成密码文件。如果没有Apache,可以使用下面的python脚本来生成密码(我就是使用的这种方式)
from optparse import OptionParser
import md5

# build the options
usage = "usage: %prog [options]"
parser = OptionParser(usage=usage)
parser.add_option("-u", "--username",action="store", dest="username", type = "string",
                  help="the username for whom to generate a password")
parser.add_option("-p", "--password",action="store", dest="password", type = "string",
                  help="the password to use")
(options, args) = parser.parse_args()

# check options
if (options.username is None) or (options.password is None):
   parser.error("You must supply both the username and password")

# Generate the string to enter into the htdigest file
realm = 'trac'
kd = lambda x: md5.md5(':'.join(x)).hexdigest()
print ':'.join((options.username, realm, kd([options.username, realm, options.password])))
将上面的代码保存到一个新文本文件中,并重命名该文件的扩展名为py(假定修改后该文件是
trac-digest.py,放在了C:\SCM目录),使用下面的命令
python trac-digest.py -u username -p password >> c:\digest.txt
具体到我们的项目就是
C:\Python24>python c:\scm\trac-digest.py -u admin -p admin >>c:\scm\digest.txt
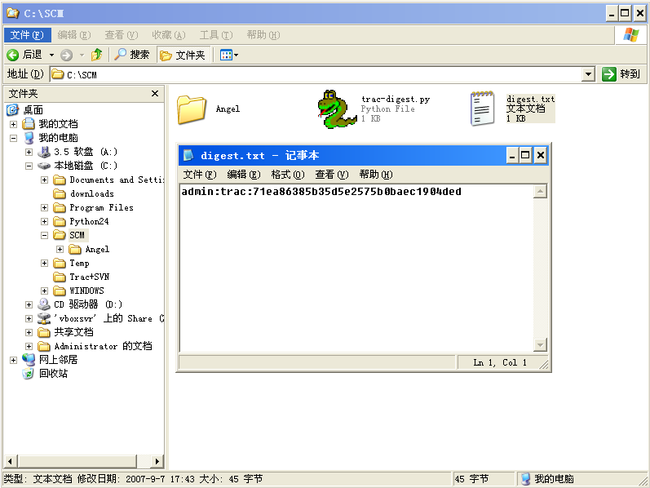
会在c:\scm\目录下生成一个digest.txt的密码文件,该文件的格式是“用户名:范围名(readlm名称,默认是trac):密码的密文”。
如下图
可以多次执行上面的命令在一个密码文件中为多个用户设定密码。

3. 使用带验证选项的行命令启动tracd
命令如下
tracd -p 8080 --auth=project1,/path/to/users.htdigest,mycompany.com /path/to/project1
或者
tracd -p 8080 --auth=*,/path/to/users.htdigest,mycompany.com /path/to/project1
具体到我们的项目就是
C:\Python24\Scripts>..\python tracd -p 8001 --auth=Angel_Trac,c:\scm\digest.txt,trac C:\SCM\Angel\Angel_Trac
或者
C:\Python24\Scripts>..\python tracd -p 8001 --auth=*,c:\scm\digest.txt,trac C:\SCM\Angel\Angel_Trac
需要注意:
a.红色的部分,是realm(范围),在行命令中的realm必须与生成密码文件的脚本总的realm相同。
b.蓝色的部分,也就是--auth的第一个参数,不是项目名称,是Trac环境全路径的最后一个目录。
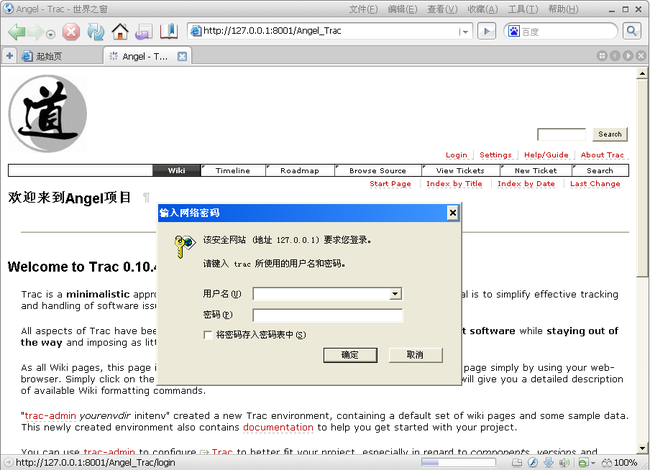
ok,现在打开浏览器,访问Trac网站,点击“Login”,就会弹出登陆对话框进行身份验证了。如下图
是不是感觉很麻烦呢,没关系,Trac有插件来扩展这些功能,我们随后就会介绍如何用插件来管理用户和配置Trac。

最后,需要强调的是,这篇文章只是对使用tracd运行Trac的用户管理,其他方式请参考Trac官方网站的指南。


参考文献:
                Trac的官方指南中的TracAdmin介绍。
                Trac的官方指南中的Trac Permissions介绍。
             Trac的官方指南中的Tracd介绍 。

