ELK 日志分析
文章目录
-
- 一、为什么用到 ELK
- 二、ELK 简介
- 三、实验部署
-
- 3.1 准备工作
- 3.2 下载并安装软件包
- 3.3 安装 JDK(java)环境工具
- 3.4 配置 elasticsearch
-
- 3.4.1 新建 elasticsearch 用户并启动
- 3.4.2 查看进程是否启动成功
- 3.4.3 若出现错误可以查看日志
- 3.4.4 测试是否可以正常访问
- 3.5 配置 logstash
-
- 3.5.1 logstash 中 grok 的正则匹配
- 3.5.2 创建 logstash 配置文件
- 3.5.3 启动
- 3.6 配置 kibana
-
- 3.6.1 修改kibana配置文件
- 3.6.2 启动
- 3.6.3 测试
- 3.7 Nginx 客户端配置
-
- 3.7.1 yum 安装二进制 nginx 软件包
- 3.7.2 下载 filebeat 并解压到/usr/local/
- 3.7.3 修改filebeat配置文件
- 3.7.4 启动
- 3.7.5 访问
- 3.7.5 查看 kibana日志
一、为什么用到 ELK
一般我们需要进行日志分析场景:直接在日志文件中 grep、awk 就可以获得自己想要的信息。但在规模较大的场景中,此方法效率低下,面临问题包括日志量太大如何归档、文本搜索太慢怎么办、如何多维度查询。需要集中化的日志管理,所有服务器上的日志收集汇总。常见解决思路是建立集中式日志收集系统,将所有节点上的日志统一收集,管理,访问。
一般大型系统是一个分布式部署的架构,不同的服务模块部署在不同的服务器上,问题出现时,大部分情况需要根据问题暴露的关键信息,定位到具体的服务器和服务模块,构建一套集中式日志系统,可以提高定位问题的效率。
一个完整的集中式日志系统,需要包含以下几个主要特点:
- 收集-能够采集多种来源的日志数据
- 传输-能够稳定的把日志数据传输到中央系统
- 存储-如何存储日志数据
- 分析-可以支持 UI 分析
- 警告-能够提供错误报告,监控机制 ELK 提供了一整套解决方案,并且都是开源软件,之间互相配合使用,完美衔接,高效的满足了很多场合的应用。目前主流的一种日志系统。
二、ELK 简介
ELK 是三个开源软件的缩写,分别表示:Elasticsearch , Logstash, Kibana , 它们都是开源软件。新增了一个 FileBeat,它是一个轻量级的日志收集处理工具(Agent),Filebeat 占用资源少,适合于在各个服务器上搜集日志后传输给 Logstash,官方也推荐此工具。
-
Elasticsearch 是个开源分布式搜索引擎,提供搜集、分析、存储数据三大功能。它的特点有:分布式,零配置,自动发现,索引自动分片,索引副本机制,restful 风格接口,多数据源,自动搜索负载等。 -
Logstash 主要是用来日志的搜集、分析、过滤日志的工具,支持大量的数据获取方式。一般工作方式为 c/s 架构,client 端安装在需要收集日志的主机上,server 端负责将收到的各节点日志进行过滤、修改等操作在一并发往 elasticsearch 上去。 -
Kibana 也是一个开源和免费的工具,Kibana 可以为 Logstash 和 ElasticSearch提供的日志分析友好的 Web 界面,可以帮助汇总、分析和搜索重要数据日志。 -
Filebeat 隶属于 Beats,是一个轻量级的日志收集处理工具。目前 Beats 包含四种工具- Packetbeat(搜集网络流量数据)
- Topbeat(搜集系统、进程和文件系统级别的 CPU 和内存使用情况等数据)
- Filebeat(搜集文件数据)
- Winlogbeat(搜集 Windows 事件日志数据)
三、实验部署
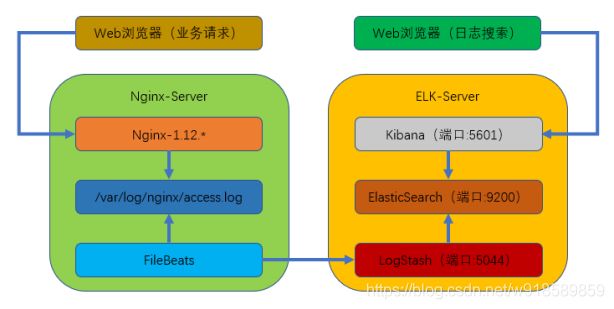
本次部署的是 filebeats(客户端),elasticsearch+logstash+kibana(服务端)组成的架构。
业务请求到达 nginx-server 机器上的 Nginx; Nginx 响应请求,并在 access.log 文件中增加访问记录; FileBeat 搜集新增的日志,通过 LogStash 的 5044 端口上传日志; LogStash 将日志信息通过本机的 9200 端口传入到 ElasticSerach; 搜索日志的用户通过浏览器访问 Kibana,服务器端口是 5601;Kibana 通过 9200 端口访问 ElasticSerach;
实验环境:
本次部署的是单点 ELK 用了两台机器(CentOS-7.5)
ELK 服务端:192.168.88.100
Nginx 客户端:192.168.88.110
3.1 准备工作
操作系统:CentOS 7.X 64 位
关闭 SELinux 和 firewalld 防火墙
此次试验环境使用网络 yum 源,保证系统能正常连接互联网
防火墙
[root@localhost ~]$ systemctl stop firewalld   #临时关闭
[root@localhost ~]$ systemctl disable firewalld   #永久关闭,enable开启
SELinux
[root@localhost ~]$ setenforce 0 && sed -i 's/^SELINUX=.*/SELINUX=disabled/' /etc/selinux/config && reboot
[root@localhost ~]$ getenforce
配置yum源
可参考之前的文章设置yum源
Linux配置yum源
修改ip
虚拟机网络为nat,网段要一致,可在VMware虚拟机【编辑】-----【虚拟网络编辑器】,选中这个nat模式网卡【子网ip】修改即可
[root@localhost ~]$ cd /etc/sysconfig/network-scripts

#两台服务器都需要修改,另一台ip改为192.168.88.110
[root@localhost ~]$ vim ifcfg-ens33
TYPE=Ethernet  #网络类型
PROXY_METHOD=none
BROWSER_ONLY=no
BOOTPROTO=static  #修改此处,改为static
IPADDR=192.168.88.100   #ip地址
NETMASK=255.255.255.0   #子网掩码
GATEWAY=192.168.88.2   #网关,可在虚拟机中查看
DEFROUTE=yes
IPV4_FAILURE_FATAL=no
IPV6INIT=yes
IPV6_AUTOCONF=yes
IPV6_DEFROUTE=yes
IPV6_FAILURE_FATAL=no
IPV6_ADDR_GEN_MODE=stable-privacy
NAME=ens33
UUID=59ab8840-ef2e-441b-97d1-f9f7fde61d7b
DEVICE=ens33
ONBOOT=yes #开机自启
DNS1=114.114.114.114 #dns地址


[root@localhost ~]$ systemctl restart network #重启网卡
3.2 下载并安装软件包
ELK 服务端配置
由于官网下载很慢,这里下载好提供百度网盘,可上传至linux
链接:https://pan.baidu.com/s/1vUcy3XXG_O7O5-x7ggir5Q
提取码:7nfo
百度网盘加速工具
[root@localhost ~]$ mkdir /elk;cd /elk
[root@localhost ~]$ wget https://artifacts.elastic.co/downloads/elasticsearch/elasticsearch-6.2.3.tar.gz
[root@localhost ~]$ wget https://artifacts.elastic.co/downloads/logstash/logstash-6.2.3.tar.gz
[root@localhost ~]$ wget https://artifacts.elastic.co/downloads/kibana/kibana-6.2.3-linux-x86_64.tar.gz
全部解压缩,并复制到/usr/local/目录下
[root@localhost ~]$ cd /elk
[root@localhost ~]$ tar -zxvf elasticsearch-6.2.3.tar.gz && cp -a elasticsearch-6.2.3 /usr/local/
[root@localhost ~]$ tar -zxvf logstash-6.2.3.tar.gz && cp -a logstash-6.2.3 /usr/local/
[root@localhost ~]$ tar -zxvf kibana-6.2.3-linux-x86_64.tar.gz && cp -a kibana-6.2.3-linux-x86_64 /usr/local/
3.3 安装 JDK(java)环境工具
[root@localhost ~]$ yum -y install java-1.8*
3.4 配置 elasticsearch
3.4.1 新建 elasticsearch 用户并启动
用 elasticsearch 普通用户启动
[root@localhost ~]$ useradd elasticsearch
[root@localhost ~]$ chown -R elasticsearch.elasticsearch /usr/local/elasticsearch-6.2.3/
[root@localhost ~]$ su - elasticsearch
[root@localhost ~]$ cd /usr/local/elasticsearch-6.2.3/
[root@localhost ~]$ ./bin/elasticsearch -d
3.4.2 查看进程是否启动成功
[root@localhost ~]$ netstat -antp
tcp6       0      0 127.0.0.1:9200          :::*                    LISTEN      13250/java
tcp6       0      0 ::1:9200                :::*                    LISTEN      13250/java
3.4.3 若出现错误可以查看日志
[root@localhost ~]$ cat /usr/local/elasticsearch-6.2.3/logs/elasticsearch.log
3.4.4 测试是否可以正常访问
[root@localhost ~]$ curl localhost:9200
{
  "name" : "BfrMpou",
  "cluster_name" : "elasticsearch",
  "cluster_uuid" : "cvsSNh5CQzC1OekD1d1Hug",
  "version" : {
    "number" : "6.2.3",
    "build_hash" : "c59ff00",
    "build_date" : "2018-03-13T10:06:29.741383Z",
    "build_snapshot" : false,
    "lucene_version" : "7.2.1",
    "minimum_wire_compatibility_version" : "5.6.0",
    "minimum_index_compatibility_version" : "5.0.0"
  },
  "tagline" : "You Know, for Search"
}
3.5 配置 logstash
Logstash 收集 nginx 日志之使用 grok 过滤插件解析日志,grok 作为一个 logstash 的过滤插件,支持根据模式解析文本日志行,拆成字段。
3.5.1 logstash 中 grok 的正则匹配
[root@localhost ~]$ exit   #切换为root用户
[root@localhost ~]$ cd /usr/local/logstash-6.2.3
[root@localhost ~]$ vim vendor/bundle/jruby/2.3.0/gems/logstash-patterns-core-4.1.2/patterns/grok-patterns
#最后面添加如下内容
WZ ([^ ]*)
NGINXACCESS %{IP:remote_ip} \- \- \[%{HTTPDATE:timestamp}\] "%{WORD:method} %{WZ:request} HTTP/%{NUMBER:httpversion}" %{NUMBER:status} %{NUMBER:bytes} %{QS:referer} %{QS:agent} %{QS:xforward}
3.5.2 创建 logstash 配置文件
[root@localhost ~]$ vim /usr/local/logstash-6.2.3/default.conf
input {  #数据的入口,监听的端口
 	beats {
 	port => "5044"
 	}
  }

#数据过滤
filter {
	 grok { #日志分析的插件
	 match => { "message" => "%{NGINXACCESS}" }
	 }
	 geoip { #监控的客户端,监控多个就写多个
	 # nginx 客户端 ip
	 source => "192.168.88.110"
	 }
}

#输出配置为本机的 9200 端口,这是 ElasticSerach 服务的监听端口
output {
	 elasticsearch {
	 hosts => ["127.0.0.1:9200"]
	 }
 }
3.5.3 启动
进入到/usr/local/logstash-6.2.3 目录下,并执行下列命令
后台启动
[root@localhost ~]$ cd /usr/local/logstash-6.2.3
[root@localhost ~]$ nohup bin/logstash -f default.conf &
查看启动日志:
[root@localhost ~]$ tailf nohup.out
查看端口是否启动:
[root@localhost ~]$ netstat -napt|grep 5044
tcp6       0      0 :::5044                 :::*                    LISTEN      13309/java
3.6 配置 kibana
3.6.1 修改kibana配置文件
打开 Kibana 配置文件/usr/local/kibana-6.2.3-linux-x86_64/config/kibana.yml,找到下面这行并修改
[root@localhost ~]$ vim /usr/local/kibana-6.2.3-linux-x86_64/config/kibana.yml
#server.host: "localhost"
#修改为
server.host: "192.168.88.100" #监听的IP地址,本机的ip地址
这样其他电脑就能用浏览器访问 Kibana 的服务了;
3.6.2 启动
进入 Kibana 的目录:/usr/local/kibana-6.2.3-linux-x86_64
执行启动命令:
[root@localhost ~]$ cd /usr/local/kibana-6.2.3-linux-x86_64
[root@localhost ~]$ nohup bin/kibana &
查看启动日志:
[root@localhost ~]$ tail -f nohup.out
查看端口是否启动:
[root@localhost ~]$ netstat -napt|grep 5601
tcp        0      0 192.168.88.100:5601     0.0.0.0:*               LISTEN      13359/bin/../node/b
3.6.3 测试
在浏览器访问 192.168.88.100:5601到此。ELK 部署完成
3.7 Nginx 客户端配置
被监控端,ip为110服务执行
3.7.1 yum 安装二进制 nginx 软件包
[root@localhost ~]$ yum -y install nginx
[root@localhost ~]$ systemctl start nginx && systemctl enable nginx
3.7.2 下载 filebeat 并解压到/usr/local/
[root@localhost ~]$ wget https://artifacts.elastic.co/downloads/beats/filebeat/filebeat-6.2.3-linux-x86_64.tar.gz
[root@localhost ~]$ tar -xf ./filebeat-6.2.3-linux-x86_64.tar.gz -C /usr/local/
3.7.3 修改filebeat配置文件
打开文件/usr/local/filebeat-6.2.3-linux-x86_64/filebeat.yml,找到如下位置:修改三处
[root@localhost ~]$ vim /usr/local/filebeat-6.2.3-linux-x86_64/filebeat.yml
enable:false    #修改为 true
paths:/var/log/*.log    #修改为/var/log/nginx/*.log
#output.elasticsearch:   #将此行注释掉
	#hosts: ["localhost:9200"]   #将此行注释掉
output.logstash:     #取消此行注释
	hosts: ["192.168.88.100:5044"] #取消此行注释并修改 IP 地址为 ELK 服务器地址
3.7.4 启动
切换到/usr/local/filebeat-6.2.3-linux-x86_64 目录下
[root@localhost ~]$ cd /usr/local/filebeat-6.2.3-linux-x86_64
后台启动 filebeat:
[root@localhost ~]$ nohup ./filebeat -e -c filebeat.yml &
查看日志
[root@localhost ~]$ tailf nohup.out
2020-11-29T19:05:11.569+0800	INFO	registrar/registrar.go:71	No registry file found under: /usr/local/filebeat-6.2.3-linux-x86_64/data/registry. Creating a new registry file.
2020-11-29T19:05:11.570+0800	INFO	registrar/registrar.go:108	Loading registrar data from /usr/local/filebeat-6.2.3-linux-x86_64/data/registry
2020-11-29T19:05:11.570+0800	INFO	registrar/registrar.go:119	States Loaded from registrar: 0
2020-11-29T19:05:11.570+0800	WARN	beater/filebeat.go:261	Filebeat is unable to load the Ingest Node pipelines for the configured modules because the Elasticsearch output is not configured/enabled. If you have already loaded the Ingest Node pipelines or are using Logstash pipelines, you can ignore this warning.
2020-11-29T19:05:11.570+0800	INFO	crawler/crawler.go:48	Loading Prospectors: 1
2020-11-29T19:05:11.570+0800	INFO	log/prospector.go:111	Configured paths: [/var/log/nginc/*.log]
2020-11-29T19:05:11.570+0800	INFO	crawler/crawler.go:82	Loading and starting Prospectors completed. Enabled prospectors: 1
2020-11-29T19:05:11.570+0800	INFO	cfgfile/reload.go:127	Config reloader started
2020-11-29T19:05:11.571+0800	INFO	cfgfile/reload.go:219	Loading of config files completed.
2020-11-29T19:05:41.581+0800	INFO	[monitoring]	log/log.go:124	Non-zero metrics in the last 30s
{"monitoring": {"metrics": {"beat":{"cpu":{"system":{"ticks":30,"time":34},"total":{"ticks":30,"time":43,"value":30},"user":{"ticks":0,"time":9}},"info":{"ephemeral_id":"2b75e453-6505-4e49-8790-a9d8a1c9aa14","uptime":{"ms":30021}},"memstats":{"gc_next":4473924,"memory_alloc":2814032,"memory_total":2814032,"rss":11853824}},"filebeat":{"harvester":{"open_files":0,"running":0}},"libbeat":{"config":{"module":{"running":0},"reloads":1},"output":{"type":"logstash"},"pipeline":{"clients":1,"events":{"active":0}}},"registrar":{"states":{"current":0},"writes":1},"system":{"cpu":{"cores":2},"load":{"1":0,"15":0.05,"5":0.01,"norm":{"1":0,"15":0.025,"5":0.005}}}}}}
3.7.5 访问
通过浏览器多访问几次 nginx 服务,这样能多制造一些访问日志,访问地址:https://192.168.88.110
3.7.5 查看 kibana日志
访问 Kibana:http://192.168.88.100:5601,点击左上角的 Discover,就可以看到访问日志已经被ELK 搜集了,然后按照下列步骤完成设置
- 输入
logstash-*,点击”Next step” - 选择
Time Filter,再点击“Create index pattern” - 然后可自行创建日志内容查询规则

