如何整合腾讯云验证码服务到SpringBoot中并将验证码存到Redis中
写在前面
⭐️一名在校的大三学生,欢迎交流指正~
最近在做一个微服务的学习项目,需要用到阿里云的短信服务,然后跑去阿里云申请,发现个人用户无法申请???!需要企业认证
然后,又听说荣联云可以,就赶快跑去申请,结果发现是一样的套路。。。。。。。。
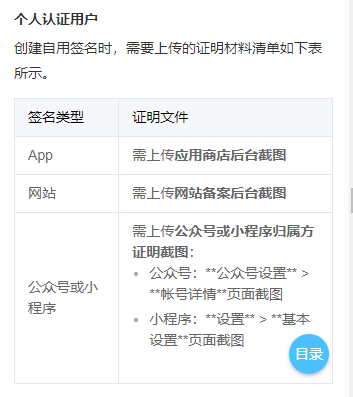
正在我打算放弃的时候,突然想到我在腾讯云有一个轻量级的服务器(已备案的),然后就又跑去腾讯云试了试,果然可以啊哈哈哈哈(前提是有已经备案的
网站,或者小程序等),详情看图,而且初次使用可以获得200条短信(虽然只有3个月吧,但是测试绝对够用了)
如果您和我一样,拥有一个已经备案的网站的话,就可以使用如下方式进行开通腾讯云的短信服务,并且整合到SpringBoot中
一、签名设置
腾讯云网址:https://console.cloud.tencent.com/
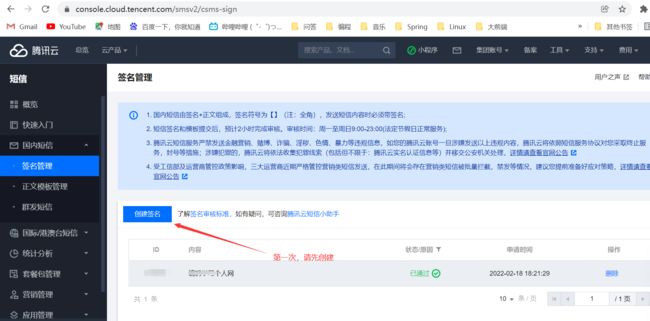
搜索短信服务
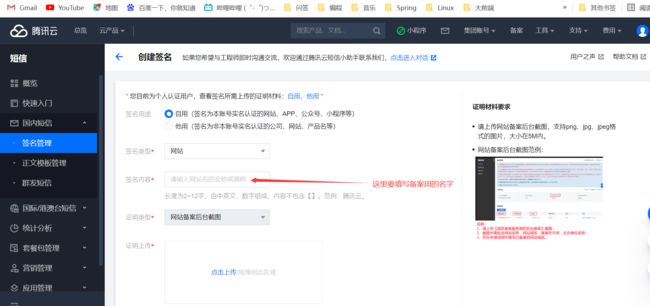
创建签名
网站后台备案截图,可以直接用搜索的方式找到(就像搜 短信 功能一样),或者直接回到首页,就能看到备案的选项哦
填写好提交即可(等1个小时左右就有结果)
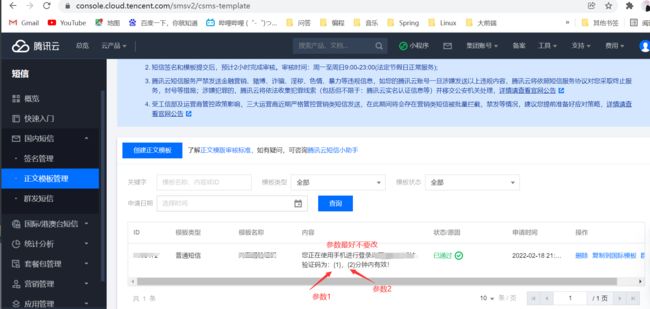
二、设置正文模板
模板可以自己设置,也可以用系统的
三、如何整合到SpringBoot中并将验证码存到Redis中
其实很简单,不过有一些细节要注意到哦,官方有对应的SDK(Java版):https://cloud.tencent.com/document/product/382/43193
下面我就说下自己的操作和遇到的坑吧
整体模块结构
导入依赖
<dependencies>

    <dependency>
        <groupId>com.tencentcloudapigroupId>
        <artifactId>tencentcloud-sdk-javaartifactId>
        <version>3.1.270version>
    dependency>
dependencies>
application.properties
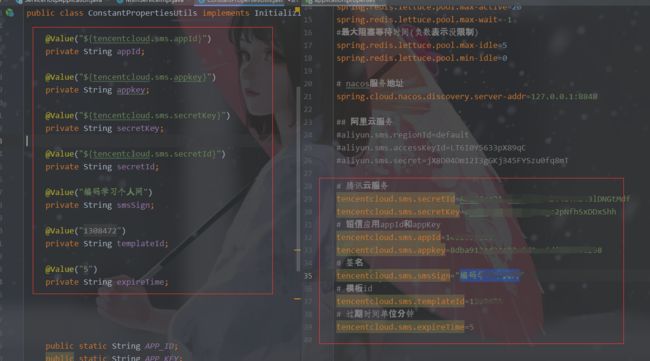
这里会遇到一个坑,就是说签名不对,因为propertis再idea里是GBK编码,而我其他的java文件是UTF-8,所以会报错,签名不对啥的,
可以直接将签名在java文件里写好,不调用propertis里的,或者直接让公共常量类里的签名写死,不去调用 propertis里的
看不懂美关系,看后面的操作就懂了!!!
如果你不清楚下面的参数在哪里找,建议百度,或者直接问腾讯云的客服工程师
# 腾讯云服务
tencentcloud.sms.secretId=你自己的secretId
tencentcloud.sms.secretKey=你自己的secretKey
# 短信应用appId和appKey
tencentcloud.sms.appId=你自己的appId
tencentcloud.sms.appkey=你自己的appkey
# 签名
tencentcloud.sms.smsSign="你自己的签名"
# 模板id
tencentcloud.sms.templateId=你自己的templateId
# 过期时间单位分钟
tencentcloud.sms.expireTime=5
创建公共常量类
在config 包下创建 ConstantPropertiesUtils.java
package com.fafa.yygh.msm.config;

import org.springframework.beans.factory.InitializingBean;
import org.springframework.beans.factory.annotation.Value;
import org.springframework.stereotype.Component;

/**
 * @author Sire
 * @version 1.0
 * @date 2022-02-18 19:41
 */
@Component
public class ConstantPropertiesUtils implements InitializingBean {

    @Value("${tencentcloud.sms.appId}")
    private String appId;

    @Value("${tencentcloud.sms.appkey}")
    private String appkey;

    @Value("${tencentcloud.sms.secretKey}")
    private String secretKey;

    @Value("${tencentcloud.sms.secretId}")
    private String secretId;

    // 这里就不要调用propertis里的了,因为编码格式不一样,
    // 为啥其他的可以调用呢,因为其他的都是数字或者字母
    @Value("直接填写签名内容")
    private String smsSign;

    @Value("${tencentcloud.sms.templateId}")
    private String templateId;

    @Value("${tencentcloud.sms.expireTime}")
    private String expireTime;

    public static String APP_ID;
    public static String APP_KEY;
    public static String SECRET_KEY;
    public static String SECRET_ID;
    public static String SMS_SIGN;
    public static String TEMPLATE_ID;
    public static String EXPIRE_TIME;

    @Override
    public void afterPropertiesSet() throws Exception {
        APP_ID = appId;
        APP_KEY = appkey;
        SECRET_KEY = secretKey;
        SECRET_ID = secretId;
        SMS_SIGN = smsSign;
        TEMPLATE_ID = templateId;
        EXPIRE_TIME = expireTime;
    }
}
对比一下,现在是不是很清晰了!!!
然后就是将其添加到业务层了
建议直接拷贝代码,因为有一些包很容易导错了
还有一些依赖,比如StringUtils 我是在公共服务里引用了的,所以这里可以直接用,如果您不能使用,请导入相关依赖
定义接口
package com.fafa.yygh.msm.service;

/**
 * @author Sire
 * @version 1.0
 * @date 2022-02-18 19:43
 */
public interface MsmService {
    /**
     * 发送手机验证码
     *
     * @param phone
     * @param code
     * @return
     */
    boolean send(String phone, String code);

}
实现类 MsmServiceImpl
package com.fafa.yygh.msm.service.impl;

import com.alibaba.excel.util.StringUtils;
import com.fafa.yygh.msm.config.ConstantPropertiesUtils;
import com.fafa.yygh.msm.service.MsmService;
import com.tencentcloudapi.common.Credential;
import com.tencentcloudapi.common.exception.TencentCloudSDKException;
import com.tencentcloudapi.common.profile.ClientProfile;
import com.tencentcloudapi.common.profile.HttpProfile;
import com.tencentcloudapi.sms.v20210111.SmsClient;
import com.tencentcloudapi.sms.v20210111.models.SendSmsRequest;
import com.tencentcloudapi.sms.v20210111.models.SendSmsResponse;
import org.springframework.stereotype.Service;

/**
 * @author Sire
 * @version 1.0
 * @date 2022-02-18 19:45
 */
@Service
public class MsmServiceImpl implements MsmService {

    /**
     * 发送手机验证码
     *
     * @param phone
     * @param code
     * @return
     */
    @Override
    public boolean send(String phone, String code) {
        // 判断手机号是否为空
        if (StringUtils.isEmpty(phone)) {
            return false;
        }
        // 整合腾讯云短信服务
        try {
            /* 必要步骤:
             * 实例化一个认证对象,入参需要传入腾讯云账户密钥对secretId,secretKey。
             * 这里采用的是从环境变量读取的方式,需要在环境变量中先设置这两个值。
             * 你也可以直接在代码中写死密钥对,但是小心不要将代码复制、上传或者分享给他人,
             * 以免泄露密钥对危及你的财产安全。
             * SecretId、SecretKey 查询: https://console.cloud.tencent.com/cam/capi */
            Credential cred = new
                Credential(ConstantPropertiesUtils.SECRET_ID, ConstantPropertiesUtils.SECRET_KEY);

            // 实例化一个http选项,可选,没有特殊需求可以跳过
            HttpProfile httpProfile = new HttpProfile();
            // 设置代理
            // httpProfile.setProxyHost("真实代理ip");
            // httpProfile.setProxyPort(真实代理端口);
            /* SDK默认使用POST方法。
             * 如果你一定要使用GET方法,可以在这里设置。GET方法无法处理一些较大的请求 */
            httpProfile.setReqMethod("GET");
            /* SDK有默认的超时时间,非必要请不要进行调整
             * 如有需要请在代码中查阅以获取最新的默认值 */
            httpProfile.setConnTimeout(60);
            /* SDK会自动指定域名。通常是不需要特地指定域名的,但是如果你访问的是金融区的服务
             * 则必须手动指定域名,例如sms的上海金融区域名: sms.ap-shanghai-fsi.tencentcloudapi.com */
            httpProfile.setEndpoint("sms.tencentcloudapi.com");

            /* 非必要步骤:
             * 实例化一个客户端配置对象,可以指定超时时间等配置 */
            ClientProfile clientProfile = new ClientProfile();
            /* SDK默认用TC3-HMAC-SHA256进行签名
             * 非必要请不要修改这个字段 */
            clientProfile.setSignMethod("HmacSHA256");
            clientProfile.setHttpProfile(httpProfile);
            /* 实例化要请求产品(以sms为例)的client对象
             * 第二个参数是地域信息,可以直接填写字符串ap-guangzhou,支持的地域列表参考
             https://cloud.tencent.com/document/api/382/52071#.E5.9C.B0.E5.9F.9F.E5.88.97.E8.A1.A8 */
            SmsClient client = new SmsClient(cred, "ap-guangzhou", clientProfile);
            /* 实例化一个请求对象,根据调用的接口和实际情况,可以进一步设置请求参数
             * 你可以直接查询SDK源码确定接口有哪些属性可以设置
             * 属性可能是基本类型,也可能引用了另一个数据结构
             * 推荐使用IDE进行开发,可以方便的跳转查阅各个接口和数据结构的文档说明 */
            SendSmsRequest req = new SendSmsRequest();

            /* 填充请求参数,这里request对象的成员变量即对应接口的入参
             * 你可以通过官网接口文档或跳转到request对象的定义处查看请求参数的定义
             * 基本类型的设置:
             * 帮助链接:
             * 短信控制台: https://console.cloud.tencent.com/smsv2
             * sms helper: https://cloud.tencent.com/document/product/382/3773 */

            /* 短信应用ID: 短信SdkAppId在 [短信控制台] 添加应用后生成的实际SdkAppId,示例如1400006666 */
            //            String sdkAppId = "1400009099";
            req.setSmsSdkAppId(ConstantPropertiesUtils.APP_ID);

            /* 短信签名内容: 使用 UTF-8 编码,必须填写已审核通过的签名,签名信息可登录 [短信控制台] 查看 */
            //            String signName = "编码学习个人网;
            req.setSignName(ConstantPropertiesUtils.SMS_SIGN);

            /* 国际/港澳台短信 SenderId: 国内短信填空,默认未开通,如需开通请联系 [sms helper] */
            String senderid = "";
            req.setSenderId(senderid);

            /* 用户的 session 内容: 可以携带用户侧 ID 等上下文信息,server 会原样返回 */
            String sessionContext = "xxx";
            req.setSessionContext(sessionContext);

            /* 短信号码扩展号: 默认未开通,如需开通请联系 [sms helper] */
            String extendCode = "";
            req.setExtendCode(extendCode);

            /* 模板 ID: 必须填写已审核通过的模板 ID。模板ID可登录 [短信控制台] 查看 */
            //            String templateId = "400000";
            req.setTemplateId(ConstantPropertiesUtils.TEMPLATE_ID);

            /* 下发手机号码,采用 E.164 标准,+[国家或地区码][手机号]
             * 示例如:+8613711112222, 其中前面有一个+号 ,86为国家码,13711112222为手机号,最多不要超过200个手机号 */
            //            String[] phoneNumberSet = {"+8621212313123", "+8612345678902", "+8612345678903"};
            String[] phoneNumberSet = {phone};
            req.setPhoneNumberSet(phoneNumberSet);

            /* 模板参数: 若无模板参数,则设置为空 */
            // 这里传输验证码 和 验证码有效时间
            String[] templateParamSet = {code, ConstantPropertiesUtils.EXPIRE_TIME};
            req.setTemplateParamSet(templateParamSet);

            /* 通过 client 对象调用 SendSms 方法发起请求。注意请求方法名与请求对象是对应的
             * 返回的 res 是一个 SendSmsResponse 类的实例,与请求对象对应 */
            SendSmsResponse res = client.SendSms(req);

            // 输出json格式的字符串回包
            System.out.println(SendSmsResponse.toJsonString(res));

            // 也可以取出单个值,你可以通过官网接口文档或跳转到response对象的定义处查看返回字段的定义
            System.out.println(res.getRequestId());
        } catch (TencentCloudSDKException e) {
            e.printStackTrace();
        }
        return true;
    }
}
编写Controller层
需要注意这里使用了一个验证码随机生成的工具类
RandomUtil
package com.fafa.yygh.msm.utils;

import java.text.DecimalFormat;
import java.util.ArrayList;
import java.util.HashMap;
import java.util.List;
import java.util.Random;

/**
 * @author Sire
 * @version 1.0
 * @date 2022-02-18 22:22
 */
public class RandomUtil {

    private static final Random random = new Random();

    private static final DecimalFormat fourdf = new DecimalFormat("0000");

    private static final DecimalFormat sixdf = new DecimalFormat("000000");

    public static String getFourBitRandom() {
        return fourdf.format(random.nextInt(10000));
    }

    public static String getSixBitRandom() {
        return sixdf.format(random.nextInt(1000000));
    }

    /**
     * 给定数组,抽取n个数据
     *
     * @param list
     * @param n
     * @return
     */
    public static ArrayList getRandom(List list, int n) {

        Random random = new Random();

        HashMap<Object, Object> hashMap = new HashMap<Object, Object>();

        // 生成随机数字并存入HashMap
        for (int i = 0; i < list.size(); i++) {

            int number = random.nextInt(100) + 1;

            hashMap.put(number, i);
        }

        // 从HashMap导入数组
        Object[] robjs = hashMap.values().toArray();

        ArrayList r = new ArrayList();

        // 遍历数组并打印数据
        for (int i = 0; i < n; i++) {
            r.add(list.get((int) robjs[i]));
            System.out.print(list.get((int) robjs[i]) + "\t");
        }
        System.out.print("\n");
        return r;
    }
}
MsmApiController
package com.fafa.yygh.msm.controller;

import com.alibaba.excel.util.StringUtils;
import com.fafa.yygh.common.result.Result;
import com.fafa.yygh.msm.service.MsmService;
import com.fafa.yygh.msm.utils.RandomUtil;
import io.swagger.annotations.Api;
import org.springframework.beans.factory.annotation.Autowired;
import org.springframework.data.redis.core.RedisTemplate;
import org.springframework.web.bind.annotation.GetMapping;
import org.springframework.web.bind.annotation.PathVariable;
import org.springframework.web.bind.annotation.RequestMapping;
import org.springframework.web.bind.annotation.RestController;

import java.util.concurrent.TimeUnit;

/**
 * @author Sire
 * @version 1.0
 * @date 2022-02-18 22:17
 */
@Api(tags = "短信服务")
@RestController
@RequestMapping("/api/msm")
public class MsmApiController {
    @Autowired
    private MsmService msmService;

    @Autowired
    private RedisTemplate<String, String> redisTemplate;

    /**
     * 发送手机验证码
     *
     * @param phone
     * @return
     */
    @GetMapping("send/{phone}")
    public Result sendCode(@PathVariable String phone) {
        //从redis获取验证码,如果获取获取到,返回ok
        // key 手机号  value 验证码
        String code = redisTemplate.opsForValue().get(phone);
        if (!StringUtils.isEmpty(code)) {
            return Result.ok().message("已发送,请勿多次点击发送");
        }
        //如果从redis获取不到,
        // 生成验证码,
        code = RandomUtil.getSixBitRandom();
        //调用service方法,通过整合短信服务进行发送
        boolean isSend = msmService.send(phone, code);
        //生成验证码放到redis里面,设置有效时间
        if (isSend) {
            redisTemplate.opsForValue().set(phone, code, 5, TimeUnit.MINUTES);
            return Result.ok().message("发送短信成功");
        } else {
            return Result.fail().message("发送短信失败");
        }

    }
}
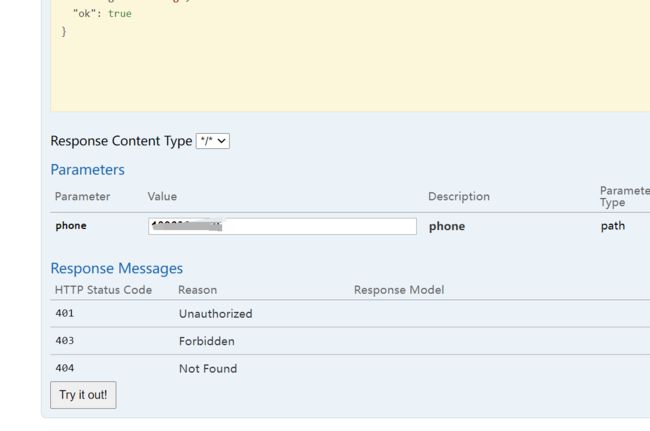
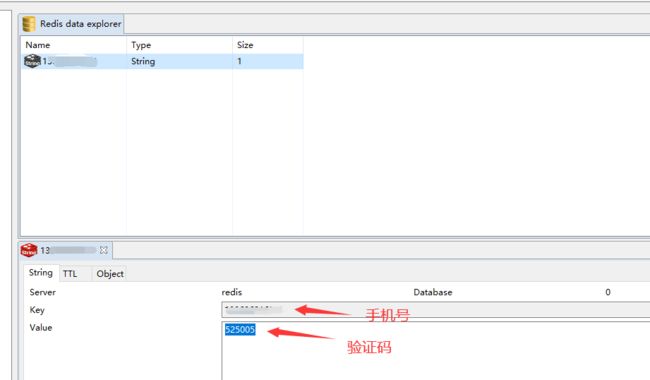
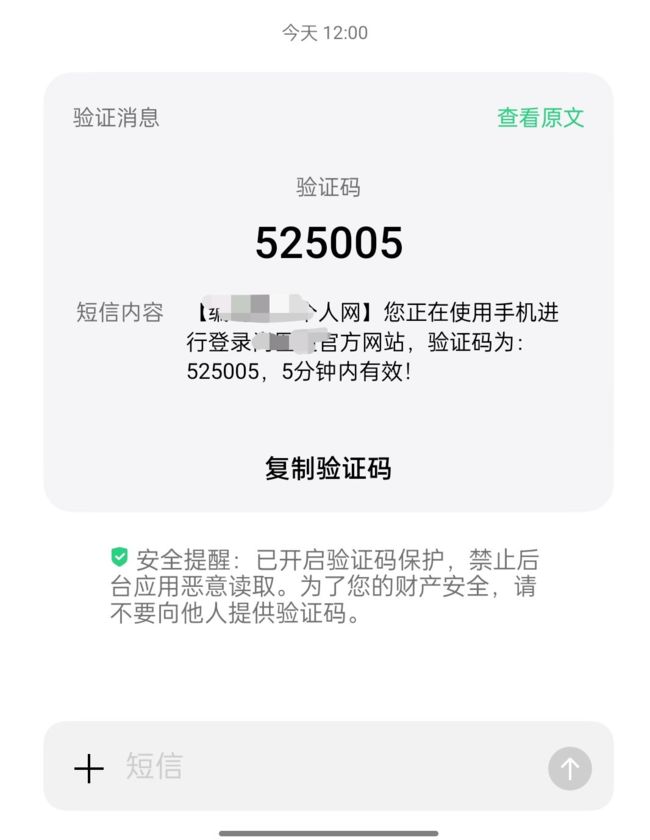
四、测试
结语
努力只能及格,拼命才能优秀,一起加油吧~

