8.腾讯微博Android客户端开发——自动获取验证码(2)
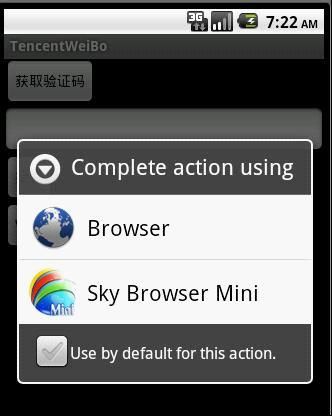
上一节给大家讲解通过调用android系统自带的浏览器进行授权认证的,使用该种方式能很容易的完成认证,但是该种方式有个弊端,也就是如果使用第三方的浏览器如UC、天天等,输入完QQ账号信息点击“授权”后并不能再次跳转到MainActivity,导致我们的认证失败。这个问题应该是非常严重的问题,因为大部分用户都会选择第三方的浏览器作为默认的浏览器。本次给大家讲解自动获取验证码的第二种解决方案,克服上一种方法的缺陷。

第二种解决方案的主角就是我们的WevView控件,我们可以使用WebView控件来进行浏览器的操作,而不使用系统或者第三方的浏览器。
1.首先创建一个Activity,命名为WebViewActivity,该Activity种只包含一个WevView控件:
< LinearLayout xmlns:android ="http://schemas.android.com/apk/res/android"
android:orientation ="vertical"
android:layout_width ="fill_parent"
android:layout_height ="fill_parent"
>
< WebView
android:id ="@+id/web"
android:layout_height ="wrap_content"
android:layout_width ="wrap_content"
/>
</ ScrollView >
2.在MainActivity种添加一个Button,用于启动WebViewActivity:
Weibo weibo = new Weibo();
// 修改getRequestToken()方法,返回结果为HashMap
Map < String, String > map = weibo.getRequestToken();
// 获取oauth_token
oauthToken = map.get( " oauth_token " );
oauthTokenSecret = map.get( " oauth_token_secret " );
Log.i(TAG, " Request Token= " + oauthToken);
Log.i(TAG, " Request Token Secret= " + oauthTokenSecret);
// 有些时候获取oauth_token失败,因此再次获取
if (TextUtil.isEmpty(oauthToken))
{
getVerifier();
return ;
}
// 构造请求的URL
StringBuilder urlBuilder = new StringBuilder();
urlBuilder.append(url);
urlBuilder.append( " ? " );
urlBuilder.append( " oauth_token= " + oauthToken);
Intent intent = new Intent(MainActivity. this ,WebViewActivity. class );
Bundle bundle = new Bundle();
bundle.putString( " url " , urlBuilder.toString());
intent.putExtras(bundle);
// 启动WebViewActivity
startActivity(intent);
3.给WebViewActivity的onCreate添加如下代码,进行浏览器的初始化:
public void onCreate(Bundle savedInstanceState)
{
super .onCreate(savedInstanceState);
setContentView(R.layout.webview);
WebView webView = (WebView) findViewById(R.id.web);
Intent intent = this .getIntent();
if ( ! intent.equals( null ))
{
Bundle bundle = intent.getExtras();
if (bundle != null )
{
if (bundle.containsKey( " url " ))
{
String url = bundle.getString( " url " );
WebSettings webSettings = webView.getSettings();
// 支持JavScript
webSettings.setJavaScriptEnabled( true );
webSettings.setSupportZoom( true );
webView.requestFocus();
webView.loadUrl(url);
Log.i(TAG, " WebView Starting.... " );
}
}
}
}
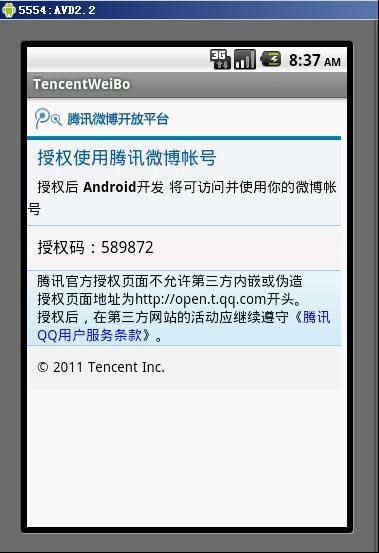
此时如果我们运行模拟器,点击按钮启动WebViewActivity按钮后,运行效果和启动浏览器差不多,我们输入QQ账户信息,点击“授权”,如果callback为空,则Activity会显示授权码。

4.下面我们需要处理的就是如何自动获取授权码。我们知道WebView是支持JavaScript,我们可以通过JavaScript进行授权码的获去,在onCreate()方法中添加如下代码
// 这种方法第一个参数就是java对象,第二个参数表示java对象的别名,在JavaScript中使用
webView.addJavascriptInterface( new JavaScriptInterface(), " Methods " );
WebViewClient client = new WebViewClient()
{
/**
* 回调方法,当页面加载完毕后执行
*/
@Override
public void onPageFinished(WebView view, String url)
{
Log.i(TAG, " WebView onPageFinished " );
// 执行获取授权码的JavaScript
view.loadUrl( " javascript:window.Methods.getHTML('<head>'+document.getElementsByTagName('body')[0].innerHTML+'</head>'); " );
super .onPageFinished(view, url);
}
};
webView.setWebViewClient(client);
其中JavaScriptInterface类是进行js处理的类:
class JavaScriptInterface
{
private static final String TAG = " MainActivity " ;
public void getHTML(String html)
{
Log.i(TAG, html);
String verifier = getVerifier(html);
if ( ! TextUtil.isEmpty(verifier))
{
Log.i(TAG, " verifier: " + verifier);
}
}
public String getVerifier(String html)
{
String ret = "" ;
String regEx = " 授权码:[0-9]{6} " ;
Pattern p = Pattern.compile(regEx);
Matcher m = p.matcher(html);
boolean result = m.find();
if (result)
{
ret = m.group( 0 ).substring( 4 );
}
return ret;
}
}
getVerifier()方法是通过正则表达式进行授权码的查找,该正则表达式是根据腾讯微博开放平台返回验证码的html源文件进行设置:
< head >
< meta http-equiv ="Content-Type" content ="text/html; charset=utf-8" >
< meta name ="viewport"
content ="minimum-scale=1.0, maximum-scale=1.0, initial-scale=1.0, width=device-width, user-scalable=no" >
< title ></ title >
< link href ="/style/oauth/mobel.css" rel ="stylesheet" type ="text/css" >
< style >
* {
TEXT-DECORATION : none ;
}
</ style >
< script type ="text/javascript" >
var step = 0 ;
var sub = 0 ;
function callback(){
}
function cl(){
sub = 0 ;
document.getElementById( ' errCode ' ).innerHTML = ' 你拒绝了授权此应用访问你的腾讯微博帐户,将不能使用此应用功能。 ' ;
document.getElementById( ' errCode ' ).style.display = ' block ' ;
var c = document.getElementById( ' conter ' );
var ql = document.getElementById( ' loginform ' );
c.removeChild(ql);
}
function changeimg(){
var i = document.getElementById( ' imgVerify ' );
i.src = " .jpg?d= " + step;
step ++ ;
/*
i.innerHTML = '';
window.setTimeout(function(){i.innerHTML = '<img id="imgVerify" width="130" height="53" src=".jpg" onclick="changeimg();" />';},200);
*/
}
function subForm(){
var u = document.getElementById( ' u ' );
var p = document.getElementById( ' p ' );
if (u.value != '' && p.value != '' ){
document.getElementById( ' login_btn ' ).disabled = true ;
} else {
return false ;
}
}
function subForm1(){
var u = document.getElementById( ' u ' );
var p = document.getElementById( ' p ' );
var v = document.getElementById( ' v ' );
if (u.value != '' && p.value != '' && v.value != '' ){
document.getElementById( ' login_btn ' ).disabled = true ;
} else {
return false ;
}
}
</ script >
</ head >
< body id ="body" >
< div id ="header" >
< a href ="http://open.t.qq.com" ></ a >
< p ></ p >
</ div >
< div id ="headerTxt" >
< h1 >
授权使用腾讯微博帐号
</ h1 >
< cite > 授权后 < span > Android开发 </ span > 将可访问并使用你的微博帐号 </ cite >
</ div >
< div id ="conter" >
< ul >
< li >
授权码:240547
</ li >
</ ul >
</ div >
< div id ="info" >
< p >
腾讯官方授权页面不允许第三方内嵌或伪造
</ p >
< p >
授权页面地址为http://open.t.qq.com开头。
</ p >
< p >
授权后,在第三方网站的活动应继续遵守《
< a
href ="http://ti.3g.qq.com/g/s?sid=AUV9TkhR9XziFokSOXQRypk1&r=252180&aid=pno"
target ="_blank" > 腾讯QQ用户服务条款 </ a > 》。
</ p >
</ div >
< div id ="footer" >
? 2011 Tencent Inc.
</ div >
< script type ="text/javascript" >
var g_btrace_zhibo = new Image( 1 , 1 );
var _u = ' http://btrace.qq.com/collect?ftime=1310183089&sIp=-1266685874&iQQ=0&sBiz=moauth&sOp=inter&iSta=0&iTy=424&iFlow=0&t=3&c=0&oa=1200b4a5a24f45509478a4a809d75495&r=7 ' ;
g_btrace_zhibo.src = _u;
</ script >
</ body >
</ head >
至此我们就完成了如何通过WebView控件获取验证码的方法,解决了上一节的缺陷。
课程下载地址:http://u.115.com/file/e60px8bk
文档下载地址:http://download.csdn.net/source/3437652
源码下载地址:http://u.115.com/file/aq2vc2re