VUE详细版
VUE
一、概述
vue特点:
- 渐进式框架:可以将Vue作为应用的一部分,带来更丰富的交互体验。如Core + Vue + router + Vuex
- 解耦视图
- 可复用的组件
- 前端路由技术
- 状态管理
- 虚拟DOM
二、VUE基础
{{message}}
1、vue实例的options对象
-
el
类型:string | HTMLElement , 挂载到元素
const app = new({
	el: '#app'
})
-
data
类型Object | Function (组件中必须是一个函数), Vue实例对应的数据
const app = new({
	el: '#app',
    data: {
        msg: 'hello',
        movies: ['fsd', 'dasd']
    }
})
-
methods
类型{[key:string]:Function} , 定义方法
const app = new({
	el: '#app',
    data: {
        msg: 'hello',
        movies: ['fsd', 'dasd']
    },
	methods: {
		add() {...}
		sub:function() {....}
}
})
-
computed
计算属性,使用: 需要将多个数据结合起来进行显示的时候
计算属性会进行缓存,多次使用的话只会计算一次
/* books: [
      {id: 101, name: "JS深入浅出", price: 90},
      {id: 102, name: "ES6深入浅出", price: 120},
      {id: 103, name: "Node深入浅出", price: 142},
      {id: 104, name: "C++深入浅出", price: 36},
   ]
*/

computed: {
   totalPrice:function () {
   let s =this.books.reduce((prev, cur) => {
          return prev + cur.price
    }, 0)
    return s
 }
}
// 显示
    {{totalPrice}}
computed存在setter和getter
一般来说不用set,因为我们要拿的是只读属性。
computed:function() {
	set:function(newValue) {
		...
	},
	get:function() {
		return this.firstName + ' ' + this.lastName
	}
}
-
filters
过滤器
/* filters:{
	 showPrice() {
		...
	}
} */
{{totalPrice | showPrice}}
2、vue指令
-
v-for
循环遍历数据
v-for=“(value,index)”

v-for=“(value,key,index)”
官方推荐, 使用v-for的时候, 加上一个 key属性
key的作用是为了高效的更新虚拟DOM
key要具有唯一性, 不然就没意义
{{index + 1}} - {{item}}
-
v-on
v-on:click=“ ”;绑定事件,简写:@click
若调用时想要获取event,则写为$event
v-on修饰符
| 修饰符 | 作用 | 实际调用 |
|---|---|---|
| .stop | 阻止事件冒泡 | event.stopPropagation() |
| .prevent | 阻止默认事件 | event.preventDefault() |
| {keyCode I keyAlias} | 监听某个键盘的键帽 | - |
| .native | 监听组件根元素的原生事件 | - |
| .once | 只触发一次回调 | - |
aaaa
-
v-once
后面不需要跟任何表达式
表示元素和组件只渲染一次, 不会随着数据的改变而变化
{{msg}}
-
v-html
后面往往跟一个string类型
会将string的html解析出来并渲染
// url: 'baidu'
-
v-text
与Mustache相似, 一般不用, 不灵活
-
v-pre
用于跳过这个元素和它子元素的编译过程, 用于显示原本的Mustache语法
-
v-cloak
在某些情况下, 我们浏览器可能会直接显示出未编译的Mustache标签
-
v-bind
作用: 动态绑定属性
![]()
语法糖简写::
:src 、 :href
动态绑定class:
- 对象语法
1.{{message}}
2. 实际开发中: /* data :{ active:'active' isActive:true } */ 3. /* getClass() { return {active: this.isActive} } */{{message}}
2)数组语法
1. <h2 v-bind:class="[类名1,类名2]">{{message}}</h2>
2.
/*  getClass() {
         return [this.isActive]
    }
    */
<h2 :class="getClass()">{{message}}</h2>
动态绑定style属性:
- 对象语法
-
v-if 、 v-else 、v-else-if
解决复用:使用key,并且key的值不一样
-
v-show
当条件为false的时
v-if: 指令的元素, 不会渲染到dom中
v-show: dom增加一个行内样式display: none -
v-model
绑定表单
v-model实现双向绑定的原理:v-bind绑定value属性和v-on绑定input事件
    {{message}}


cosnt app = new Vue({
    el: '#app',
    data: {
        message: '你好'
    }
})
v-model结合radio的使用
<div id="app">
    <label for="male">
        <inout type="radio" id="male" value="男" v-model="sex">男
    </label>
    <label for="male">
        <inout type="radio" id="female" value="女" v-model="sex">nv
    </label>
    <h2>您选择的性别是: {{sex}}</h2>
</div>

cosnt app = new Vue({
    el: '#app',
    data: {
        sex: '男'
    }
})
v-model结合checkbox的使用
- 单选框
const app = new Vue({
el: '#app',
data: {
isAgree: false
})
- 多选框
 篮球
 乒乓球
 羽毛球球
 足球

const app = new Vue({
        el: '#app',
        data: {
            hobbies: []
        })
v-model结合select使用
- 下拉框单选
v-model绑定的是一个值
当选中option中一个时, 会将它对应的value赋值到mySelect中
您最喜欢的水果: {{mySelect}}
- 下拉框多选
v-model绑定的是一个数组
当选择多个值时,会将选中的option对应的value添加到数组mySelect中
您最喜欢的水果: {{mySelect}}
值绑定(推荐)
含义: 动态的给value赋值
1 在前面的value中的值, 都是在定义input的时候直接给定的
2 但真实开发中, input的值可能是从网络获取或定义在data中的
3 可以通过v-bind:value动态的给value绑定值
const app = new Vue({
el: '#app',
data: {
originFruits: ["苹果", "香蕉", "橘子", "榴莲", "荔枝"],
checkFruits: []
})
修饰符
- lazy修饰符
前景: v-model默认是在input事件中实时同步输入框的数据的 (容易同步的过于频繁 )
作用: 可以让数据只有在失去焦点或回车时才会更新
- number修饰符
前景: 默认情况下, 在输入框中无论输入字母还是数字, 都会被当做字符串类型进行处理
作用: 当做数字类型进行处理
- trim修饰符
前景: 输入的内容首位容易有空格
作用: 可以过滤掉内容左右两边的空格
3.、MVVM
Model View View Model

M: Model 数据模型
数据层
数据可能是固定的思数据, 更多的是来自服务器, 从网络上请求下来的数据
V: View 视图模板
视觉层
在前端开发中, 通常是DOM层
作用: 是给用户展示各种信息
VM: View-Model 视图模型
视图模型层
是View和Model沟通的桥梁
一方面实现了Data Binding (数据绑定), 讲Model的改变实时的反应到View中
另一方面实现了DOM Listener (DOM监听), 当DOM发生一些时间 (点击, 滚动, touch等) 时, 可以监听到, 并在需要的情况下改变对应的Data
4、Vue的生命周期

5、插值操作-mustache语法
mustache语法可以进行运算
- Mustache语法 (双大括号)
- 可以直接写变量
- 可以写简单的表达式
{{firstName + ' ' + lastName}}
{{firstName}} {{lastName}}
{{counter * 2}}
三、组件化开发
组件的使用三步骤:
1. 创建组件构造器
调用Vue.extend( ) 方法
2. 注册组件(全局注册、局部注册)
Vue.component( ) 方法
Vue.component(‘组件标签名’,组件构造器)
3. 使用组件
在Vue实例的作用范围内使用
<组件名>
创建组件构造器时有语法糖:
Vue为了简化注册组件的过程, 提供了注册的语法塘, 省去了调用Vue.extend()的步骤. 而是可以直接使用一个对象来代替
// 全局组件
Vue.component('xxx', {
    template: '

        哈哈哈哈

    '
})

// 内部会自动调用Vue.extend()


// 局部组件
const app = new Vue({
    el: '#app',
    data: {
        meassage: '哈哈哈'
    },
    components: {
        'cpn': {
            template: '

                    哈哈哈哈

            '
        }
    }
})
全局组件和局部组件
- 全局组件(意味着可以在多个vue实例中使用)
上述代码
-
局部组件(用的最多)
在vue实例的options里面添加一个components
components: {
标签名:构造器名
}
const cpnC = Vue.extend({ template: `` }) const app = new Vue({ el: '#app', data: { }, components: { // cpn使用组件时的标签名, cpnC是组件构造器 cpn: cpnC } })Hello World
父与子组件
在父组件中注册组件并使用组件
const cpnC1 = Vue.extend({
        template: `

                我是标题
                我是内容,哈哈哈哈

        `
    })


const cpnC2 = Vue.extend({
        template: `

                我是标题2


                我是内容,呵呵呵呵

        `,

        components: {
            cpn1: cpnC1
        }
    })
父子组件的错误用法: 以子标签的形式在Vue实例中使用
- 因为当子组件注册到父组件的components时, Vue会编译好父组件的模块
- 该模块的内容已经决定了父组件将要渲染的HTML (相当于父组件中已经有子组件中的内容了)
父传子通信props
- 写法一:数组方式(不推荐)
        这是标题
        {{books1[0]}}


const cpn = Vue.extend({
        template: '#cpn1',
        props: ['books1']
    })

    const app = new Vue({
        el: '#app',
        data: {
            books:["钢铁是怎样炼成的", "朝花夕拾", "su"]
        },
        components: {
            cpn
        }
    })
- 写法二
    // 在使用组件的时候绑定
    // 不支持驼峰命名  cMovies要写成c-movies


        {{item}}
        {{cMessage}}


const cpn = {
    template: '#cpn',
    // 把数组里的当变量来看了
    props: {
        // 类型限制
        // cMovies: Array,
        // cMeesage: String,

        // 类型限制 + 提供一些默认值 or  required表示必传值,不然报错
        cMessage: {
            type: String,
            default: '哈',
            required: true
        },
        cMovies: {
            type: Array, // 对象or数组类型的时候, 默认值必须是个函数
            default() {
                return {}
            }
        }
    }
    data () {
        return {}
    }
}

const app = new Vue({
    el: '#app',
    data: {
        meassage: '哈哈哈',
        movies: ['哈喽', '嗨', '哟哟']
    },
    components: {
        cpn
    }
})
子传父自定义事件
this.$emit 发射事件
// 父组件模板
// 2.父组件监听一个事件
// 不能写驼峰
// 子组件模板
// 子组件
const cpn = {
template: '#cpn',
data() {
return {
categories: [
{id: 'aaaa', name: '热门推荐'},
{id: 'bbbb', name: '手机数码'},
{id: 'cccc', name: '家用家电'},
{id: 'dddd', name: '电脑办公'},
]
}
},
methods: {
btnClick(item) {
// 要把item传给父组件
// 1. 发送一个事件 (自定义事件)
// 会把item当成默认的传到父组件去
this.$emit('itemclick', item)
]
}
}
// 父组件
const app = new Vue({
el: '#app',
data: {
meassage: '哈哈哈'
},
components: {
cpn
},
methods: {
// 3. 父组件监听的事件
cpnClick(item) {
console.log('成功了', item);
}
}
父子组件通信-双向绑定
        {{number1}}

        {{dnumber1}}


const app = new Vue({
        el: '#app',
        data: {
            num1: 1,
            num2: 0
        },
        methods: {
            num1change(value) {
                this.num1 = parseInt(value)
            }
        },
        components: {
            cpn: {
                template: '#cpn',
                props: {
                    number1: Number,
                    number2: Number
                },
                data() {
                    return {
                        dnumber1: this.number1,
                        dnumber2: this.number2
                    }
                },
                methods: {
                    numqInput(event) {
                        this.dnumber1 = event.target.value
                        this.$emit('num1change', this.dnumber1)
                    }
                }
            }
        }
    })

可以通过watch监听,watch和data并列
watch(newValue, oldValue) {
    ...
}
父访问子
- $children: 拿所有子组件
- $refs: 拿指定的子组件
// 必须加一个 ref="名字"
子访问父
- $parent: 上一级父组件
- $root: 根组件
我是子组件
const app = new Vue({
el: '#app',
data: {
meassage: '哈哈哈'
},
components: {
cpn: {
template: "#cpn",
data() {
return {
name: '我是cpn的name'
}
},
conmponents: {
ccpn: {
template: '#ccpn',
btnClick() {
// 1. 访问父组件$parent
// 不建议这么写, 一层套一层 复用性太差
console.log(this.$parent);
console.log(this.$parent.name); // 我是cpn的name
// 2. 访问根组件 $root
console.log(this.$root.meassage); // 哈哈哈
}
}
}
}
}
})
插槽slot
组件的插槽为了让封装的组件更加具有扩展性。
抽取共性,保留不同。
基本使用
- 插槽的基本使用
- 插槽的默认值 button 按钮
- 如果有多个值同时放入到组件进行替换时, 一起作为替换元素
    这是替换的内容呀


        第一个元素
        第二个元素


        这个是标题
        这个是内容

        默认值元素


const app = new Vue({
    el: '#app',
    data: {
        meassage: '哈哈哈'
    },
    components: {
        cpn: {
            template: '#cpn'
        }
    }
})
具名插槽
在多个插槽的情况下, 替换制定插槽的内容
    sususu


       我是组件
        left
        center
        right
作用域插槽
父组件替换插槽的标签,但是内容由子组件来提供。
需求:
1. 子组件中包括一组数据, num: ['1', '2', '3', '4', '5']
2. 需要在多个界面展示
某些界面是以水平方向展示
某些界面是以列表形式展示
某些界面直接展示一个数组
3. 内容在子组件, 希望父组件告诉我们如何展示, 怎么办?
利用slot作用域插槽就行了
// 2. 获取子组件中的num
// 根据之前的起名来取 如 slot.aaa
{{item}}
// 1. slot定义 'data'可以随便起名 如 :aaa="num"
- {{item}}
const app = new Vue({
el: '#app',
data: {
message: '哈哈哈'
},
components: {
cpn: {
template: '#cpn',
data() {
return {
num: ['1', '2', '3', '4', '5']
}
}
}
}
})
四、模块化
常见的模块化规范:CommonJS、AMD、CMD、ES6里的Modules
CommonJS:
   // 导出
   module.exports = {
       flag: true,
       test(a, b) {
           return a + b
       }
   }
   // 导入
   let {flag, test} = require('./aaa.js')
   let _ma = require('./aaa.js')
   let flage = _ma.flag
ES6模块化:
export 和 import
注意:script标签内需要设置属性
// 导出
<script type="Module">
    let flag = true
	function sum(num1, num2) {
        return num1 + num2
    }
	// 方式一
    export {flag, sum}
    // 方式二
    export let height = 1.88
    // 方式三
    export function  sum(num1, num2) {
       return num1 + num2
    }
	// export defaule(只能有一个,导入者自己命名)
	const address = '北京市'
    export address
    // 此时的导入
    import add from '../add.js'
</script>

// 导入
<script>
    import {flag} from './aaa.js'
	// 统一全部导入
	import * as aaa from './aaa.js'
</script>
五、webpack
概述
webpack是一个静态模块化打包工具。
webpack依赖于node.js,node自带了软件包管理工具。
和grunt/glup对比
grunt/glup核心是task, 如果工程模块化简单,则使用进行简单的合并、压缩。
grunt/gulp更强调的是前端流程的自动化,模块化不是它的核心。
webpack更加强调模块化开发管理,而文件压缩合并、预处理等功能,是他附带的功能。
webpack安装
node版本:10.13.0
-
webpack全局安装和卸载
webpak安装:npm install [email protected] -g
webpack卸载:npm uninstall webpack -g
-
webpack局部安装
npm install webpack@3.6.0 --save-dev
–save-dev 是开发时依赖,项目打包后不需要继续使用。
webpack使用
webpack ./src/main.js ./dist/bundle.js
- 创建文件目录,src 和 dist,打包后的文件放在dist文件夹内
- 使用模块化导入导出,最后的html文件只需要引入dist文件夹内打包好的就可。
webpack配置
- 创建webpack.config.js文件
// 为了动态获取打包后的路径, path 在node包里面 -- 看下面一段代码 装包
const path = require('path')

moudle.exports = {
    // 入口和出口
    entry: './src/main.js',
    output: {
        // path:动态获取路径
        path: path.resolve(__dirname, 'dist'),
        filename: 'bundle.js'
    }
}
- node包
// 初始化--生成
npm init

// 生成的文件可能有中文 / 符号  可以改名
meetwebpack

... 后面全部回车, 一路通过. OK就行
... 生成 package.json文件

// package.json文件里面也有依赖的文件
![]()
![]()
- package.json文件
"version" -- 版本号
// 本地安装webpack (之前是全局安装) -- 开发时依赖 运行时依赖
npm install webpack@3.6.0 --save-dev
// 开发时依赖 (本地安装webpack后, 重新打开package.json文件会出现)
"devDependencies": {
"webpack": "^3.6.0"
}
// 使用vue之后, 会有 (运行时依赖)
"dependencise": {
"webpack": "^3.6.0"
}
---
// 执行脚本的配置
"scripts": {
"test": '',
"build": "webpack"
}
npm run test
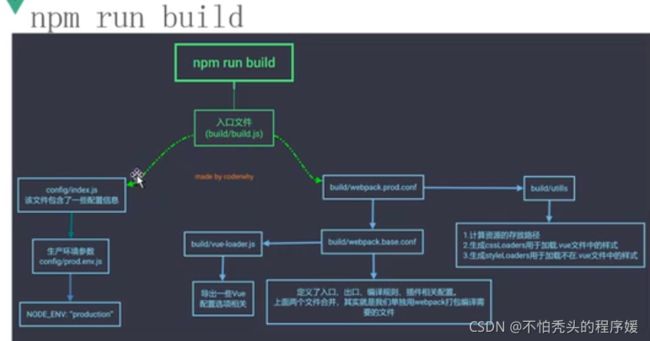
npm run build // 执行本地的webpack
CSS Less Img ES6转Es5 Vue 处理
loader使用过程:
- 使用npm安装
- 在webpack.config.js中的module关键字下进行配置
-
CSS的loader
main.js
// 1. 使用commonjs的模块化规范
const {add, mul} = require('./js/mathUtils.js')

// 2. 使用ES6的模块化的规范
import {name, age} from "./js/info"

// 3. 依赖CSS文件
require('./css/normal.css')
终端安装css-loader
npm install css-loader@2.0.2 --save-dev
webpack.config.js
const path = require('path')

module.exports = {
    // 入口和出口
    entry: './src/main.js',
    output: {
        // path:动态获取路径
        path: path.resolve(__dirname, 'dist'),
        filename: 'bundle.js'
    },
    // 添加如下内容
    module: {
        rules: [
            {
                test: /\.css$/,
                // css-loader只复制加载不负责解析
                use: [ 'css-loader' ]
            }
        ]
    }
}
然后再次打包!发现还是没有背景,因为css-loader只复制加载不负责解析
再次去官方安装style-loader
npm install style-loader@0.23.1 --save-dev
然后在刚才添加的module里面添加
    module: {
        rules: [
            {
                test: /\.css$/,
                // style-loader负责将样式添加到DOM中
                // 这里添加,使用多个loader时,是从右向左
                use: [ 'style-loader','css-loader' ]
            }
        ]
    }
-
less文件处理
main.js
// 1. 使用commonjs的模块化规范
const {add, mul} = require('./js/mathUtils.js')

// 2. 使用ES6的模块化的规范
import {name, age} from "./js/info"

// 3. 依赖CSS文件
require('./css/normal.css')

// 4. 依赖less文件
require('./css/special.less')
终端安装less-loader
npm install --save-dev less-loader@4.1.0 less@3.9.0
webpack.config.js
    module: {
        rules: [
            {
                test: /\.css$/,
                use: [ 'style-loader','css-loader' ]
            },
            // 添加如下内容
            {
                test: /\.less$/,
                use: [{
                    loader: "style-loader" // creates style nodes from JS strings
                }, {
                    loader: "css-loader" // translates CSS into CommonJS
                }, {
                    loader: "less-loader" // compiles Less to CSS
                }]
            }
        ]
    }
-
图片文件处理
安装url-loader
npm install --save-dev url-loader@1.1.2
webpack.config.js
    output: {
        // path:动态获取路径
        path: path.resolve(__dirname, 'dist'),
        filename: 'bundle.js',
        // 文件打包好以后从哪里找
        publicPath: 'dist/'
    },

rules: [
            {
                test: /\.(png|jpg|gif|jpeg)$/,
                use: [
                    {
                        loader: 'url-loader',
                        options: {
                            // 当加载的图片小于limit时,会将图片编译成base64字符串形式
                            // 当加载的图片大于limit时,需要安装file-loader模块进行加载
                            limit: 8186   // (图片小于8kb)
                        }
                    }
                ]
            }
        ]
安装file-loader
npm install file-loader@3.0.1 --save-dev
修改文件名
为防止重复:img/name.hash:8.ext (8为hash值),在webpack.config.js中添加如下内容。
    options: {
     // 当加载的图片小于limit时,会将图片编译成base64字符串形式
     // 当加载的图片大于limit时,需要安装file-loader模块进行加载
             limit: 12000,
              name: 'img/[name].[hash:8].[ext]'
     },
-
ES6语法处理
使用babel对应的loader
npm install --save-dev babel-loader@7.1.5 babel-core@6.26.3 babel-preset-es2015@6.24.1
webpack.config.js
   {
                test: /\.js$/,
                // exclude: 排除
                // include:包含
                exclude: /(node_modules|bower_components)/,
                use: {
                    loader: 'babel-loader',
                    options: {
                        presets: ['es2015']
                    }
                }
            }
配置vue
安装运行依赖
npm install vue --save
main.js
import Vue from 'vue'
new Vue({
     el: '#app',
     data:{
         message: 'Hello World'
     }
 })
vue两个版本:
runtime-only :代码中不允许出现template
runtime-compiler:可以有template,因为有compiler可以编译解析
如果报这种错误:

第一种版本解决方案:
在webpack.config.js配置如下代码
module.exports = {
    resolve: {
        // alias:别名
        alias: {
            'vue$': 'vue/dist/vue.esm.js'
        }
    }
vue最终使用方案
抽离页面:
main.js
import App from './vue/App.vue'
new Vue({
el: '#app',
template: 'App.vue
这里是vue
{{message}}
然后
- 安装vue-loader 和 vue-template-compiler
npm install vue-loader@15.4.2 vue-template-compiler@2.5.21 --save-dev
- 配置webapck.config.js
module.exports = {
    module: {
        rules: [
            {
                test: /\.vue$/,
                use: ['vue-loader']
            }
        ]
    }
}
- 由于vue-loader的14版本以上需要安装plugin所以,我们去package.json中把vue-loader改成@13.0.0版本,然后运行
npm install
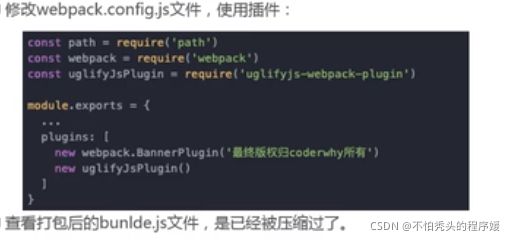
六、webpack-plugin
loader:转换某些类型的模块,是一个转换器。
plugin:插件,是webpack本身的扩展,是一个扩展器。
使用过程:
- 通过npm安装需要使用的plugins
- 在webpack.config.js中的plugins中配置插件
- 添加版权的plugin
const webpack = require('webpack')


moudule.exports = {
    ...
   plugins: [
        new webpack.BannerPlugin('最终版权归汪汪所有')
    ]
}
- 打包HTML的plugin
发布时需要将index.html打包到dist文件夹下----HtmlWebpackPlugin
它可以自动生成index.html文件,也可以将打包的js文件,自动通过script标签插入到body中。
- 安装HtmlWebpackPlugin插件
npm install html-webpack-plugin@3.2.0 --save-dev
- 修改webpack.config.js内的内容
const htmlWebpackPlugin = require('html-webpack-plugin')

pluginsL [
    new htmlWebpackPlugin({
        template: 'index.html'
    })
]
此外需要删除之前在output中添加的publicPath属性,将根目录下的index.html文件改成只有div,


- js压缩的plugin
uglifyjs-webpack-plugin插件
- 安装插件
npm install uglifyjs-webpack-plugin@1.1.1 --save-dev
- 修改webpack.config.js的配置
const uglifyWebpackPlugin = require('uglifyjs-webpack-plugin')

    plugins: [
        new uglifyWebpackPlugin()
    ]
- dev-server 的搭建
-
安装
npm install --save-dev webpack-dev-serve@2.9.1
devserver选项本身属性:
- contentBase:为哪个文件夹提供服务,默认是根文件夹
- port:端口号
- inline:页面实时刷新
- historyApiFallback:在SPA页面中,依赖HTML5的history模式
-
配置webpack.config.js
// 修改webpack.config.js文件
module.exports = {
    ...
    devServer: {
        contentBase: './dist',
        inline: true
    }
}

// package.json文件中再配置一个scripts,  open参数表示直接打开浏览器
"scripts": {
    ...
    "dev": "webpack-dev-server --open"
}
- webpack配置文件的分离
很多配置开发时需要, 发布时不需要,反之一样, 所以要做分离
- 在build文件夹中, 建立一个base.config.js文件 --> 公共配置
- 在build文件夹中, 建立一个dev.config.js文件 --> 开发配置
- 在build文件夹中, 建立一个prod.config.js文件 --> 发布配置
- 复制webpack.config.js文件内容 -> 上面三个文件
- 按照区分 --> 进行文件夹内配置的删除
- 装一个插件
npm install webpack-merge --save-dev
详情见:https://www.bilibili.com/video/av59594689?p=89 (9m)
七、Vue-cli

CLI 是(Command-Line Interface) 命令行界面, 俗称脚手架
Vue CLI是官方发布的vue.js项目脚手架, 可以快速搭建vue开发环境以及webpack配置
Vue CLI 使用前提 - 安装node 安装webpack
Vue-cli的使用
vue --version 查看vue版本
npm uninstall @vue/cli -g 卸载
npm install -g @vue/cli 安装
// 安装Vue脚手架
npm install -g @vue/cli

// 上面安装的是Vue CLI3.0版本, 想要按照Vue CLI2的方式初始化项目时需要进行下列的命令
// 拉取2.x模板
// 'vue init' 的运行效果将会跟 '[email protected]' 相同
npm install -g @vue/cli-init

// Vue CLI2初始化项目  project -> 项目名称 英文
vue init webpack my-project

// Vue CLI3初始化项目 project -> 项目名称 英文
vue create my-project
vue-cli 2
// 创建Vue CLI2项目
vue init webpack vuecli2

? Project name vuecli2 --> 项目名字
? Project description test vue cli2 --> 项目描述
? Author  huqinxue --> 作者
? Vue build --> 详解看下面一段
? Install vue-router? (Y/n)  Y
? Use ESlint to lint your code? (Y/n) Y
  ? Pick an ESLint preset --> 选择ESlint的规范 Standard
? Set up unit tests (Y/n)  --> 单元测试
? Setup e2e tests with Nightwatch? (Y/n)  --> 端对端测试
? Yes, use NPM
  Yes, use Yarn
目录结构解析

runtime-compiler和runtime-only的区别?

- runtime-compiler的过程:
template -》ast(抽象语法树)-》render -》虚拟DOM -》真实DOM
- runtime-only的过程:(性能更高)
render -》vDOM -》真实DOM
尽量使用runtime-complier
rebder函数的使用 (runtiome-only)

-- 使用方式一:
return createElement('标签', '相关数据对象, 可不传', ['内容数组'])

new Vue({
    el: "#app",
    render: (createElement) => {
        //render函数基本使用
        return createElement('div', {class: 'box'}, ['codewhy'])
        //嵌套render函数
        return createElement('div', {class: 'box'}, ['codewhy', createElement('h2', ['标题啊'])])
    }
})

-- 使用方式二: 传入一个组件对象
const cpn = Vue.component('cpn', {
    template: '我是cpn组件',
    data () {
        return {

        }
    }
})

new Vue({
    el: "#app",
    render: (createElement) => {
        return createElement(cpn)
    }
})
.vue中的文件里的template是被谁处理的?
答:被vue-template-compiler解析成了render函数。
vue-cli 3


vue-cli 3 和 vue-cli 2的区别
3 是基于 webpack 4 打造,2还是 webapck 3
3 的设计原则是“0配置”,移除的配置文件根目录下的,build和config等目录
3 提供了 vue ui 命令,提供了可视化配置,更加人性化
移除了static文件夹,新增了public文件夹,并且index.html移动到public中
// 创建vue-cli 3
vue create my-project

? Please pick a preset:
> default (babel, eslint)
> Manually select features //手动选择功能
defalut路线:
// 用哪个下载依赖
Pick the package manager to use when installing dependencies:
  Use Yarn
> Use NPM

Vue CLI v3.0.0-alpha.5
✨  reating project in E:\git\note\my-project. // 创建项目
�  Initializing git repository... // 初始化git库
⚙  Installing CLI plugins. This might take a while... // 安装脚手架插件

其实这个过程中还会判断你对npm/yarn源的连接速度,询问你是否切换至淘宝镜像
Your connection to the the default npm registry seems to be slow.
Use https://registry.npm.taobao.org for faster installation?

完成之后我们可以看到除node_modules之外的目录结构变成了
│  package-lock.json
│  package.json
├─public
│      favicon.ico
│      index.html
└─src
    │  App.vue
    │  main.js
    ├─assets
    │      logo.png
    └─components
            HelloWorld.vue
Manually select feature路线
? Check the features needed for your project: (Press <space> to select, <a> to toggle all, <i> to invert selection)
>( ) TypeScript
 ( ) Progressive Web App (PWA) Support
 ( ) Router
 ( ) Vuex
 ( ) CSS Pre-processors
 ( ) Linter / Formatter --> ESLint
 ( ) Unit Testing
 ( ) E2E Testing

PS: 空格选中/反选 回车确认

看到可以自由组合现在所需的功能了。
创建的过程中会询问配置文件保存位置是config.js还是package.json,但是其中也是一些简单的配置

// 这些配置文件存放方式
? Where do you prefer placing config for Bable, PostCSS, ESLint, etc,> (Use arrow keys)
> In dedicated config files  --> 单独存放到一个文件
  In package.json

// 刚刚自定义的配置是否需要保存一个模板 (下次会在创建后出现)
// 可以删除的, 在.vuerc文件里
// 文件后面有rc (run command 运行终端的意思)
? Save this as a preset for future projects? (Y/n)
...

// 用哪个下载依赖
Pick the package manager to use when installing dependencies:
  Use Yarn
> Use NPM
脚手架会默认创建git文件,里面是创建项目的全部。
八、vue-router
路由:通过互联的网络把信息从源地址传输到目的地址的活动。
路由器提供了两种机制: 路由和转送
- 路由是决定数据包从来源到目的地的路径
- 转送将输入端的数据转移到合适的输出端
路由中有一个非常重要的概念叫路由表
- 路由表本质上就是一个映射表, 决定了数据包的指向
- 映射表:【内网ip1:电脑MAC地址;…】
什么是前端渲染,什么是后端渲染?
答:后端渲染:服务端渲染;后端路由:处理URL和页面之间的映射关系;
前端渲染:浏览器中显示的网页中的大部分内容,都是由前端写的js代码在浏览器中执行,最终渲染出来的网页。
后端路由 + 前端路由
后端路由
服务器直接生产渲染好对应的HTML页面,返回给客户端进行展示。
缺点:HTML和数据逻辑混乱,编写和维护都很难。

前后端分离阶段
ajax的出现。
后端只提供API来返回数据,不负责任何阶段的内容。

优势:后端专注于数据,前端专注于交互和可视化。
前端路由
SPA页面(simple page application)
整个网页只有一个html页面

综合总结面试
综合总结提问
-
什么是前端渲染, 什么是后端渲染?
前端渲染:
指的是后端返回JSON数据,前端利用预先写的html模板,循环读取JSON数据,拼接字符串(es6的模板字符串特性大大减少了拼接字符串的的成本),并插入页面。
-
好处:网络传输数据量小。不占用服务端运算资源(解析模板),模板在前端(很有可能仅部分在前端),改结构变交互都前端自己来了,改完自己调就行。
-
坏处:前端耗时较多,对前端工作人员水平要求相对较高。前端代码较多,因为部分以前在后台处理的交互逻辑交给了前端处理。占用少部分客户端运算资源用于解析模板。
后端渲染:
前端请求,后端用后台模板引擎直接生成html,前端接受到数据之后,直接插入页面。
-
好处:前端耗时少,即减少了首屏时间,模板统一在后端。前端(相对)省事,不占用客户端运算资源(解析模板)
-
坏处:占用服务器资源。
前端渲染与后端渲染对比:
后端渲染:
页面呈现速度:快,受限于用户的带宽
流量消耗:少一点点(可以省去前端框架部分的代码)
可维护性:差(前后端东西放一起,掐架多年,早就在闹分手啦)
seo友好度:好
编码效率:低(这个跟不同的团队不同,可能不对)
前端渲染:
页面呈现速度:主要受限于带宽和客户端机器的好坏,优化的好,可以逐步动态展开内容,感觉上会更快一点
流量消耗:多一点点(一个前端框架大概50KB)当然,有的用后端渲染的项目前端部分也有在用框架
可维护性:好,前后端分离,各施其职,代码一目明了。
SEO友好度:差,大量使用ajax,多数浏览器不能抓取ajax数据。
编码效率:高,前后端各自只做自己擅长的东西,后端最后只输出接口,不用管页面呈现,只要前后端人员能力不错,效率不会低
-
什么是前后端分离
现在 Web 服务器不再处理任何业务,它接收到请求后,经过转换,发送给各个相关后端服务器,将各个后端服务器返回的,处理过的业务数据填入 HTML 模板,最后发送给浏览器。Web 服务器和后端服务器间,可以选用任何你觉得合适的通信手段,可以是 REST,可以是 RPC,选用什么样的通信手段,这是另一个议题了。
这样,前端人员和后端人员约定好接口后,前端人员彻底不用再关心业务处理是怎么回事,他只需要把界面做好就可以了,后端人员也不用再关系前端界面是什么样的,他只需要做好业务逻辑处理即可。服务的切离,代码管理,服务部署也都独立出来分别管理,系统的灵活性也获得了极大的提升。
注意,这不是个微服务架构,那是另外一个议题了
总结,任何系统架构设计,实际上是对组织结构在系统上进行映射,前后端分离,就是在对前端开发人员和后端开发人员的工作进行解耦,尽量减少他她们之间的交流成本,帮助他她们更能专注于自己擅长的工作。
最后是几个常见误解的说明:
前后端分离是说浏览器和后端服务分离吗?
不是,前后端分离里的前端不是浏览器,指的是生成 HTML 的那个服务,它可以是一个仅仅生成 HTML 的 Web 服务器,也可以是在浏览器中通过 JS 动态生成 HTML 的 单页应用。实践中,有实力的团队往往在实现前后端分离里时,前端选用 node 服务器,后端选用 C#、Java 等(排名不分先后)
前后端分离是种技术吗?
不是,前后端分离是种架构模式,或者说是最佳实践。所谓模式就是大家这么用了觉得不错,你可以直接抄来用的固定套路。
前后端分离是最佳实践吗?
看你团队和项目的情况,如果是短平快的小项目,真的没必要。如果是面向简历开发,那绝对在任何时候都应该使用前后端分离这种架构。
-
什么是前端路由, 什么是后端路由?
A. 什么是前端路由?
很重要的一点是页面不刷新,前端路由就是把不同路由对应不同的内容或页面的任务交给前端来做,每跳转到不同的URL都是使用前端的锚点路由. 随着(SPA)单页应用的不断普及,前后端开发分离,目前项目基本都使用前端路由,在项目使用期间页面不会重新加载
B. 什么是后端路由?
浏览器在地址栏中切换不同的url时,每次都向后台服务器发出请求,服务器响应请求,在后台拼接html文件传给前端显示, 返回不同的页面, 意味着浏览器会刷新页面,网速慢的话说不定屏幕全白再有新内容。后端路由的另外一个极大的问题就是 前后端不分离。
优点:分担了前端的压力,html和数据的拼接都是由服务器完成。
缺点:当项目十分庞大时,加大了服务器端的压力,同时在浏览器端不能输入制定的url路径进行指定模块的访问。另外一个就是如果当前网速过慢,那将会延迟页面的加载,对用户体验不是很友好。
C. 什么时候使用前端路由?
在单页面应用,大部分页面结构不变,只改变部分内容的使用
D. 前端路由有什么优点和缺点?
优点:
用户体验好,和后台网速没有关系,不需要每次都从服务器全部获取,快速展现给用户
可以再浏览器中输入指定想要访问的url路径地址。
实现了前后端的分离,方便开发。有很多框架都带有路由功能模块
缺点:
使用浏览器的前进,后退键的时候会重新发送请求,没有合理地利用缓存
单页面无法记住之前滚动的位置,无法在前进,后退的时候记住滚动的位置
ulr的hash和H5的history
location.hash监听URL,而且页面不刷新!
history.pushState({},‘’,‘home’) 类似于栈结构。
history.back()
history.forward()前进
history.replaceState({},’’,‘home’) 这个没有历史记录!
history.go(-1/-2/1/2)弹出一个,然后跳转到弹出后的位置。
安装和使用vue-router
安装:
npm install vue-router --save
导入:
- 导入路由对象,并且调用Vue.use(VueRouter)
- 创建路由实例,并且传入路由映射配置
- 在Vue实例中挂载创建的路由实例
使用:
- 创建路由组件
在src文件夹中创建router文件夹
在router文件夹中创建index.js文件

-- index.js  配置路由相关的信息
// 导入路由对
import Vue from ‘vue’
import VueRouter from ‘vue-router’

// 2. 通过Vue.use(插件)安装插件
Vue.use(VueRouter)

// 3. 创建路由实例--> VueRouter对象
// 3.2 把router抽象出来
const routes = [
]

const app = new VueRouter({
    // 3.1 配置路由和组件之间的映射配置
    router
})

// 4. 将router对象传入到Vue实例
export defualt router

-- main.js 文件
// 导入router
import router from './router'

// 挂载
new Vue({
    el: '#app',
    router,
    render: h => h(App)
})
- 配置路由映射:组件和路径映射关系
const routes = [
  {
    path: '/home',
    component: Home
  },
  {
    path: '/about',
    component: About
  }
]
- 使用路由:通过和
  <div id="app">
    <router-view></router-view>
    <router-link to="/home">首页</router-link>
     <router-link to="/about">关于</router-link>
  </div>
设置路由默认路径
const rutes = [
    {
        path: '',
        redircet: '/home'
    }
]
使用H5的history
在路由实例里面加上mode: ‘history’
const router = new VueRouter({
  // 配置路由和组件之间的应用关系
  routes,
  mode: 'history'
})
router-link的属性
- to属性
<router-link to="/home">router-link>
- tag属性
<router-link tag="button">router-link>
- replace属性。相当于history的replaceState
<router-link replace>router-link>
- active-class属性。为其重命名class
<router-link active-class="active">router-link>
如果统一重命名class则可以去路由实例里面:
const router = new VueRouter({
  // 配置路由和组件之间的应用关系
  routes,
  mode: 'history',
  linkActiveClass: 'active'
})
通过代码路由跳转
- this.$router.push()
- this.$router.replace()
    <button @click="homeBtn">首页</button>
    <button @click="aboutBtn">关于</button>
    <router-view></router-view>
    homeBtn() {
      // vue-router源码里的
      this.$router.push('/home')
    },
    aboutBtn() {
      this.$router.push('/about')
    }
动态路由
url后面跟某些路径:例:/home/userId
index.js
const outes = [
    {
        path: '/user/:abc',
        component: User
    }
]
app.vue
   <router-link v-bind:to="'/user/'+userId">用户router-link>

export default = {
  data() {
    return {
      userId: 'zs'
    }
}
如果想要拿到id,user.vue里面内容
<h1>{{userId}}</h1>

export default = {
   computed: {
        userId() {
          return this.$route.params.abc
        }
}
路由懒加载
vue打包后的文件

懒加载:用到时才加载。
路由懒加载:将不同的路由对应的组件分割成不同的代码块,当路由访问时才加载对应的组件。这样更加高效。
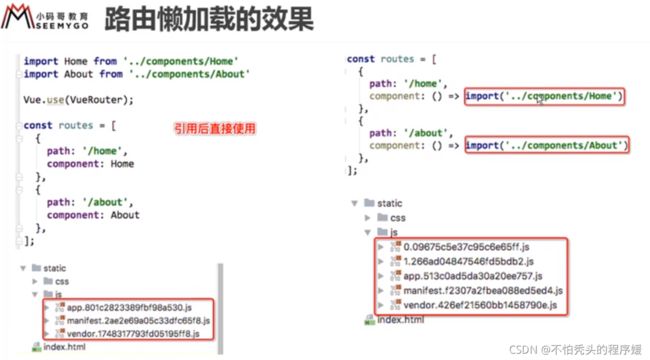
懒加载方式:

index.js
1. 把之前导入的组件删了
2. 用变量接收
const Home = () => import('../components/Home')
const About = () => import('../components/About')
const User = () => import('../components/User')
3. 配置路由映射
const routes = [
  {
    path: '',
    // 重定向
    redirect: '/home'
  },
  {
    path: '/home',
    component: Home
  },
  {
    path: '/about',
    component: About
  },
  {
    path: '/user/:abc',
    component: User
  }
]

// 也可以这样写
const routes = [
  {
    path: '',
    // 重定向
    redirect: '/home'
  },
  {
    path: '/home',
    component: () => import('../components/Home')
  },
  {
    path: '/about',
    component: () => import('../components/About')
  },
  {
    path: '/user/:abc',
    component: () => import('../components/User')
  }
]
这样懒加载后的文档截图:

嵌套路由
比如在home页面中,我们希望通过 /home/news 和 /home/message 访问一些内容。
一个路径映射一个组件,访问这两个路径也会分别渲染两个组件。
路径与组件的关系:
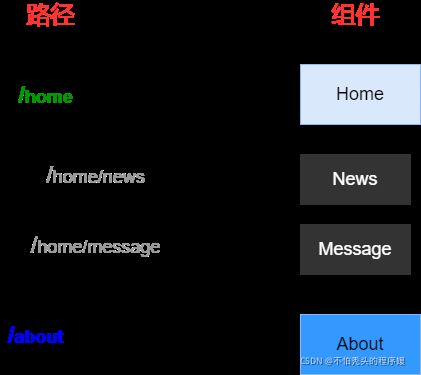
实现嵌套路由:
- 创建对应的子组件,并且在路由映射中配置子组件
- 在组件内部使用标签
1. 新建组件
2. 去路由index.js里面导入并配置
const HomeNews = () => import('../components/HomeNews')
const HomeMessage = () => import('../components/HomeMessage')

const routes = [
  {
    path: '/home',
    component: Home,
    children: [
      {
        path: '',
        redirect: 'news'
      },
      {
        path: 'news',
        component: HomeNews
      },
      {
        path: 'message',
        component: HomeMessage
      }
    ]
  }
]

3. 去home组件内使用
<template>
  <div>
    <h2>我是首页</h2>
    <p>我是首页内容,哈哈哈</p>
    <router-link to="/home/news">新闻</router-link>
    <router-link to="/home/message">信息</router-link>
    <router-view></router-view>
  </div>
</template>
传递参数
传递参数主要有两种方式:params和query
URL:协议://主机:端口/路径?查询(query)
params类型
- 配置路由:/router/:id
- 传递方式:在path后面跟上对应的值
- 传递后形成的路径:/router/123,/router/abc
1. router-link方式
    <router-link v-bind:to="'/user/'+userId">用户</router-link>

2. 代码跳转
    <button @click="userBtn">用户</button>
    userBtn() {
      this.$router.push('/user/' + this.userId)
    }
3. 取URL后面的值
this.$route.params.userId
query类型
-
配置路由:/router,也就是普通配置
-
传递方式:对象中使用query的key作为传递方式
-
传递后形成的路径:/router?id=123,/router?id=abc
1. router-link 方式
<router-link :to="{path: '/profile',query: {name: 'zs',age: 16, height: 1.88}}">档案</router-link>

2. 代码跳转
<button @click="profileBtn">我的</button>
    profileBtn() {
      this.$router.push({
        path: '/profile',
        query: {
          name: 'zs',
          age: 18,
          height: 1.88
        }
      })

3. 取URL值
this.$route.query.name
$route 和 $router 的区别
$route为VueRouter实例,想要导航到不同URL,则使用$router.push方法
$route为当前router跳转对象里面可以获取name、path、query、params等
路由导航守卫
为什么使用导航守卫?
我们来考虑一个需求: 在一个SPA应用中, 如何改变网页的标题呢?
- 网页标题是通过
- 可以通过JS来修改
更好的办法-使用导航守卫.
vue-router提供的导航守卫主要用来监听监听路由的进入和离开的.
vue-router提供了beforeEach和afterEach的钩子函数, 它们会在路由即将改变前和改变后触发.
导航守卫使用
我们可以利用beforeEach来完成标题的修改.
首先, 我们可以在钩子当中定义一些标题, 可以利用meta来定义
其次, 利用导航守卫,修改我们的标题.
- 全局守卫
前置守卫(guard)
router.beforeRach((to, from, next) => {
    ...... next()
})
// to:即将进入的目标的路由对象
// from:当前导航即将要离开的路由对象
// next:调用该方法后,才能进入下一个钩子
// 这里的next函数不可以省略

后置钩子(hook)
router.afterEach((to, from) => {

})
// 无需主动调用next函数
// 1. 必须在路由配置里面添加数据,meta里面
const routes = [
  {
    path: '',
    // 重定向
    redirect: '/home'
  },
  {
    path: '/home',
    component: Home,
    children: [
      {
        path: '',
        redirect: 'news'
      },
      {
        path: 'news',
        component: HomeNews
      },
      {
        path: 'message',
        component: HomeMessage
      }
    ],
    meta: {
      title: '首页'
    }
  },
  {
    path: '/about',
    component: About,
    meta: {
      title: '关于'
    }
  },
  {
    path: '/user/:abc',
    component: User,
    meta: {
      title: '用户'
    }
  },
  {
    path: '/profile',
    component: Profile,
    meta: {
      title: '我的'
    }
  }
]

// 2. 使用路由导航守卫
router.beforeEach((to, from, next) => {
  document.title = to.matched[0].meta.title
  next()
})
- 路由独享守卫
const rutes = [
    {
        path: '/about',
        component: About,
        meta: {
          title: '关于'
        },
        beforeEnter: (to, from, next) => {
          console.log('about beforeEnter');
          next()
        }
    }

]
- 组件内守卫
keep-alive
- router-view也是一个组件,如果直接被包在keep-alive里面,所有路径匹配到的视图组件都会被缓存。
- keep-alive是Vue内置的组件,可以使被包含的组件保留状态。
keep-alive的属性:
- include - 字符串或正则表达式,只有匹配的组件会被缓存
- exclude - 字符串或正则表达式,任何匹配的组件都不会被缓存
// 这里的Profile是export modeule里面name的值
<keep-alive exclude="Proflie">
      <router-view></router-view>
</keep-alive>
作用:进入组件不会频繁被创建,离开组件不会被频繁销毁。
<keep-alive>
    <router-view>
        // 所有路径匹配到的视图组件都会被缓存
    router-view>
keep-alive>
页面切换回来保留原来状态
actived和disactived只能在keep-active中使用
 data() {
    return {
      path: '/home/news'
    }
  },
  activated() {
    this.$router.push(this.path)
  },
  beforeRouteLeave(to, from, next) {
    this.path = this.$route.path
    next()
  }
路径配置问题
图片等静态资源引用路径,如果修改太麻烦了. 可以统一做配置.
-- build 文件夹 - webpack.base.config.js文件

resolve: {
    extensions: ['.js', '.vue', '.json'],
    alias: {
        '@': resolve('src'),
        'assets': resolve('src/assets'),
        'components': resolve('src/components'),
        'views': resolve('src/views')
    }
}

使用:
import xxx from './components/xxx'
-->
import xxx from 'components/xxx'

<img src="../../assets/img/xxx.jpg">
-->
<img src="~assets/img/xxx.jpg">
九、TabBar
见CSDN
十、VueX
是Vue应用程序开发的状态管理模式。
采用集中式存储管理应用的所有组件的状态。
状态管理模式:多个组件共享的变量全部存储在一个对象里面,将这个对象放在顶层Vue实例,让其他组件可以使用。
VueX是响应式的。
管理什么状态?
需要在多个页面共享的状态。比如用户状态、地理位置、头像、商品收藏、购物车中的物品等
多页面的状态管理

- 安装VueX:
npm install vuex --save
- 新建一个文件夹store,创建index.js
index.js
import Vue from 'vue'
import Vuex from 'vuex'

// 1. 安装插件
Vue.use(Vuex)

// 2. 创建对象
const store = new Vuex.Store({
  // 保存状态
  state: { },
  mutations: { },
  actions: { },
  getters: { },
  modules: { }
})

// 3. 导出store共享
export default store

// 4. 去main.js里面导入并挂载

// 5. 挂载后会给Vue.prototype.$store = store
main.js
import Vue from 'vue'
import App from './App'
import store from "./store";
Vue.config.productionTip = false
/* eslint-disable no-new */
new Vue({
el: '#app',
store,
components: { App },
template: '- 使用
<h2>{{$store.state.counter}}</h2>
Vuex核心:
- State
- Getters
- Mutation
- Action
- Moudule

vuex的state
单一状态树(单一数据源),保存状态相关信息
const store = new Vuex.Store({
  // 保存状态
  state: {
  	counter: 0
  },
  mutations: { },
  actions: { },
  getters: { },
  modules: { }
})
使用值
<h2>{{$store.state.counter}}h2>
vuex的mutations
定义一些方法修改state里面的状态。vuex的store状态更新唯一方式。
Mutations包括两部分:
- 字符串的事件类型(type)
- 回调函数,回调函数的参数第一个参数state,第二个参数为传递过来的参数(payload)
const store = new Vuex.Store({
  state: {
      counter: 100
  },
  mutations: {
      // 事件类型:increment,回调函数参数state
    increment(state) {
      state.counter++
    },
    incrementCount(state, count) {
      state.counter += count
    },
  }
})
使用
this.$store.commit(‘方法名’)
this.$store.commit('increment')
this.$store.commit('increment', 15)
提交风格:
- 上述代码都是commit普通提交风格
- type类型提交
this.$store.commit({
    type: 'increment',
    // 这里的count传递的是整个对象
    count: 值
})
Mutations的响应规则:
Vuex的store中的state是响应式的, 当state中的数据发生改变时, Vue组件会自动更新.
必须遵守一些Vuex对应的规则:
- 提前在store中初始化好所需的属性.
- 当给state中的对象添加新属性时, 使用下面的方式:
- 方式一: 使用
Vue.set(要修改的对象, 索引值, 修改后的值) - 方式二: 用心对象给旧对象重新赋值
- 方式一: 使用
响应式原理:
添加到state里的属性会被添加至响应式系统中,而响应式系统会监听属性的变化,当属性发生变化时,会通知所有界面中用到这些属性的地方,让界面发生刷新。
updateInfo(state) {
      // 添加属性:Vue.set(要修改的对象, 索引值, 修改后的值)
      Vue.set(state.info, 'address', 'China')
      // 删除属性做不到响应式
      // delete state.info.age
      // 删除的话使用Vue.delete
      Vue.delete(state.info, 'age')
  }
Mutations常量类型 - 概念
考虑下面的问题
- 在mutation中, 我们定义了很多事件类型(也就是其中的方法名称).
当我们的项目增大时, Vuex管理的状态越来越多, 需要更新状态的情况越来越多, 那么意味着Mutation中的方法越来越多. - 方法过多, 使用者需要花费大量的经历去记住这些方法, 甚至是多个文件间来回切换, 查看方法名称, 甚至如果不是复制的时候, 可能还会出现写错的情况
如何避免上述的问题
在各种Flux实现中, 一种很常见的方案就是使用常量替代Mutation事件的类型.我们可以将这些常量放在一个单独的文件中, 方便管理以及让整个app所有的事件类型一目了然.
具体怎么做
我们可以创建一个文件: mutation-types.js, 并且在其中定义我们的常量.
定义常量时, 我们可以使用ES2015中的风格, 使用一个常量来作为函数的名称.
// 新建一个文件 mutation-types.js
export const UPDATE_INFO = 'UPDATE_INFO'
// index.js 内容
import * as type from './mutation-types'

Vue.use(Vuex)

const store = new Vuxe.Store({
    state: {
        info: {
            name: 'qiuqiu', age: 18
        }
    },
    mutations: {
        [UPDATE_INFO] (state, payload) {
            state.info = {...state.info, 'sex': payload.sex}
        }
    }
})
// App.vue内容
import {UPDATE_INFO} from './mutation-types'

export default {
    name: 'App',
    methods: {
        this.$store.commit(UPDATE_INFO, {sex: '女'});
    }
}
Mutations必须是同步函数原因:devtools将不能更好的追踪数据的变化。
vuex的Getter
数据经过某种变换显示的,类似于计算属性
getter的使用三种形式:
- 普通形式,只有一个参数state
const store = new Vuex.Store({
  state: {
    student: [
      {id: 110, name: 'why', age: 18},
      {id: 111, name: 'Janes', age: 22},
      {id: 112, name: 'corder', age: 30},
      {id: 113, name: 'su', age: 55}
    ]
  },
  getters: {
    filterAge(state) {
      return state.student.filter(value => value.age > 20)
    }
})
- 两个参数,第一个state,第二个Getters本身
filterAgeLength(state, getters) {
      return getters.filterAge.length
  }
- 传入一个自定义参数,需要通过return函数获取参数
    moreAges(state) {
      return age => {
        return state.student.filter(value => value.age > age)
      }
    }
使用
<p>{{$store.getters.filterAge}}p>
// 若有自定义参数则是
<p>{{$store.getters.moreAges(8)}}p>
vuex的Action
类似于Mutation,但是是用来代替Mutation进行异步操作的。
Action基本操作
const store = new Vuex.Store({
    state: {
        count: 0
    },
    mutations: {
        addCount (state) {
            state.count++
        }
    },
    actions: {
        // 默认参数 context 上下文,这里的context代表了store
        // 所用数据修改都要在mutations中, 所以在actions中异步后, 也要去mutations中修改
        // 在mutations中修改, 才能被devtools监控到
        addCount (context) {
            context.commit('addCount');
        }
    }
})
调用
// 调用actions中的方法, 使用的是 dispatch
this.$store.dispatch('addCount');
Action返回Promise
  actions: {
    // context: 上下文,这里的context则相当于store
    aUpdateInfo(context, payload) {
      return new Promise(((resolve, reject) => {
        setTimeout(() => {
          // 这里修改state数据必须要通过Mutation,所以需要去调用Mutation
          context.commit('updateInfo')
          console.log(payload);
          resolve('data success')
        }, 1000)
      }))
    }
  }
    updateInfo() {
      this.$store
        .dispatch('aUpdateInfo', 'data')
        .then(res => {
          console.log(res);
        })
    }
vuex的Moudule
划分模块,针对不同模块进行不同的操作然后保存。
const moduleA = {
  state: { ... },
  mutations: { ... },
  getters: { ... },
  actions: { ... }
}
const moduleB = {
  state: { ... },
  mutations: { ... },
  getters: { ... },
  actions: { ... }
}

const store = new Vuex.store({
  modules: {
    a: moduleA,
    b: moduleB
  }
})
- 子模块里的store
const moduleA = {
  state: {
    name: 'zs'
  }
}

// 使用
<h2>{{$store.state.a.name}}</h2>
- 子模块里的mutations
const moduleA = {
  state: {
    name: 'zs'
  },
  mutations: {
    updateName(state, payload) {
       // 会先从store里面找,找不到就去模块里面
      state.name = payload
    }
  }
}
updateName() {
     this.$store.commit('updateName', 'su')
}
- 子模块里的getters,这里可以有三个参数(state, getters, rootState)
 getters: {
    fullName(state) {
      return state.name + '111'
    },
    fullName2(state, getters) {
      return getters.fullName + '222'
    },
    fullName3(state, getters, rootState) {
      return getters.fullName2 + rootState.counter
    }
  }
<h2>{{$store.getters.fullName}}</h2>
<h2>{{$store.getters.fullName2}}</h2>
<h2>{{$store.getters.fullName3}}</h2>
- 子模块里的actions
  actions: {
    aUpdateName(context) {
      setTimeout(() => {
        context.commit('updateName', 'wangwu')
      }, 1000)
    },

     // context参数完整写法,上述用了ES6的对象解构
    aUpdateName({state, commit, payload})
  }
    aUpdateName() {
      this.$store.dispatch('aUpdateName')
    }
项目解构
components文件夹
store文件夹
  - index.js        -> 组装模块并导出 store的文件
  - actions.js      -> 根级别的 actions
  - mutations.js    -> 根级别的 mutations
  - modules
      - aaaa.js     -> a模块
      - bbbb.js     -> b模块
十一、axios
JSONP
在前端开发中, 我们一种常见的网络请求方式就是JSONP
使用JSONP最主要的原因往往是为了解决跨域访问的问题.
JSONP的原理是什么呢?
JSONP的核心在于通过script标签的src来帮助我们请求数据.
原因是我们的项目部署在domain1.com服务器上时, 是不能直接访问domain2.com服务器上的资料的.
这个时候, 我们利用script标签的src帮助我们去服务器请求到数据, 将数据当做一个javascript的函数来执行, 并且执行的过程中传入我们需要的json.
所以, 封装jsonp的核心就在于我们监听window上的jsonp进行回调时的名称.
JSONP封装
let count = 1;
export default function originPJSONP (option) {
    // 1. 从传入的option中提取URL
    const url = option.url;

    // 2. 在body中添加script标签
    const body = document.getElementsByTagName('body')[0];
    const script = document.createElement('script);

    // 3. 内部生成一个不重复的callback
    const callback = 'jsonp' + count++

    // 4. 监听window上的jsonp调用
    return new Promise((resolve, reject) => {
        try {
            window[callback] = function (result) {
                body.removeChild(script);
                resolve(result);
            }
            const params = handleParam(option.data);
            script.src = url + '?callback=' + callback + params;
            body.appendChild(script);
        } catch (e) {
            body.removeChild(script);
            reject(e);
        }
    })
}
funciton handleParam (data) {
    let url = '';
    for (let key in data) {
        let value = data[key] !== undefinded ? data[key] :
        url += '&${key}=${encodeURIComponent(value)}'
    }
    return url
}
axios的特点
- 能够发送XMLHttpRequests请求
- 在node.js中发送http请求
- 支持Promise API
- 拦截请求和响应
- 转换请求和响应数据
axios的使用
支持多种请求方式:
- axios(config)
- axios.request(config)
- axios.get(url, [config])
- axios.delete(url, [config])
- axios.head(url, [ config])
- axios.post(url, [data, [config]])
- axios.put(url, [data, [config]])
- axios.patch(url, [ data, [ config]])
-
安装axios依赖
npm install axios --save
-
axios的基本使用
// main.js里面引入axios
import axios from "axios";

// 直接在main.js使用
axios({
  url: 'http://123.207.32.32:8000/home/multidata',
  method: 'GET'
}).then(res => {
  console.log(res.data.data);
})

axios({
  // 等同于:http://123.207.32.32:8000/home/data?type=pop&page=1
  url: 'http://123.207.32.32:8000/home/data',
  params: {
    type: 'pop',
    page: 1
  },
  method: 'GET'
}).then(res => {
  console.log(res);
})
axios发送并发请求
axios.all,可以放入多个请求的数组。
axios.all可以将数组[res1, res2]展开为res1,res2
// 并发请求
axios.all([axios(), axios()]).then(res => {

})
例子:
axios.all([axios({
  url: 'http://123.207.32.32:8000/home/multidata'
}), axios({
  url: 'http://123.207.32.32:8000/home/data',
  params: {
    type: 'pop',
    page: 1
  }
})]).then(res => {
  console.log(res[0]);
  console.log(res[1]);
})
// 或者
.then(axios.spread((res1, res2) => {
  console.log(res1);
}))
axios全局配置
axios.defaults.baseURL = '123.207.32.32:8000'
axios.defaults.headers.post['Content-Type'] = 'application/x-www-form-urlencoded'
axios.defaults.timeout = 5000
[外链图片转存失败,源站可能有防盗链机制,建议将图片保存下来直接上传(img-6f6ThREL-1630630927178)(C:\Users\HeJingWang\AppData\Roaming\Typora\typora-user-images\image-20210822214839397.png)]
axios的实例和模块封装
实例
// 创建对应的axios实例
const instance1 = axios.create({
  baseURL: 'http://123.207.32.32:8000',
  timeout: 5000
})
instance1({
  url: '/home/multidata'
}).then(res => {
  console.log(res);
})
instance1({
  url: '/home/data',
  params: {
    type: 'pop',
    page: 1
  }
}).then(res => {
  console.log(res);
})

const instance2 = axios.create({
  baseURL: '',
  timeout: 1000
  // headers: {}
})
在使用第三方框架的时候一定不可以有太强的依赖,最好进行封装。
封装
1. 创建一个新的文件夹network
2. 新建一个request.js
3. request.js内容(封装好的组件)

import axios from "axios";
export function request (config) {
    // 1. 创建axios的实例
    const instance = axios.create({
        baseURL: 'http://111.222.33.44',
        timeout: 5000
    })
    // 2. 发送真正的网络请求
    // 返回的 instancel(config)就是一个promise
    return instancel(config)
}

4. 使用
request({
  url: '/home/multidata'
}).then(res => {
  console.log(res);
}).catch(err => {
  console.log(err);
})
axios拦截器
axios提供了拦截器,用于我们在发送每次请求或者得到相应后,进行对应的处理
export function request (config) {
    // 1. 创建axios的实例
    const instance = axios.create({
        baseURL: 'http://111.222.33.44',
        timeout: 5000
    })

    // 2. axios拦截器
    // config可以随便命名
    instance.interceptiors.request.use(config => {
        // 不返回, 调用的时候会进入err
        return config
    }, err => {      // 发送都没成功
        console.log(err);
    })

    // 3. 发送真正的网络请求
    return instancel(config)
}
拦截器中做什么
- 请求成功
- 过滤一些信息
- 每次请求后, 会展示loding图标
- 某些网络请求(登录的token), 必须携带某一些特殊的信息
- 响应拦截
instance.interceptors.resques.use(res => {
    return config
}, err => {
    console.log(err);
})
补充知识
1.使用匿名函数解决变量重命名问题
2.Promise
Promise是异步编程的一种解决方案。
链式编程。
什么情况下用到promise?
当有异步操作的时候。
promise的三种状态
- pending:等待状态
- resolved / fulled:满足状态。当我们主动回调了resolve时,就处于该状态,并且会回调.then()
- rejected:拒绝状态。当我们主动回调了resolve时,就处于该状态,并且会回调.catch()
写法1
new Promise(((resolve, reject) => {
    setTimeout(() => {
        resolve('Hello')
        // reject('Error')
    }, 1000)
})).then((data) => {
    console.log(data)
}).catch((err) => console.log(err))
写法2
new Promise(((resolve, reject) => {
    setTimeout(() => {
        resolve('Hello')
        reject('Error')
    }, 1000)
    // .then(函数1,函数2)
})).then(data => {
    console.log(data);
}, err => {
    console.log(err);
} )
Promise的链式调用
通过Promise包装一下新的数据,并将Promise对象返回。
- return new Promise形式
- Promise.resolve()/ Promise.reject()
- 直接 return 数据
// 一. 完整写法使用new Promise
new Promise((resolve, reject) => {})
new Promise((resolve, reject) => {
    setTimeout(() => {
        resolve('aaa')
    }, 1000)
}).then(res => {
    // 1. 自己处理10行
    console.log(res, '第一层10行伪代码');

    // 2. 对结果处理
    return new Promise(resolve => {
        resolve(res + '111')
    })
}).then(res => {
    console.log(res, '第二层处理的伪代码')

    return new Promise((resolve, reject) => {
        resolve(res + '222')
    })
}).then(res => {
    console.log(res, '第三层的处理伪代码')
})

// 二.使用Promise.resolve()或Promise.reject()
new Promise((resolve, reject) => {
    setTimeout(() => {
        resolve('aaa')
    }, 1000)
}).then(res => {
    // 1. 自己处理10行
    console.log(res, '第一层10行伪代码');

    // 2. 对结果处理
    return Promise.reject(res + '111')
}).then(res => {
    console.log(res, '第二层处理的伪代码')

    return Promise.resolve(res + '222')
}).then(res => {
    console.log(res, '第三层的处理伪代码')
}).catch(err => {
    console.log(err);
})

// 三.省略掉Promise.resolve()
new Promise((resolve, reject) => {
    setTimeout(() => {
        resolve('aaa')
    }, 1000)
}).then(res => {
    // 1. 自己处理10行
    console.log(res, '第一层10行伪代码');

    // 2. 对结果处理
    throw '111'
    // return res + '111
}).then(res => {
    console.log(res, '第二层处理的伪代码')

    return res + '222'
}).then(res => {
    console.log(res, '第三层的处理伪代码')
}).catch(err => {
    console.log(err)
})
Promise.all
Promise.all([ ])
// 例1
Promise.all([
    new Promise((resolve, reject) => {
        $ajax({
            url: 'url1',
            success: data => {
                resolve(data)
            }
        })
    }),
    new Promise((resolve, reject) => {
        $ajax({
            url: 'url2',
            success: data => {
                resolve(data)
            }
        })
    })
]).then(res => {
    console.log(res[0]);
    console.log(res[1]);
})

// 例2
Promise.all([
    new Promise((resolve, reject) => {
        setTimeout(() => {
            resolve('resulte1')
        }, 1000)
    }),
    new Promise((resolve, reject) => {
        setTimeout(() => {
            resolve('result2')
        }, 1000)
    })
]).then(res => {
    console.log(res);
})
3.对象解构
const obj = {
    name: 'why',
    age: 18,
    height: 1.88
}
const {name, age, height} = obj;
4.数组解构
const names = ['why', 'so', 'ha']
const [name1, name2, name3] = names
``
拦截器中做什么
- 请求成功
- 过滤一些信息
- 每次请求后, 会展示loding图标
- 某些网络请求(登录的token), 必须携带某一些特殊的信息
- 响应拦截
instance.interceptors.resques.use(res => {
    return config
}, err => {
    console.log(err);
})