Seata客户端源码分析
1. Seata的客户端启动流程
- 自动加载各种Bean及配置信息
- 初始化TM
- 初始化RM(具体服务)
- 初始化分布式事务客户端完成,代理数据源
- 连接TC(Seata服务端),注册RM,注册TM
- 开启全局事务
- 执行业务方法
- 提交或回滚全局事务
2. 基于SpringBoot自动装配
-
GlobalTransactionAutoConfiguration自动装配类
所以我们直接通过官方案例引入的Seata包,找到SpringBoot项目在启动的时候自动扫描加载类型的spring.factories,然后找到GlobalTransactionAutoConfiguration(Seata自动配置类)
# Auto Configure
org.springframework.boot.autoconfigure.EnableAutoConfiguration=io.seata.spring.boot.autoconfigure.SeataAutoConfiguration
public class SeataAutoConfiguration {
    ...

    //GlobalTransactionScanner处理全局事务或全局锁
    @Bean
    @DependsOn({BEAN_NAME_SPRING_APPLICATION_CONTEXT_PROVIDER, BEAN_NAME_FAILURE_HANDLER})
    @ConditionalOnMissingBean(GlobalTransactionScanner.class)
    public GlobalTransactionScanner globalTransactionScanner(SeataProperties seataProperties, FailureHandler failureHandler) {
        if (LOGGER.isInfoEnabled()) {
            LOGGER.info("Automatically configure Seata");
        }
        return new GlobalTransactionScanner(seataProperties.getApplicationId(), seataProperties.getTxServiceGroup(), failureHandler);
    }
    ...
}
-
GlobalTransactionScanner在装配类中注入
该类会为有Seata注解的Bean加入AOP增强的支持,如TccActionInterceptor;GlobalTransactionalInterceptor,全局事务拦截器
该类继承自AbstractAutoProxyCreator,从而获得了AOP增强Bean的能力
在方法Object wrapIfNecessary(Object bean, String beanName, Object cacheKey) 中根据Seata的注解来增强了带有Seta注解的Bean,从而后续如果调用相关方法时,就会去调动GlobalTransactionalInterceptor的invoke方法。
3. 2PC核心逻辑
-
GlobalTransactionalInterceptor类中处理全局事务
执行到GlobalTransactionalInterceptor.invoke方法
// GlobalTransactionalInterceptor.java
@Override
public Object invoke(final MethodInvocation methodInvocation) throws Throwable {
    ...
    //获取全局事务注解
    final GlobalTransactional globalTransactionalAnnotation =
          getAnnotation(method, targetClass, GlobalTransactional.class);
    //获取全局锁注解
    final GlobalLock globalLockAnnotation = getAnnotation(method, targetClass, GlobalLock.class);
    ...
    if (globalTransactionalAnnotation != null) {
        // 在全局分布式事务逻辑下执行业务方法
        return handleGlobalTransaction(methodInvocation, globalTransactionalAnnotation);
    } else if (globalLockAnnotation != null) {
        // 在全局锁逻辑下执行业务方法
        return handleGlobalLock(methodInvocation);
    }
    ...
    return methodInvocation.proceed();
}
然后会调用handleGlobalTransaction方法来处理全局事务,从代码看来使用了模板方法模式,将部分通用逻辑移动到了模板类中
// GlobalTransactionalInterceptor.java
private Object handleGlobalTransaction(final MethodInvocation methodInvocation,
    final GlobalTransactional globalTrxAnno) throws Throwable {
    try {
        return transactionalTemplate.execute(new TransactionalExecutor() {
            @Override
            public Object execute() throws Throwable {
                //执行业务方法
                return methodInvocation.proceed();
            }
            ...
            // 解析GlobalTransactional注解属性,封装为对象
            @Override
            public TransactionInfo getTransactionInfo() {
                TransactionInfo transactionInfo = new TransactionInfo();
                //省略代码创建了全局事务名,超时时间,重试间隔等全局事务需要数据
                ...
                return transactionInfo;
            }
        });
    } catch (TransactionalExecutor.ExecutionException e) {
        // 执行二阶段各种回滚逻辑
    }
    ...
}
//TransactionalTemplate.java
public Object execute(TransactionalExecutor business) throws Throwable {
    // 1 获取事务信息
    TransactionInfo txInfo = business.getTransactionInfo();
    ...
    // 1.1 获取或创建全局事务
    GlobalTransaction tx = GlobalTransactionContext.getCurrentOrCreate();
    // 1.2 根据配置的不同事务传播行为,执行不同的逻辑
    Propagation propagation = txInfo.getPropagation();
    SuspendedResourcesHolder suspendedResourcesHolder = null;
    try {
        ...
        // 事务传播行为逻辑处理
        try {
            // 2. 开始分布式事务
            beginTransaction(txInfo, tx);
            Object rs = null;
            try {
                // 执行业务方法
                rs = business.execute();
            } catch (Throwable ex) {
                // 3.发生异常全局回滚,各个数据通过undo_log表进行事务补偿.
                completeTransactionAfterThrowing(txInfo, tx, ex);
                throw ex;
            }
            // 4. 全局提交事务.
            commitTransaction(tx);
            return rs;
        } finally {
            //5. 释放相关所有资源
        }
    }
    ...
}
在模板类中有如下逻辑

1. 获取全局事务信息
    1. 获取或创建全局事务,获得XID
    2. 根据配置的不同事务传播行为,执行不同的逻辑
1. 开始分布式事务
2. 发生异常全局回滚,各个数据通过undo_log表进行事务补偿.
3. 全局提交事务.
4. 释放相关所有资源

    其中开启分布式事务步骤是发起全局事务的核心逻辑
// TransactionalTemplate.java
private void beginTransaction(TransactionInfo txInfo, GlobalTransaction tx) throws TransactionalExecutor.ExecutionException {
    try {
        triggerBeforeBegin();
        // 向TC发起请求,创建全局事务
        tx.begin(txInfo.getTimeOut(), txInfo.getName());
        triggerAfterBegin();
    } catch (TransactionException txe) {
        throw new TransactionalExecutor.ExecutionException(tx, txe,
                                                           TransactionalExecutor.Code.BeginFailure);
    }
}
//begin方法AT模式是DefaultGlobalTransaction的实现

//DefaultGlobalTransaction.java
@Override
public void begin(int timeout, String name) throws TransactionException {
    //判断调用者是否是TM,不是TM不能发起请求
    if (role != GlobalTransactionRole.Launcher) {
        return;
    }
    // 获取全局事务XID,这里会用Netty和Seata-Server请求创建
    xid = transactionManager.begin(null, null, name, timeout);
    status = GlobalStatus.Begin;
    // 为分布式事务请求绑定上全局事务ID
    RootContext.bind(xid);
    ...
}

//下面来看,transactionManager.begin方法
//DefaultTransactionManager.java
@Override
public String begin(String applicationId, String transactionServiceGroup, String name, int timeout)
    throws TransactionException {
    GlobalBeginRequest request = new GlobalBeginRequest();
    request.setTransactionName(name);
    request.setTimeout(timeout);
    //发送创建全局事务的请求
    GlobalBeginResponse response = (GlobalBeginResponse) syncCall(request);
    if (response.getResultCode() == ResultCode.Failed) {
        throw new TmTransactionException(TransactionExceptionCode.BeginFailed, response.getMsg());
    }
    return response.getXid();
}
private AbstractTransactionResponse syncCall(AbstractTransactionRequest request) throws TransactionException {
    try {
        // 通过Netty发送各种和事务相关的请求
        return (AbstractTransactionResponse) TmNettyRemotingClient.getInstance().sendSyncRequest(request);
    } catch (TimeoutException toe) {
        throw new TmTransactionException(TransactionExceptionCode.IO, "RPC timeout", toe);
    }
}
在beginTransaction(向TC发起请求,创建全局事务)中,有如下流程

1. 判断调用者是否是TM,不是TM不能发起请求
2. 获取全局事务XID,这里会用Netty和Seata-Server请求创建
    1. 发送创建全局事务的请求
    2. 通过Netty发送各种和事务相关的请求
1. 为分布式事务请求绑定上全局事务ID
4. Seata数据源代理
4.1 如何使用了代理数据源对象
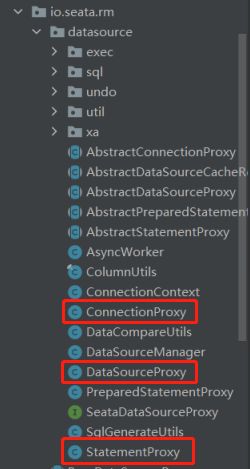
因为分布式事务是要建立在本地数据源操作之上的,所以为了使用者方便使用,Seata对本地数据源进行代理,对于使用者来说还是使用的DataSource对象,跟原始对象使用没啥区别。通过代理对象也实现了Seata分布式事务的逻辑。
而对于Seata来说,操作数据源的业务方法执行的同时还需要准备undo_log数据,资源锁等, 这些操作都是在代理数据源中完成的,Seata为了实现这些功能,还对Connection,Statement等做了代理的封装。
在自动装配类 SeataAutoConfiguration 中,还有数据源代理对象的注入
public class SeataAutoConfiguration {
    ...
    //数据源代理
    @Bean(BEAN_NAME_SEATA_AUTO_DATA_SOURCE_PROXY_CREATOR)
    @ConditionalOnProperty(prefix = StarterConstants.SEATA_PREFIX, name = {"enableAutoDataSourceProxy", "enable-auto-data-source-proxy"}, havingValue = "true", matchIfMissing = true)
    @ConditionalOnMissingBean(SeataAutoDataSourceProxyCreator.class)
    public SeataAutoDataSourceProxyCreator seataAutoDataSourceProxyCreator(SeataProperties seataProperties) {
        return new SeataAutoDataSourceProxyCreator(seataProperties.isUseJdkProxy(),seataProperties.getExcludesForAutoProxying());
    }
}
public class SeataAutoDataSourceProxyCreator extends AbstractAutoProxyCreator {
    ...
    private final String[] excludes;
    private final Advisor advisor = new DefaultIntroductionAdvisor(new SeataAutoDataSourceProxyAdvice());

    public SeataAutoDataSourceProxyCreator(boolean useJdkProxy, String[] excludes) {
        this.excludes = excludes;
        setProxyTargetClass(!useJdkProxy);
    }

    @Override
    protected Object[] getAdvicesAndAdvisorsForBean(Class beanClass, String beanName, TargetSource customTargetSource) throws BeansException {
        ...
        return new Object[]{advisor};
    }

    @Override
    protected boolean shouldSkip(Class beanClass, String beanName) {
        //对DataSource对象进行代理,支持配置排除
        return SeataProxy.class.isAssignableFrom(beanClass) ||
            !DataSource.class.isAssignableFrom(beanClass) ||
            Arrays.asList(excludes).contains(beanClass.getName());
    }
}
通过SeataAutoDataSourceProxyCreator的注入后,将会通过SeataAutoDataSourceProxyAdvice来处理对数据源的调用方法的增强逻辑
在类中对方法的调用时,把原数据源对象替换成了代理数据源对象
public class SeataAutoDataSourceProxyAdvice implements MethodInterceptor, IntroductionInfo {

    @Override
    public Object invoke(MethodInvocation invocation) throws Throwable {
        //获取原数据源,然后用原数据源创建数据源代理对象。
        DataSourceProxy dataSourceProxy = DataSourceProxyHolder.get().putDataSource((DataSource) invocation.getThis());
        Method method = invocation.getMethod();
        Object[] args = invocation.getArguments();
        Method m = BeanUtils.findDeclaredMethod(DataSourceProxy.class, method.getName(), method.getParameterTypes());
        if (m != null) {
            //调用时用数据源代理对象调用
            return m.invoke(dataSourceProxy, args);
        } else {
            return invocation.proceed();
        }
    }

    @Override
    public Class[] getInterfaces() {
        return new Class[]{SeataProxy.class};
    }

}
该类DataSourceProxyHolder中,对每一个数据源都会用一个唯一的代理对象。 如果没有就新建。
public class DataSourceProxyHolder {
    private static final int MAP_INITIAL_CAPACITY = 8;
    private ConcurrentHashMap dataSourceProxyMap;
    private DataSourceProxyHolder() {
        dataSourceProxyMap = new ConcurrentHashMap<>(MAP_INITIAL_CAPACITY);
    }
    //单例模式
    private static class Holder {
        private static final DataSourceProxyHolder INSTANCE;
        static {
            INSTANCE = new DataSourceProxyHolder();
        }
    }
    public static DataSourceProxyHolder get() {
        return Holder.INSTANCE;
    }
    //根据数据源创建代理数据源,如果没有对应的,就根据数据源创建一个新的
    public DataSourceProxy putDataSource(DataSource dataSource) {
        return this.dataSourceProxyMap.computeIfAbsent(dataSource, DataSourceProxy::new);
    }
    //根据数据源返回代理数据源
    public DataSourceProxy getDataSourceProxy(DataSource dataSource) {
        return this.dataSourceProxyMap.get(dataSource);
    }
}
注意:这里的DataSourceProxy 指的是AT模式的数据源,Seata并没有对XA做数据源代理,所以如果需要使用XA模式,需要关闭代理数据源,然后自己代码实现代理数据源。
seata.enable-auto-data-source-proxy=false
@Configuration
public class SeataDataSourceConfig {

    @Resource
    private DataSourceProperties dataSourceProperties;

    @Bean
    public DataSource dataSource() {
        DruidDataSource druidDataSource = createDruidDataSource();
        //这里可以实现动态切换数据源为XA还是AT模式,只需要返回不同的代理即可
        return new DataSourceProxyXA(druidDataSource);
        //AT 模式下的数据源代理
        //return new DataSourceProxy(druidDataSource);
    }

    private DruidDataSource createDruidDataSource() {
        DruidDataSource druidDataSource = new DruidDataSource();
        druidDataSource.setUrl(dataSourceProperties.getUrl());
        druidDataSource.setUsername(dataSourceProperties.getUsername());
        druidDataSource.setPassword(dataSourceProperties.getPassword());
        druidDataSource.setDriverClassName(dataSourceProperties.getDriverClassName());
        druidDataSource.setMaxActive(180);
        druidDataSource.setMaxWait(60000);
        druidDataSource.setMinIdle(0);
        druidDataSource.setValidationQuery("SELECT 1 FROM DUAL");
        druidDataSource.setTestOnBorrow(false);
        druidDataSource.setTestOnReturn(false);
        druidDataSource.setTestWhileIdle(true);
        druidDataSource.setTimeBetweenEvictionRunsMillis(60000);
        druidDataSource.setMinEvictableIdleTimeMillis(25200000);
        druidDataSource.setRemoveAbandoned(true);
        druidDataSource.setRemoveAbandonedTimeout(1800);
        druidDataSource.setLogAbandoned(true);
        return druidDataSource;
    }

    @Bean
    public SqlSessionFactory sqlSessionFactory(DataSource dataSource,
                                               @Value("${mybatis.mapper-locations}")
                                                       String mapperLocations) throws Exception {
        SqlSessionFactoryBean factoryBean = new SqlSessionFactoryBean();
        factoryBean.setDataSource(dataSource);
        factoryBean.setMapperLocations(new PathMatchingResourcePatternResolver()
                .getResources(mapperLocations));
        return factoryBean.getObject();
    }
}
也可以参考我的文章的SeataXA模式章节介绍
[我来 wolai - 不仅仅是未来的云端协作平台与个人笔记](我来 wolai - 不仅仅是未来的云端协作平台与个人笔记)
4.2 DataSourceProxy源码解析
我们知道在AT模式里面,会自动记录undo log、资源锁定等等,都是通过ConnectionProxy完成的。那ConnectionProxy则是有DataSourceProxy来创建的,源码如下:
public class DataSourceProxy extends AbstractDataSourceProxy implements Resource {
  ...
  @Override
  public ConnectionProxy getConnection() throws SQLException {
      Connection targetConnection = targetDataSource.getConnection();
      return new ConnectionProxy(this, targetConnection);
  }

  @Override
  public ConnectionProxy getConnection(String username, String password) throws SQLException {
      Connection targetConnection = targetDataSource.getConnection(username, password);
      return new ConnectionProxy(this, targetConnection);
  }
  ...
}
在ConnectionProxy对PreparedStatement和Statement进行代理。 所以最终执行会进入到PreparedStatementProxy和StatementProxy中,具体要参考AbstractConnectionProxy,ConnectionProxy继承自AbstractConnectionProxy的
// AbstractConnectionProxy.java
@Override
public Statement createStatement() throws SQLException {
    //调用真实连接对象获得Statement对象
    Statement targetStatement = getTargetConnection().createStatement();
    //创建Statement的代理
    return new StatementProxy(this, targetStatement);
}

@Override
public PreparedStatement prepareStatement(String sql) throws SQLException {
    ...
    // 创建PreparedStatementProxy代理
    return new PreparedStatementProxy(this, targetPreparedStatement, sql);
}
从PreparedStatementProxy和StatementProxy中都可以看出,在业务SQL发生时,都会调用ExecuteTemplate.execute来执行,所以这是一个关键方法
// StatementProxy.java
@Override
public ResultSet executeQuery(String sql) throws SQLException {
    this.targetSQL = sql;
    return ExecuteTemplate.execute(this, (statement, args) -> statement.executeQuery((String) args[0]), sql);
}
...

// PreparedStatementProxy.java
@Override
public int executeUpdate() throws SQLException {
    return ExecuteTemplate.execute(this, (statement, args) -> statement.executeUpdate());
}
ExecuteTemplate.execute方法解析
public class ExecuteTemplate {
    ...
    public static  T execute(List sqlRecognizers,
                                                     StatementProxy statementProxy,
                                                     StatementCallback statementCallback,
                                                     Object... args) throws SQLException {
        // 如果没有全局锁,并且不是AT模式,直接执行SQL
        if (!RootContext.requireGlobalLock() && BranchType.AT != RootContext.getBranchType()) {
            // Just work as original statement
            return statementCallback.execute(statementProxy.getTargetStatement(), args);
        }

        // 得到数据库类型 ->MySQL
        String dbType = statementProxy.getConnectionProxy().getDbType();
        if (CollectionUtils.isEmpty(sqlRecognizers)) {
            //sqlRecognizers为SQL语句的解析器,获取执行的SQL,通过它可以获得SQL语句表名、相关的列名、类型的等信息,最后解析出对应的SQL表达式
            sqlRecognizers = SQLVisitorFactory.get(
                    statementProxy.getTargetSQL(),
                    dbType);
        }
        Executor executor;
        if (CollectionUtils.isEmpty(sqlRecognizers)) {
            //如果seata没有找到合适的SQL语句解析器,那么便创建简单执行器PlainExecutor,
            //PlainExecutor直接使用原生的Statement对象执行SQL
            executor = new PlainExecutor<>(statementProxy, statementCallback);
        } else {
            if (sqlRecognizers.size() == 1) {
                SQLRecognizer sqlRecognizer = sqlRecognizers.get(0);
                switch (sqlRecognizer.getSQLType()) {
                    //下面根据是增、删、改、加锁查询、普通查询分别创建对应的处理器
                    case INSERT:
                        executor = EnhancedServiceLoader.load(InsertExecutor.class, dbType,
                                new Class[]{StatementProxy.class, StatementCallback.class, SQLRecognizer.class},
                                new Object[]{statementProxy, statementCallback, sqlRecognizer});
                        break;
                    case UPDATE:
                        executor = new UpdateExecutor<>(statementProxy, statementCallback, sqlRecognizer);
                        break;
                    case DELETE:
                        executor = new DeleteExecutor<>(statementProxy, statementCallback, sqlRecognizer);
                        break;
                    case SELECT_FOR_UPDATE:
                        executor = new SelectForUpdateExecutor<>(statementProxy, statementCallback, sqlRecognizer);
                        break;
                    default:
                        executor = new PlainExecutor<>(statementProxy, statementCallback);
                        break;
                }
            } else {
                // 此执行器可以处理一条SQL语句包含多个Delete、Update语句
                executor = new MultiExecutor<>(statementProxy, statementCallback, sqlRecognizers);
            }
        }
        // 执行器执行
        T rs= executor.execute(args);
        ...
        return rs;
    }

}
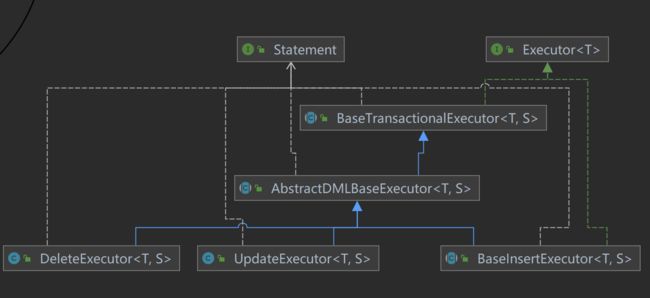
从ExecuteTemplate中可以看到,seata将SQL语句的执行委托给了不同的执行器。seata提供了6个执行器(模板模式),所有执行器的父类型为AbstractDMLBaseExecutor。
- UpdateExecutor 执行update语句
- InsertExecutor 执行insert语句
- DeleteExecutor 执行delete语句
- SelectForUpdateExecutor 执行select for update语句
- PlainExecutor 执行普通查询语句
- MultiExecutor 复合执行器,在一条SQL语句中执行多条语句
关系结构图
那我们继续向下看,这里我们要分析的就是executor.execute(args);方法,自然这里调用的就是父类的方法
@Override
public T execute(Object... args) throws Throwable {
    String xid = RootContext.getXID();
    if (xid != null) {
        // 获取xid
        statementProxy.getConnectionProxy().bind(xid);
    }
    // 设置全局锁
    statementProxy.getConnectionProxy().setGlobalLockRequire(RootContext.requireGlobalLock());
    return doExecute(args);
}
向下来看doExecute()方法,AbstractDMLBaseExecutor重写的方法
@Override
public T doExecute(Object... args) throws Throwable {
    AbstractConnectionProxy connectionProxy = statementProxy.getConnectionProxy();
    if (connectionProxy.getAutoCommit()) {
        return executeAutoCommitTrue(args);
    } else {
        return executeAutoCommitFalse(args);
    }
}
首先我们都清楚,数据库本身都是自动提交
@Override
public T doExecute(Object... args) throws Throwable {
    AbstractConnectionProxy connectionProxy = statementProxy.getConnectionProxy();
    if (connectionProxy.getAutoCommit()) {
        return executeAutoCommitTrue(args);
    } else {
        return executeAutoCommitFalse(args);
    }
}
进入executeAutoCommitTrue()方法中
protected T executeAutoCommitTrue(Object[] args) throws Throwable {
    ConnectionProxy connectionProxy = statementProxy.getConnectionProxy();
    try {
        // 更改为手动提交
        connectionProxy.changeAutoCommit();
        return new LockRetryPolicy(connectionProxy).execute(() -> {
            // 调用手动提交方法 得到分支业务最终结果
            T result = executeAutoCommitFalse(args);
            // 执行提交
            connectionProxy.commit();
            return result;
        });
    } catch (Exception e) {
        // when exception occur in finally,this exception will lost, so just print it here
        LOGGER.error("execute executeAutoCommitTrue error:{}", e.getMessage(), e);
        if (!LockRetryPolicy.isLockRetryPolicyBranchRollbackOnConflict()) {
            connectionProxy.getTargetConnection().rollback();
        }
        throw e;
    } finally {
        connectionProxy.getContext().reset();
        connectionProxy.setAutoCommit(true);
    }
}
然后我们查看connectionProxy.changeAutoCommit();更改为手动提交
protected T executeAutoCommitFalse(Object[] args) throws Exception {
    if (!JdbcConstants.MYSQL.equalsIgnoreCase(getDbType()) && isMultiPk()) {
        throw new NotSupportYetException("multi pk only support mysql!");
    }
    // 前镜像
    TableRecords beforeImage = beforeImage();
    // 执行具体业余
    T result = statementCallback.execute(statementProxy.getTargetStatement(), args);
    // 后镜像
    TableRecords afterImage = afterImage(beforeImage);
    // 暂存UndoLog,为了在Commit的时候保存到数据库
    prepareUndoLog(beforeImage, afterImage);
    return result;
}
然后我们再回到executeAutoCommitTrue这个方法中向下看connectionProxy.commit();
@Override
public void commit() throws SQLException {
    try {
        LOCK_RETRY_POLICY.execute(() -> {
            // 具体执行
            doCommit();
            return null;
        });
    } catch (SQLException e) {
        if (targetConnection != null && !getAutoCommit() && !getContext().isAutoCommitChanged()) {
            rollback();
        }
        throw e;
    } catch (Exception e) {
        throw new SQLException(e);
    }
}
进入到doCommit方法中
private void doCommit() throws SQLException {
    //判断是否存在全局事务
    if (context.inGlobalTransaction()) {
        processGlobalTransactionCommit();
    } else if (context.isGlobalLockRequire()) {
        processLocalCommitWithGlobalLocks();
    } else {
        targetConnection.commit();
    }
}
此时很明显我们存在全局事务,所以进入到processGlobalTransactionCommit方法中
private void processGlobalTransactionCommit() throws SQLException {
    try {
        // 注册分支
        register();
    } catch (TransactionException e) {
        recognizeLockKeyConflictException(e, context.buildLockKeys());
    }
    try {
        //写入数据库undolog
        UndoLogManagerFactory.getUndoLogManager(this.getDbType()).flushUndoLogs(this);
        //执行原生提交,和undo_log一起提交到数据库中,保证一阶段正常
        targetConnection.commit();
    } catch (Throwable ex) {
        LOGGER.error("process connectionProxy commit error: {}", ex.getMessage(), ex);
        report(false);
        throw new SQLException(ex);
    }
    if (IS_REPORT_SUCCESS_ENABLE) {
        report(true);
    }
    context.reset();
}
其中的register方法就是注册分支事务的方法,同时还有把undolog写入数据库和执行提交的操作
// 注册分支事务,生成分支事务id
private void register() throws TransactionException {
    if (!context.hasUndoLog() || !context.hasLockKey()) {
        return;
    }
    // 注册分支事务
    Long branchId = DefaultResourceManager.get().branchRegister(BranchType.AT, getDataSourceProxy().getResourceId(),
                                                                null, context.getXid(), null, context.buildLockKeys());
    context.setBranchId(branchId);
}
接下来我们就具体看看写入数据库的方法flushUndoLogs
@Override
public void flushUndoLogs(ConnectionProxy cp) throws SQLException {
    ConnectionContext connectionContext = cp.getContext();
    if (!connectionContext.hasUndoLog()) {
        return;
    }

    String xid = connectionContext.getXid();
    long branchId = connectionContext.getBranchId();

    BranchUndoLog branchUndoLog = new BranchUndoLog();
    branchUndoLog.setXid(xid);
    branchUndoLog.setBranchId(branchId);
    branchUndoLog.setSqlUndoLogs(connectionContext.getUndoItems());

    UndoLogParser parser = UndoLogParserFactory.getInstance();
    byte[] undoLogContent = parser.encode(branchUndoLog);

    CompressorType compressorType = CompressorType.NONE;
    if (needCompress(undoLogContent)) {
        compressorType = ROLLBACK_INFO_COMPRESS_TYPE;
        undoLogContent = CompressorFactory.getCompressor(compressorType.getCode()).compress(undoLogContent);
    }

    if (LOGGER.isDebugEnabled()) {
        LOGGER.debug("Flushing UNDO LOG: {}", new String(undoLogContent, Constants.DEFAULT_CHARSET));
    }
    // 写入数据库具体位置
    insertUndoLogWithNormal(xid, branchId, buildContext(parser.getName(), compressorType), undoLogContent, cp.getTargetConnection());
}
具体写入方法,此时我们使用的是MySql,所以执行的是MySql实现类
@Override
protected void insertUndoLogWithNormal(String xid, long branchId, String rollbackCtx, byte[] undoLogContent,
                                       Connection conn) throws SQLException {
    insertUndoLog(xid, branchId, rollbackCtx, undoLogContent, State.Normal, conn);
}

@Override
protected void insertUndoLogWithGlobalFinished(String xid, long branchId, UndoLogParser parser, Connection conn) throws SQLException {
    insertUndoLog(xid, branchId, buildContext(parser.getName(), CompressorType.NONE), parser.getDefaultContent(), State.GlobalFinished, conn);
}

// 具体写入,而这些数据就对于我们数据库的undo_log表数据
private void insertUndoLog(String xid, long branchId, String rollbackCtx, byte[] undoLogContent,
                           State state, Connection conn) throws SQLException {
    try (PreparedStatement pst = conn.prepareStatement(INSERT_UNDO_LOG_SQL)) {
        pst.setLong(1, branchId);
        pst.setString(2, xid);
        pst.setString(3, rollbackCtx);
        pst.setBytes(4, undoLogContent);
        pst.setInt(5, state.getValue());
        pst.executeUpdate();
    } catch (Exception e) {
        if (!(e instanceof SQLException)) {
            e = new SQLException(e);
        }
        throw (SQLException) e;
    }
}
原理图参考地址:
Seata-源码分析图 | ProcessOn免费在线作图,在线流程图,在线思维导图 |

