IDEA集成Docker插件实现项目打包镜像一键部署与Docker CA加密认证
IDEA集成Docker插件实现项目打包镜像一键部署与Docker CA加密认证
- Docker开启远程访问
-
- 修改该Docker服务文件
- 加载配置与重启
- 验证是否开启成功
- IDEA配置docker
-
- 编写Dockerfile文件
- 创建Dockerfile配置
- 执行Dockerfile配置
- docker-maven-plugin
-
- 配置pom.xml构建信息
- 打包构建镜像
- 查看镜像
- 绑定Docker命令到Maven各个阶段
- 使用私有Docker仓库地址
- Docker CA加密认证
-
- Docker认证命令配置
- IDEA操作Docker
Docker开启远程访问
修改该Docker服务文件
#修改Docker服务文件
vim /lib/systemd/system/docker.service

# 通常使用端口2375与守护进程进行非加密通信,使用端口2376与守护进程进行加密通信。
#修改ExecStart行,添加如下配置
-H tcp://0.0.0.0:2375 -H unix:///var/run/docker.sock
[Service]
Type=notify
# the default is not to use systemd for cgroups because the delegate issues still
# exists and systemd currently does not support the cgroup feature set required
# for containers run by docker

# 注释最初配置
# ExecStart=/usr/bin/dockerd -H fd:// --containerd=/run/containerd/containerd.sock
# 开启远程访问
ExecStart=/usr/bin/dockerd -H fd:// --containerd=/run/containerd/containerd.sock -H tcp://0.0.0.0:2375 -H unix:///var/run/docker.sock

ExecReload=/bin/kill -s HUP $MAINPID
TimeoutSec=0
RestartSec=2
Restart=always
加载配置与重启
重新加载配置文件
systemctl daemon-reload
重启服务
systemctl restart docker.service
验证是否开启成功
查看端口是否开启
netstat -antp | grep dockerd  #如果找不到netstat命令,使用yum install net-tools安装

[root@administrator ~]# netstat -antp | grep dockerd
tcp6       0      0 :::2375                 :::*                    LISTEN      4514/dockerd
直接curl看是否生效,测试通过localhost是否能使用Docker Engine API
curl http://127.0.0.1:2375/info

curl http://localhost:2375/version
访问:http://ip:2375/version测试远程能否通过主机IP使用Docker Engine API

IDEA配置docker
IDEA安装Docker插件
IDEA默认集成了Docker插件。如果没有,从File->Settings->Plugins进入插件安装界面,在搜索框中输入docker,点击Install按钮进行安装。安装后重启Idea。
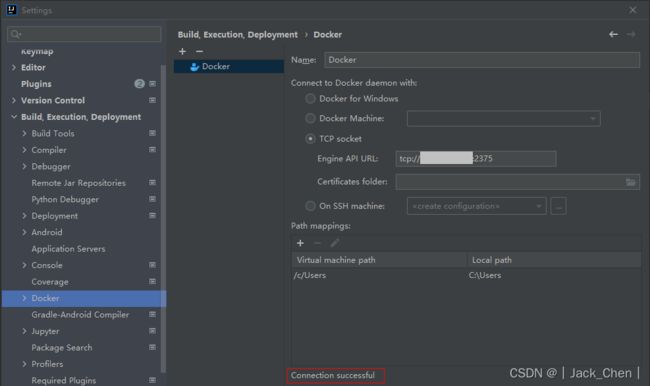
从File->Settings->Build,Execution,Deployment->Docker打开配置界面,配置docker,连接到远程docker服务
编写Dockerfile文件
在pom.xml文件所在同级目录,创建名为Dockerfile的文件
# 基础镜像
FROM openjdk:8

#作者信息
MAINTAINER author_information

#申明一个环境变量
ENV HOME_PATH /home

#指定容器启动时,执行命令会在该目录下执行
WORKDIR $HOME_PATH

#应用构建成功后的jar复制到容器指定目录下
ADD target/SpringBoot-0.0.1-SNAPSHOT.jar $HOME_PATH/app.jar

#指定容器内部端口
EXPOSE 8888

#容器启动时执行的命令
ENTRYPOINT ["java","-jar","app.jar"]
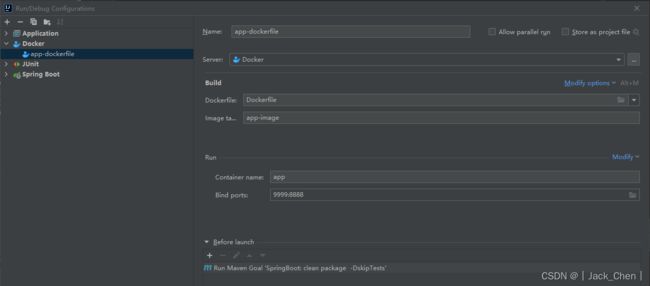
创建Dockerfile配置
Name: 配置名称

Server: 选择Docker远程连接配置

Build

	Dockerfile:选择编写的Dockerfile文件

	Image tag:设置生成镜像的名称

Run:容器运行相关的额外配置

	Container name :设置容器名称

	Bind ports: 端口绑定

Before launch: 配置运行前进行的额外操作

	clean package  -DskipTests :重新编译构建:清理、打包、跳过测试
执行Dockerfile配置
[INFO] --- maven-resources-plugin:3.1.0:testResources (default-testResources) @ SpringBoot ---
[INFO] Using 'UTF-8' encoding to copy filtered resources.
[INFO] skip non existing resourceDirectory D:\WorkSpace\SpringBoot\SpringBoot\src\test\resources
[INFO]
[INFO] --- maven-compiler-plugin:3.8.1:testCompile (default-testCompile) @ SpringBoot ---
[INFO] Changes detected - recompiling the module!
[INFO] Compiling 2 source files to D:\WorkSpace\SpringBoot\SpringBoot\target\test-classes
[INFO]
[INFO] --- maven-surefire-plugin:2.22.2:test (default-test) @ SpringBoot ---
[INFO] Tests are skipped.
[INFO]
[INFO] --- maven-jar-plugin:3.2.0:jar (default-jar) @ SpringBoot ---
[INFO] Building jar: D:\WorkSpace\SpringBoot\SpringBoot\target\SpringBoot-0.0.1-SNAPSHOT.jar
[INFO]
[INFO] --- spring-boot-maven-plugin:2.3.2.RELEASE:repackage (repackage) @ SpringBoot ---
[INFO] Replacing main artifact with repackaged archive
[INFO] ------------------------------------------------------------------------
[INFO] BUILD SUCCESS
[INFO] ------------------------------------------------------------------------
[INFO] Total time:  8.479 s
[INFO] Finished at: 2021-12-13T10:52:41+08:00
[INFO] ------------------------------------------------------------------------

Process finished with exit code 0
Docker构建信息
Deploying 'app Dockerfile: Dockerfile'...
Building image...
Preparing build context archive...
[==================================================>]231/231 files
Done

Sending build context to Docker daemon...
[==================================================>] 45.36MB
Done

Step 1/7 : FROM openjdk:8
8: Pulling from library/openjdk
5e0b432e8ba9: Pull complete
a84cfd68b5ce: Pull complete
e8b8f2315954: Pull complete
0598fa43a7e7: Pull complete
e0d35e3be804: Pull complete
cc526d02f40c: Pull complete
94f9f735b512: Pull complete
Digest: sha256:d847fdd469a97814a8c118bdb887402a629539002a8c95e4c288ba9389023273
Status: Downloaded newer image for openjdk:8
 ---> 5bbce51c9625
Step 2/7 : MAINTAINER author_information
 ---> Running in 6c284c4b5760
Removing intermediate container 6c284c4b5760
 ---> 69667ca16305
Step 3/7 : ENV HOME_PATH /home
 ---> Running in a7db17091292
Removing intermediate container a7db17091292
 ---> b4ea04a3f9e0
Step 4/7 : WORKDIR $HOME_PATH
 ---> Running in d30dd81b060c
Removing intermediate container d30dd81b060c
 ---> e0d7d8612471
Step 5/7 : ADD target/SpringBoot-0.0.1-SNAPSHOT.jar $HOME_PATH/app.jar
 ---> 9311a765d1fa
Step 6/7 : EXPOSE 8888
 ---> Running in 886760657fbf
Removing intermediate container 886760657fbf
 ---> 7eb01ec04b2b
Step 7/7 : ENTRYPOINT ["java","-jar","app.jar"]
 ---> Running in 52302bde47df
Removing intermediate container 52302bde47df
 ---> a5fe639b0ea4

Successfully built a5fe639b0ea4
Successfully tagged app-image:latest
Creating container...
Container Id: 1fa00700d7e44008c0147537633f989f5e0dad2ec2feb0d4dcf536f47eba07a5
Container name: 'app'
Starting container 'app'
'app Dockerfile: Dockerfile' has been deployed successfully.
项目启动信息
  .   ____          _            __ _ _
2021-12-13T02:52:50.486656996Z  /\\ / ___'_ __ _ _(_)_ __  __ _ \ \ \ \
2021-12-13T02:52:50.486662053Z ( ( )\___ | '_ | '_| | '_ \/ _` | \ \ \ \
2021-12-13T02:52:50.486666493Z  \\/  ___)| |_)| | | | | || (_| |  ) ) ) )
2021-12-13T02:52:50.486670850Z   '  |____| .__|_| |_|_| |_\__, | / / / /
2021-12-13T02:52:50.486682355Z  =========|_|==============|___/=/_/_/_/
2021-12-13T02:52:50.486687022Z  :: Spring Boot ::        (v2.3.2.RELEASE)
2021-12-13T02:52:50.486692068Z
2021-12-13T02:52:50.943602301Z 2021-12-13 02:52:50.923  INFO 1 --- [           main] cn.ybzy.demo.Application                 : Starting Application v0.0.1-SNAPSHOT on 78ccbfcfd8b7 with PID 1 (/home/app.jar started by root in /home)
2021-12-13T02:52:50.943714240Z 2021-12-13 02:52:50.933  INFO 1 --- [           main] cn.ybzy.demo.Application                 : No active profile set, falling back to default profiles: default
2021-12-13T02:52:55.388436890Z 2021-12-13 02:52:55.374  INFO 1 --- [           main] o.s.b.w.embedded.tomcat.TomcatWebServer  : Tomcat initialized with port(s): 8888 (http)
2021-12-13T02:52:55.417423600Z 2021-12-13 02:52:55.406  INFO 1 --- [           main] o.apache.catalina.core.StandardService   : Starting service [Tomcat]
2021-12-13T02:52:55.417479871Z 2021-12-13 02:52:55.407  INFO 1 --- [           main] org.apache.catalina.core.StandardEngine  : Starting Servlet engine: [Apache Tomcat/9.0.37]
2021-12-13T02:52:55.593516194Z 2021-12-13 02:52:55.583  INFO 1 --- [           main] o.a.c.c.C.[Tomcat].[localhost].[/]       : Initializing Spring embedded WebApplicationContext
2021-12-13T02:52:55.593571747Z 2021-12-13 02:52:55.583  INFO 1 --- [           main] w.s.c.ServletWebServerApplicationContext : Root WebApplicationContext: initialization completed in 4421 ms
2021-12-13T02:52:56.333579730Z  _ _   |_  _ _|_. ___ _ |    _
2021-12-13T02:52:56.333687060Z | | |\/|_)(_| | |_\  |_)||_|_\
2021-12-13T02:52:56.333693146Z      /               |
2021-12-13T02:52:56.333697576Z                         3.3.2
2021-12-13T02:52:57.522491446Z 2021-12-13 02:52:57.512  INFO 1 --- [           main] o.s.s.concurrent.ThreadPoolTaskExecutor  : Initializing ExecutorService 'applicationTaskExecutor'
2021-12-13T02:52:58.490595954Z 2021-12-13 02:52:58.487  INFO 1 --- [           main] o.s.b.w.embedded.tomcat.TomcatWebServer  : Tomcat started on port(s): 8888 (http) with context path ''
2021-12-13T02:52:58.516487066Z 2021-12-13 02:52:58.514  INFO 1 --- [           main] cn.ybzy.demo.Application                 : Started Application in 9.952 seconds (JVM running for 11.366)
2021-12-13T02:53:03.163608112Z 2021-12-13 02:53:03.159  INFO 1 --- [nio-8888-exec-1] o.a.c.c.C.[Tomcat].[localhost].[/]       : Initializing Spring DispatcherServlet 'dispatcherServlet'
2021-12-13T02:53:03.163727603Z 2021-12-13 02:53:03.159  INFO 1 --- [nio-8888-exec-1] o.s.web.servlet.DispatcherServlet        : Initializing Servlet 'dispatcherServlet'
2021-12-13T02:53:03.179540679Z 2021-12-13 02:53:03.173  INFO 1 --- [nio-8888-exec-1] o.s.web.servlet.DispatcherServlet        : Completed initialization in 14 ms
docker-maven-plugin
配置pom.xml构建信息
	<properties>
        <java.version>1.8</java.version>
        <docker.image.prefix>docker</docker.image.prefix>
    </properties>

			<plugin>
                <groupId>com.spotify</groupId>
                <artifactId>docker-maven-plugin</artifactId>
                <version>1.0.0</version>
                <configuration>
                    <!-- 镜像名称 docker/springboot-->
                    <imageName>${docker.image.prefix}/${project.artifactId}</imageName>
                    <!--指定标签-->
                    <imageTags>
                        <imageTag>latest</imageTag>
                    </imageTags>
                    <!-- 基础镜像-->
                    <baseImage>openjdk:8</baseImage>
                    <!-- 制作者提供本人信息 -->
                    <maintainer>author author@gmail.com</maintainer>
                    <!--切换到/home目录 -->
                    <workdir>/home</workdir>
                    <cmd>["java", "-version"]</cmd>
                    <!--${project.build.finalName}.jar" 指的是打包后的jar包文件-->
                    <entryPoint>["java", "-jar", "${project.build.finalName}.jar"]</entryPoint>
                    <!-- 指定Dockerfile路径
                    <dockerDirectory>${project.basedir}/src/main/docker</dockerDirectory>
                    -->
                    <!--指定远程docker api地址-->
                    <dockerHost>http://IP:2375</dockerHost>
                    <!-- 复制jar包到docker容器指定目录 -->
                    <resources>
                        <resource>
                            <targetPath>/home</targetPath>
                            <!--指定需要复制的根目录,${project.build.directory} 表示target目录-->
                            <directory>${project.build.directory}</directory>
                            <!--指定需要复制的文件,${project.build.finalName}.jar 指的是打包后的jar包文件-->
                            <include>${project.build.finalName}.jar</include>
                        </resource>
                    </resources>
                </configuration>
            </plugin>
使用docker-maven插件自动生成如下文件:
FROM openjdk:8

MAINTAINER author author@gmail.com

WORKDIR /home

ADD /home/springboot-0.0.1-SNAPSHOT.jar /home/

ENTRYPOINT ["java", "-jar", "springboot-0.0.1-SNAPSHOT.jar"]

CMD ["java", "-version"]
打包构建镜像
对项目进行打包并构建镜像到Docker上
mvn clean package docker:build
构建镜像信息
[INFO] Building image docker/springboot
Step 1/6 : FROM openjdk:8

 ---> 5bbce51c9625
Step 2/6 : MAINTAINER author author@gmail.com

 ---> Running in 26d43778f848
Removing intermediate container 26d43778f848
 ---> e84687af3956
Step 3/6 : WORKDIR /home

 ---> Running in d40701dc2fa2
Removing intermediate container d40701dc2fa2
 ---> c13ff0ee15ad
Step 4/6 : ADD /home/springboot-0.0.1-SNAPSHOT.jar /home/

 ---> 38c6d5dc9d29
Step 5/6 : ENTRYPOINT ["java", "-jar", "springboot-0.0.1-SNAPSHOT.jar"]

 ---> Running in 1b7e13b193cd
Removing intermediate container 1b7e13b193cd
 ---> 309a61b47f49
Step 6/6 : CMD ["java", "-version"]

 ---> Running in 14c3ab54e4d9
Removing intermediate container 14c3ab54e4d9
 ---> 26ae18adc558
ProgressMessage{id=null, status=null, stream=null, error=null, progress=null, progressDetail=null}
Successfully built 26ae18adc558
Successfully tagged docker/springboot:latest
[INFO] Built docker/springboot
[INFO] Tagging docker/springboot with latest
[INFO] ------------------------------------------------------------------------
[INFO] BUILD SUCCESS
[INFO] ------------------------------------------------------------------------
[INFO] Total time:  24.674 s
[INFO] Finished at: 2021-12-13T11:30:45+08:00
[INFO] ------------------------------------------------------------------------

Process finished with exit code 0
查看镜像
[root@administrator ~]# docker images
REPOSITORY                      TAG          IMAGE ID       CREATED          SIZE
docker/springboot               latest       26ae18adc558   2 minutes ago    557MB
绑定Docker命令到Maven各个阶段
可以把Docker分为build、tag、push,然后分别绑定Maven的package、deploy 阶段
mvn deploy:完成整个 build、tag、push操作

mvn build:完成build、tag 操作

-DskipDockerBuild: 跳过build镜像

-DskipDockerTag: 跳过tag镜像

-DskipDockerPush: 跳过push镜像

-DskipDocker: 跳过整个阶段

mvn package -DskipDockerTag: 跳过tag过程
		 </configuration>

                <executions>
                    <!--当执行mvn package时,执行: mvn clean package docker:build -->
                    <execution>
                        <id>build-image</id>
                        <phase>package</phase>
                        <goals>
                            <goal>build</goal>
                        </goals>
                    </execution>

                    <!--当执行mvn package时,会对镜像进行标签设定-->
                    <execution>
                        <id>tag-image</id>
                        <phase>package</phase>
                        <goals>
                            <goal>tag</goal>
                        </goals>
                        <configuration>
                            <image>${docker.image.prefix}/${project.artifactId}:latest</image>
                            <newName>${docker.image.prefix}/${project.artifactId}:${project.version}</newName>
                        </configuration>
                    </execution>

                    <execution>
                        <id>push-image</id>
                        <phase>deploy</phase>
                        <goals>
                            <goal>push</goal>
                        </goals>
                        <configuration>
                            <imageName>${docker.image.prefix}/${project.artifactId}:${project.version}</imageName>
                        </configuration>
                    </execution>
                </executions>
            </plugin>
使用私有Docker仓库地址
docker-maven-plugin插件很容易实现push镜像到私有Docker仓库中
创建私有仓库
docker run -di --name=registry -p 5000:5000 registry
修改daemon.json,添加docker信任的私有仓库地址
vi /etc/docker/daemon.json

{
 "insecure-registries":["Ip:5000"]
}
重启docker 服务
systemctl restart docker
修改POM文件
			<configuration>
                    <!--将镜像推送到Docker私有仓库-->
                    <registryUrl>IP:5000</registryUrl>
                    <pushImage>true</pushImage>
                    <imageName>IP:5000/${docker.image.prefix}/${project.artifactId}:${project.version</imageName>
            </configuration>
执行mvn deploy,查看私有仓库http://IP:5000/v2/_catalog
Docker CA加密认证
官方Demo:https://docs.docker.com/engine/security/https/#create-a-ca-server-and-client-keys-with-openssl
Docker认证命令配置
创建ca文件夹,存放CA私钥和公钥
mkdir ca && cd ca
在Docker守护进程的主机上,生成CA私钥和公钥
openssl genrsa -aes256 -out ca-key.pem 4096
执行命令后,要求设置密码,输入密码以及再次输入密码确认
[root@administrator ca]# openssl genrsa -aes256 -out ca-key.pem 4096
Generating RSA private key, 4096 bit long modulus
................................................................................................................................................................................++
............................................................................................................................................++
e is 65537 (0x10001)
Enter pass phrase for ca-key.pem:
Verifying - Enter pass phrase for ca-key.pem:
[root@administrator ca]# ls
ca-key.pem
[root@administrator ca]#
补全CA证书信息,依次输入密码、国家、省、市、组织名称、邮箱等信息
openssl req -new -x509 -days 365 -key ca-key.pem -sha256 -out ca.pem
[root@administrator ca]# openssl req -new -x509 -days 365 -key ca-key.pem -sha256 -out ca.pem
Enter pass phrase for ca-key.pem:
You are about to be asked to enter information that will be incorporated
into your certificate request.
What you are about to enter is what is called a Distinguished Name or a DN.
There are quite a few fields but you can leave some blank
For some fields there will be a default value,
If you enter '.', the field will be left blank.
-----
Country Name (2 letter code) [XX]:CN
State or Province Name (full name) []:SC
Locality Name (eg, city) [Default City]:CD
Organization Name (eg, company) [Default Company Ltd]:YBZY
Organizational Unit Name (eg, section) []:YBZY
Common Name (eg, your name or your server's hostname) []:CJ
Email Address []:admin@qq.com
[root@administrator ca]# ls
ca-key.pem  ca.pem
[root@administrator ca]#
现在有了CA,可以创建服务器密钥和证书签名请求 (CSR)。确保“Common Name”与用于连接到Docker 的主机名匹配
生成server-key.pem
openssl genrsa -out server-key.pem 4096
[root@administrator ca]# openssl genrsa -out server-key.pem 4096
Generating RSA private key, 4096 bit long modulus
................++
...........................................................................................................................................................................................................................++
e is 65537 (0x10001)
[root@administrator ca]# ls
ca-key.pem  ca.pem  server-key.pem
[root@administrator ca]#
CA来签署公钥
由于可以通过 IP 地址和 DNS 名称建立 TLS 连接,因此在创建证书时需要指定 IP 地址。例如,要允许使用10.10.10.20和连接127.0.0.1
openssl req -subj "/CN=$HOST" -sha256 -new -key server-key.pem -out server.csr
$Host换成自己服务器外网的IP或者域名,即远程设备连接服务器Docker的一个地址
[root@administrator ca]# openssl req -subj "/CN=x.x.x.x" -sha256 -new -key server-key.pem -out server.csr
[root@administrator ca]# ls
ca-key.pem  ca.pem  server.csr  server-key.pem
[root@administrator ca]#
配置白名单
允许指定ip可以连接到服务器的docker,可以配置多个Ip,用逗号分隔开

因为是ssl连接,所以推荐配置0.0.0.0,也就是所有ip都可以连接,但必须拥有证书的才可以连接成功
ip方式
echo subjectAltName = IP:$HOST,IP:0.0.0.0 >> extfile.cnf
域名方式
echo subjectAltName = DNS:$HOST,IP:0.0.0.0 >> extfile.cnf
[root@administrator ca]# echo subjectAltName = IP:x.x.x.x,IP:0.0.0.0 >> extfile.cnf
[root@administrator ca]# ls
ca-key.pem  ca.pem  extfile.cnf  server.csr  server-key.pem
[root@administrator ca]#
将 Docker 守护进程密钥的扩展使用属性设置为仅用于服务器身份验证
echo extendedKeyUsage = serverAuth >> extfile.cnf
[root@administrator ca]# echo extendedKeyUsage = serverAuth >> extfile.cnf
[root@administrator ca]#
生成签名证书,主要输入设置的密码
openssl x509 -req -days 365 -sha256 -in server.csr -CA ca.pem -CAkey ca-key.pem \
>   -CAcreateserial -out server-cert.pem -extfile extfile.cnf
[root@administrator ca]# openssl x509 -req -days 365 -sha256 -in server.csr -CA ca.pem -CAkey ca-key.pem \
>   -CAcreateserial -out server-cert.pem -extfile extfile.cnf
Signature ok
subject=/CN=x.x.x.x
Getting CA Private Key
Enter pass phrase for ca-key.pem:
[root@administrator ca]#
[root@administrator ca]# ls
-CAcreateserial  ca-key.pem  ca.pem  ca.srl  extfile.cnf  server-cert.pem  server.csr  server-key.pem
[root@administrator ca]#
生成客户端密匙和证书签名请求
生成后cert.pem,server-cert.pem您可以安全地删除两个证书签名请求和扩展配置文件:
openssl genrsa -out key.pem 4096

openssl req -subj '/CN=client' -new -key key.pem -out client.csr
[root@administrator ca]# openssl genrsa -out key.pem 4096
Generating RSA private key, 4096 bit long modulus
...................................................................................................................++
...........................................................................................................................................................................................................................................++
e is 65537 (0x10001)
[root@administrator ca]# openssl req -subj '/CN=client' -new -key key.pem -out client.csr
[root@administrator ca]# ls
-CAcreateserial  ca-key.pem  ca.pem  ca.srl  client.csr  extfile.cnf  key.pem  server-cert.pem  server.csr  server-key.pem
[root@administrator ca]#
使密钥适合客户端身份验证,创建扩展配置文件
echo extendedKeyUsage = clientAuth >> extfile.cnf
echo extendedKeyUsage = clientAuth > extfile-client.cnf
[root@administrator ca]# echo extendedKeyUsage = clientAuth >> extfile.cnf
[root@administrator ca]# echo extendedKeyUsage = clientAuth > extfile-client.cnf
[root@administrator ca]# ls
-CAcreateserial  ca-key.pem  ca.pem  ca.srl  client.csr  extfile-client.cnf  extfile.cnf  key.pem  server-cert.pem  server.csr  server-key.pem
[root@administrator ca]#
生成签名证书,生成cert.pem需要输入设置的密码
openssl x509 -req -days 365 -sha256 -in client.csr -CA ca.pem -CAkey ca-key.pem -CAcreateserial -out cert.pem -extfile extfile-client.cnf
[root@administrator ca]# openssl x509 -req -days 365 -sha256 -in client.csr -CA ca.pem -CAkey ca-key.pem  -CAcreateserial -out cert.pem -extfile extfile-client.cnf
Signature ok
subject=/CN=client
Getting CA Private Key
Enter pass phrase for ca-key.pem:
[root@administrator ca]# ls
-CAcreateserial  ca-key.pem  ca.pem  ca.srl  cert.pem  client.csr  extfile-client.cnf  extfile.cnf  key.pem  server-cert.pem  server.csr  server-key.pem
[root@administrator ca]#
生成cert.pem和server-cert之后。您可以安全地删除两个证书签名请求和扩展配置文件
rm -v client.csr server.csr extfile.cnf extfile-client.cnf
修改权限,保护密钥意外损坏,删除写入权限,使它们只能被读取
chmod -v 0400 ca-key.pem key.pem server-key.pem
证书是可以对外可读的,删除写入权限以防止意外损坏
chmod -v 0444 ca.pem server-cert.pem cert.pem
将证书放在主机目录的指定位置,方便之后修改Docker的配置文件
[root@administrator ca]# cp server-*.pem /usr/local/program/docker-ca/
[root@administrator ca]# cp ca.pem /usr/local/program/docker-ca/
修改Docker配置,使Docker守护程序仅接受来自提供CA信任的证书的客户端的连接
vim /lib/systemd/system/docker.service
[Service]
Type=notify
# the default is not to use systemd for cgroups because the delegate issues still
# exists and systemd currently does not support the cgroup feature set required
# for containers run by docker
# 最初配置
# ExecStart=/usr/bin/dockerd -H fd:// --containerd=/run/containerd/containerd.sock

# 如下配置
ExecStart=/usr/bin/dockerd -H fd:// --containerd=/run/containerd/containerd.sock --tlsverify --tlscacert=/usr/local/program/docker-ca/ca.pem  --tlscert=/usr/local/program/docker-ca/server-cert.pem --tlskey=/usr/local/program/docker-ca/server-key.pem -H tcp://0.0.0.0:2376 -H unix:///var/run/docker.sock

ExecReload=/bin/kill -s HUP $MAINPID
TimeoutSec=0
RestartSec=2
Restart=always
重新加载daemon并重启docker
systemctl daemon-reload
systemctl restart docker
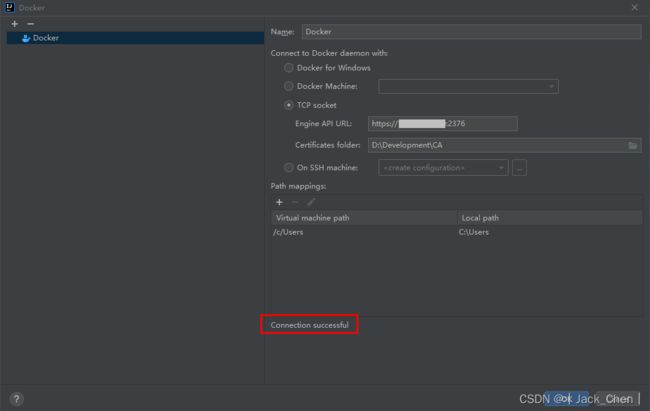
IDEA操作Docker
注意使用https协议,非tcp协议,否则可能出现:Client sent an HTTP request to an HTTPS server


